新增符號圖層 (Android SDK)
本文說明如何使用 Azure 地圖服務 Android SDK,將資料來源中的點資料轉譯為地圖上的符號圖層。 符號圖層會將點轉譯為地圖上的影像和文字。
注意
Azure 地圖服務 Android SDK 淘汰
適用於 Android 的 Azure 地圖服務原生 SDK 現已被取代,將於 3/31/25 淘汰。 若要避免服務中斷,請在 3/31/25 之前遷移至 Azure 地圖服務 Web SDK。 如需詳細資訊,請參閱 Azure 地圖服務 Android SDK 移轉指南 (部分機器翻譯)。
提示
根據預設,符號圖層會轉譯資料來源中所有幾何圖形的座標。 若要限制圖層,使其只轉譯點幾何特徵,請將圖層的 filter 選項設為 eq(geometryType(), "Point")。 如果還要加上 MultiPoint 特徵,請將圖層的 filter 選項設定為 any(eq(geometryType(), "Point"), eq(geometryType(), "MultiPoint"))。
必要條件
務必完成快速入門:建立 Android 應用程式文件中的步驟。 本文中的程式碼區塊可以插入地圖的 onReady 事件處理常式。
新增符號圖層
您必須先執行幾個步驟,才能將符號圖層新增至地圖。 首先,建立資料來源,並將其新增至地圖。 建立符號圖層。 然後,將資料來源傳入符號圖層,以從資料來源擷取資料。 最後,將資料新增至資料來源,以便轉譯一些內容。
下列程式碼示範載入地圖之後應該新增至地圖的內容。 此範例會使用符號圖層在地圖上轉譯單一點。
//Create a data source and add it to the map.
DataSource source = new DataSource();
map.sources.add(source);

//Create a point and add it to the data source.
source.add(Point.fromLngLat(0, 0));

//Create a symbol layer to render icons and/or text at points on the map.
SymbolLayer layer = new SymbolLayer(source);

//Add the layer to the map.
map.layers.add(layer);
//Create a data source and add it to the map.
val source = DataSource()
map.sources.add(source)

//Create a point and add it to the data source.
source.add(Point.fromLngLat(0, 0))

//Create a symbol layer to render icons and/or text at points on the map.
val layer = SymbolLayer(source)

//Add the layer to the map.
map.layers.add(layer)
有三種不同類型的點資料可以新增至地圖:
- GeoJSON Point 幾何 - 此物件只包含點的座標,僅此而已。
Point.fromLngLat靜態方法可以用來輕鬆地建立這些物件。 - GeoJSON MultiPoint 幾何 - 此物件包含多個點的座標,僅此而已。 將點陣列傳遞至
MultiPoint類別,以建立這些物件。 - GeoJSON 特徵 - 此物件包含任何 GeoJSON 幾何以及一組屬性,其中包含與幾何相關聯的中繼資料。
如需詳細資訊,請參閱建立資料來源文件有關建立資料及將其新增至地圖的部分。
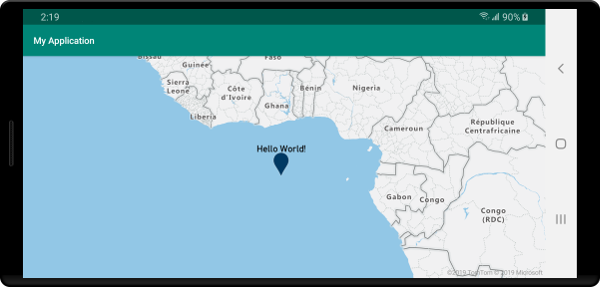
下列程式碼範例會建立 GeoJSON Point 幾何,並將其傳遞至 GeoJSON 特徵,將 title 值新增至其屬性。 title 屬性會顯示為地圖上符號圖示上方的文字。
//Create a data source and add it to the map.
DataSource source = new DataSource();
map.sources.add(source);

//Create a point feature.
Feature feature = Feature.fromGeometry(Point.fromLngLat(0, 0));

//Add a property to the feature.
feature.addStringProperty("title", "Hello World!");

//Add the feature to the data source.
source.add(feature);

//Create a symbol layer to render icons and/or text at points on the map.
SymbolLayer layer = new SymbolLayer(source,
    //Get the title property of the feature and display it on the map.
    textField(get("title"))
);

//Add the layer to the map.
map.layers.add(layer);
//Create a data source and add it to the map.
val source = DataSource()
map.sources.add(source)

//Create a point feature.
val feature = Feature.fromGeometry(Point.fromLngLat(0, 0))

//Add a property to the feature.
feature.addStringProperty("title", "Hello World!")

//Add the feature to the data source.
source.add(feature)

//Create a symbol layer to render icons and/or text at points on the map.
val layer = SymbolLayer(
    source,  //Get the title property of the feature and display it on the map.
    textField(get("title"))
)

//Add the layer to the map.
map.layers.add(layer)
下列螢幕擷取畫面顯示上述程式碼,使用具有符號圖層的圖示和文字標籤來轉譯點特徵。
提示
根據預設,符號圖層會隱藏重疊的符號,以最佳化符號的轉譯。 當您放大時,隱藏的符號就會變成可見。 若要停用此功能並隨時轉譯所有符號,請將 iconAllowOverlap 和 textAllowOverlap 選項設定為 true。
將自訂圖示新增至符號圖層
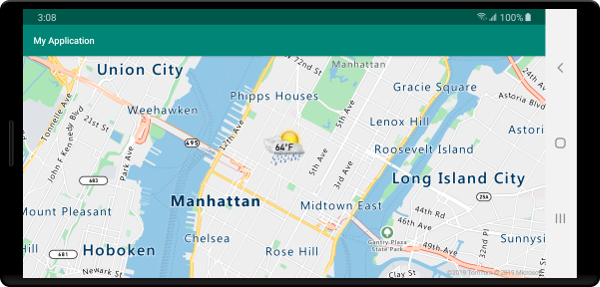
使用 WebGL 來呈現符號圖層。 所有這類資源 (例如圖示影像) 必須載入 WebGL 內容中。 此範例顯示如何將自訂圖示新增至地圖資源。 接著,此圖示會用來在地圖上以自訂符號轉譯點資料。 符號圖層的 textField 屬性需要指定運算式。 在此案例中,我們想要轉譯溫度屬性。 因為溫度是一個數字,所以必須轉換成字串。 此外,我們還想在它的後面附加 "°F"。 運算式可用來執行此串連;concat(Expression.toString(get("temperature")), literal("°F"))。
//Load a custom icon image into the image sprite of the map.
map.images.add("my-custom-icon", R.drawable.showers);

//Create a data source and add it to the map.
DataSource source = new DataSource();
map.sources.add(source);

//Create a point feature.
Feature feature = Feature.fromGeometry(Point.fromLngLat(-73.985708, 40.75773));

//Add a property to the feature.
feature.addNumberProperty("temperature", 64);

//Add the feature to the data source.
source.add(feature);

//Create a symbol layer to render icons and/or text at points on the map.
SymbolLayer layer = new SymbolLayer(source,
    iconImage("my-custom-icon"),
    iconSize(0.5f),

    //Get the title property of the feature and display it on the map.
    textField(concat(Expression.toString(get("temperature")), literal("°F"))),
    textOffset(new Float[]{0f, -1.5f})
);
//Load a custom icon image into the image sprite of the map.
map.images.add("my-custom-icon", R.drawable.showers)

//Create a data source and add it to the map.
val source = DataSource()
map.sources.add(source)

//Create a point feature.
val feature = Feature.fromGeometry(Point.fromLngLat(-73.985708, 40.75773))

//Add a property to the feature.
feature.addNumberProperty("temperature", 64)

//Add the feature to the data source.
source.add(feature)

//Create a symbol layer to render icons and/or text at points on the map.
val layer = SymbolLayer(
    source,
    iconImage("my-custom-icon"),
    iconSize(0.5f),  //Get the title property of the feature and display it on the map.
    textField(concat(Expression.toString(get("temperature")), literal("°F"))),
    textOffset(arrayOf(0f, -1.5f))
)
在此範例中,下列影像會載入至應用程式的可繪製資源資料夾。
 |
|---|
| showers.png |
下列螢幕擷取畫面顯示上述程式碼,使用具有符號圖層的自訂圖示和格式化文字標籤來轉譯點特徵。
提示
當您只想要轉譯具有符號圖層的文字時,您可以將圖示選項的 iconImage 屬性設定為 "none" 來隱藏圖示。
修改符號色彩
Azure 地圖服務 Android SDK 隨附一組預設標記圖示的預先定義色彩變化。 例如,marker-red 可以傳遞至符號圖層的 iconImage 選項,以呈現該圖層中標記圖示的紅色版本。
SymbolLayer layer = new SymbolLayer(source,
    iconImage("marker-red")
);
val layer = SymbolLayer(source,
    iconImage("marker-red")
)
下表列出所有可用的內建圖示影像名稱。 這些標記會從色彩資源中提取可以覆寫的色彩。 不過,覆寫其中一個標記的色彩會套用至使用該圖示影像的所有圖層。
| 圖示影像名稱 | 色彩資源名稱 |
|---|---|
marker-default |
azure_maps_marker_default |
marker-black |
azure_maps_marker_black |
marker-blue |
azure_maps_marker_blue |
marker-darkblue |
azure_maps_marker_darkblue |
marker-red |
azure_maps_marker_red |
marker-yellow |
azure_maps_marker_yellow |
您也可以使用 azure_maps_marker_border 色彩資源名稱來覆寫所有標記的框線色彩。 您可以在應用程式的 colors.xml 檔案中新增具有相同名稱的色彩,以覆寫這些標記的色彩。 例如,下列 colors.xml 檔案會讓預設標記色彩變成亮綠色。
<?xml version="1.0" encoding="utf-8"?>
<resources>
    <color name="azure_maps_marker_default">#00FF00</color>
</resources>
下列程式碼是預設標記向量 XML 的修改版本,您可以修改此程式碼以建立預設標記的自訂版本。 修改的版本可以新增至您應用程式的 drawable 資料夾,並使用 map.images.add 新增至地圖影像原件,然後搭配符號圖層使用。
<vector xmlns:android="http://schemas.android.com/apk/res/android"
    android:width="24.5dp"
    android:height="36.5dp"
    android:viewportWidth="24.5"
    android:viewportHeight="36.5">
    <path
        android:pathData="M12.25,0.25a12.2543,12.2543 0,0 0,-12 12.4937c0,6.4436 6.4879,12.1093 11.059,22.5641 0.5493,1.2563 1.3327,1.2563 1.882,0C17.7621,24.8529 24.25,19.1857 24.25,12.7437A12.2543,12.2543 0,0 0,12.25 0.25Z"
        android:strokeWidth="0.5"
        android:fillColor="@color/azure_maps_marker_default"
        android:strokeColor="@color/azure_maps_marker_border"/>
</vector>
下一步
請參閱下列文章,以取得更多可新增至地圖的程式碼範例: