本教學課程說明如何使用 Azure 地圖服務路線規劃服務 API 以及地圖控制項顯示從起點到終點的路線方向。 本教學課程會示範如何執行:
- 在網頁上建立和顯示地圖控制項。
- 定義符號圖層和線條圖層,以定義路線的顯示呈現。
- 建立 GeoJSON 物件並新增至地圖,以代表起點和終點。
- 使用取得路線指示 API,取得起點和終點的路線方向。
如需原始程式碼,請參閱 GitHub 中的路由 (英文) 教學課程。 如需即時範例,請參閱路由至目的地 (英文)。
先決條件
建立和顯示地圖控制項
下列步驟示範如何在網頁中建立和顯示地圖控制項。
在您的本機機器上建立新檔案,並將其命名為 MapRoute.html。
將下列 HTML 新增至檔案:
<!DOCTYPE html>
<html>
<head>
    <title>Map Route</title>
    <meta charset="utf-8">
    <meta name="viewport" content="width=device-width, initial-scale=1, shrink-to-fit=no">

    <!-- Add references to the Azure Maps Map control JavaScript and CSS files. -->
    <link rel="stylesheet" href="https://atlas.microsoft.com/sdk/javascript/mapcontrol/3/atlas.min.css" type="text/css">
    <script src="https://atlas.microsoft.com/sdk/javascript/mapcontrol/3/atlas.min.js"></script>

    <script>
        var map, datasource, client;

        function GetMap() {
            //Add Map Control JavaScript code here.
        }
    </script>
    <style>
        html,
        body {
            width: 100%;
            height: 100%;
            padding: 0;
            margin: 0;
        }

        #myMap {
            width: 100%;
            height: 100%;
        }
    </style>
</head>
<body onload="GetMap()">
    <div id="myMap"></div>
</body>
</html>
與 HTML 相關的一些須知事項:
- HTML 標頭包含 Azure 地圖控制項程式庫所裝載的 CSS 和 JavaScript 資源檔案。
- 頁面主體完成載入後,頁面主體的
onload事件會呼叫GetMap函式。 -
GetMap函式包含內嵌 JavaScript 程式碼,可用來存取 Azure 地圖服務 API。 下一個步驟會新增此函式。
接下來,將下列 JavaScript 程式碼新增至
GetMap函式,其會在上一個步驟所新增的程式碼下方。 此程式碼會建立地圖控制項,並使用您提供的 Azure 地圖服務訂用帳戶金鑰將其初始化。 請確定將字串<Your Azure Maps Key>取代為您從地圖服務帳戶中複製的 Azure 地圖服務主要金鑰。//Instantiate a map object var map = new atlas.Map('myMap', { // Replace <Your Azure Maps Key> with your Azure Maps subscription key. https://aka.ms/am-primaryKey authOptions: { authType: 'subscriptionKey', subscriptionKey: '<Your Azure Maps Key>' } });與 JavaScript 相關的一些須知事項:
將變更儲存至檔案,並在瀏覽器中開啟 HTML 網頁。 顯示的地圖是您可以藉由呼叫
atlas.Map和使用 Azure 地圖服務帳戶訂用帳戶金鑰來建立的最基本地圖。

定義路線顯示呈現
在本教學課程中,此路線將以線條圖層來呈現。 開始和結束點將使用符號圖層呈現。 如需新增線條圖層的詳細資訊,請參閱將線條圖層新增至地圖。 若要深入了解符號圖層,請參閱將符號圖層新增至地圖。
在
GetMap函式中,在地圖完成初始化之後新增下列 JavaScript 程式碼。//Wait until the map resources are ready. map.events.add('ready', function() { //Create a data source and add it to the map. datasource = new atlas.source.DataSource(); map.sources.add(datasource); //Add a layer for rendering the route lines and have it render under the map labels. map.layers.add(new atlas.layer.LineLayer(datasource, null, { strokeColor: '#2272B9', strokeWidth: 5, lineJoin: 'round', lineCap: 'round' }), 'labels'); //Add a layer for rendering point data. map.layers.add(new atlas.layer.SymbolLayer(datasource, null, { iconOptions: { image: ['get', 'icon'], allowOverlap: true }, textOptions: { textField: ['get', 'title'], offset: [0, 1.2] }, filter: ['any', ['==', ['geometry-type'], 'Point'], ['==', ['geometry-type'], 'MultiPoint']] //Only render Point or MultiPoints in this layer. })); });與 JavaScript 相關的一些須知事項:
- 此程式碼會實作地圖控制項的
ready事件處理常式。 本教學課程中的其餘程式碼將放在ready事件處理常式內。 - 在地圖控制項的
ready事件處理常式中,系統會建立資料來源以儲存路線起點和終點。 - 系統建立線條圖層並將其附加至資料來源,以定義呈現路線的方式。 為了確保路線不會涵蓋道路標籤,傳遞第二個參數,其值為
'labels'。
接下來系統會建立符號圖層,並將其附加至資料來源。 此圖層會指定起點和終點的呈現方式。 已新增運算式,以從每個點物件的屬性中擷取圖示影像和文字標籤資訊。 若要深入了解運算式,請參閱資料驅動樣式運算式一文。
- 此程式碼會實作地圖控制項的
接著,將起點設在 Microsoft,並將終點設在西雅圖的加油站。 起點和終點是藉由在 Map 控制項的
ready事件處理常式中附加下列程式碼來建立://Create the GeoJSON objects which represent the start and end points of the route. var startPoint = new atlas.data.Feature(new atlas.data.Point([-122.130137, 47.644702]), { title: "Redmond", icon: "pin-blue" }); var endPoint = new atlas.data.Feature(new atlas.data.Point([-122.3352, 47.61397]), { title: "Seattle", icon: "pin-round-blue" }); //Add the data to the data source. datasource.add([startPoint, endPoint]); map.setCamera({ bounds: atlas.data.BoundingBox.fromData([startPoint, endPoint]), padding: 80 });與 JavaScript 相關的一些須知事項:
- 此程式碼會建立兩個 GeoJSON 點物件,代表起點和終點,此資訊也會新增到資料來源。
- 最後一個程式碼區塊會使用起點和終點的經緯度設定相機檢視。
- 起點和終點會新增至資料來源。
- 系統會使用
atlas.data.BoundingBox.fromData函式計算起點和終點的週框方塊。 此週框方塊會用來透過map.setCamera函式設定整個路線的地圖相機檢視。 - 系統會加入邊框間距,以補償符號圖示的像素維度。
如需地圖控制項的 setCamera 屬性詳細資訊,請參閱 setCamera(CameraOptions | CameraBoundsOptions & AnimationOptions) 屬性。
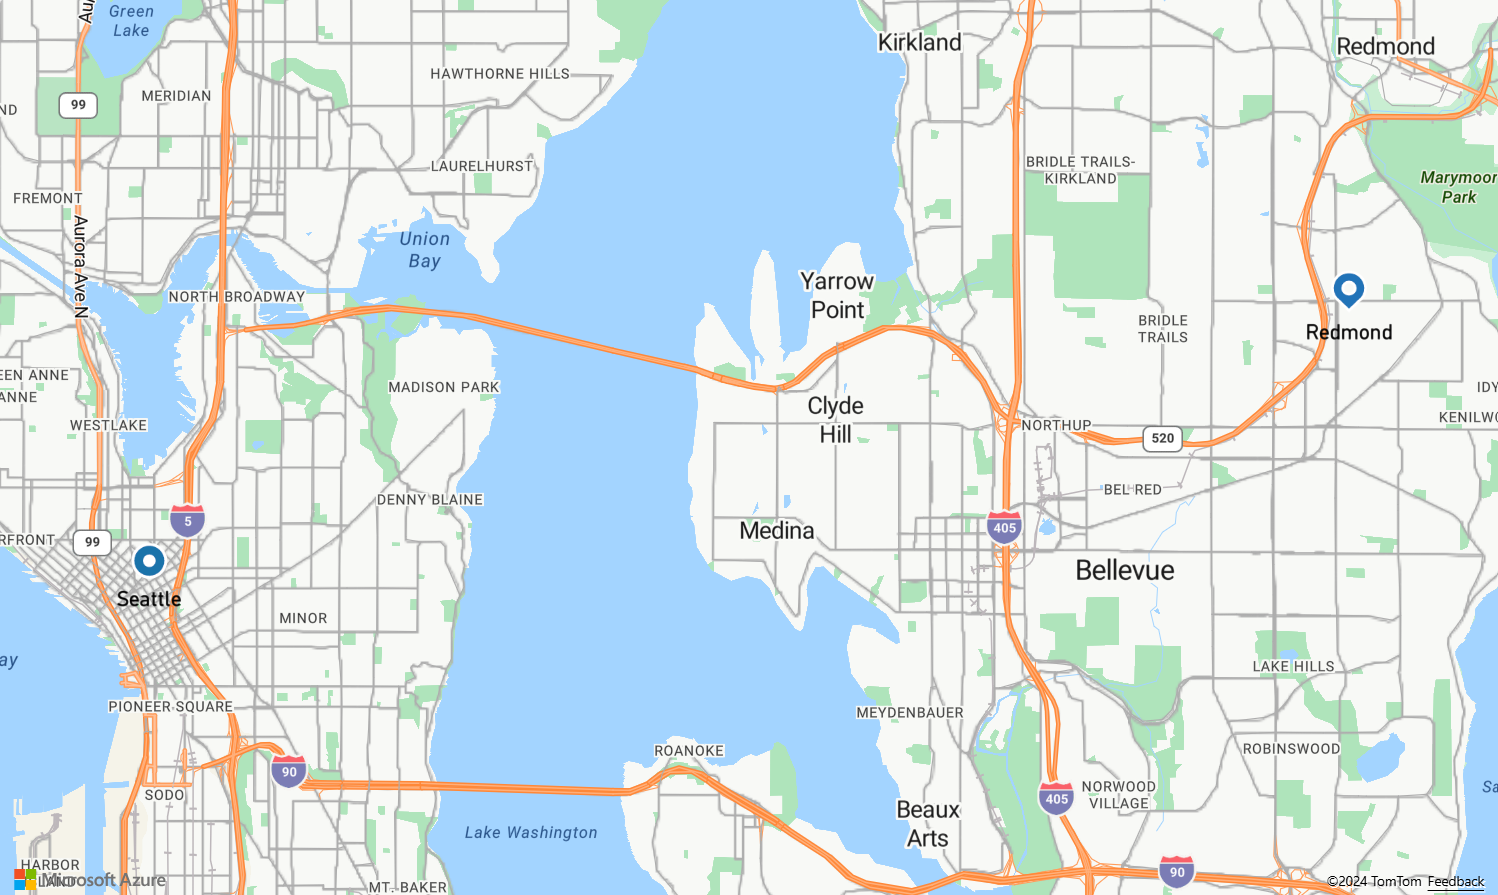
儲存 MapRoute.html 並重新整理瀏覽器。 現在地圖會以西雅圖作為中心。 藍色的淚珠形圖釘會標示起點。 藍色的圓形圖釘會標示終點。

取得路線方向
本節說明如何使用 Azure 地圖服務路線指示 API 來取得路線指示,以及從某個點到達另一個點的預估時間。
秘訣
Azure 地圖服務路線服務提供 API 以根據不同的路線類型 (例如「最快速」、「最短」、「最環保」或「驚心動魄」thrilling的路線) 以及根據距離、交通流量條件和使用的運輸模式,來規劃路線。 服務也可讓使用者根據歷程記錄交通流量條件來規劃未來的路由。 使用者可以查看任何指定時間的路由持續期間預測。 如需詳細資訊,請參閱取得路線方向 API。
在
GetMap函式之控制項的ready事件處理常式內,將下列內容新增至 JavaScript 程式碼。var query = startPoint.geometry.coordinates[1] + "," + startPoint.geometry.coordinates[0] + ":" + endPoint.geometry.coordinates[1] + "," + endPoint.geometry.coordinates[0]; var url = `https://atlas.microsoft.com/route/directions/json?api-version=1.0&query=${query}`; //Make a search route request fetch(url, { headers: { "Subscription-Key": map.authentication.getToken() } }) .then((response) => response.json()) .then((response) => { var route = response.routes[0]; //Create an array to store the coordinates of each turn var routeCoordinates = []; route.legs.forEach((leg) => { var legCoordinates = leg.points.map((point) => { return [point.longitude, point.latitude]; }); //Add each turn to the array routeCoordinates = routeCoordinates.concat(legCoordinates); }); //Add route line to the datasource datasource.add(new atlas.data.Feature(new atlas.data.LineString(routeCoordinates))); });與 JavaScript 相關的一些須知事項:
- 此程式碼會建構從起點到終點的路線。
-
url會要求 Azure 地圖服務路線規劃服務 API 計算路線方向。 - 接著會從回應擷取座標陣列,並新增至資料來源。
儲存 MapRoute.html 檔案並重新整理網頁瀏覽器。 地圖現在應該會顯示從起點到終點的路線。


後續步驟
下一個教學課程會示範如何建立具有限制 (例如旅遊模式或貨物類型) 的路線查詢, 然後您可以在同一個地圖上顯示多條路線。