教學課程:透過後端服務使用 Azure 通知中樞將推播通知傳送至 Flutter 應用程式
 下載範例
下載範例在本教學課程中,您會使用
ASP.NET Core Web API 後端是用來使用最新且最佳 安裝 方法來處理用戶端的 裝置註冊。 服務也會以跨平臺的方式傳送推播通知。
這些作業是使用 通知中樞 SDK 來處理後端作業。 如需整體方法的進一步詳細數據,請參閱從應用程式後端註冊 檔。
本教學課程會引導您完成下列步驟:
先決條件
若要跟著做,您需要:
- 您可以在其中建立和管理資源的 Azure 訂用帳戶。
- Flutter 工具組(以及其先決條件)。
- 已安裝 Flutter 和 Dart 外掛程式的 Visual Studio Code。
- 安裝CocoaPods 來管理連結庫相依性。
- 能夠在 Android(實體或模擬器裝置)或 iOS(僅限實體裝置)上執行應用程式。
針對 Android,您必須具備:
- 開發人員解除鎖定實體裝置或模擬器 (已安裝Google Play Services 執行 API 26 和更新版本)。
針對 iOS,您必須具備:
- 作用中的 Apple Developer Account。
- 註冊至開發人員帳戶的實體 iOS 裝置(執行 iOS 13.0 和更新版本)。
- .p12開發憑證 安裝在 金鑰鏈 可讓您 在實體裝置上執行應用程式。
注意
iOS 模擬器不支援遠端通知,因此在 iOS 上探索此範例時需要實體裝置。 不過,您不需要在 Android 和 iOS 上執行應用程式,才能完成本教學課程。
您可以遵循此第一個原則範例中的步驟,但沒有任何先前的經驗。 不過,您將受益於熟悉下列層面。
- Apple Developer Portal。
- ASP.NET Core。
- Google Firebase 控制台。
- Microsoft Azure 和 使用 Azure 通知中樞將推播通知傳送至 iOS 應用程式。
- Flutter 和 Dart 進行跨平台開發。
- 適用於 Android 和 iOS 原生開發的 Kotlin 和 Swift。
提供的步驟專屬於 macOS。 可以略過 iOS 層面,以遵循 Windows。
設定推播通知服務和 Azure 通知中樞
在本節中,您會設定 Firebase 雲端通訊 (FCM) 和 Apple 推播通知服務 (APNS)。 接著,您會建立並設定通知中樞以使用這些服務。
建立 Firebase 專案並啟用適用於 Android 的 Firebase 雲端通訊
登入
Firebase 控制台。 建立新的 Firebase 專案,輸入 PushDemo 做為 項目名稱。 注意
系統會為您產生唯一的名稱。 根據預設,這會由您提供之名稱的小寫變體,加上以虛線分隔的產生數位所組成。 如果您想要,只要它仍然是全域唯一的,您可以變更此專案。
建立項目之後,請選擇 [將 Firebase 新增至 Android 應用程式。
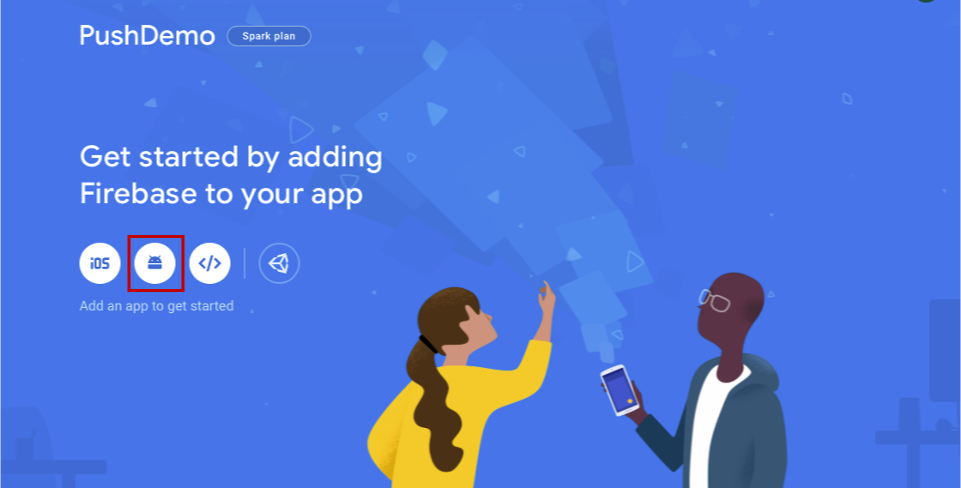
在 [將 Firebase 新增至 Android 應用程式 頁面上,採取下列步驟。
針對 Android 套件名稱,輸入套件的名稱。 例如:
com.<organization_identifier>.<package_name>。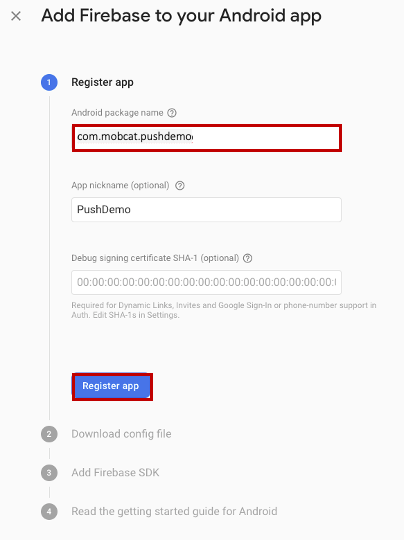
選取 [[註冊應用程式]。
選取 [下載 google-services.json]。 然後將檔案儲存到本機資料夾以供稍後使用,然後選取 [下一步]
。 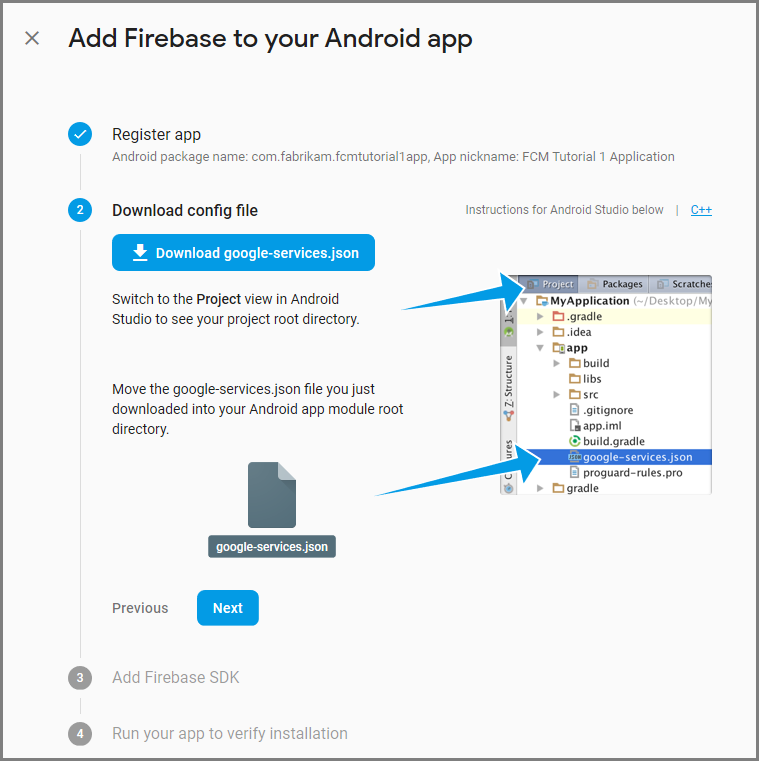
選取 [[下一步]。
選取 [繼續控制台
注意
如果未啟用 [繼續控制台] 按鈕
,因為 確認安裝 檢查,請選擇 [略過此步驟 。
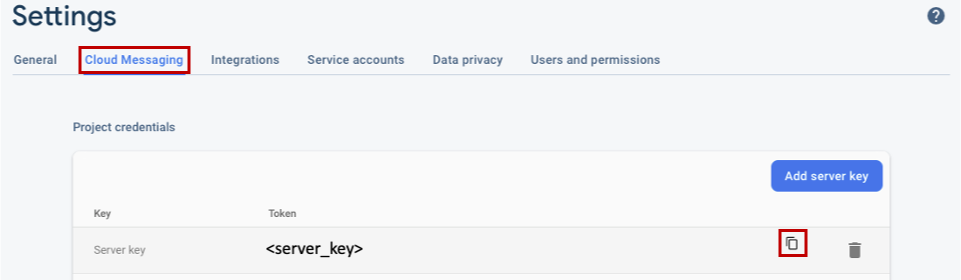
在 Firebase 控制台中,選取項目的齒輪。 然後選擇 [項目設定]。
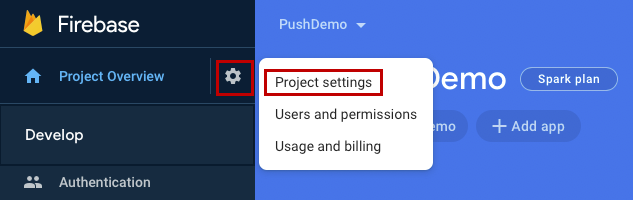
注意
如果您尚未下載 google-services.json 檔案,您可以在此頁面下載。
切換至頂端的 [雲端傳訊] 索引標籤。 複製並儲存 伺服器金鑰 以供稍後使用。 您可以使用此值來設定通知中樞。
註冊 iOS 應用程式以取得推播通知
若要將推播通知傳送至 iOS 應用程式,請向 Apple 註冊您的應用程式,並註冊推播通知。
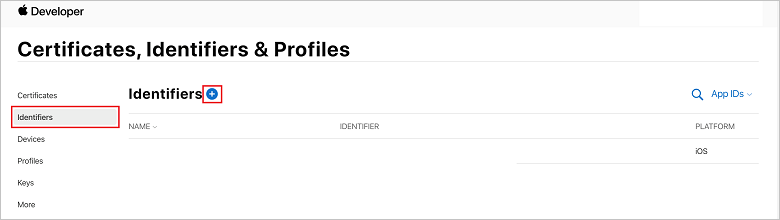
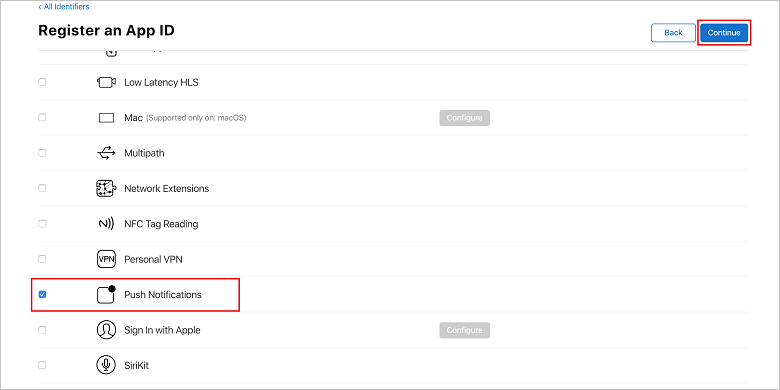
如果您尚未註冊應用程式,請流覽至 Apple 開發人員中心的 iOS 佈建入口網站。 使用您的 Apple ID 登入入口網站,流覽至 [憑證]、[標識符] & [配置檔],然後選取 [標識符]。 按兩下 [+] 以註冊新的應用程式。
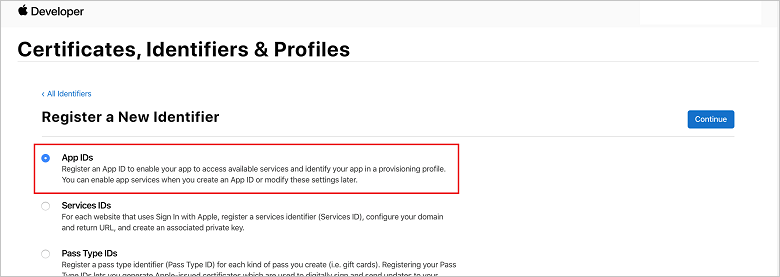
在 [[註冊新標識符] 畫面上,選取 [應用程式標識符] 單選按鈕。 然後選取 [繼續 繼續]。
 註冊新的標識碼頁面
更新新應用程式的下列三個值,然後選取 [繼續 繼續:
描述:輸入應用程式的描述性名稱。
套件組合識別碼:輸入 com 表單的套件組合識別碼。<organization_identifier>。如 應用程式散發指南中所述的<product_name>。 在下列螢幕快照中,會使用
mobcat值作為組織標識碼,並使用 PushDemo 值作為產品名稱。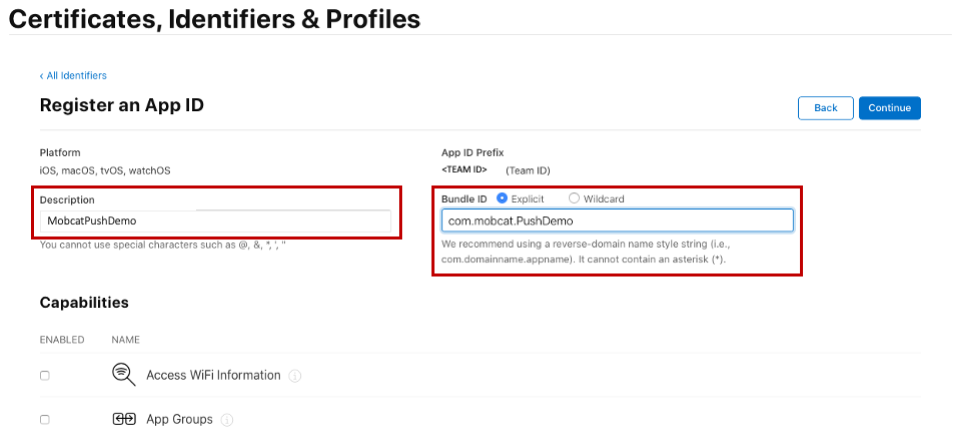
推播通知:檢查 [功能] 區段中的 [推播通知] 選項。
此動作會產生您的應用程式識別碼和您確認資訊的要求。 選取 [[繼續],然後選取 [註冊 以確認新的應用程式標識符。
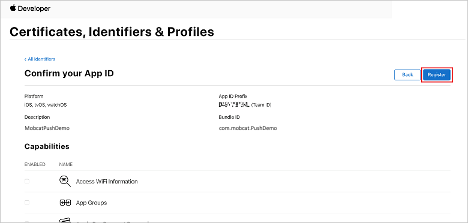
選取 [註冊之後,您會在 [憑證]、[標識符 & 配置檔] 頁面中看到新的 [應用程式標識符] 作為明細專案。
在 [憑證] 的 [標識符] & [配置檔] 頁面的 [標識符]下,找出您所建立的應用程式標識符明細專案。 然後,選取其數據列以顯示 [編輯您的應用程式識別符設定] 畫面
。
建立通知中樞的憑證
必須有憑證,才能讓通知中樞與 Apple Push Notification Services (APNS) 搭配使用,而且可以透過下列兩種方式之一提供:
建立可直接上傳至通知中樞的 p12 推播憑證(原始方法)
建立 p8 憑證,以用於令牌型驗證(較新的和建議方法)
較新的方法有許多優點,如 APNS
選項 1:建立可直接上傳至通知中樞的 p12 推播憑證
在您的 Mac 上,執行 Keychain 存取工具。 您可以從 Utilities 資料夾或 Launchpad 上的 Other 資料夾開啟。
選取 [
密鑰鏈存取 ],展開 [憑證助理 ],然後選取 [從證書頒發機構單位要求憑證]。 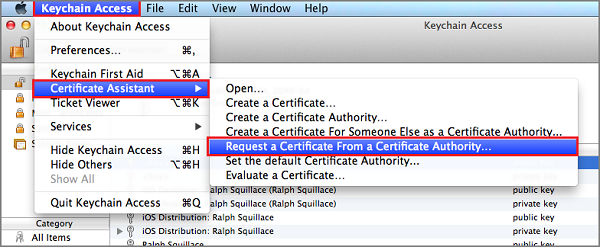
注意
根據預設,Keychain Access 會選取清單中的第一個專案。 如果您位於 [憑證] 類別中,且 Apple Worldwide Developer Relations Certification Authority 不是清單中的第一個專案,就可能會發生此問題。 在產生 CSR(憑證簽署要求)之前,請確定您有非密鑰專案,或已選取 Apple 全球開發人員關係證書頒發機構單位 密鑰。
選取
[使用者電子郵件位址] ,輸入您的[一般名稱] 值,確定您指定 [儲存到磁碟],然後選取 [繼續 ]。 保留 CA 電子郵件地址 空白,因為不需要。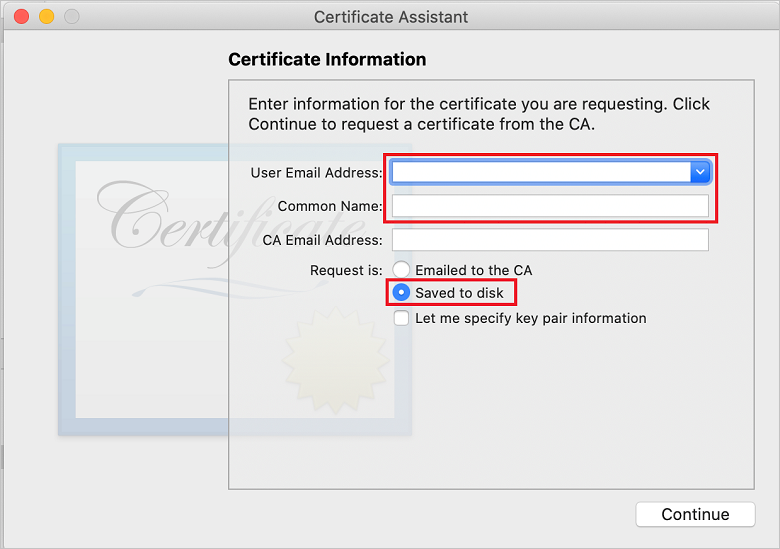
在 [另存新檔]
中輸入 憑證簽署要求 (CSR) 檔案的名稱 ,選取 [位置]中的位置,然後選取 [ 儲存 ]。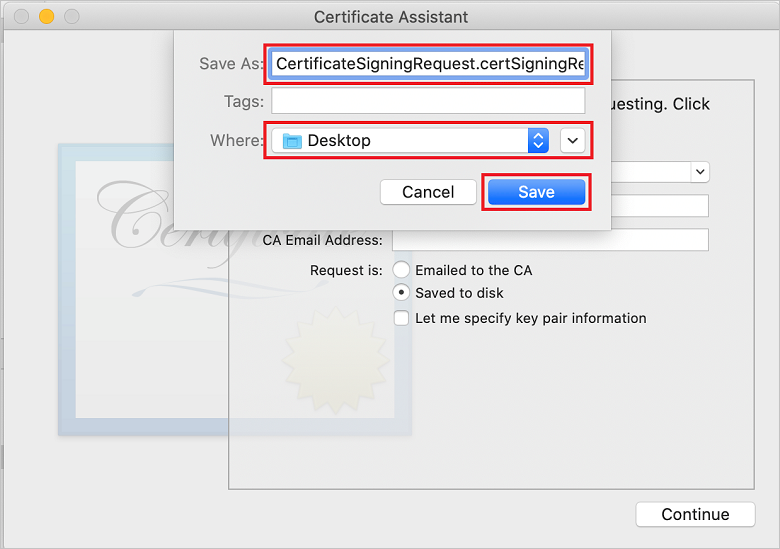
此動作會將 CSR 檔案 儲存在選取的位置。 預設位置為 Desktop。 請記住為檔案選擇的位置。
回到 [憑證]、[標識符 & 配置檔] 頁面的 [iOS 布建入口網站]、向下卷動至 核取的 [推播通知] 選項,然後選取 [設定] 來建立憑證。
![[編輯應用程式識別符] 頁面](media/notification-hubs-edit-appid.png)
Apple 推播通知服務 TLS/SSL 憑證 視窗隨即出現。 選取 [開發 TLS/SSL 憑證] 區段底下的 [建立憑證] 按鈕。
![[建立應用程式識別符] 按鈕的憑證](media/notification-hubs-appid-create-certificate.png)
[建立新的憑證] 畫面隨即顯示。
注意
本教學課程使用開發憑證。 註冊生產憑證時會使用相同的程式。 只要確定您在傳送通知時使用相同的憑證類型。
選取 [選擇檔案,流覽至您儲存 CSR 檔案的位置,然後按兩下憑證名稱加以載入。 然後選取 [繼續 繼續]。
在入口網站建立憑證之後,選取 [下載] 按鈕
。 儲存憑證,並記住儲存憑證的位置。 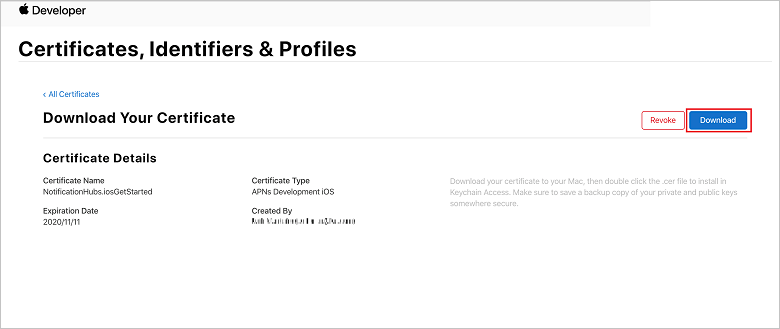
憑證會下載並儲存到您 下載 資料夾中的電腦。
![[下載] 資料夾中尋找憑證檔案](media/notification-hubs-certificate-downloaded.png)
注意
根據預設,下載的開發憑證會命名為 aps_development.cer。
按兩下下載的推送憑證 aps_development.cer。 此動作會在 Keychain 中安裝新的憑證,如下圖所示:

注意
雖然憑證中的名稱可能不同,但名稱前面會加上 Apple Development iOS Push Services,並具有與其相關聯的適當套件組合標識符。
在 [密鑰鏈存取] 中,[控制] + 按兩下您在 [憑證] 類別中建立的新推播憑證。 選取 [匯出],將檔案命名為 ,選取 p12 格式,然後選取 [儲存]。
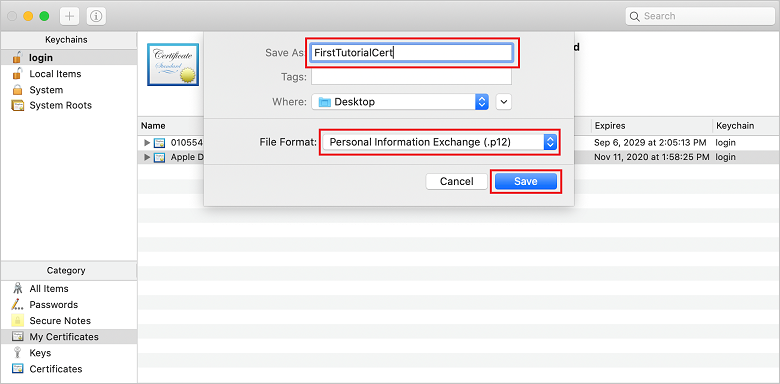
您可以選擇使用密碼來保護憑證,但密碼是選擇性的。 如果您想要略過密碼建立,請按兩下 [確定]。 記下匯出之 p12 憑證的檔名和位置。 它們用來啟用APN的驗證。
注意
您的 p12 檔名和位置可能不同於本教學課程中所描繪的內容。
選項 2:建立可用於令牌型驗證的 p8 憑證
記下下列詳細資料:
- 應用程式識別碼前置詞 (小組識別子)
- 套件組合標識碼
回到 憑證、標識子 & 配置檔中,按兩下 [金鑰]。
注意
如果您已針對 APNS設定密鑰,則可以重複使用在建立後立即下載的 p8 憑證。 若是如此,您可以忽略步驟 3 到 5。
按兩下 [+] 按鈕(或 [建立金鑰 按鈕] 來建立新的金鑰。
提供適當的 金鑰名稱 值,然後核取 [Apple 推播通知服務 (APNS)] 選項,然後按兩下 [繼續],然後在下一個畫面上 註冊。
按兩下 [
下載 ],然後將p8 檔案 (前面加上AuthKey_ ) 移至安全的本機目錄,然後按兩下 [完成]。 注意
請務必將 p8 檔案保留在安全的地方(並儲存備份)。 下載金鑰之後,就無法在移除伺服器複本時重新下載金鑰。
在 [金鑰]上,按下您建立的密鑰(或如果您選擇改用該金鑰,則為現有的金鑰)。
記下 金鑰標識碼 值。
在您選擇的適當應用程式中開啟 p8 憑證,例如 Visual Studio Code。 記下金鑰值 (----- BEGIN PRIVATE KEY----- 和 ----- END PRIVATE KEY-----)。
-----BEGIN 私鑰-----
<key_value>
-----END 私鑰-----注意
這是 令牌值,稍後將用來設定 通知中樞。
在這些步驟結束時,您應該有下列資訊,以供稍後在 使用 APNS 資訊設定通知中樞:
- 小組識別碼 (請參閱步驟 1)
- 套件組合識別碼 (請參閱步驟 1)
- 金鑰識別碼 (請參閱步驟 7)
- 令牌值 (步驟 8 中取得的 p8 索引鍵值)
建立應用程式的布建配置檔
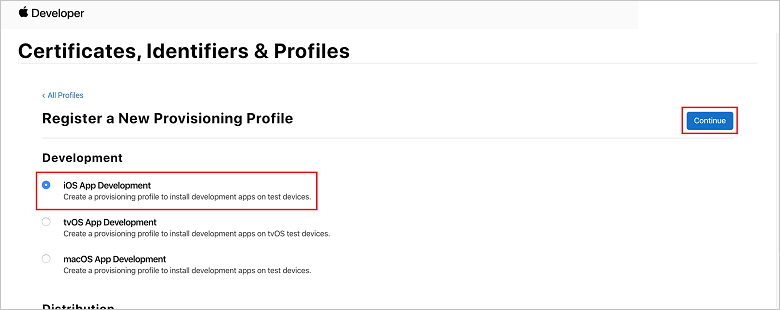
返回 iOS 佈建入口網站,選取 [憑證]、[標識符 & 配置檔]、從左側功能表中選取 [配置檔],然後選取 [+] 以建立新的配置檔。 [註冊新的布建配置檔] 畫面隨即出現。
選取 [iOS 應用程式開發] 底下的 [開發] 作為布建配置檔類型,然後選取 [繼續]。
接下來,從 [
應用程式標識符 ] 下拉式清單中選取您建立的應用程式標識符,然後選取 [繼續]。 
在 [選取憑證 視窗中,選取用於程式代碼簽署的開發憑證,然後選取 [繼續 繼續]。
注意
此憑證不是您在上一個步驟 中建立的推送憑證,。 這是您的開發憑證。 如果不存在,您必須建立它,因為這是本教學課程的 必要條件。 開發人員憑證可以透過 Xcode 或 Visual Studio,在 Apple Developer Portal中建立。
返回 [憑證]、[標識符 & 配置檔] 頁面、從左側功能表中選取 [配置檔],然後選取 [+] 以建立新的配置檔。 [註冊新的布建配置檔] 畫面隨即出現。
在 [選取憑證 視窗中,選取您建立的開發憑證。 然後選取 [繼續 繼續]。
接下來,選取要用於測試的裝置,然後選取 [繼續 繼續。
最後,在 布建配置檔名稱中選擇配置檔的名稱,然後選取 [產生]。
建立新的佈建設定檔時,請選擇 [下載]
。 請記住其儲存位置。 流覽至布建配置檔的位置,然後按兩下它,將它安裝在您的開發電腦上。
建立通知中樞
在本節中,您會建立通知中樞,並使用 APNS設定驗證。 您可以使用 p12 推播憑證或令牌型驗證。 如果您想要使用已建立的通知中樞,您可以跳至步驟 5。
登入 azure
。 單擊 [建立資源],然後搜尋並選擇 [通知中樞],然後按兩下 [建立 建立]。
更新下列欄位,然後按兩下列欄位 [建立]
: 基本詳細數據
訂用帳戶: 從下拉式清單中選擇目標 訂用帳戶
資源群組: 建立新的 資源群組(或挑選現有的資源群組)命名空間詳細數據
通知中樞Namespace: 輸入 通知中樞 命名空間的全域唯一名稱
注意
請確定已為此欄位選取 [建立新] 選項
。 通知中樞詳細數據
通知中樞: 輸入 通知中樞的名稱
位置: 從下拉式清單中選擇適當的位置
定價層: 保留預設 免費 選項注意
除非您已達到免費層中樞數目上限。
布建 通知中樞 之後,請流覽至該資源。
瀏覽至新的 通知中樞。
從清單中選取 [存取原則] (MANAGE底下)。
記下 原則名稱 值及其對應的 連接字串 值。
使用APNS資訊設定通知中樞
在 [通知服務] 底下,選取 [Apple],然後根據您先前在 [建立通知中樞的憑證] 一節中選擇的方法,遵循適當的步驟。
注意
只有在您想要將推播通知傳送給從市集購買應用程式的使用者時,才使用 應用程式模式生產。
選項 1:使用 .p12 推播憑證
選取 憑證。
選取檔案圖示。
選取您稍早導出的 .p12 檔案,然後選取 [開啟
。 如有必要,請指定正確的密碼。
選取 沙箱 模式。
選取 [儲存]。
選項 2:使用令牌型驗證
選擇 [令牌]。
輸入您稍早取得的下列值:
- 金鑰標識碼
- 套件組合標識碼
- 小組標識碼
- 令牌
選擇 沙箱。
選取 [儲存]。
使用 FCM 資訊設定通知中樞
- 在左側功能表的 [ 設定] 區段中,選取 [Google [GCM/FCM]。
- 從 Google Firebase 控制台中輸入您注意到 伺服器密鑰。
- 選取工具列上的 [儲存]。
建立 ASP.NET Core Web API 後端應用程式
在本節中,您會建立 ASP.NET Core Web API 後端,以處理 裝置註冊,以及將通知傳送至 Flutter 行動應用程式。
建立 Web 專案
在 Visual Studio中,選取 [檔案]>[新增解決方案]。
選取 [.NET Core>應用程式>ASP.NET Core>API>[下一步]。
在 [設定新的 ASP.NET Core Web API] 對話框中,選取 [目標 Framework.NET Core 3.1。
輸入
PushDemoApi [項目名稱] ,然後選取 [建立]。 開始偵錯 (Command + Enter) 以測試範本化應用程式。
注意
樣本化應用程式已設定為使用 WeatherForecastController 作為 launchUrl。 這會在 Properties>launchSettings.json中設定。
如果您收到 找到無效開發憑證的提示, 訊息:
按兩下 [[是] 同意執行 'dotnet dev-certs https' 工具來修正此問題。 'dotnet dev-certs https' 工具接著會提示您輸入憑證的密碼,以及密鑰鏈的密碼。
當系統提示您 安裝並信任新憑證時,按兩下 [[是],然後輸入金鑰鏈的密碼。
展開 Controllers 資料夾,然後刪除 WeatherForecastController.cs。
刪除 WeatherForecast.cs。
使用 Secret Manager 工具設定本機組態值,。 將秘密與解決方案分離,可確保它們最終不會出現在原始檔控制中。 開啟 終端機 然後移至項目檔的目錄,然後執行下列命令:
dotnet user-secrets init
dotnet user-secrets set "NotificationHub:Name" <value>
dotnet user-secrets set "NotificationHub:ConnectionString" <value>
將佔位元值取代為您自己的通知中樞名稱和連接字串值。 您在 建立通知中樞 一節中記下它們。 否則,您可以在 Azure 中查閱它們。
NotificationHub:Name:
請參閱概觀頂端 Essentials 摘要中的名稱 。NotificationHub:ConnectionString:
請參閱 存取原則 中的 DefaultFullSharedAccessSignature注意
在生產案例中,您可以查看 azure KeyVault 等選項,安全地儲存連接字串。 為了簡單起見,秘密會新增至 Azure App Service 應用程式設定。
使用 API 金鑰驗證客戶端 (選擇性)
API 金鑰不如令牌那麼安全,但本教學課程的目的就已足夠。 您可以透過 ASP.NET 中間件輕鬆地設定 API 金鑰。
將 API 金鑰 新增至本機組態值。
dotnet user-secrets set "Authentication:ApiKey" <value>注意
您應該將佔位元值取代為您自己的值,並記下它。
控件 + 單擊 PushDemoApi 專案的 [],從 [新增 新增] 功能表 選擇 [新增資料夾],然後按兩下 [使用 驗證 新增 做為 [資料夾名稱]。
[控件] + 單擊 [驗證] 資料夾中的 [],然後 從 [新增] 功能表選擇 [[新增檔案...]。
選取
[一般 空白類別 ],輸入ApiKeyAuthOptions.cs 名稱 ,然後按兩下 [新增] 新增下列實作。 using Microsoft.AspNetCore.Authentication; namespace PushDemoApi.Authentication { public class ApiKeyAuthOptions : AuthenticationSchemeOptions { public const string DefaultScheme = "ApiKey"; public string Scheme => DefaultScheme; public string ApiKey { get; set; } } }將另一個 空白類別 新增至名為 ApiKeyAuthHandler.cs的 Authentication 資料夾,然後新增下列實作。
using System;
using System.Collections.Generic;
using System.Linq;
using System.Security.Claims;
using System.Text.Encodings.Web;
using System.Threading.Tasks;
using Microsoft.AspNetCore.Authentication;
using Microsoft.Extensions.Logging;
using Microsoft.Extensions.Options;

namespace PushDemoApi.Authentication
{
    public class ApiKeyAuthHandler : AuthenticationHandler<ApiKeyAuthOptions>
    {
        const string ApiKeyIdentifier = "apikey";

        public ApiKeyAuthHandler(
            IOptionsMonitor<ApiKeyAuthOptions> options,
            ILoggerFactory logger,
            UrlEncoder encoder,
            ISystemClock clock)
            : base(options, logger, encoder, clock) {}

        protected override Task<AuthenticateResult> HandleAuthenticateAsync()
        {
            string key = string.Empty;

            if (Request.Headers[ApiKeyIdentifier].Any())
            {
                key = Request.Headers[ApiKeyIdentifier].FirstOrDefault();
            }
            else if (Request.Query.ContainsKey(ApiKeyIdentifier))
            {
                if (Request.Query.TryGetValue(ApiKeyIdentifier, out var queryKey))
                    key = queryKey;
            }

            if (string.IsNullOrWhiteSpace(key))
                return Task.FromResult(AuthenticateResult.Fail("No api key provided"));

            if (!string.Equals(key, Options.ApiKey, StringComparison.Ordinal))
                return Task.FromResult(AuthenticateResult.Fail("Invalid api key."));

            var identities = new List<ClaimsIdentity> {
                new ClaimsIdentity("ApiKeyIdentity")
            };

            var ticket = new AuthenticationTicket(
                new ClaimsPrincipal(identities), Options.Scheme);

            return Task.FromResult(AuthenticateResult.Success(ticket));
        }
    }
}
注意
驗證處理程式 是實作配置行為的型別,在此案例中為自定義 API 金鑰配置。
將另一個 空白類別 新增至名為 ApiKeyAuthenticationBuilderExtensions.cs的 Authentication 資料夾,然後新增下列實作。
using System;
using Microsoft.AspNetCore.Authentication;

namespace PushDemoApi.Authentication
{
    public static class AuthenticationBuilderExtensions
    {
        public static AuthenticationBuilder AddApiKeyAuth(
            this AuthenticationBuilder builder,
            Action<ApiKeyAuthOptions> configureOptions)
        {
            return builder
                .AddScheme<ApiKeyAuthOptions, ApiKeyAuthHandler>(
                    ApiKeyAuthOptions.DefaultScheme,
                    configureOptions);
        }
    }
}
注意
此擴充方法可簡化 Startup.cs 中的中間件元件程式代碼,使其更容易閱讀且通常更容易遵循。
在 Startup.cs中,更新 ConfigureServices 方法,以在呼叫 服務下方設定 API 密鑰驗證。AddControllers 方法。
using PushDemoApi.Authentication;
using PushDemoApi.Models;
using PushDemoApi.Services;

public void ConfigureServices(IServiceCollection services)
{
    services.AddControllers();

    services.AddAuthentication(options =>
    {
        options.DefaultAuthenticateScheme = ApiKeyAuthOptions.DefaultScheme;
        options.DefaultChallengeScheme = ApiKeyAuthOptions.DefaultScheme;
    }).AddApiKeyAuth(Configuration.GetSection("Authentication").Bind);
}
仍在 Startup.cs中,更新 Configure 方法,以在應用程式的 IApplicationBuilder上呼叫 UseAuthentication 和 UseAuthorization 擴充方法。 請確定這些方法會在 UseRouting 和 應用程式之前呼叫。UseEndpoints。
public void Configure(IApplicationBuilder app, IWebHostEnvironment env)
{
    if (env.IsDevelopment())
    {
        app.UseDeveloperExceptionPage();
    }

    app.UseHttpsRedirection();

    app.UseRouting();

    app.UseAuthentication();

    app.UseAuthorization();

    app.UseEndpoints(endpoints =>
    {
        endpoints.MapControllers();
    });
}
注意
呼叫 UseAuthentication 會註冊使用先前註冊的驗證配置中間件(從 ConfigureServices)。 這必須在相依於用戶驗證的任何中間件之前呼叫。
新增相依性並設定服務
ASP.NET Core 支援 相依性插入 (DI) 軟體設計模式,這是在類別與其相依性之間達成 控制反轉 的技術。
使用通知中樞和 通知中樞 SDK 進行後端作業, 封裝在服務內。 服務會透過適當的抽象概念進行註冊並可供使用。
控制項 + 按兩下 [相依性] 資料夾上的 [],然後選擇 [管理 NuGet 套件...]。
搜尋 Microsoft.Azure.NotificationHubs,並確定已核取。
按兩下 [[新增套件],然後在系統提示接受授權條款時,按兩下 [接受]。
控件 + 單擊 PushDemoApi 專案的 [],從 [[新增] 功能表 選擇 [新增資料夾],然後按兩下 [使用 Models 作為 資料夾名稱新增。
[控件] + 單擊 [Models] 資料夾中的 [],然後 從 [新增] 功能表選擇 [新增檔案...]。
選取
[一般 空類別 ],輸入名稱 的PushTemplates.cs ,然後按兩下 [新增 新增下列實作。 namespace PushDemoApi.Models { public class PushTemplates { public class Generic { public const string Android = "{ \"notification\": { \"title\" : \"PushDemo\", \"body\" : \"$(alertMessage)\"}, \"data\" : { \"action\" : \"$(alertAction)\" } }"; public const string iOS = "{ \"aps\" : {\"alert\" : \"$(alertMessage)\"}, \"action\" : \"$(alertAction)\" }"; } public class Silent { public const string Android = "{ \"data\" : {\"message\" : \"$(alertMessage)\", \"action\" : \"$(alertAction)\"} }"; public const string iOS = "{ \"aps\" : {\"content-available\" : 1, \"apns-priority\": 5, \"sound\" : \"\", \"badge\" : 0}, \"message\" : \"$(alertMessage)\", \"action\" : \"$(alertAction)\" }"; } } }將另一個 空白類別 新增至名為 DeviceInstallation.cs的 Models 資料夾,然後新增下列實作。
using System.Collections.Generic;
using System.ComponentModel.DataAnnotations;

namespace PushDemoApi.Models
{
    public class DeviceInstallation
    {
        [Required]
        public string InstallationId { get; set; }

        [Required]
        public string Platform { get; set; }

        [Required]
        public string PushChannel { get; set; }

        public IList<string> Tags { get; set; } = Array.Empty<string>();
    }
}
將另一個 空白類別 新增至名為 NotificationRequest.cs的 Models 資料夾,然後新增下列實作。
using System;

namespace PushDemoApi.Models
{
    public class NotificationRequest
    {
        public string Text { get; set; }
        public string Action { get; set; }
        public string[] Tags { get; set; } = Array.Empty<string>();
        public bool Silent { get; set; }
    }
}
將另一個 空白類別 新增至名為 NotificationHubOptions.cs的 Models 資料夾,然後新增下列實作。
using System.ComponentModel.DataAnnotations;

namespace PushDemoApi.Models
{
    public class NotificationHubOptions
    {
        [Required]
        public string Name { get; set; }

        [Required]
        public string ConnectionString { get; set; }
    }
}
將新資料夾新增至名為 ServicesPushDemoApi 專案。
將 空白介面 新增至名為 INotificationService.cs的 Services 資料夾,然後新增下列實作。
using System.Threading;
using System.Threading.Tasks;
using PushDemoApi.Models;

namespace PushDemoApi.Services
{
    public interface INotificationService
    {
        Task<bool> CreateOrUpdateInstallationAsync(DeviceInstallation deviceInstallation, CancellationToken token);
        Task<bool> DeleteInstallationByIdAsync(string installationId, CancellationToken token);
        Task<bool> RequestNotificationAsync(NotificationRequest notificationRequest, CancellationToken token);
    }
}
將 空白類別 新增至名為 NotificationHubsService.cs的 Services 資料夾,然後新增下列程式代碼以實作 INotificationService 介面:
using System;
using System.Collections.Generic;
using System.Linq;
using System.Threading;
using System.Threading.Tasks;
using Microsoft.Azure.NotificationHubs;
using Microsoft.Extensions.Logging;
using Microsoft.Extensions.Options;
using PushDemoApi.Models;

namespace PushDemoApi.Services
{
    public class NotificationHubService : INotificationService
    {
        readonly NotificationHubClient _hub;
        readonly Dictionary<string, NotificationPlatform> _installationPlatform;
        readonly ILogger<NotificationHubService> _logger;

        public NotificationHubService(IOptions<NotificationHubOptions> options, ILogger<NotificationHubService> logger)
        {
            _logger = logger;
            _hub = NotificationHubClient.CreateClientFromConnectionString(
                options.Value.ConnectionString,
                options.Value.Name);

            _installationPlatform = new Dictionary<string, NotificationPlatform>
            {
                { nameof(NotificationPlatform.Apns).ToLower(), NotificationPlatform.Apns },
                { nameof(NotificationPlatform.Fcm).ToLower(), NotificationPlatform.Fcm }
            };
        }

        public async Task<bool> CreateOrUpdateInstallationAsync(DeviceInstallation deviceInstallation, CancellationToken token)
        {
            if (string.IsNullOrWhiteSpace(deviceInstallation?.InstallationId) ||
                string.IsNullOrWhiteSpace(deviceInstallation?.Platform) ||
                string.IsNullOrWhiteSpace(deviceInstallation?.PushChannel))
                return false;

            var installation = new Installation()
            {
                InstallationId = deviceInstallation.InstallationId,
                PushChannel = deviceInstallation.PushChannel,
                Tags = deviceInstallation.Tags
            };

            if (_installationPlatform.TryGetValue(deviceInstallation.Platform, out var platform))
                installation.Platform = platform;
            else
                return false;

            try
            {
                await _hub.CreateOrUpdateInstallationAsync(installation, token);
            }
            catch
            {
                return false;
            }

            return true;
        }

        public async Task<bool> DeleteInstallationByIdAsync(string installationId, CancellationToken token)
        {
            if (string.IsNullOrWhiteSpace(installationId))
                return false;

            try
            {
                await _hub.DeleteInstallationAsync(installationId, token);
            }
            catch
            {
                return false;
            }

            return true;
        }

        public async Task<bool> RequestNotificationAsync(NotificationRequest notificationRequest, CancellationToken token)
        {
            if ((notificationRequest.Silent &&
                string.IsNullOrWhiteSpace(notificationRequest?.Action)) ||
                (!notificationRequest.Silent &&
                (string.IsNullOrWhiteSpace(notificationRequest?.Text)) ||
                string.IsNullOrWhiteSpace(notificationRequest?.Action)))
                return false;

            var androidPushTemplate = notificationRequest.Silent ?
                PushTemplates.Silent.Android :
                PushTemplates.Generic.Android;

            var iOSPushTemplate = notificationRequest.Silent ?
                PushTemplates.Silent.iOS :
                PushTemplates.Generic.iOS;

            var androidPayload = PrepareNotificationPayload(
                androidPushTemplate,
                notificationRequest.Text,
                notificationRequest.Action);

            var iOSPayload = PrepareNotificationPayload(
                iOSPushTemplate,
                notificationRequest.Text,
                notificationRequest.Action);

            try
            {
                if (notificationRequest.Tags.Length == 0)
                {
                    // This will broadcast to all users registered in the notification hub
                    await SendPlatformNotificationsAsync(androidPayload, iOSPayload, token);
                }
                else if (notificationRequest.Tags.Length <= 20)
                {
                    await SendPlatformNotificationsAsync(androidPayload, iOSPayload, notificationRequest.Tags, token);
                }
                else
                {
                    var notificationTasks = notificationRequest.Tags
                        .Select((value, index) => (value, index))
                        .GroupBy(g => g.index / 20, i => i.value)
                        .Select(tags => SendPlatformNotificationsAsync(androidPayload, iOSPayload, tags, token));

                    await Task.WhenAll(notificationTasks);
                }

                return true;
            }
            catch (Exception e)
            {
                _logger.LogError(e, "Unexpected error sending notification");
                return false;
            }
        }

        string PrepareNotificationPayload(string template, string text, string action) => template
            .Replace("$(alertMessage)", text, StringComparison.InvariantCulture)
            .Replace("$(alertAction)", action, StringComparison.InvariantCulture);

        Task SendPlatformNotificationsAsync(string androidPayload, string iOSPayload, CancellationToken token)
        {
            var sendTasks = new Task[]
            {
                _hub.SendFcmNativeNotificationAsync(androidPayload, token),
                _hub.SendAppleNativeNotificationAsync(iOSPayload, token)
            };

            return Task.WhenAll(sendTasks);
        }

        Task SendPlatformNotificationsAsync(string androidPayload, string iOSPayload, IEnumerable<string> tags, CancellationToken token)
        {
            var sendTasks = new Task[]
            {
                _hub.SendFcmNativeNotificationAsync(androidPayload, tags, token),
                _hub.SendAppleNativeNotificationAsync(iOSPayload, tags, token)
            };

            return Task.WhenAll(sendTasks);
        }
    }
}
注意
提供給 SendTemplateNotificationAsync 的標記表達式限制為 20 個標記。 對於大多數運算元而言,其限制為 6,但在此案例中,表示式只包含 OU (||) 。 如果要求中有20個以上的標記,則必須將其分割成多個要求。 如需詳細資訊,請參閱 路由和標記表達式 檔。
在 Startup.cs中,更新 ConfigureServices 方法,將 NotificationHubsService 新增為 INotificationService的單一實作。
using PushDemoApi.Models;
using PushDemoApi.Services;

public void ConfigureServices(IServiceCollection services)
{
    ...

    services.AddSingleton<INotificationService, NotificationHubService>();

    services.AddOptions<NotificationHubOptions>()
        .Configure(Configuration.GetSection("NotificationHub").Bind)
        .ValidateDataAnnotations();
}
建立通知 API
控件 + 單擊 [Controllers] 資料夾中的 [],然後 從 [新增] 功能表選擇 [新增檔案...]。
選取 [ASP.NET Core>Web API 控制器類別],輸入 NotificationsControllerName,然後按兩下 [[新增]。
注意
如果您遵循 Visual Studio 2019
,請選擇具有讀取/寫入動作 範本的 API 控制器。 將下列命名空間新增至檔案頂端。
using System.ComponentModel.DataAnnotations;
using System.Net;
using System.Threading;
using System.Threading.Tasks;
using Microsoft.AspNetCore.Authorization;
using Microsoft.AspNetCore.Mvc;
using PushDemoApi.Models;
using PushDemoApi.Services;
更新樣板化控制器,使其衍生自 ControllerBase,並以 ApiController 屬性裝飾。
[ApiController]
[Route("api/[controller]")]
public class NotificationsController : ControllerBase
{
    // Templated methods here
}
注意
Controller 基類提供檢視的支援,但在此情況下不需要這麼做,因此可以改用 ControllerBase。 如果您遵循 visual Studio 2019
,您可以略過此步驟。 如果您選擇使用 API 金鑰 區段完成
驗證用戶端,則也應該使用 Authorize 屬性來裝飾NotificationsController 。[Authorize]更新建構函式以接受 已註冊的 INotificationService 實例 做為自變數,並將它指派給只讀成員。
readonly INotificationService _notificationService;

public NotificationsController(INotificationService notificationService)
{
    _notificationService = notificationService;
}
在
launchSettings.json (Properties 資料夾中),將launchUrl 從變更為 api/notifications ,以符合 Route属性 RegistrationsController 中指定的 URL。 開始偵錯 (Command + Enter) 驗證應用程式正在使用新的 NotificationsController,並傳回 401 未經授權 狀態。
注意
Visual Studio 可能不會在瀏覽器中自動啟動應用程式。 您將使用 Postman,從這一點開始測試 API。
在新的 Postman 索引標籤上,將要求設定為 GET。 輸入下列位址,將佔位符 <applicationUrl> 取代為 Properties>launchSettings.json中找到的 https applicationUrl。
<applicationUrl>/api/notifications注意
默認配置檔的 applicationUrl 應該是 'https://localhost:5001'。 如果您使用
IIS (在 Windows 上的 Visual Studio 2019預設值),您應該改用 iisSettings 專案中指定的applicationUrl 。 如果位址不正確,您會收到 404 回應。如果您選擇使用 API 金鑰 區段完成
驗證用戶端,請務必設定要求標頭以包含您的 apikey 值。鑰匙 價值 apikey <your_api_key> 按兩下 [傳送] 按鈕
。 注意
您應該會收到一些 JSON 內容 200 OK 狀態。
如果您收到
SSL 憑證驗證 警告,您可以在 [設定] 中,將 [postman] 設定為 [要求 SSL 憑證驗證]。 以下列程式代碼取代 NotificationsController.cs 中的樣板化類別方法。
[HttpPut]
[Route("installations")]
[ProducesResponseType((int)HttpStatusCode.OK)]
[ProducesResponseType((int)HttpStatusCode.BadRequest)]
[ProducesResponseType((int)HttpStatusCode.UnprocessableEntity)]
public async Task<IActionResult> UpdateInstallation(
    [Required]DeviceInstallation deviceInstallation)
{
    var success = await _notificationService
        .CreateOrUpdateInstallationAsync(deviceInstallation, HttpContext.RequestAborted);

    if (!success)
        return new UnprocessableEntityResult();

    return new OkResult();
}

[HttpDelete()]
[Route("installations/{installationId}")]
[ProducesResponseType((int)HttpStatusCode.OK)]
[ProducesResponseType((int)HttpStatusCode.BadRequest)]
[ProducesResponseType((int)HttpStatusCode.UnprocessableEntity)]
public async Task<ActionResult> DeleteInstallation(
    [Required][FromRoute]string installationId)
{
    var success = await _notificationService
        .DeleteInstallationByIdAsync(installationId, CancellationToken.None);

    if (!success)
        return new UnprocessableEntityResult();

    return new OkResult();
}

[HttpPost]
[Route("requests")]
[ProducesResponseType((int)HttpStatusCode.OK)]
[ProducesResponseType((int)HttpStatusCode.BadRequest)]
[ProducesResponseType((int)HttpStatusCode.UnprocessableEntity)]
public async Task<IActionResult> RequestPush(
    [Required]NotificationRequest notificationRequest)
{
    if ((notificationRequest.Silent &&
        string.IsNullOrWhiteSpace(notificationRequest?.Action)) ||
        (!notificationRequest.Silent &&
        string.IsNullOrWhiteSpace(notificationRequest?.Text)))
        return new BadRequestResult();

    var success = await _notificationService
        .RequestNotificationAsync(notificationRequest, HttpContext.RequestAborted);

    if (!success)
        return new UnprocessableEntityResult();

    return new OkResult();
}
建立 API 應用程式
您現在會在 Azure App Service 中建立 API 應用程式,以裝載後端服務。
登入 Azure 入口網站。
單擊 [
建立資源 ],然後搜尋並選擇 [API 應用程式 ],然後按兩下 [建立]。 更新下列欄位,然後按兩下列欄位 [建立]
。 應用程式名稱:
輸入 API 應用程式 的全域唯一名稱訂用帳戶:
選擇您在中建立通知中樞 相同的目標訂用帳戶。 資源群組:
在您建立通知中樞,請選擇相同的資源群組。 App Service 方案/位置:
建立新的 App Service 方案注意
從預設選項變更為包含 SSL 支援的方案。 否則,在使用行動應用程式時,您必須採取適當的步驟,以防止 HTTP 要求遭到封鎖。
Application Insights:
保留建議的選項(將使用該名稱建立新的資源),或挑選現有的資源。布建 API 應用程式 之後,請流覽至該資源。
記下 概觀頂端 Essentials 摘要中的 URL 屬性。 此 URL 是您 後端端點,稍後在本教學課程中將會使用。
注意
URL 會使用您稍早指定的 API 應用程式名稱,格式
https://<app_name>.azurewebsites.net。從清單中選取 組態 ([設定]底下)。
針對下列每個設定,按兩下列 [[新增應用程式設定] 以輸入 [名稱] 和 [值],然後按兩下 [確定]。
名字 價值 Authentication:ApiKey<api_key_value> NotificationHub:Name<hub_name_value> NotificationHub:ConnectionString<hub_connection_string_value> 新增所有應用程式設定后,按兩下 [儲存]
,然後 [繼續 ]。
發佈後端服務
接下來,您會將應用程式部署至 API 應用程式,使其可從所有裝置存取。
注意
下列步驟專屬於 Visual Studio for Mac。 如果您在 Windows 上使用 Visual Studio 2019,發佈流程會有所不同。 請參閱在 Windows上
如果您尚未這麼做,請將設定從 Debug 變更為 Release。
控件 + 單擊 [PushDemoApi 專案],然後從 [發佈] 功能表選擇 [發佈至 Azure...]。
如果系統提示您這樣做,請遵循驗證流程。 使用您在上一個 建立 API 應用程式 一節中使用的帳戶。
選取您先前從清單中建立的 azure App Service API 應用程式
作為發佈目標,然後按兩下 [ 發佈 ]。
完成精靈之後,它會將應用程式發佈至 Azure,然後開啟應用程式。 如果您尚未這麼做,請記下 URL。 此 URL 是您在本教學課程稍後使用的 後端端點。
驗證已發佈的 API
在 Postman 開啟新的索引標籤,將要求設定為 PUT,然後輸入下列位址。 將佔位元取代為您在上一個 發佈後端服務 區段中記下的基礎位址。
https://<app_name>.azurewebsites.net/api/notifications/installations注意
基位址的格式應為
https://<app_name>.azurewebsites.net/如果您選擇使用 API 金鑰 區段完成
驗證用戶端,請務必設定要求標頭以包含您的 apikey 值。鑰匙 價值 apikey <your_api_key> 選擇 Body的原始 選項,然後從格式選項清單中選擇 [JSON],然後包含部分佔位元 JSON 內容:
{}點選 [傳送]
。 注意
您應該會收到來自服務的 422 UnprocessableEntity 狀態。
再次執行步驟 1-4,但這次指定要求端點來驗證您收到 400 不正確的要求 回應。
https://<app_name>.azurewebsites.net/api/notifications/requests
注意
目前無法使用有效的要求數據來測試 API,因為這需要來自用戶端行動應用程式的平臺特定資訊。
建立跨平臺 Flutter 應用程式
在本節中,您會建置 Flutter 行動應用程式,以跨平臺方式實作推播通知。
它可讓您透過您所建立的後端服務,從通知中樞註冊和取消註冊。
當指定動作且應用程式位於前景時,就會顯示警示。 否則,通知會出現在通知中心。
注意
您通常會在應用程式生命週期的適當時間點執行註冊(和取消註冊)動作,而不需要明確的用戶註冊/取消註冊輸入。 不過,此範例需要明確的使用者輸入,才能更輕鬆地探索及測試這項功能。
建立 Flutter 解決方案
開啟 Visual Studio Code的新實例。
開啟 命令選擇區 (Shift + Command + P)。
選取 [Flutter:新增項目 命令,然後按 Enter。
輸入 push_demo項目名稱,然後選取 專案位置。
出現提示時,請選擇 [取得套件]
。 Control + 按兩下 kotlin 資料夾上的 [] 資料夾(在 [應用程式]>src>main下),然後選擇 [Finder中的顯色]。 然後,將子資料夾 (在 kotlin 資料夾下) 分別重新命名為
com、<your_organization>和pushdemo。注意
使用 Visual Studio Code 範本時,這些資料夾預設為 com,範例<project_name>。 假設 mobcat 用於 組織,資料夾結構應該會顯示為:
- kotlin
- com
- mobcat
- pushdemo
- mobcat
- com
- kotlin
回到 Visual Studio Code 中,將 android>應用程式中的 applicationId 值更新為>build.gradle
com.<your_organization>.pushdemo。注意
您應該針對 <your_organization> 佔位元使用您自己的組織名稱。 例如,使用 mobcat,因為組織會導致 套件名稱 值,com.mobcat.pushdemo。
在 AndroidManifest.xml 檔案、src>偵錯、src>main和 src>配置檔 底下,更新 套件 屬性。 請確定值符合您在上一個步驟中使用的 applicationId。
<manifest
    xmlns:android="http://schemas.android.com/apk/res/android"
    package="com.<your_organization>.pushdemo>">
    ...
</manifest>
在 src>main 底下,更新 AndroidManifest.xml 檔案中的
android:label屬性,以 PushDemo。 然後,直接在android:label底下新增android:allowBackup屬性,將其值設定為 false。<application android:name="io.flutter.app.FlutterApplication" android:label="PushDemo" android:allowBackup="false" android:icon="@mipmap/ic_launcher"> ... </application>開啟 app 層級 build.gradle 檔案(android>app>build.gradle),然後更新 compileSdkVersion (從 android 區段) 使用 API 29。 然後,分別將 minSdkVersion 和 targetSdkVersion 值(從 defaultConfig 區段)更新為 26 和 29。
注意
本教學課程的目的只支援執行 API 層級 26 和更新版本的裝置,不過您可以擴充它以支持執行舊版的裝置。
控件 + 按兩下 ios 資料夾中的 [],然後選擇 [在 Xcode中開啟]。
在 Xcode中,按兩下 執行器(頂端 xcodeproj,而不是資料夾)。 然後,選取 [
執行器] 目標,然後選取 [[一般 ] 索引標籤。選取 [所有 組建元件],將 套件組合識別碼 更新為。 注意
您應該針對 <your_organization> 佔位元使用您自己的組織名稱。 例如,使用 mobcat,因為組織會產生 com.mobcat.PushDemo套件組合標識碼 值。
按兩下 Info.plist,然後將 套件組合名稱 值更新為 PushDemo
關閉 Xcode,並傳回 Visual Studio Code。
回到 Visual Studio Code
中,開啟 pubspec.yaml ,將http 和flutter_secure_storage Dart 套件 新增為相依性。 然後,儲存盤案,然後按兩下 [取得套件] 提示時,按兩下 [取得套件]。dependencies: flutter: sdk: flutter http: ^0.12.1 flutter_secure_storage: ^3.3.3在 終端機中,將目錄變更為 ios 資料夾(適用於您的 Flutter 專案)。 然後,執行 pod install 命令來安裝新的 Pod(flutter_secure_storage 套件需要)。
Control + 按兩下 lib 資料夾中的 [],然後使用 main_page.dart 作為檔名,從功能表中選擇 [新增檔案]。 然後,新增下列程序代碼。
import 'package:flutter/material.dart';

class MainPage extends StatefulWidget {
  @override
  _MainPageState createState() => _MainPageState();
}

class _MainPageState extends State<MainPage> {
  @override
  Widget build(BuildContext context) {
    return Scaffold(
      body: SafeArea(
        child: Column(
          crossAxisAlignment: CrossAxisAlignment.stretch,
          children: <Widget>[],
        )
      )
    );
  }
}
在main.dart 中,以下列內容取代樣板化程序代碼。
import 'package:flutter/material.dart';
import 'package:push_demo/main_page.dart';

final navigatorKey = GlobalKey<NavigatorState>();

void main() => runApp(MaterialApp(home: MainPage(), navigatorKey: navigatorKey));
在 終端機中,在每個目標平臺上建置並執行應用程式,以測試範本化應用程式在您的裝置上執行。 請確定支援的裝置已連線。
flutter run
實作跨平臺元件
控件 + 單擊 lib 資料夾中的 [],然後使用 [模型] 作為 [資料夾名稱],從功能表中 選擇 [新增資料夾]。
控件 + 單擊 [models] 資料夾上的 [],然後使用 device_installation.dart 作為檔名,從功能表中選擇 [新增檔案]。 然後,新增下列程序代碼。
class DeviceInstallation {
    final String deviceId;
    final String platform;
    final String token;
    final List<String> tags;

    DeviceInstallation(this.deviceId, this.platform, this.token, this.tags);

    DeviceInstallation.fromJson(Map<String, dynamic> json)
      : deviceId = json['installationId'],
        platform = json['platform'],
        token = json['pushChannel'],
        tags = json['tags'];

    Map<String, dynamic> toJson() =>
    {
      'installationId': deviceId,
      'platform': platform,
      'pushChannel': token,
      'tags': tags,
    };
}
將新檔案新增至 models 資料夾,稱為 push_demo_action.dart 定義此範例中支持的動作列舉。
enum PushDemoAction {
  actionA,
  actionB,
}
將新資料夾新增至名為 services 的專案, 然後使用下列實作,將名為 device_installation_service.dart 的新檔案新增至該資料夾。
import 'package:flutter/services.dart';

class DeviceInstallationService {
  static const deviceInstallation = const MethodChannel('com.<your_organization>.pushdemo/deviceinstallation');
  static const String getDeviceIdChannelMethod = "getDeviceId";
  static const String getDeviceTokenChannelMethod = "getDeviceToken";
  static const String getDevicePlatformChannelMethod = "getDevicePlatform";

  Future<String> getDeviceId() {
    return deviceInstallation.invokeMethod(getDeviceIdChannelMethod);
  }

  Future<String> getDeviceToken() {
    return deviceInstallation.invokeMethod(getDeviceTokenChannelMethod);
  }

  Future<String> getDevicePlatform() {
    return deviceInstallation.invokeMethod(getDevicePlatformChannelMethod);
  }
}
注意
您應該針對 <your_organization> 佔位元使用您自己的組織名稱。 例如,使用 mobcat,因為組織會導致 MethodChannel 名稱 com.mobcat.pushdemo/deviceinstallation。
此類別會封裝使用基礎原生平臺,以取得必要的裝置安裝詳細數據。 MethodChannel 有助於與基礎原生平台進行雙向異步通訊。 此通道的平臺特定對應專案將會在後續步驟中建立。
使用下列實作,將另一個檔案新增至名為 notification_action_service.dart 的資料夾。
import 'package:flutter/services.dart';
import 'dart:async';
import 'package:push_demo/models/push_demo_action.dart';

class NotificationActionService {
  static const notificationAction =
      const MethodChannel('com.<your_organization>.pushdemo/notificationaction');
  static const String triggerActionChannelMethod = "triggerAction";
  static const String getLaunchActionChannelMethod = "getLaunchAction";

  final actionMappings = {
    'action_a' : PushDemoAction.actionA,
    'action_b' : PushDemoAction.actionB
  };

  final actionTriggeredController = StreamController.broadcast();

  NotificationActionService() {
    notificationAction
        .setMethodCallHandler(handleNotificationActionCall);
  }

  Stream get actionTriggered => actionTriggeredController.stream;

  Future<void> triggerAction({action: String}) async {

    if (!actionMappings.containsKey(action)) {
      return;
    }

    actionTriggeredController.add(actionMappings[action]);
  }

  Future<void> checkLaunchAction() async {
    final launchAction = await notificationAction.invokeMethod(getLaunchActionChannelMethod) as String;

    if (launchAction != null) {
      triggerAction(action: launchAction);
    }
  }

  Future<void> handleNotificationActionCall(MethodCall call) async {
    switch (call.method) {
      case triggerActionChannelMethod:
        return triggerAction(action: call.arguments as String);
      default:
        throw MissingPluginException();
        break;
    }
  }
}
注意
這是用來集中處理通知動作的簡單機制,以便使用強型別的列舉,以跨平臺方式處理這些動作。 服務可讓基礎原生平臺在通知承載中指定動作時觸發動作。 它也可讓一般程式代碼在 Flutter 準備好處理動作之後,回溯檢查應用程式啟動期間是否已指定動作。 例如,從通知中心點選通知來啟動應用程式時。
使用下列實作,將新檔案新增至名為
notification_registration_service.dart 資料夾的服務。 import 'dart:convert'; import 'package:flutter/services.dart'; import 'package:http/http.dart' as http; import 'package:push_demo/services/device_installation_service.dart'; import 'package:push_demo/models/device_installation.dart'; import 'package:flutter_secure_storage/flutter_secure_storage.dart'; class NotificationRegistrationService { static const notificationRegistration = const MethodChannel('com.<your_organization>.pushdemo/notificationregistration'); static const String refreshRegistrationChannelMethod = "refreshRegistration"; static const String installationsEndpoint = "api/notifications/installations"; static const String cachedDeviceTokenKey = "cached_device_token"; static const String cachedTagsKey = "cached_tags"; final deviceInstallationService = DeviceInstallationService(); final secureStorage = FlutterSecureStorage(); String baseApiUrl; String apikey; NotificationRegistrationService(this.baseApiUrl, this.apikey) { notificationRegistration .setMethodCallHandler(handleNotificationRegistrationCall); } String get installationsUrl => "$baseApiUrl$installationsEndpoint"; Future<void> deregisterDevice() async { final cachedToken = await secureStorage.read(key: cachedDeviceTokenKey); final serializedTags = await secureStorage.read(key: cachedTagsKey); if (cachedToken == null || serializedTags == null) { return; } var deviceId = await deviceInstallationService.getDeviceId(); if (deviceId.isEmpty) { throw "Unable to resolve an ID for the device."; } var response = await http .delete("$installationsUrl/$deviceId", headers: {"apikey": apikey}); if (response.statusCode != 200) { throw "Deregister request failed: ${response.reasonPhrase}"; } await secureStorage.delete(key: cachedDeviceTokenKey); await secureStorage.delete(key: cachedTagsKey); } Future<void> registerDevice(List<String> tags) async { try { final deviceId = await deviceInstallationService.getDeviceId(); final platform = await deviceInstallationService.getDevicePlatform(); final token = await deviceInstallationService.getDeviceToken(); final deviceInstallation = DeviceInstallation(deviceId, platform, token, tags); final response = await http.put(installationsUrl, body: jsonEncode(deviceInstallation), headers: {"apikey": apikey, "Content-Type": "application/json"}); if (response.statusCode != 200) { throw "Register request failed: ${response.reasonPhrase}"; } final serializedTags = jsonEncode(tags); await secureStorage.write(key: cachedDeviceTokenKey, value: token); await secureStorage.write(key: cachedTagsKey, value: serializedTags); } on PlatformException catch (e) { throw e.message; } catch (e) { throw "Unable to register device: $e"; } } Future<void> refreshRegistration() async { final currentToken = await deviceInstallationService.getDeviceToken(); final cachedToken = await secureStorage.read(key: cachedDeviceTokenKey); final serializedTags = await secureStorage.read(key: cachedTagsKey); if (currentToken == null || cachedToken == null || serializedTags == null || currentToken == cachedToken) { return; } final tags = jsonDecode(serializedTags); return registerDevice(tags); } Future<void> handleNotificationRegistrationCall(MethodCall call) async { switch (call.method) { case refreshRegistrationChannelMethod: return refreshRegistration(); default: throw MissingPluginException(); break; } } }注意
此類別會封裝使用 DeviceInstallationService,以及後端服務的要求來執行必要的註冊、取消註冊和重新整理註冊動作。 只有在您選擇使用 API 金鑰 區段完成
驗證用戶端時,才需要 apiKey 自變數。使用下列實作,將新檔案新增至名為 config.dart 的 lib 資料夾。
class Config {
  static String apiKey = "API_KEY";
  static String backendServiceEndpoint = "BACKEND_SERVICE_ENDPOINT";
}
注意
這是用來定義應用程式秘密的簡單方式。 將佔位元值取代為您自己的值。 當您建置後端服務時,應該會記下這些專案。 API 應用程式 URL 應
https://<api_app_name>.azurewebsites.net/。 只有在您選擇使用 API 金鑰 區段完成驗證用戶端時,才需要 apiKey 成員。請務必將此內容新增至您的 gitignore 檔案,以避免將這些秘密認可至原始檔控制。
實作跨平臺UI
在 main_page.dart中,將 組建 函式取代為下列專案。
@override
Widget build(BuildContext context) {
return Scaffold(
    body: Padding(
      padding: const EdgeInsets.symmetric(horizontal: 20.0, vertical: 40.0),
      child: Column(
        mainAxisAlignment: MainAxisAlignment.end,
        crossAxisAlignment: CrossAxisAlignment.stretch,
        children: <Widget>[
          FlatButton(
            child: Text("Register"),
            onPressed: registerButtonClicked,
          ),
          FlatButton(
            child: Text("Deregister"),
            onPressed: deregisterButtonClicked,
          ),
        ],
      ),
    ),
  );
}
將必要匯入新增至 main_page.dart 檔案頂端。
import 'package:push_demo/services/notification_registration_service.dart';
import 'config.dart';
將欄位新增至 _MainPageState 類別,以儲存 NotificationRegistrationService的參考。
final notificationRegistrationService = NotificationRegistrationService(Config.backendServiceEndpoint, Config.apiKey);在 _MainPageState 類別中,實作 Register 和 Deregister 按鈕的事件處理程式,onPressed 事件。 呼叫對應的 Register/Deregister 方法,然後顯示警示以指出結果。
void registerButtonClicked() async {
    try {
      await notificationRegistrationService.registerDevice(List<String>());
      await showAlert(message: "Device registered");
    }
    catch (e) {
      await showAlert(message: e);
    }
  }

  void deregisterButtonClicked() async {
    try {
      await notificationRegistrationService.deregisterDevice();
      await showAlert(message: "Device deregistered");
    }
    catch (e) {
      await showAlert(message: e);
    }
  }

  Future<void> showAlert({ message: String }) async {
    return showDialog<void>(
      context: context,
      barrierDismissible: false,
      builder: (BuildContext context) {
        return AlertDialog(
          title: Text('PushDemo'),
          content: SingleChildScrollView(
            child: ListBody(
              children: <Widget>[
                Text(message),
              ],
            ),
          ),
          actions: <Widget>[
            FlatButton(
              child: Text('OK'),
              onPressed: () {
                Navigator.of(context).pop();
              },
            ),
          ],
        );
      },
    );
  }
現在,在main.dart
中,請確定檔案頂端有下列匯入。 import 'package:flutter/material.dart'; import 'package:push_demo/models/push_demo_action.dart'; import 'package:push_demo/services/notification_action_service.dart'; import 'package:push_demo/main_page.dart';宣告變數以儲存 NotificationActionService 實例的參考, 並將其初始化。
final notificationActionService = NotificationActionService();新增函式,以處理觸發動作時警示的顯示。
void notificationActionTriggered(PushDemoAction action) {
  showActionAlert(message: "${action.toString().split(".")[1]} action received");
}

Future<void> showActionAlert({ message: String }) async {
  return showDialog<void>(
    context: navigatorKey.currentState.overlay.context,
    barrierDismissible: false,
    builder: (BuildContext context) {
      return AlertDialog(
        title: Text('PushDemo'),
        content: SingleChildScrollView(
          child: ListBody(
            children: <Widget>[
              Text(message),
            ],
          ),
        ),
        actions: <Widget>[
          FlatButton(
            child: Text('OK'),
            onPressed: () {
              Navigator.of(context).pop();
            },
          ),
        ],
      );
    },
  );
}
更新 主要 函式,觀察 NotificationActionServiceactionTriggered 數據流,並檢查在應用程式啟動期間擷取的任何動作。
void main() async {
  runApp(MaterialApp(home: MainPage(), navigatorKey: navigatorKey,));
  notificationActionService.actionTriggered.listen((event) { notificationActionTriggered(event as PushDemoAction); });
  await notificationActionService.checkLaunchAction();
}
注意
這隻是為了示範推播通知動作的接收和傳播。 一般而言,這些會以無訊息方式處理,例如流覽至特定檢視或重新整理某些數據,而不是在此案例中顯示警示。
設定原生 Android 專案以進行推播通知
新增Google Services JSON 檔案
[控件] 按兩下 ],然後選擇 [在 Android Studio 中開啟]android 資料夾中的 [。 然後,切換至 Project 檢視(如果尚未開啟)。 在 Firebase 控制台中設定 PushDemo 專案時,找出您稍早下載的 google-services.json 檔案。 然後,將它拖曳到 應用程式 模組根目錄 (android>android>應用程式)。
設定組建設定和許可權
將 Project 檢視切換為 Android。
開啟 AndroidManifest.xml,然後在結尾 標籤之前,於 應用程式 專案後面新增 INTERNET 和 READ_PHONE_STATE 許可權。
<manifest>
    <application>...</application>
    <uses-permission android:name="android.permission.INTERNET" />
    <uses-permission android:name="android.permission.READ_PHONE_STATE" />
</manifest>
新增 Firebase SDK
在 Android Studio中,開啟專案層級 build.gradle 檔案 (Gradle Scripts>build.gradle (Project: android))。 並確定您在
buildscript>相依性 節點中有 'com.google.gms:google-services' classpath。buildscript { repositories { // Check that you have the following line (if not, add it): google() // Google's Maven repository } dependencies { // ... // Add the following line: classpath 'com.google.gms:google-services:4.3.3' // Google Services plugin } } allprojects { // ... repositories { // Check that you have the following line (if not, add it): google() // Google's Maven repository // ... } }注意
請確定您在建立 Android Project時,依照 Firebase 控制台 中提供的指示來參考最新版本。
在應用層級 build.gradle 檔案中(Gradle 腳本>build.gradle (Module: app)),套用 Google Services Gradle 外掛程式。 在 android 節點上方套用外掛程式。
// ...

// Add the following line:
apply plugin: 'com.google.gms.google-services'  // Google Services plugin

android {
  // ...
}
在相同的檔案中,在 [相依性] 節點中,新增 Cloud Messaging Android 連結庫的相依性。
dependencies {
    // ...
    implementation 'com.google.firebase:firebase-messaging:20.2.0'
}
注意
請確定您根據 雲端通訊 Android 用戶端檔參考最新版本。
儲存變更,然後按下 [[ 立即同步處理] 按鈕(從工具列提示字元 使用 Gradle 檔案同步處理專案。
處理Android的推播通知
在
Android Studio 中,Control 單擊 。com 上的 your_organization .pushdemo 套件資料夾 ( app src main kotlin ]],從 [新增 ] 菜單選擇[套件 ]。 輸入 服務 做為名稱,然後按 Return。控件 + 單擊 [服務] 資料夾上的 [],從 [新增] 功能表選擇 [Kotlin 檔案/類別]。 輸入 DeviceInstallationService 作為名稱,然後按 Return。
使用下列程式代碼實作 DeviceInstallationService。
package com.<your_organization>.pushdemo.services

import android.annotation.SuppressLint
import android.content.Context
import android.provider.Settings.Secure
import com.google.android.gms.common.ConnectionResult
import com.google.android.gms.common.GoogleApiAvailability
import io.flutter.embedding.engine.FlutterEngine
import io.flutter.plugin.common.MethodCall
import io.flutter.plugin.common.MethodChannel

@SuppressLint("HardwareIds")
class DeviceInstallationService {

    companion object {
        const val DEVICE_INSTALLATION_CHANNEL = "com.<your_organization>.pushdemo/deviceinstallation"
        const val GET_DEVICE_ID = "getDeviceId"
        const val GET_DEVICE_TOKEN = "getDeviceToken"
        const val GET_DEVICE_PLATFORM = "getDevicePlatform"
    }

    private var context: Context
    private var deviceInstallationChannel : MethodChannel

    val playServicesAvailable
        get() = GoogleApiAvailability.getInstance().isGooglePlayServicesAvailable(context) == ConnectionResult.SUCCESS

    constructor(context: Context, flutterEngine: FlutterEngine) {
        this.context = context
        deviceInstallationChannel = MethodChannel(flutterEngine.dartExecutor.binaryMessenger, DEVICE_INSTALLATION_CHANNEL)
        deviceInstallationChannel.setMethodCallHandler { call, result -> handleDeviceInstallationCall(call, result) }
    }

    fun getDeviceId() : String
        = Secure.getString(context.applicationContext.contentResolver, Secure.ANDROID_ID)

    fun getDeviceToken() : String {
        if(!playServicesAvailable) {
            throw Exception(getPlayServicesError())
        }

        // TODO: Revisit once we have created the PushNotificationsFirebaseMessagingService
        val token = "Placeholder_Get_Value_From_FirebaseMessagingService_Implementation"

        if (token.isNullOrBlank()) {
            throw Exception("Unable to resolve token for FCM.")
        }

        return token
    }

    fun getDevicePlatform() : String = "fcm"

    private fun handleDeviceInstallationCall(call: MethodCall, result: MethodChannel.Result) {
        when (call.method) {
            GET_DEVICE_ID -> {
                result.success(getDeviceId())
            }
            GET_DEVICE_TOKEN -> {
                getDeviceToken(result)
            }
            GET_DEVICE_PLATFORM -> {
                result.success(getDevicePlatform())
            }
            else -> {
                result.notImplemented()
            }
        }
    }

    private fun getDeviceToken(result: MethodChannel.Result) {
        try {
            val token = getDeviceToken()
            result.success(token)
        }
        catch (e: Exception) {
            result.error("ERROR", e.message, e)
        }
    }

    private fun getPlayServicesError(): String {
        val resultCode = GoogleApiAvailability.getInstance().isGooglePlayServicesAvailable(context)

        if (resultCode != ConnectionResult.SUCCESS) {
            return if (GoogleApiAvailability.getInstance().isUserResolvableError(resultCode)){
                GoogleApiAvailability.getInstance().getErrorString(resultCode)
            } else {
                "This device is not supported"
            }
        }

        return "An error occurred preventing the use of push notifications"
    }
}
注意
這個類別會實作
com.<your_organization>.pushdemo/deviceinstallation通道的平臺特定對應專案。 這是在 app DeviceInstallationService.dart內的 Flutter 部分定義。 在此情況下,會從一般程式代碼呼叫原生主機。 請務必將 <your_organization> 取代為您自己的組織,無論使用這個位置。此類別提供唯一標識碼(使用 Secure.AndroidId),作為通知中樞註冊承載的一部分。
將另一個
Kotlin 檔案/類別 新增至名為NotificationRegistrationService 資料夾的服務,然後新增下列程序代碼。 package com.<your_organization>.pushdemo.services import io.flutter.embedding.engine.FlutterEngine import io.flutter.plugin.common.MethodChannel class NotificationRegistrationService { companion object { const val NOTIFICATION_REGISTRATION_CHANNEL = "com.<your_organization>.pushdemo/notificationregistration" const val REFRESH_REGISTRATION = "refreshRegistration" } private var notificationRegistrationChannel : MethodChannel constructor(flutterEngine: FlutterEngine) { notificationRegistrationChannel = MethodChannel(flutterEngine.dartExecutor.binaryMessenger, NotificationRegistrationService.NOTIFICATION_REGISTRATION_CHANNEL) } fun refreshRegistration() { notificationRegistrationChannel.invokeMethod(REFRESH_REGISTRATION, null) } }注意
這個類別會實作
com.<your_organization>.pushdemo/notificationregistration通道的平臺特定對應專案。 這是在 app 的 Flutter 部分中定義,NotificationRegistrationService.dart。 在此情況下,會從原生主機呼叫通用程序代碼。 同樣地,請小心將 <your_organization> 取代為您自己的組織,無論使用這個位置。將另一個
Kotlin 檔案/類別 新增至名為NotificationActionService 資料夾的服務,然後新增下列程式代碼。 package com.<your_organization>.pushdemo.services import io.flutter.embedding.engine.FlutterEngine import io.flutter.plugin.common.MethodCall import io.flutter.plugin.common.MethodChannel class NotificationActionService { companion object { const val NOTIFICATION_ACTION_CHANNEL = "com.<your_organization>.pushdemo/notificationaction" const val TRIGGER_ACTION = "triggerAction" const val GET_LAUNCH_ACTION = "getLaunchAction" } private var notificationActionChannel : MethodChannel var launchAction : String? = null constructor(flutterEngine: FlutterEngine) { notificationActionChannel = MethodChannel(flutterEngine.dartExecutor.binaryMessenger, NotificationActionService.NOTIFICATION_ACTION_CHANNEL) notificationActionChannel.setMethodCallHandler { call, result -> handleNotificationActionCall(call, result) } } fun triggerAction(action: String) { notificationActionChannel.invokeMethod(NotificationActionService.TRIGGER_ACTION, action) } private fun handleNotificationActionCall(call: MethodCall, result: MethodChannel.Result) { when (call.method) { NotificationActionService.GET_LAUNCH_ACTION -> { result.success(launchAction) } else -> { result.notImplemented() } } } }注意
這個類別會實作
com.<your_organization>.pushdemo/notificationaction通道的平臺特定對應專案。 這是在 NotificationActionService.dart內應用程式的 Flutter 部分所定義。 在此情況下,可以雙向呼叫。 請務必將 <your_organization> 取代為您自己的組織,無論使用這個位置。將新的 Kotlin 檔案/類別 新增至 com。<your_organization>.pushdemo 套件,稱為 pushNotificationsFirebaseMessagingService,然後使用下列程式代碼實作。
package com.<your_organization>.pushdemo

import android.os.Handler
import android.os.Looper
import com.google.firebase.messaging.FirebaseMessagingService
import com.google.firebase.messaging.RemoteMessage
import com.<your_organization>.pushdemo.services.NotificationActionService
import com.<your_organization>.pushdemo.services.NotificationRegistrationService

class PushNotificationsFirebaseMessagingService : FirebaseMessagingService() {

    companion object {
        var token : String? = null
        var notificationRegistrationService : NotificationRegistrationService? = null
        var notificationActionService : NotificationActionService? = null
    }

    override fun onNewToken(token: String) {
        PushNotificationsFirebaseMessagingService.token = token
        notificationRegistrationService?.refreshRegistration()
    }

    override fun onMessageReceived(message: RemoteMessage) {
        message.data.let {
            Handler(Looper.getMainLooper()).post {
                notificationActionService?.triggerAction(it.getOrDefault("action", null))
            }
        }
    }
}
注意
當應用程式在前景執行時,此類別會負責處理通知。 如果動作包含在
onMessageReceived 中收到的通知承載中,它會有條件地呼叫NotificationActionService 上的 。 這也會呼叫triggerAction NotificationRegistrationService ,當覆寫 onNewToken 函式refreshRegistration Firebase 令牌時,重新產生。 再一次,請小心用您自己的組織取代 <your_organization>。
在 AndroidManifest.xml (app>src>main),將 PushNotificationsFirebaseMessagingService 新增至具有
com.google.firebase.MESSAGING_EVENT意圖篩選 應用程式 專案的底部。<manifest> <application> <!-- EXISTING MANIFEST CONTENT --> <service android:name="com.<your_organization>.pushdemo.PushNotificationsFirebaseMessagingService" android:exported="false"> <intent-filter> <action android:name="com.google.firebase.MESSAGING_EVENT" /> </intent-filter> </service> </application> </manifest>回到 DeviceInstallationService中,確定檔案頂端有下列匯入。
package com.<your_organization>.pushdemo
import com.<your_organization>.pushdemo.services.PushNotificationsFirebaseMessagingService
注意
以您自己的組織值取代 <your_organization>。
更新佔位元文字 Placeholder_Get_Value_From_FirebaseMessagingService_Implementation,以從 PushNotificationFirebaseMessagingService取得令牌值。
fun getDeviceToken() : String {
    if(!playServicesAvailable) {
        throw Exception(getPlayServicesError())
    }

    // Get token from the PushNotificationsFirebaseMessagingService.token field.
    val token = PushNotificationsFirebaseMessagingService.token

    if (token.isNullOrBlank()) {
        throw Exception("Unable to resolve token for FCM.")
    }

    return token
}
在 MainActivity中,確定檔案頂端有下列匯入。
package com.<your_organization>.pushdemo

import android.content.Intent
import android.os.Bundle
import com.google.android.gms.tasks.OnCompleteListener
import com.google.firebase.iid.FirebaseInstanceId
import com.<your_organization>.pushdemo.services.DeviceInstallationService
import com.<your_organization>.pushdemo.services.NotificationActionService
import com.<your_organization>.pushdemo.services.NotificationRegistrationService
import io.flutter.embedding.android.FlutterActivity
注意
以您自己的組織值取代 <your_organization>。
新增變數以儲存 DeviceInstallationService的參考。
private lateinit var deviceInstallationService: DeviceInstallationService新增名為 processNotificationActions 的函式,以檢查 意圖 是否有名為 動作的額外值。 有條件地觸發該動作,或在應用程式啟動期間處理動作時儲存該動作以供稍後使用。
 private fun processNotificationActions(intent: Intent, launchAction: Boolean = false) {
    if (intent.hasExtra("action")) {
        var action = intent.getStringExtra("action");

        if (action.isNotEmpty()) {
            if (launchAction) {
                PushNotificationsFirebaseMessagingService.notificationActionService?.launchAction = action
            }
            else {
                PushNotificationsFirebaseMessagingService.notificationActionService?.triggerAction(action)
            }
        }
    }
}
覆寫 onNewIntent 函式上的
,以呼叫 processNotificationActions 。override fun onNewIntent(intent: Intent) { super.onNewIntent(intent) processNotificationActions(intent) }注意
由於
MainActivity 的LaunchMode 設定為SingleTop ,因此會透過將 意圖 傳送至現有的Activity SingleTop ,因此會透過將 意圖 傳送至現有的Activity SingleTop ,因此會透過將 意圖 傳送至現有的Activity SingleTop ,因此會透過將 函式,而不是 onCreate 函式意圖 傳送至現有的Activity 的 LaunchMode 設定為SingleTop 實例NewIntent,因此您必須在 onCreate 和 onNewIntent 函式中處理傳入 Intent 。覆寫 onCreate 函式上的
,將 deviceInstallationService 設定為 deviceInstallationService的新實例。 override fun onCreate(savedInstanceState: Bundle?) { super.onCreate(savedInstanceState) flutterEngine?.let { deviceInstallationService = DeviceInstallationService(context, it) } }在 pushNotificationFirebaseMessagingServices
上設定 notificationActionService 和notificationRegistrationService 属性。flutterEngine?.let { deviceInstallationService = DeviceInstallationService(context, it) PushNotificationsFirebaseMessagingService.notificationActionService = NotificationActionService(it) PushNotificationsFirebaseMessagingService.notificationRegistrationService = NotificationRegistrationService(it) }在相同的函式中,有條件地呼叫 FirebaseInstanceId.getInstance()。instanceId。 實作
OnCompleteListener ,在呼叫refreshRegistration 之前,先在 PushNotificationFirebaseMessagingService上設定產生的 令牌 值。if(deviceInstallationService?.playServicesAvailable) { FirebaseInstanceId.getInstance().instanceId .addOnCompleteListener(OnCompleteListener { task -> if (!task.isSuccessful) return@OnCompleteListener PushNotificationsFirebaseMessagingService.token = task.result?.token PushNotificationsFirebaseMessagingService.notificationRegistrationService?.refreshRegistration() }) }仍在 onCreate
中,呼叫 函式結尾的 processNotificationActions 。 針對 launchAction 自變數使用 true true,表示正在應用程式啟動期間處理此動作。processNotificationActions(this.intent, true)
注意
每次執行應用程式並停止偵錯會話時,都必須重新註冊應用程式,才能繼續接收推播通知。
設定推播通知的原生 iOS 專案
設定執行器目標和 Info.plist
在
Visual Studio Code 中,Control 按兩下 ],然後選擇 [在 Xcode中開啟]ios 資料夾中的 [。 在
Xcode 中,按兩下 [執行器][執行器 ],按兩下頂端xcodeproj ,而不是資料夾),然後選取執行器 目標,然後簽署 & 功能 。 選取 [所有 建置組態] 後,為 Team選擇您的開發人員帳戶。 確定已核取 [自動管理簽署] 選項,並自動選取您的簽署憑證和布建配置檔。注意
如果您沒有看到新的布建配置檔值,請嘗試選取 [Xcode>喜好設定]> [帳戶] 來重新整理簽署身分識別的配置檔,然後選取 [下載手動配置檔] 按鈕以下載配置檔。
按兩下 [+ 功能],然後搜尋 [推播通知]。
按兩下 , 以新增此功能。推播通知 開啟 Info.plist,並將 最低系統版本 設定為 13.0。
注意
本教學課程的目的,僅支援執行 iOS 13.0 和更新版本的裝置,不過您可以擴充它以支持執行舊版的裝置。
開啟 Runner.entitlements,並確定 APS 環境 設定設為 開發。
處理 iOS 的推播通知
Control + 按兩下 [執行器] [執行器] 資料夾中的 [],然後選擇 [使用 Services 作為名稱的新群組]。
控件 按兩下 [ ],然後選擇 [Services ] 資料夾上的 [[新增檔案...] 。然後,選擇 [Swift 檔案 ],然後按兩下 [下一步]。 針對名稱指定 DeviceInstallationService ,然後按兩下 [建立]。 使用下列程式代碼實作 DeviceInstallationService.swift。
import Foundation

class DeviceInstallationService {

    enum DeviceRegistrationError: Error {
        case notificationSupport(message: String)
    }

    var token : Data? = nil

    let DEVICE_INSTALLATION_CHANNEL = "com.<your_organization>.pushdemo/deviceinstallation"
    let GET_DEVICE_ID = "getDeviceId"
    let GET_DEVICE_TOKEN = "getDeviceToken"
    let GET_DEVICE_PLATFORM = "getDevicePlatform"

    private let deviceInstallationChannel : FlutterMethodChannel

    var notificationsSupported : Bool {
        get {
            if #available(iOS 13.0, *) {
                return true
            }
            else {
                return false
            }
        }
    }

    init(withBinaryMessenger binaryMessenger : FlutterBinaryMessenger) {
        deviceInstallationChannel = FlutterMethodChannel(name: DEVICE_INSTALLATION_CHANNEL, binaryMessenger: binaryMessenger)
        deviceInstallationChannel.setMethodCallHandler(handleDeviceInstallationCall)
    }

    func getDeviceId() -> String {
        return UIDevice.current.identifierForVendor!.description
    }

    func getDeviceToken() throws -> String {
        if(!notificationsSupported) {
            let notificationSupportError = getNotificationsSupportError()
            throw DeviceRegistrationError.notificationSupport(message: notificationSupportError)
        }

        if (token == nil) {
            throw DeviceRegistrationError.notificationSupport(message: "Unable to resolve token for APNS.")
        }

        return token!.reduce("", {$0 + String(format: "%02X", $1)})
    }

    func getDevicePlatform() -> String {
        return "apns"
    }

    private func handleDeviceInstallationCall(call: FlutterMethodCall, result: @escaping FlutterResult) {
        switch call.method {
        case GET_DEVICE_ID:
            result(getDeviceId())
        case GET_DEVICE_TOKEN:
            getDeviceToken(result: result)
        case GET_DEVICE_PLATFORM:
            result(getDevicePlatform())
        default:
            result(FlutterMethodNotImplemented)
        }
    }

    private func getDeviceToken(result: @escaping FlutterResult) {
        do {
            let token = try getDeviceToken()
            result(token)
        }
        catch let error {
            result(FlutterError(code: "UNAVAILABLE", message: error.localizedDescription, details: nil))
        }
    }

    private func getNotificationsSupportError() -> String {

        if (!notificationsSupported) {
            return "This app only supports notifications on iOS 13.0 and above. You are running \(UIDevice.current.systemVersion)"
        }

        return "An error occurred preventing the use of push notifications."
    }
}
注意
這個類別會實作
com.<your_organization>.pushdemo/deviceinstallation通道的平臺特定對應專案。 這是在 app DeviceInstallationService.dart內的 Flutter 部分定義。 在此情況下,會從一般程式代碼呼叫原生主機。 請務必將 <your_organization> 取代為您自己的組織,無論使用這個位置。此類別提供唯一標識碼(使用 UIDevice.identifierForVendor 值),作為通知中樞註冊承載的一部分。
將另一個 Swift 檔案 新增至名為 NotificationRegistrationService的 Services 資料夾,然後新增下列程式代碼。
import Foundation

class NotificationRegistrationService {

    let NOTIFICATION_REGISTRATION_CHANNEL = "com.<your_organization>.pushdemo/notificationregistration"
    let REFRESH_REGISTRATION = "refreshRegistration"

    private let notificationRegistrationChannel : FlutterMethodChannel

    init(withBinaryMessenger binaryMessenger : FlutterBinaryMessenger) {
       notificationRegistrationChannel = FlutterMethodChannel(name: NOTIFICATION_REGISTRATION_CHANNEL, binaryMessenger: binaryMessenger)
    }

    func refreshRegistration() {
        notificationRegistrationChannel.invokeMethod(REFRESH_REGISTRATION, arguments: nil)
    }
}
注意
這個類別會實作
com.<your_organization>.pushdemo/notificationregistration通道的平臺特定對應專案。 這是在 app 的 Flutter 部分中定義,NotificationRegistrationService.dart。 在此情況下,會從原生主機呼叫通用程序代碼。 同樣地,請小心將 <your_organization> 取代為您自己的組織,無論使用這個位置。將另一個 Swift 檔案 新增至名為 NotificationActionService的 Services 資料夾,然後新增下列程序代碼。
import Foundation

class NotificationActionService {

    let NOTIFICATION_ACTION_CHANNEL = "com.<your_organization>.pushdemo/notificationaction"
    let TRIGGER_ACTION = "triggerAction"
    let GET_LAUNCH_ACTION = "getLaunchAction"

    private let notificationActionChannel: FlutterMethodChannel

    var launchAction: String? = nil

    init(withBinaryMessenger binaryMessenger: FlutterBinaryMessenger) {
        notificationActionChannel = FlutterMethodChannel(name: NOTIFICATION_ACTION_CHANNEL, binaryMessenger: binaryMessenger)
        notificationActionChannel.setMethodCallHandler(handleNotificationActionCall)
    }

    func triggerAction(action: String) {
       notificationActionChannel.invokeMethod(TRIGGER_ACTION, arguments: action)
    }

    private func handleNotificationActionCall(call: FlutterMethodCall, result: @escaping FlutterResult) {
        switch call.method {
        case GET_LAUNCH_ACTION:
            result(launchAction)
        default:
            result(FlutterMethodNotImplemented)
        }
    }
}
注意
這個類別會實作
com.<your_organization>.pushdemo/notificationaction通道的平臺特定對應專案。 這是在 NotificationActionService.dart內應用程式的 Flutter 部分所定義。 在此情況下,可以雙向呼叫。 請務必將 <your_organization> 取代為您自己的組織,無論使用這個位置。在 AppDelegate.swift中,新增變數來儲存您先前建立之服務的參考。
var deviceInstallationService : DeviceInstallationService?
var notificationRegistrationService : NotificationRegistrationService?
var notificationActionService : NotificationActionService?
新增名為 processNotificationActions 的函式, 來處理通知數據。 有條件地觸發該動作,或在應用程式啟動期間處理動作時儲存該動作以供稍後使用。
func processNotificationActions(userInfo: [AnyHashable : Any], launchAction: Bool = false) {
    if let action = userInfo["action"] as? String {
        if (launchAction) {
            notificationActionService?.launchAction = action
        }
        else {
            notificationActionService?.triggerAction(action: action)
        }
    }
}
覆寫 didRegisterForRemoteNotificationsWithDeviceToken 函式,為 DeviceInstallationService設定 令牌 值。 然後,在 NotificationRegistrationService上呼叫 refreshRegistration 。
override func application(_ application: UIApplication, didRegisterForRemoteNotificationsWithDeviceToken deviceToken: Data) {
  deviceInstallationService?.token = deviceToken
  notificationRegistrationService?.refreshRegistration()
}
覆寫 didReceiveRemoteNotification 函式,將 userInfo 自變數傳遞至 processNotificationActions 函式。
override func application(_ application: UIApplication, didReceiveRemoteNotification userInfo: [AnyHashable : Any]) {
    processNotificationActions(userInfo: userInfo)
}
覆寫 didFailToRegisterForRemoteNotificationsWithError 函式來記錄錯誤。
override func application(_ application: UIApplication, didFailToRegisterForRemoteNotificationsWithError error: Error) {
    print(error);
}
注意
這在很大程度上是佔位元。 您要針對生產案例實作適當的記錄和錯誤處理。
在 didFinishLaunchingWithOptions中,具現化 deviceInstallationService、notificationRegistrationService和 notificationActionService 變數。
let controller : FlutterViewController = window?.rootViewController as! FlutterViewController

deviceInstallationService = DeviceInstallationService(withBinaryMessenger: controller.binaryMessenger)
notificationRegistrationService = NotificationRegistrationService(withBinaryMessenger: controller.binaryMessenger)
notificationActionService = NotificationActionService(withBinaryMessenger: controller.binaryMessenger)
在相同的函式中,有條件地要求授權並註冊遠端通知。
if #available(iOS 13.0, *) {
  UNUserNotificationCenter.current().requestAuthorization(options: [.alert, .sound, .badge]) {
      (granted, error) in

      if (granted)
      {
          DispatchQueue.main.async {
              let pushSettings = UIUserNotificationSettings(types: [.alert, .sound, .badge], categories: nil)
              application.registerUserNotificationSettings(pushSettings)
              application.registerForRemoteNotifications()
          }
      }
  }
}
如果 launchOptions 包含 remoteNotification 機碼,請在 didFinishLaunchingWithOptions 函式結尾 呼叫 processNotificationActions。 傳入產生的 userInfo 物件,並使用 true true for the launchAction 自變數。 true 值表示在應用程式啟動期間正在處理動作。
if let userInfo = launchOptions?[.remoteNotification] as? [AnyHashable : Any] {
    processNotificationActions(userInfo: userInfo, launchAction: true)
}
測試解決方案
您現在可以透過後端服務測試傳送通知。
傳送測試通知
在 Postman中開啟新的索引標籤。
將要求設定為 POST,然後輸入下列位址:
https://<app_name>.azurewebsites.net/api/notifications/requests如果您選擇使用 API 金鑰 區段完成
驗證用戶端,請務必設定要求標頭以包含您的 apikey 值。鑰匙 價值 apikey <your_api_key> 選擇 Body的原始 選項,然後從格式選項清單中選擇 [JSON],然後包含部分佔位元 JSON 內容:
{
    "text": "Message from Postman!",
    "action": "action_a"
}
選取 [程序代碼] 按鈕,該按鈕位於視窗右上方的 [儲存] 按鈕底下。 針對 HTML 顯示時,要求看起來應該類似下列範例(視您是否包含 apikey 標頭而定):
POST /api/notifications/requests HTTP/1.1
Host: https://<app_name>.azurewebsites.net
apikey: <your_api_key>
Content-Type: application/json

{
    "text": "Message from backend service",
    "action": "action_a"
}
在一或兩個目標平臺上執行 PushDemo 應用程式 (Android 和 iOS)。
注意
如果您要在 Android 測試,請確定您未在 Debug中執行,或執行應用程式來部署應用程式,然後強制關閉應用程式,然後從啟動器重新啟動它。
在 PushDemo 應用程式中,點選 [註冊] 按鈕。
回到
Postman ,然後按兩下 [傳送] 按鈕 。 驗證您是否在Postman
200 OK 回應,且警示會出現在應用程式中,其中顯示收到ActionA 動作。 關閉 PushDemo 應用程式,然後在 Postman中再次 按兩下 [傳送] 按鈕。
驗證您是否再次在 Post man
中取得 200 OK 回應。 使用正確的訊息驗證 PushDemo 應用程式的通知區域中是否出現通知。點選通知以確認它已開啟應用程式,並顯示已收到 警示
ActionA 動作。 回到 Postman中,修改前一個要求本文以傳送無訊息通知,指定 action_b,而不是針對 動作 值 action_a。
{
    "action": "action_b",
    "silent": true
}
當應用程式仍然開啟時,按兩下postman
中的 [傳送 ] 按鈕。驗證您在
Postman 200 OK 回應,且警示會出現在應用程式中,其中顯示收到ActionB 動作,而不是收到 ActionA 動作。 關閉 PushDemo 應用程式,然後在 Postman中再次 按兩下 [傳送] 按鈕。
驗證您是否在 Postman 中取得 200 OK 回應,且無訊息通知不會出現在通知區域中。
故障排除
後端服務沒有回應
在本機測試時,請確定後端服務正在執行,並使用正確的埠。
如果針對 azure API 應用程式
請務必檢查您已在 Postman 或透過客戶端測試時,於行動應用程式組態中正確指定基位址。 在本機測試時,基地址應該表示 https://<api_name>.azurewebsites.net/ 或 https://localhost:5001/。
啟動或停止偵錯會話之後,未在Android上收到通知
請確定您在啟動或停止偵錯會話之後再次註冊。 調試程式會導致產生新的 Firebase 令牌。 通知中樞安裝也必須更新。
從後端服務接收 401 狀態代碼
驗證您要設定 apikey 要求標頭,且此值符合您為後端服務設定的值。
如果您在本機測試時收到此錯誤,請確定您在用戶端設定中定義的密鑰值,符合 API所使用的 Authentication:ApiKey 使用者設定值。
如果您要使用 API 應用程式進行測試,請確定用戶端設定檔中的金鑰值符合您在 API App中使用的應用程式設定 Authentication:ApiKey 應用程式設定。
注意
如果您在部署後端服務之後已建立或變更此設定,則必須重新啟動服務,才能生效。
如果您選擇不使用 API 金鑰 區段完成
從後端服務接收 404 狀態代碼
驗證端點和 HTTP 要求方法是否正確。 例如,端點應該表示為:
-
[PUT]
https://<api_name>.azurewebsites.net/api/notifications/installations -
[DELETE]
https://<api_name>.azurewebsites.net/api/notifications/installations/<installation_id> -
[POST]
https://<api_name>.azurewebsites.net/api/notifications/requests
或在本機測試時:
-
[PUT]
https://localhost:5001/api/notifications/installations -
[DELETE]
https://localhost:5001/api/notifications/installations/<installation_id> -
[POST]
https://localhost:5001/api/notifications/requests
在用戶端應用程式中指定基位址時,請確定它以 /結尾。 在本機測試時,基地址應該表示 https://<api_name>.azurewebsites.net/ 或 https://localhost:5001/。
無法註冊並顯示通知中樞錯誤訊息
確認測試裝置具有網路連線能力。 然後,藉由設定斷點來檢查 HttpResponse中的 StatusCode 屬性值,以判斷 Http 回應狀態代碼。
檢閱先前根據狀態代碼適用的疑難解答建議。
在各 API 傳回這些特定狀態代碼的行上設定斷點。 然後在本機偵錯時嘗試呼叫後端服務。
使用適當的承載,驗證後端服務是否如預期般運作,Postman。 針對有問題的平臺,使用用戶端程式代碼所建立的實際承載。
檢閱平臺特定的組態區段,以確保未遺漏任何步驟。 檢查是否有適當的值已針對適當的平臺解析 installation id 和 token 變數。
無法解析裝置錯誤訊息的識別碼
檢閱平臺特定的組態區段,以確保未遺漏任何步驟。
相關連結
- Azure 通知中樞概觀
- 在macOS 上安裝 Flutter
- 在 Windows 上安裝 Flutter
- 通知中樞 SDK 進行後端作業
- GitHub 上的 通知中樞 SDK
- 向應用程式後端註冊
- 註冊管理
- 使用標籤
- 使用自定義範本
後續步驟
您現在應該已透過後端服務連線到通知中樞的基本 Flutter 應用程式,而且可以傳送和接收通知。
您可能需要調整本教學課程中使用的範例,以符合您自己的案例。 也建議實作更健全的錯誤處理、重試邏輯和記錄。
Visual Studio App Center 可快速併入行動應用程式,以提供 分析 和 診斷,以協助進行疑難解答。