注意
為了獲得更大的功能, PyTorch 也可以與 Windows 上的 DirectML 搭配使用。
在本教學課程的上一個部分中,您已瞭解如何以 ONNX 格式建置和導出模型。 現在,我們將示範如何將導出的模型內嵌至 Windows 應用程式,並藉由呼叫 WinML API 在裝置上本機執行。
完成時,您將有一個可運作的影像分類應用程式。
關於範例應用程式
在本教學課程的此步驟中,您將建立可使用 ML 模型分類影像的應用程式。 其基本 UI 可讓您從本機裝置選取影像,並使用您在上一個元件中建置和定型的 ONNX 模型分類來分類影像。 然後,模型所傳回的標籤會顯示在影像旁邊。
在這裡,我們將逐步引導您完成該程式。
注意
如果您選擇使用預先定義的程式代碼範例,則可以複製 方案檔。 複製存放庫、流覽至此範例,並使用 Visual Studio 開啟 classifierPyTorch.sln 檔案。跳至此頁面的 [啟動應用程式 ] 部分,以查看其使用中。
接下來,我們將引導您如何建立應用程式並新增 Windows ML 程式代碼。
建立 Windows ML UWP (C#)
若要建立運作中的 Windows ML 應用程式,您必須執行下列動作:
- 載入機器學習模型。
- 以必要格式載入影像。
- 系結模型的輸入和輸出。
- 評估模型並顯示有意義的結果。
您也需要建立基本UI,因為很難在命令行中建立令人滿意的影像型應用程式。
在 Visual Studio 中開啟新專案
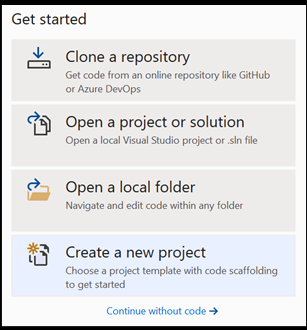
- 現在就開始吧。 開啟 Visual Studio 並選擇 建立新專案。
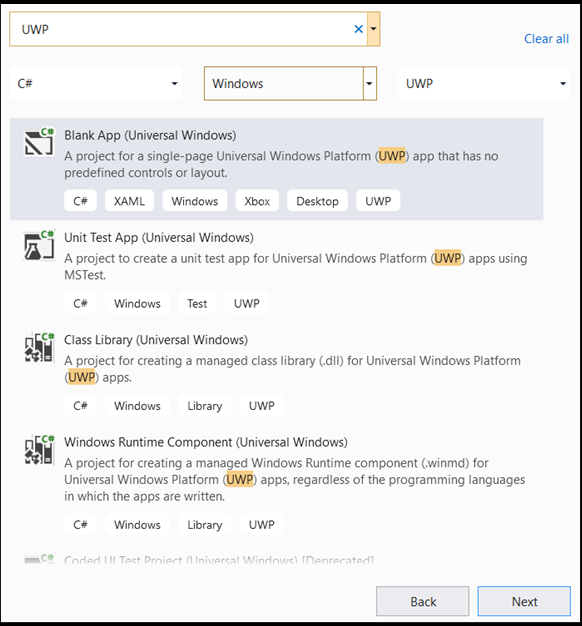
- 在搜尋欄中,輸入
UWP,然後選取Blank APP (Universal Windows)。 這會針對具有預先定義控件或版面配置的單頁 通用 Windows 平台 (UWP) 應用程式開啟 C# 專案。 選取next以開啟專案的組態視窗。
- 在設定視窗中,執行下列動作:
- 命名專案。 在這裡,我們稱之為 分類器PyTorch。
- 選擇專案的位置。
- 如果您使用 VS2019,請確定
Create directory for solution已核取 。 - 如果您使用 VS2017,請確定
Place solution and project in the same directory未核取。
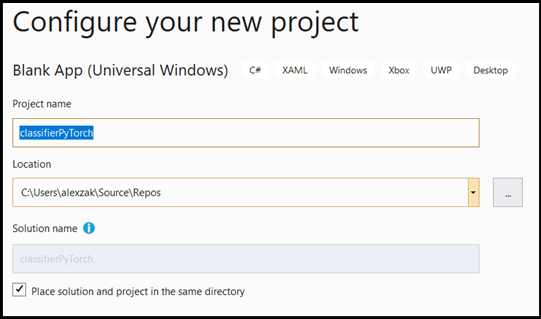
按 create 以建立您的專案。 最低目標版本視窗可能會快顯。 請確定您的最低版本已設定為 Windows 10 版本 1809 (10.0;組建 17763) 或更高版本。
- 建立項目之後,流覽至專案資料夾、開啟 assets 資料夾
[….\classifierPyTorch \Assets],然後將檔案ImageClassifier.onnx複製到此位置。
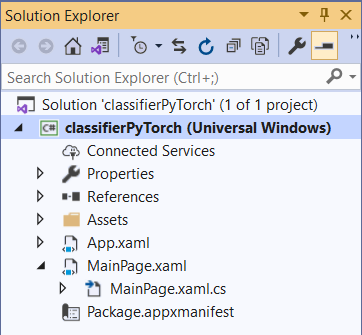
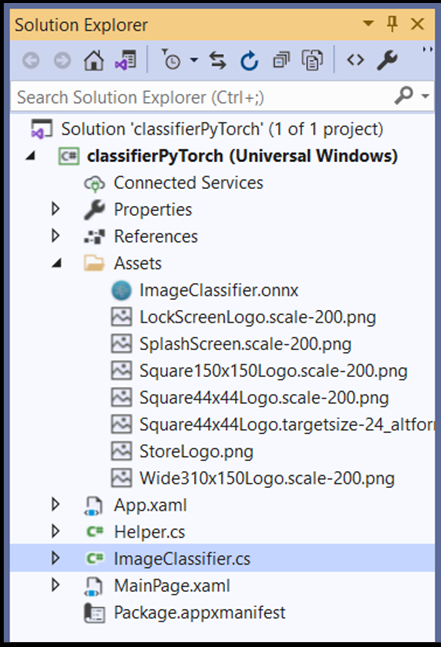
探索專案方案
讓我們探索您的專案方案。
Visual Studio 會自動在 方案總管 內建立數個 cs-code 檔案。
MainPage.xaml 包含 GUI 的 XAML 程式代碼,並 MainPage.xaml.cs 包含您的應用程式程式碼,也稱為程式碼後置。 如果您之前已建立 UWP 應用程式,則這些檔案應該非常熟悉。
建立應用程式 GUI
首先,讓我們為您的應用程式建立簡單的 GUI。
按兩下程式
MainPage.xaml代碼檔案。 在您的空白應用程式中,應用程式的 GUI XAML 範本是空的,因此我們需要新增一些 UI 功能。將下列程式代碼新增至
MainPage.xaml,並<Grid>取代和</Grid>標記。
    <Grid Background="{ThemeResource ApplicationPageBackgroundThemeBrush}">

        <StackPanel Margin="1,0,-1,0">
            <TextBlock x:Name="Menu"
                       FontWeight="Bold"
                       TextWrapping="Wrap"
                       Margin="10,0,0,0"
                       Text="Image Classification"/>
            <TextBlock Name="space" />
            <Button Name="recognizeButton"
                    Content="Pick Image"
                    Click="OpenFileButton_Click"
                    Width="110"
                    Height="40"
                    IsEnabled="True"
                    HorizontalAlignment="Left"/>
            <TextBlock Name="space3" />
            <Button Name="Output"
                    Content="Result is:"
                    Width="110"
                    Height="40"
                    IsEnabled="True"
                    HorizontalAlignment="Left"
                    VerticalAlignment="Top">
            </Button>
            <!--Display the Result-->
            <TextBlock Name="displayOutput"
                       FontWeight="Bold"
                       TextWrapping="Wrap"
                       Margin="25,0,0,0"
                       Text="" Width="1471" />
            <TextBlock Name="space2" />
            <!--Image preview -->
            <Image Name="UIPreviewImage" Stretch="Uniform" MaxWidth="300" MaxHeight="300"/>
        </StackPanel>
    </Grid>
使用 Windows ML 程式代碼產生器將模型新增至專案 (mlgen)
Windows Machine Learning 程式代碼產生器或 mlgen 是 Visual Studio 擴充功能,可協助您開始使用 UWP app 上的 WinML API。 當您將定型的 ONNX 檔案新增至 UWP 專案時,它會產生範本程式代碼。
Windows 機器學習 的程式代碼產生器 mlgen 會建立介面(適用於 C#、C++/WinRT 和 C++/CX),其中包含為您呼叫 Windows ML API 的包裝函式類別。 這可讓您輕鬆地載入、系結及評估專案中的模型。 在本教學課程中,我們將使用它來處理其中許多函式。
程式代碼產生器適用於 Visual Studio 2017 和更新版本。 我們建議使用Visual Studio。 請注意,在 Windows 10 版本 1903 和更新版本中,mlgen 不再包含在 Windows 10 SDK 中,因此您必須下載並安裝擴充功能。 如果您已遵循本教學課程的簡介,表示您已經處理過此動作,但如果不是,您應該下載 VS 2019 或 VS 2017。
注意
若要深入瞭解 mlgen,請參閱 mlgen 檔
如果您尚未安裝 mlgen,請安裝 mlgen。
以滑鼠右鍵按下
AssetsVisual Studio 中 方案總管 的資料夾,然後選取Add > Existing Item。瀏覽至 內的
classifierPyTorch [….\classifierPyTorch \Assets]assets 資料夾,尋找您先前在該處複製的 ONNX 模型,然後選取add。將 ONNX 模型新增至 VS 中方案總管中的 assets 資料夾之後,專案現在應該會有兩個新的檔案:
-
ImageClassifier.onnx- 這是您的模型,其格式為 ONNX。 -
ImageClassifier.cs– 自動產生的 WinML 程式代碼檔案。
- 若要確定當您編譯應用程式時模型會建置,請選擇檔案
ImageClassifier.onnx並選擇Properties。 針對Build Action,選取Content。
ONNX 檔案程序代碼
現在,讓我們探索檔案中 ImageClassifier.cs 新產生的程序代碼。
產生的程式代碼包含三個類別:
-
ImageClassifierModel:這個類別包含兩個模型具現化和模型評估的方法。 其可協助我們建立機器學習模型表示法、在系統默認裝置上建立會話、將特定輸入和輸出系結至模型,以及以異步方式評估模型。 -
ImageClassifierInput:這個類別會初始化模型預期的輸入類型。 模型輸入取決於輸入數據的模型需求。 -
ImageClassifierOutput:這個類別會初始化模型將輸出的類型。 模型輸出取決於模型定義的方式。
在本教學課程中,我們不想處理張量化。 我們將稍微變更 ImageClassifierInput 類別,以變更輸入數據類型,並讓我們的生活更容易。
- 在檔案中
ImageClassifier.cs進行下列變更:
將 input 變數從 TensorFloat 變更為 ImageFeatureValue。
public sealed class ImageClassifierInput
    {
        public ImageFeatureValue input; // shape(-1,3,32,32)
    }
載入模型
按兩下
MainPage.xaml.cs檔案以開啟應用程式的程式代碼後置。以下列方式取代 「using」 語句,以取得您需要之所有 API 的存取權:
// Specify all the using statements which give us the access to all the APIs that we'll need
using System;
using System.Threading.Tasks;
using Windows.AI.MachineLearning;
using Windows.Graphics.Imaging;
using Windows.Media;
using Windows.Storage;
using Windows.Storage.Pickers;
using Windows.Storage.Streams;
using Windows.UI.Xaml;
using Windows.UI.Xaml.Controls;
using Windows.UI.Xaml.Media.Imaging;
- 在函式上方
MainPage,在您的public MainPage()類別內新增下列變數宣告。
        // All the required fields declaration
        private ImageClassifierModel modelGen;
        private ImageClassifierInput image = new ImageClassifierInput();
        private ImageClassifierOutput results;
        private StorageFile selectedStorageFile;
        private string label = "";
        private float probability = 0;
        private Helper helper = new Helper();

        public enum Labels
        {
            plane,
            car,
            bird,
            cat,
            deer,
            dog,
            frog,
            horse,
            ship,
            truck
        }
現在,您將實作 LoadModel 方法。 方法會存取 ONNX 模型,並將其儲存在記憶體中。 然後,您將使用 CreateFromStreamAsync 方法將模型具現化為 LearningModel 物件。 類別 LearningModel 代表定型的機器學習模型。 具現化之後, LearningModel 就是您用來與 Windows ML 互動的初始物件。
若要載入模型,您可以在 類別中使用 LearningModel 數個靜態方法。 在此情況下,您將使用 CreateFromStreamAsync 方法。
方法 CreateFromStreamAsync 是使用 mlgen 自動建立的,因此您不需要實作這個方法。 您可以按兩下 mlgen 產生的檔案, classifier.cs 以檢閱此方法。
注意
若要深入了解 LearningModel 課程,請檢閱 LearningModel 類別檔。 若要深入瞭解載入模型的其他方式,請檢閱 載入模型檔
- 將呼叫新增至
loadModel主要類別的建構函式。
        // The main page to initialize and execute the model.
        public MainPage()
        {
            this.InitializeComponent();
            loadModel();
        }
- 在該類別內
loadModel新增方法的實作MainPage。
        private async Task loadModel()
        {
            // Get an access the ONNX model and save it in memory.
            StorageFile modelFile = await StorageFile.GetFileFromApplicationUriAsync(new Uri($"ms-appx:///Assets/ImageClassifier.onnx"));
            // Instantiate the model.
            modelGen = await ImageClassifierModel.CreateFromStreamAsync(modelFile);
        }
載入影像
- 我們需要定義 click 事件,以起始模型執行的四個方法呼叫序列 – 轉換、系結和評估、輸出擷取和顯示結果。 將下列方法新增至 類別內的
MainPage.xaml.cs程式MainPage碼檔案。
        // Waiting for a click event to select a file
        private async void OpenFileButton_Click(object sender, RoutedEventArgs e)
        {
            if (!await getImage())
            {
                return;
            }
            // After the click event happened and an input selected, begin the model execution.
            // Bind the model input
            await imageBind();
            // Model evaluation
            await evaluate();
            // Extract the results
            extractResult();
            // Display the results
            await displayResult();
        }
- 現在,您將實作
getImage()方法。 此方法會選取輸入圖像檔,並將它儲存在記憶體中。 將下列方法新增至 類別內的MainPage.xaml.cs程式MainPage碼檔案。
        // A method to select an input image file
        private async Task<bool> getImage()
        {
            try
            {
                // Trigger file picker to select an image file
                FileOpenPicker fileOpenPicker = new FileOpenPicker();
                fileOpenPicker.SuggestedStartLocation = PickerLocationId.PicturesLibrary;
                fileOpenPicker.FileTypeFilter.Add(".jpg");
                fileOpenPicker.FileTypeFilter.Add(".png");
                fileOpenPicker.ViewMode = PickerViewMode.Thumbnail;
                selectedStorageFile = await fileOpenPicker.PickSingleFileAsync();
                if (selectedStorageFile == null)
                {
                    return false;
                }
            }
            catch (Exception)
            {
                return false;
            }
            return true;
        }
接下來,您將實作影像 Bind() 方法,以取得位圖 BGRA8 格式的檔案表示法。 但首先,您將建立協助程序類別來調整影像的大小。
- 若要建立協助程式檔案,請以滑鼠右鍵按下方案名稱 (
ClassifierPyTorch),然後選擇Add a new item。 在開啟的視窗中,選取Class併為其命名。 在這裡,我們稱之為Helper。
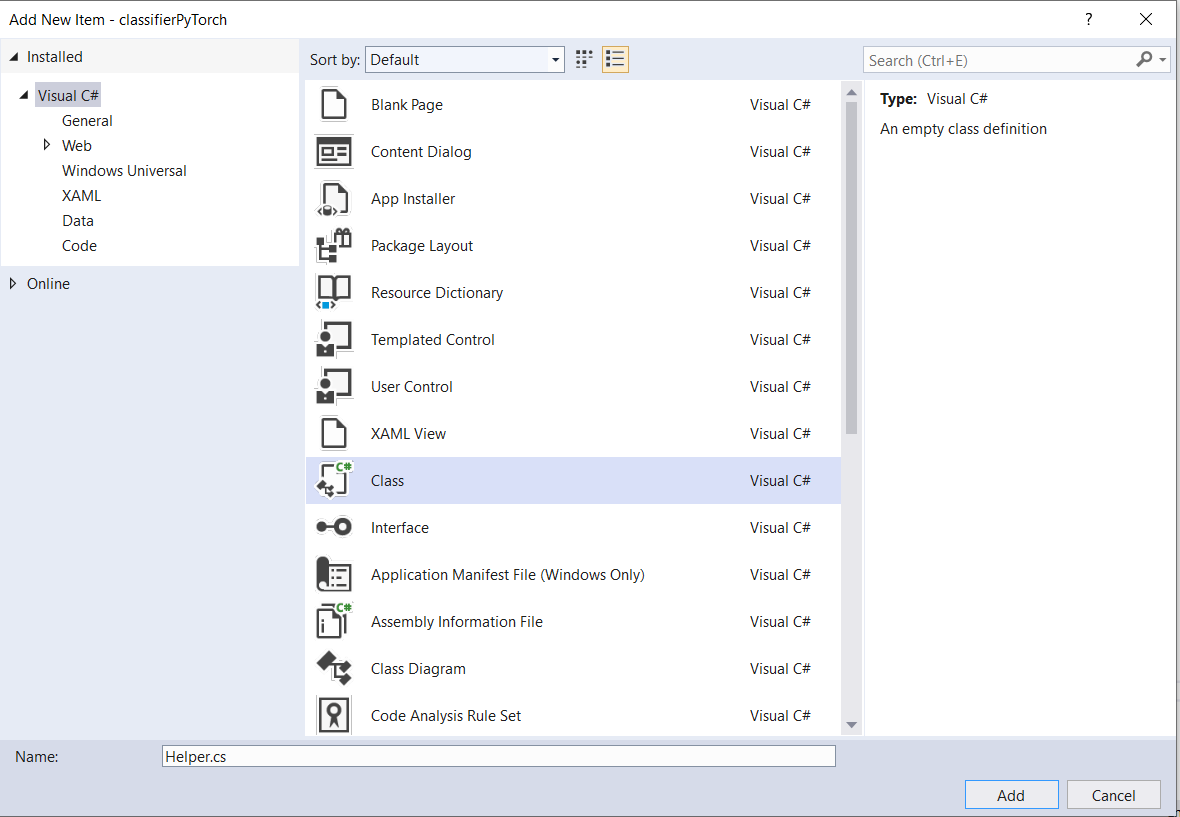
- 新的類別檔案會出現在您的專案中。 開啟此類別,並新增下列程式代碼:
using System;
using System.Threading.Tasks;
using Windows.Graphics.Imaging;
using Windows.Media;

namespace classifierPyTorch
{
    public class Helper
    {
        private const int SIZE = 32;
        VideoFrame cropped_vf = null;

        public async Task<VideoFrame> CropAndDisplayInputImageAsync(VideoFrame inputVideoFrame)
        {
            bool useDX = inputVideoFrame.SoftwareBitmap == null;

            BitmapBounds cropBounds = new BitmapBounds();
            uint h = SIZE;
            uint w = SIZE;
            var frameHeight = useDX ? inputVideoFrame.Direct3DSurface.Description.Height : inputVideoFrame.SoftwareBitmap.PixelHeight;
            var frameWidth = useDX ? inputVideoFrame.Direct3DSurface.Description.Width : inputVideoFrame.SoftwareBitmap.PixelWidth;

            var requiredAR = ((float)SIZE / SIZE);
            w = Math.Min((uint)(requiredAR * frameHeight), (uint)frameWidth);
            h = Math.Min((uint)(frameWidth / requiredAR), (uint)frameHeight);
            cropBounds.X = (uint)((frameWidth - w) / 2);
            cropBounds.Y = 0;
            cropBounds.Width = w;
            cropBounds.Height = h;

            cropped_vf = new VideoFrame(BitmapPixelFormat.Bgra8, SIZE, SIZE, BitmapAlphaMode.Ignore);

            await inputVideoFrame.CopyToAsync(cropped_vf, cropBounds, null);
            return cropped_vf;
        }
    }
}
現在,讓我們將影像轉換成適當的格式。
類別 ImageClassifierInput 會初始化模型預期的輸入類型。 在我們的案例中,我們已將程式代碼設定為預期 ImageFeatureValue。
類別 ImageFeatureValue 描述用來傳遞至模型之影像的屬性。 若要建立 ImageFeatureValue,您可以使用 CreateFromVideoFrame 方法。 如需原因及這些類別和方法運作方式的更具體詳細數據,請參閱 ImageFeatureValue 類別檔
注意
在本教學課程中,我們會使用 ImageFeatureValue 類別,而不是張量。 如果 Window ML 不支援模型的色彩格式,則這不是選項。 如需如何使用影像轉換和張量化的範例,請參閱 自定義 Tensorization 範例。
- 將方法的實作
convert()新增至 MainPage 類別內的程式MainPage.xaml.cs碼檔案。 convert 方法會以 BGRA8 格式取得輸入檔的表示法。
// A method to convert and bide the input image.
private async Task imageBind ()
{
    UIPreviewImage.Source = null;
    try
    {
        SoftwareBitmap softwareBitmap;
        using (IRandomAccessStream stream = await selectedStorageFile.OpenAsync(FileAccessMode.Read))
        {
            // Create the decoder from the stream
            BitmapDecoder decoder = await BitmapDecoder.CreateAsync(stream);
            // Get the SoftwareBitmap representation of the file in BGRA8 format
            softwareBitmap = await decoder.GetSoftwareBitmapAsync();
            softwareBitmap = SoftwareBitmap.Convert(softwareBitmap, BitmapPixelFormat.Bgra8, BitmapAlphaMode.Premultiplied);
        }
        // Display the image
        SoftwareBitmapSource imageSource = new SoftwareBitmapSource();
        await imageSource.SetBitmapAsync(softwareBitmap);
        UIPreviewImage.Source = imageSource;

        // Encapsulate the image within a VideoFrame to be bound and evaluated
        VideoFrame inputImage = VideoFrame.CreateWithSoftwareBitmap(softwareBitmap);
        // Resize the image size to 32x32
        inputImage=await helper.CropAndDisplayInputImageAsync(inputImage);
        // Bind the model input with image
        ImageFeatureValue imageTensor = ImageFeatureValue.CreateFromVideoFrame(inputImage);
        image.modelInput = imageTensor;

        // Encapsulate the image within a VideoFrame to be bound and evaluated
        VideoFrame inputImage = VideoFrame.CreateWithSoftwareBitmap(softwareBitmap);
        // bind the input image
        ImageFeatureValue imageTensor = ImageFeatureValue.CreateFromVideoFrame(inputImage);
        image.modelInput = imageTensor;
    }
    catch (Exception e)
    {
    }
}
系結和評估模型
接下來,您將根據模型建立會話、系結會話的輸入和輸出,以及評估模型。
建立會話以系結模型:
若要建立會話,您可以使用 類別 LearningModelSession 。 這個類別可用來評估機器學習模型,並將模型系結至裝置,然後執行並評估模型。 當您建立會話以在機器的特定裝置上執行模型時,您可以選取裝置。 默認裝置是 CPU。
注意
若要深入瞭解如何選擇裝置,請檢閱 建立會話 檔。
系結模型輸入和輸出:
若要系結輸入和輸出,您可以使用 類別 LearningModelBinding 。 機器學習模型具有輸入和輸出功能,可將資訊傳入和傳出模型。 請注意,Windows ML API 必須支援必要的功能。 類別 LearningModelBinding 會套用至 LearningModelSession ,以將值系結至具名輸入和輸出功能。
系結的實作由 mlgen 自動產生,因此您不需要處理它。 系結是藉由呼叫 類別的預先定義方法來實作 LearningModelBinding 。 在我們的案例中 Bind ,它會使用 方法將值系結至具名功能類型。
評估模型:
建立工作階段以將模型和系結值系結至模型的輸入和輸出之後,您可以評估模型的輸入並取得其預測。 若要執行模型執行,您應該在 LearningModelSession 上呼叫任何預先定義的評估方法。 在我們的案例中,我們將使用 EvaluateAsync 方法。
類似於 CreateFromStreamAsync, EvaluateAsync 此方法也由 WinML 程式代碼產生器自動產生,因此您不需要實作這個方法。 您可以在 檔案中 ImageClassifier.cs 檢閱此方法。
方法 EvaluateAsync 會使用已系結於系結的功能值,以異步方式評估機器學習模型。 它會使用 建立會話 LearningModelSession、使用 系結輸入和輸出 LearningModelBinding、執行模型評估,並使用 類別取得模型的 LearningModelEvaluationResult 輸出功能。
注意
若要瞭解另一個評估方法來執行模型,請檢閱 LearningModelSession 類別檔,檢查哪些方法可以在 LearningModelSession 上實作。
- 將下列方法新增至 MainPage 類別內的程式
MainPage.xaml.cs碼檔案,以建立工作階段、系結和評估模型。
        // A method to evaluate the model
        private async Task evaluate()
        {
            results = await modelGen.EvaluateAsync(image);
        }
擷取並顯示結果
您現在必須擷取模型輸出,並顯示正確的結果,您將實 extractResult 作 和 displayResult 方法。 您必須找到傳回正確標籤的最高機率。
- 將
extractResult方法新增至 類別內的MainPage.xaml.cs程式MainPage碼檔案。
        // A method to extract output from the model
        private void extractResult()
        {
            // Retrieve the results of evaluation
            var mResult = results.modelOutput as TensorFloat;
            // convert the result to vector format
            var resultVector = mResult.GetAsVectorView();

            probability = 0;
            int index = 0;
            // find the maximum probability
            for(int i=0; i<resultVector.Count; i++)
            {
                var elementProbability=resultVector[i];
                if (elementProbability > probability)
                {
                    index = i;
                }
            }
            label = ((Labels)index).ToString();
        }
- 將
displayResult方法新增至 類別內的MainPage.xaml.cs程式MainPage碼檔案。
        private async Task displayResult()
        {
            displayOutput.Text = label;
        }
介紹完畢! 您已使用基本 GUI 成功建立 Windows 機器學習應用程式,以測試分類模型。 下一個步驟是啟動應用程式,並在您的 Windows 裝置本機執行。
啟動應用程式
完成應用程式介面、新增模型併產生 Windows ML 程式代碼之後,您就可以測試應用程式!
啟用開發人員模式,並從 Visual Studio 測試您的應用程式。 請確定頂端工具列中的下拉選單設定為 Debug。 如果您的裝置是 64 位,請將 [方案平臺] 變更為 x64,以在本機計算機上執行專案,如果專案為 32 位,請將 x86 變更為 x86。
我們的模型已定型來分類下列影像:飛機、汽車、鳥、貓、鹿、狗、青蛙、馬、船、卡車。 若要測試我們的應用程式,您將使用為此專案建置的樂高汽車影像。 讓我們看看我們的 app 如何分類影像的內容。

將此映像儲存在您的本機裝置上,以測試應用程式。 視需要將影像格式變更為
.jpg。 您也可以使用.jpg或.png格式,從本機裝置取得任何其他相關影像。若要執行專案,請選擇工具
Start Debugging列上的按鈕,或按F5。應用程式啟動時,按 [挑選映射],然後從本機裝置選取映射。
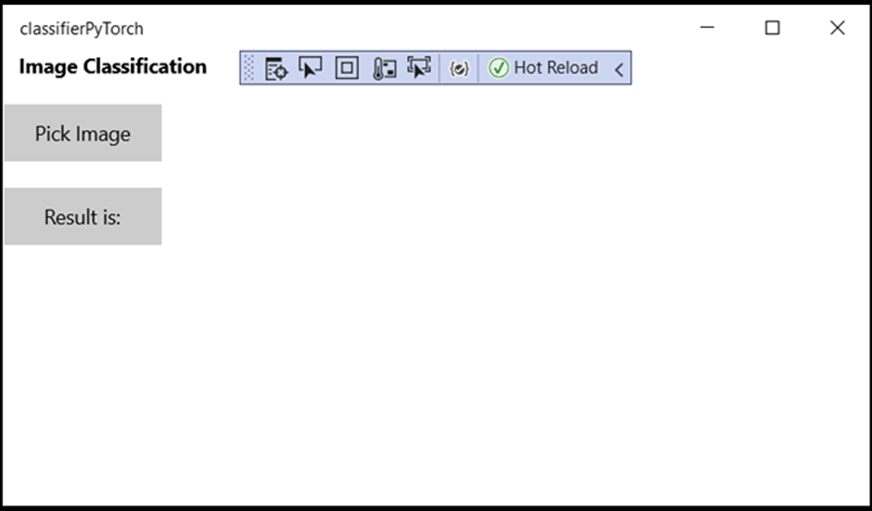
結果會立即出現在畫面上。 如您所見,我們的 Windows ML 應用程式已成功將影像分類為汽車。

摘要
您剛建立第一個 Windows 機器學習 應用程式,從模型建立到成功執行。
其他資源
若要深入了解此教學課程中提及的主題,請瀏覽下列資源:
- Windows ML 工具:深入瞭解 Windows ML 儀錶板、 WinMLRunner 和 mglen Windows ML 程式代碼產生器等工具。
- ONNX 模型:深入瞭解 ONNX 格式。
- Windows ML 效能和記憶體:深入瞭解如何使用 Windows ML 管理應用程式效能。
- Windows Machine Learning API 參考:深入瞭解 Windows ML API 的三個領域。