Tutorial: Validate data using SemPy and Great Expectations (GX)
In this tutorial, you learn how to use SemPy together with Great Expectations (GX) to perform data validation on Power BI semantic models.
This tutorial shows you how to:
- Validate constraints on a dataset in your Fabric workspace with Great Expectation's Fabric Data Source (built on semantic link).
- Configure a GX Data Context, Data Assets, and Expectations.
- View validation results with a GX Checkpoint.
- Use semantic link to analyze raw data.
Prerequisites
Get a Microsoft Fabric subscription. Or, sign up for a free Microsoft Fabric trial.
Sign in to Microsoft Fabric.
Use the experience switcher on the left side of your home page to switch to the Synapse Data Science experience.
- Select Workspaces from the left navigation pane to find and select your workspace. This workspace becomes your current workspace.
- Download the Retail Analysis Sample PBIX.pbix file.
- In your workspace, use the Upload button to upload the Retail Analysis Sample PBIX.pbix file to the workspace.
Follow along in notebook
great_expectations_tutorial.ipynb is the notebook that accompanies this tutorial.
To open the accompanying notebook for this tutorial, follow the instructions in Prepare your system for data science tutorials, to import the notebook to your workspace.
If you'd rather copy and paste the code from this page, you can create a new notebook.
Be sure to attach a lakehouse to the notebook before you start running code.
Set up the notebook
In this section, you set up a notebook environment with the necessary modules and data.
- Install
SemPyand the relevantGreat Expectationslibraries from PyPI using the%pipin-line installation capability within the notebook.
# install libraries
%pip install semantic-link great-expectations great_expectations_experimental great_expectations_zipcode_expectations

# load %%dax cell magic
%load_ext sempy
- Perform necessary imports of modules that you'll need later:
import great_expectations as gx
from great_expectations.expectations.expectation import ExpectationConfiguration
from great_expectations_zipcode_expectations.expectations import expect_column_values_to_be_valid_zip5
Set up GX Data Context and Data Source
In order to get started with Great Expectations, you first have to set up a GX Data Context. The context serves as an entry point for GX operations and holds all relevant configurations.
context = gx.get_context()
You can now add your Fabric dataset to this context as a Data Source to start interacting with the data. This tutorial uses a standard Power BI sample semantic model Retail Analysis Sample .pbix file.
ds = context.sources.add_fabric_powerbi("Retail Analysis Data Source", dataset="Retail Analysis Sample PBIX")
Specify Data Assets
Define Data Assets to specify the subset of data you'd like to work with. The asset can be as simple as full tables, or be as complex as a custom Data Analysis Expressions (DAX) query.
Here, you'll add multiple assets:
- Power BI table
- Power BI measure
- Custom DAX query
- Dynamic Management View (DMV) query
Power BI table
Add a Power BI table as a data asset.
ds.add_powerbi_table_asset("Store Asset", table="Store")
Power BI measure
If your dataset contains preconfigured measures, you add the measures as assets following a similar API to SemPy's evaluate_measure.
ds.add_powerbi_measure_asset(
    "Total Units Asset",
    measure="TotalUnits",
    groupby_columns=["Time[FiscalYear]", "Time[FiscalMonth]"]
)
DAX
If you'd like to define your own measures or have more control over specific rows, you can add a DAX asset with a custom DAX query. Here, we define a Total Units Ratio measure by dividing two existing measures.
ds.add_powerbi_dax_asset(
    "Total Units YoY Asset",
    dax_string=
    """
    EVALUATE SUMMARIZECOLUMNS(
        'Time'[FiscalYear],
        'Time'[FiscalMonth],
        "Total Units Ratio", DIVIDE([Total Units This Year], [Total Units Last Year])
    )
    """
)
DMV query
In some cases, it might be helpful to use Dynamic Management View (DMV) calculations as part of the data validation process. For example, you can keep track of the number of referential integrity violations within your dataset. For more information, see Clean data = faster reports.
ds.add_powerbi_dax_asset(
    "Referential Integrity Violation",
    dax_string=
    """
    SELECT
        [Database_name],
        [Dimension_Name],
        [RIVIOLATION_COUNT]
    FROM $SYSTEM.DISCOVER_STORAGE_TABLES
    """
)
Expectations
To add specific constraints to the assets, you first have to configure Expectation Suites. After adding individual Expectations to each suite, you can then update the Data Context set up in the beginning with the new suite. For a full list of available expectations, see the GX Expectation Gallery.
Start by adding a "Retail Store Suite" with two expectations:
- a valid zip code
- a table with row count between 80 and 200
suite_store = context.add_expectation_suite("Retail Store Suite")

suite_store.add_expectation(ExpectationConfiguration("expect_column_values_to_be_valid_zip5", { "column": "PostalCode" }))
suite_store.add_expectation(ExpectationConfiguration("expect_table_row_count_to_be_between", { "min_value": 80, "max_value": 200 }))

context.add_or_update_expectation_suite(expectation_suite=suite_store)
TotalUnits Measure
Add a "Retail Measure Suite" with one expectation:
- Column values should be greater than 50,000
suite_measure = context.add_expectation_suite("Retail Measure Suite")
suite_measure.add_expectation(ExpectationConfiguration(
    "expect_column_values_to_be_between",
    {
        "column": "TotalUnits",
        "min_value": 50000
    }
))

context.add_or_update_expectation_suite(expectation_suite=suite_measure)
Total Units Ratio DAX
Add a "Retail DAX Suite" with one expectation:
- Column values for Total Units Ratio should be between 0.8 and 1.5
suite_dax = context.add_expectation_suite("Retail DAX Suite")
suite_dax.add_expectation(ExpectationConfiguration(
    "expect_column_values_to_be_between",
    {
        "column": "[Total Units Ratio]",
        "min_value": 0.8,
        "max_value": 1.5
    }
))

context.add_or_update_expectation_suite(expectation_suite=suite_dax)
Referential Integrity Violations (DMV)
Add a "Retail DMV Suite" with one expectation:
- the RIVIOLATION_COUNT should be 0
suite_dmv = context.add_expectation_suite("Retail DMV Suite")
# There should be no RI violations
suite_dmv.add_expectation(ExpectationConfiguration(
    "expect_column_values_to_be_in_set",
    {
        "column": "RIVIOLATION_COUNT",
        "value_set": [0]
    }
))
context.add_or_update_expectation_suite(expectation_suite=suite_dmv)
Validation
To actually run the specified expectations against the data, first create a Checkpoint and add it to the context. For more information on Checkpoint configuration, see Data Validation workflow.
checkpoint_config = {
    "name": f"Retail Analysis Checkpoint",
    "validations": [
        {
            "expectation_suite_name": "Retail Store Suite",
            "batch_request": {
                "datasource_name": "Retail Analysis Data Source",
                "data_asset_name": "Store Asset",
            },
        },
        {
            "expectation_suite_name": "Retail Measure Suite",
            "batch_request": {
                "datasource_name": "Retail Analysis Data Source",
                "data_asset_name": "Total Units Asset",
            },
        },
        {
            "expectation_suite_name": "Retail DAX Suite",
            "batch_request": {
                "datasource_name": "Retail Analysis Data Source",
                "data_asset_name": "Total Units YoY Asset",
            },
        },
        {
            "expectation_suite_name": "Retail DMV Suite",
            "batch_request": {
                "datasource_name": "Retail Analysis Data Source",
                "data_asset_name": "Referential Integrity Violation",
            },
        },
    ],
}
checkpoint = context.add_checkpoint(
    **checkpoint_config
)
Now run the checkpoint and extract the results as a pandas DataFrame for simple formatting.
result = checkpoint.run()
Process and print your results.
import pandas as pd

data = []

for run_result in result.run_results:
    for validation_result in result.run_results[run_result]["validation_result"]["results"]:
        row = {
            "Batch ID": run_result.batch_identifier,
            "type": validation_result.expectation_config.expectation_type,
            "success": validation_result.success
        }

        row.update(dict(validation_result.result))

        data.append(row)

result_df = pd.DataFrame.from_records(data)

result_df[["Batch ID", "type", "success", "element_count", "unexpected_count", "partial_unexpected_list"]]

From these results you can see that all your expectations passed the validation, except for the "Total Units YoY Asset" that you defined through a custom DAX query.
Diagnostics
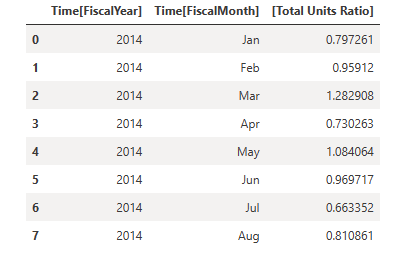
Using semantic link, you can fetch the source data to understand which exact years are out of range. Semantic link provides an inline magic for executing DAX queries. Use semantic link to execute the same query you passed into the GX Data Asset and visualize the resulting values.
%%dax "Retail Analysis Sample PBIX"

EVALUATE SUMMARIZECOLUMNS(
    'Time'[FiscalYear],
    'Time'[FiscalMonth],
    "Total Units Ratio", DIVIDE([Total Units This Year], [Total Units Last Year])
)
Save these results in a DataFrame.
df = _
Plot the results.
import matplotlib.pyplot as plt

df["Total Units % Change YoY"] = (df["[Total Units Ratio]"] - 1)

df.set_index(["Time[FiscalYear]", "Time[FiscalMonth]"]).plot.bar(y="Total Units % Change YoY")

plt.axhline(0)

plt.axhline(-0.2, color="red", linestyle="dotted")
plt.axhline( 0.5, color="red", linestyle="dotted")

None

From the plot, you can see that April and July were slightly out of range and can then take further steps to investigate.
Storing GX configuration
As the data in your dataset changes over time, you might want to rerun the GX validations you just performed. Currently, the Data Context (containing the connected Data Assets, Expectation Suites, and Checkpoint) lives ephemerally, but it can be converted to a File Context for future use. Alternatively, you can instantiate a File Context (see Instantiate a Data Context).
context = context.convert_to_file_context()
Now that you saved the context, copy the gx directory to your lakehouse.
Important
This cell assumes you added a lakehouse to the notebook. If there is no lakehouse attached, you won't see an error, but you also won't later be able to get the context. If you add a lakehouse now, the kernel will restart, so you'll have to re-run the entire notebook to get back to this point.
# copy GX directory to attached lakehouse
!cp -r gx/ /lakehouse/default/Files/gx
Now, future contexts can be created with context = gx.get_context(project_root_dir="<your path here>") to use all the configurations from this tutorial.
For example, in a new notebook, attach the same lakehouse and use context = gx.get_context(project_root_dir="/lakehouse/default/Files/gx") to retrieve the context.
Related content
Check out other tutorials for semantic link / SemPy:
- Tutorial: Clean data with functional dependencies
- Tutorial: Analyze functional dependencies in a sample semantic model
- Tutorial: Extract and calculate Power BI measures from a Jupyter notebook
- Tutorial: Discover relationships in a semantic model, using semantic link
- Tutorial: Discover relationships in the Synthea dataset, using semantic link
الملاحظات
قريبًا: خلال عام 2024، سنتخلص تدريجيًا من GitHub Issues بوصفها آلية إرسال ملاحظات للمحتوى ونستبدلها بنظام ملاحظات جديد. لمزيد من المعلومات، راجع https://aka.ms/ContentUserFeedback.
إرسال الملاحظات وعرضها المتعلقة بـ