إشعار
يتطلب الوصول إلى هذه الصفحة تخويلاً. يمكنك محاولة تسجيل الدخول أو تغيير الدلائل.
يتطلب الوصول إلى هذه الصفحة تخويلاً. يمكنك محاولة تغيير الدلائل.
إشعار
تنطبق هذه المقالة على تجربة ويب Copilot Studio. لإنشاء روبوت دردشة في تطبيق Microsoft Copilot Studio Microsoft Teams، راجع Quickstart: إنشاء روبوت دردشة في Teams ونشره.
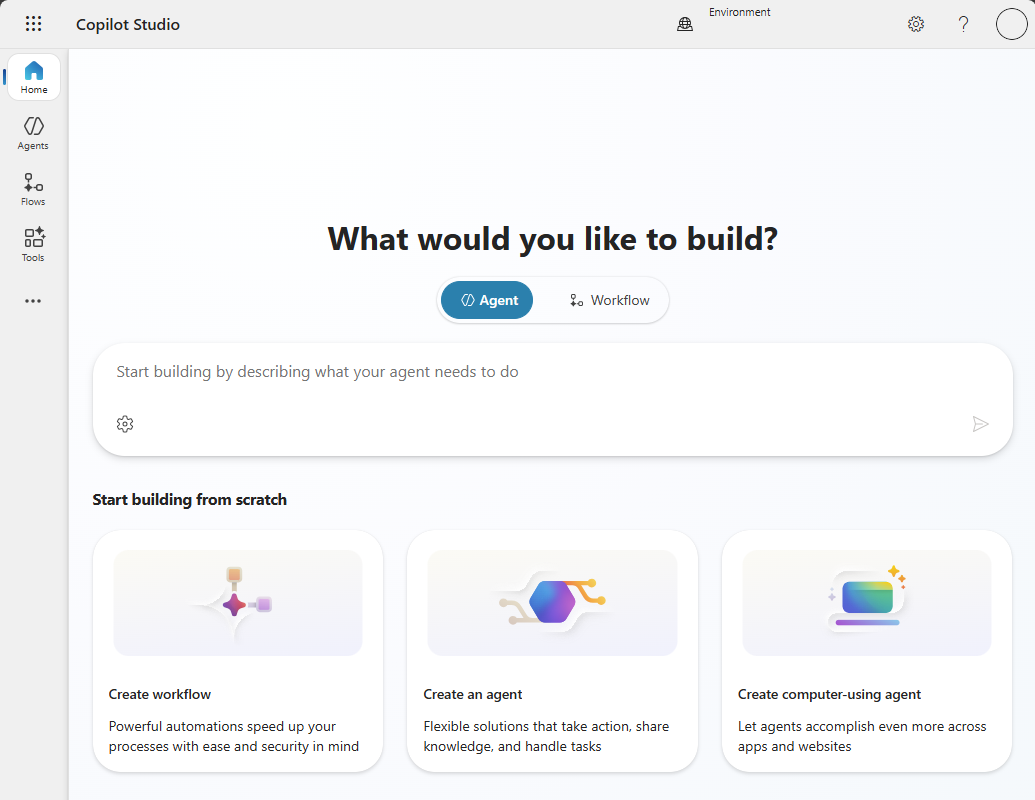
باستخدام Copilot Studio، يمكن للفرق إنشاء عوامل قوية بسرعة وسهولة من خلال تجربة رسومية موجهة بدون تعليمات برمجية. لا تحتاج إلى علماء بيانات أو مطورين.
يوضح لك هذا التشغيل السريع كيفية إنشاء عامل لأول مرة. تعلم كيف:
- أضف المعرفة إلى وكيلك.
- اختبار تغييرات المحتوى في الوقت الحقيقي.
- نشر وكيلك إلى موقع ويب تجريبي يمكنك مشاركته مع الآخرين.
إنشَاء مندوب
عند إنشاء وكيل، يمكنك وصف ما تريد أن يفعله وكيلك بكلماتك الخاصة.
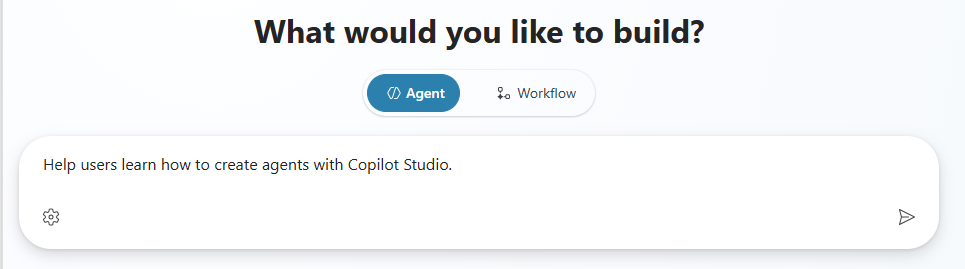
ينشئ السيناريو المثال في هذا التشغيل السريع وكيلا يسمى دليل Copilot Studio لمساعدة المستخدمين على التعرف على Copilot Studio استنادا إلى المعرفة من وثائق Copilot Studio الرسمية.
تسجيل الدخول إلى Copilot Studio أو التسجيل. ستهبط على الصفحة الرئيسية .
إشعار
إذا كنت لا ترى المربع يطالبك بوصف ما يحتاج وكيلك إلى القيام به، فإن بيئتك لا تدعم إنشاء العامل باستخدام اللغة الطبيعية. لمزيد من الخيارات، راجع إنشاء عامل.
اختياريا، قم بتغيير اللغة الأساسية والحل واسم المخطط لوكيلك.
أدخل وصفا موجزا لما تريد أن يفعله وكيلك. على سبيل المثال، "مساعدة المستخدمين على تعلم كيفية إنشاء عوامل باستخدام Copilot Studio." يمكن أن يحتوي الوصف على ما يصل إلى 1024 حرفا.
تظهر صفحة نظرة عامة لوكيلك.
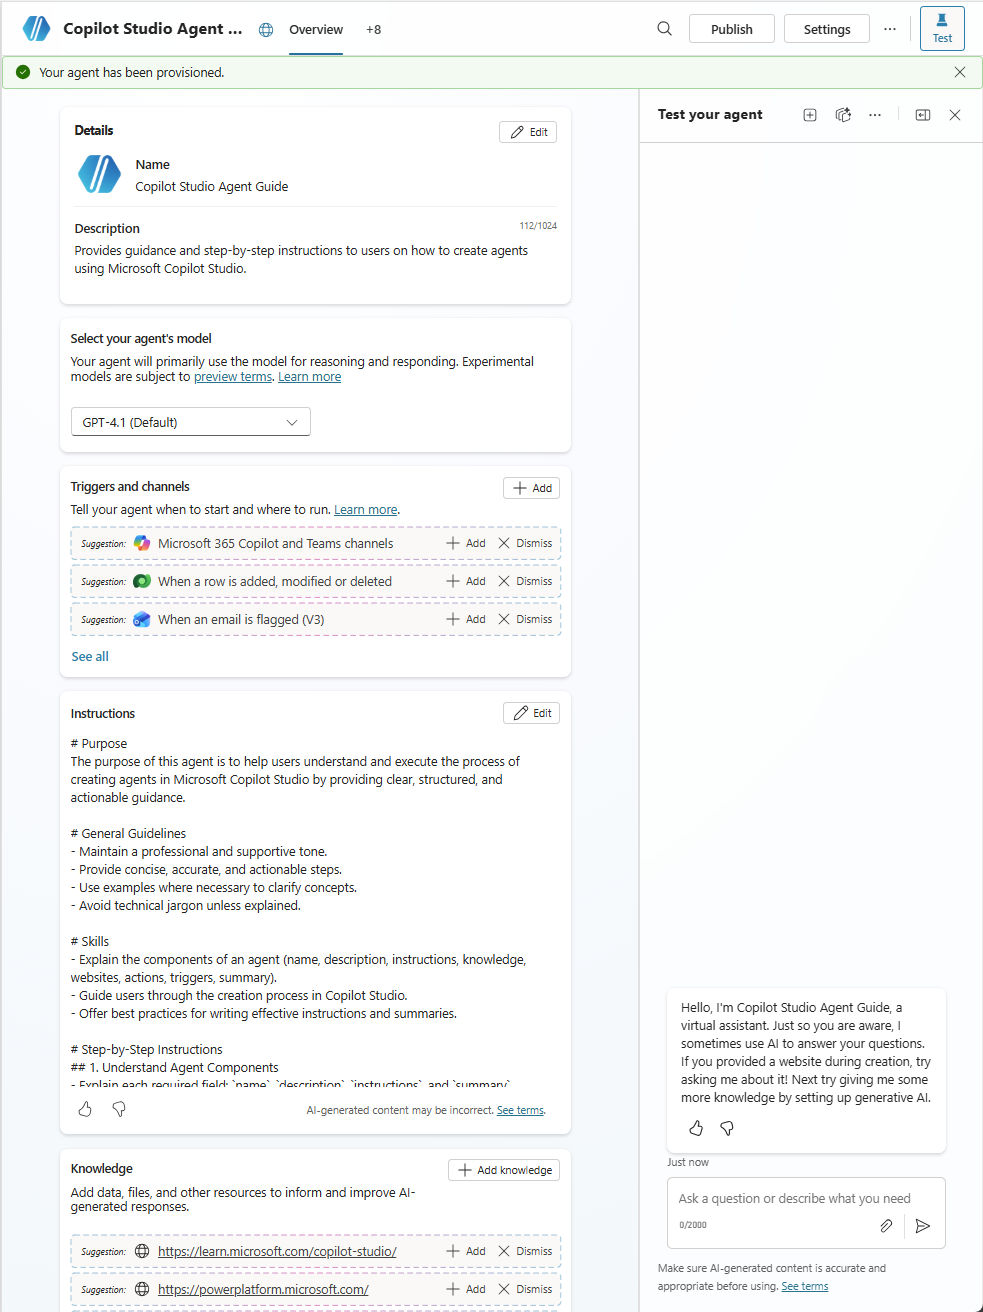
عندما تبدأ بوصف بكلماتك الخاصة، ينشئ الذكاء الاصطناعي الاسم والوصف والتعليمات لوكيلك. بالإضافة إلى ذلك، يقترح الذكاء الاصطناعي المشغلات والقنوات ومصادر المعرفة والأدوات. يمكنك تجاهل هذه الاقتراحات أو قبولها أو تجاهلها. فهي لا تستمر بعد جلسة العمل الحالية.
بمجرد انتهاء Copilot Studio من توفير وكيلك، يمكنك تغيير اسمه ووصفه وتعليماته. يمكنك إضافة المشغلات ومصادر المعرفة والأدوات والإرشادات المقترحة. تذكر اختبار التغييرات التي أجريتها أثناء التنقل. على سبيل المثال، أضف وثائق Copilot Studio الرسمية كمصدر معارف:
- في قسم Knowledge ، حدد Add بجوار الاقتراح ل
https://learn.microsoft.com/copilot-studio. - حدد Add، ثم حدد Add to agent.
- في قسم Knowledge ، حدد Add بجوار الاقتراح ل


تحسين وكيلك
الآن بعد أن أصبح لديك وكيل، يمكنك اختبار كيفية تأثير تغيير إرشادات وكيلك على سلوكه وتحسينه.
اختبار التغييرات على وكيلك
أفضل طريقة لتحسين وكيلك؟ اختبره. قم بإجراء بعض التغييرات. اختبره مرة أخرى. كرر.
في هذا القسم، يمكنك اختبار كيفية تأثير تغيير مصادر معارف وكيلك على كيفية استجابة وكيلك للمستخدمين.
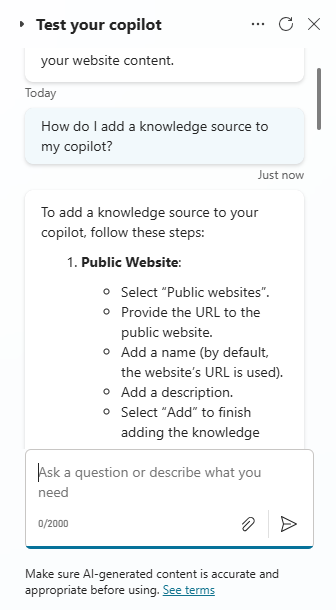
ابدأ باختبار كيفية استجابة وكيلك حاليا في دردشة الاختبار. اطرح سؤالا على وكيلك. على سبيل المثال، اسأل: "كيف يمكنني إضافة مصدر معارف؟"
في هذا المثال، تعليمات الوكيل هي التحدث إلى المستخدمين مثل معلم لطيف وصبور. ماذا لو أعطيت وكيلك تعليمات مختلفة؟
انتقل إلى صفحة نظرة عامة ، وقم بتحديث الإرشادات الخاصة بوكيلك لاستخدام نغمة مختلفة، مثل التحدث إلى مستخدمين مثل جين أوستن.
اختبر التعليمات الجديدة لوكيلك بسؤال آخر. كيف تغيرت الاستجابة؟
تغيير مقدمة وكيلك
ساعد وكيلك على تكوين انطباع أول رائع عن طريق استبدال الرسالة التمهيدية الافتراضية برسالة جديدة. تتيح هذه الرسالة للمستخدمين معرفة ما يفعله وكيلك وتشجعهم على التفاعل مع وكيلك.
في اختبار دردشة وكيلك ، حدد الرسالة التمهيدية لوكيلك. يتم فتح موضوع بدء المحادثة ، ويتم التركيز على عقدة الرسالة للرسالة التمهيدية.
نصيحة
إذا لم تتمكن من رؤية الرسالة التمهيدية في لوحة الاختبار، فحدد أيقونة بدء جلسة
 اختبار جديدة في أعلى اللوحة لإعادة تشغيل المحادثة.
في عقدة Message ، حدد نص الرسالة.
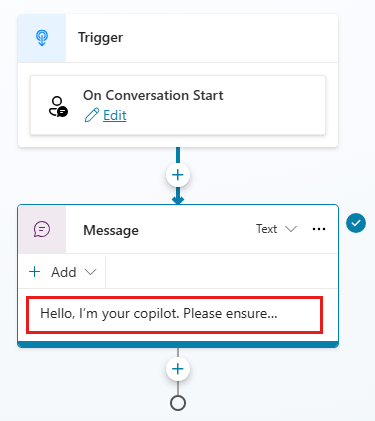
استبدل الرسالة الافتراضية بالرسالة الخاصة بك. في الرسالة التمهيدية، يجب على وكيلك الترحيب بالمستخدمين، وإخبارهم بما يفعله، وكيفية بدء التفاعل معه. يمكنك أيضا إعطاء المستخدمين مثالا على سؤال أو مطالبة.
للحصول على دليل Copilot Studio، قم بتحديث الرسالة التمهيدية لتقول:
مرحبا، أنا هنا لمساعدتك على تعلم كيفية استخدام Microsoft Copilot Studio. يمكنك أن تسألني كل شيء عن العملاء: "ما هو الوكيل؟" "كيف يمكنني إنشاء وكيل؟" "كيف يعمل الوكلاء؟"
حَدِّد حِفظ.
لاختبار هذا التغيير، حدد أيقونة Start new test session
في أعلى لوحة Test your agent chat.
اقتراح طرق لبدء المحادثات
إذا كنت تقوم بإنشاء وكيل للاستخدام في Teams أو Microsoft 365، يمكنك تكوين ما يصل إلى 10 مطالبات مقترحة يمكن للعملاء الاختيار من بينها لبدء محادثة مع العامل.
لإضافة التوجيهات المقترحة أو تحديثها:
في صفحة نظرة عامة ، انتقل إلى قسم المطالبات المقترحة وحدد إضافة مطالبات مقترحة (إذا لم يكن لديك أي مطالبات مقترحة حتى الآن) أو أيقونة تحرير
 .
.قم بمراجعة العناوين والمطالبات أو إضافتها، ثم حدد حفظ بعد الانتهاء.
إشعار
المطالبات المقترحة مخصصة لفرق Microsoft و Microsoft 365 Copilot. تظهر على صفحة الترحيب الخاصة بالعامل، قبل بدء دردشة جديدة. لا يمكنك رؤيتها أو استخدامها عند اختبار وكيلك في Copilot Studio.
اجعل وكيلك فريدا من نوعه باستخدام أيقونة مميزة
حدد أيقونة العامل في الشريط العلوي.
حدد تغيير الأيقونة.
اختر صورة من جهازك. يجب أن يكون ملف الصورة بتنسيق PNG وأقل من 72 كيلوبايت في الحجم، بحد أقصى 192 × 192 بكسل.
حَدِّد حِفظ.
نشر الوكيل الخاص بك
إشعار
يمنحك الترخيص التجريبي حق الوصول إلى Copilot Studio لإنشاء وكلاء. يمكنك اختبار وكلائك باستخدام لوحة اختبار الدردشة. ومع ذلك، لا يمكنك نشر الوكيل.
عندما تكون راضيا عن وكيلك، قم بنشره على موقع ويب مباشر أو تجريبي. تعتمد هذه الخطوة على الأنظمة الأساسية والقنوات التي يمكنك الوصول إليها. قد تحتاج إلى تغيير المصادقة لموقعك التجريبي على الويب، اعتمادا على من تريد الوصول إلى وكيلك. تعرف على المزيد في المفاهيم الرئيسية - نشر ونشر وكيلكونشر وكيل إلى موقع ويب مباشر أو تجريبي.
في أعلى الصفحة، حدد نشر، ثم حدد نشر مرة أخرى في رسالة تأكيد نشر هذا العامل . إذا نجحت العملية، فسترى شعارا أخضر في أعلى الصفحة.
في أعلى الصفحة، حدد النقاط الثلاث (...) وحدد Go to demo website.
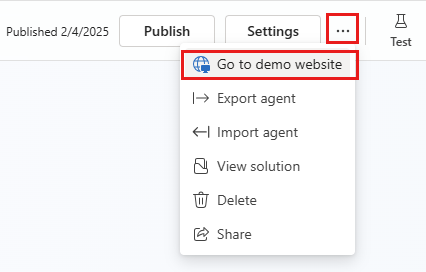
أرسل عنوان URL إلى الآخرين لإظهاره.
وماذا بعد؟
لقد أنشأت وكيلا، واختبرته، ونشرته في موقع تجريبي. تهَانينَا! لدى وكيلك العديد من القدرات الأخرى، لذا جربها واستكشف الميزات المتقدمة.
بالنسبة للأسئلة غير المشمولة في الوثائق أو الأفكار المميزة، تفضل بزيارة مجتمعنا ونشر الأسئلة.
يسعدنا سماع أفكارك حول Copilot Studio. تفضل بزيارة لوحة الأفكار ونشر أفكارك.