Note
Access to this page requires authorization. You can try signing in or changing directories.
Access to this page requires authorization. You can try changing directories.
Customers have data privacy and compliance requirements to secure their data by encrypting their data at-rest. This secures the data from exposure in an event where a copy of the database is stolen. With data encryption at-rest, the stolen database data is protected from being restored to a different server without the encryption key.
All customer data stored in Power Platform is encrypted at-rest with strong Microsoft-managed encryption keys by default. Microsoft stores and manages the database encryption key for all your data so you don't have to. However, Power Platform provides this customer-managed encryption key (CMK) for your added data protection control where you can self-manage the database encryption key that is associated with your Microsoft Dataverse environment. This allows you to rotate or swap the encryption key on demand, and also allows you to prevent Microsoft's access to your customer data when you revoke the key access to our services at any time.
To learn more about customer-managed key in Power Platform, watch the customer-managed key video.
These encryption key operations are available with customer-managed key (CMK):
- Create an RSA (RSA-HSM) key from your Azure Key vault.
- Create a Power Platform enterprise policy for your key.
- Grant the Power Platform enterprise policy permission to access your key vault.
- Grant the Power Platform service admin to read the enterprise policy.
- Apply encryption key to your environment.
- Revert/remove environment’s CMK encryption to Microsoft-managed key.
- Change key by creating a new enterprise policy, removing the environment from CMK and reapply CMK with new enterprise policy.
- Lock CMK environments by revoking CMK key vault and/or key permissions.
- Apply a CMK key.
Currently, all your customer data stored only in the following apps and services can be encrypted with customer-managed key:
Commercial cloud
- Dataverse (Custom solutions and Microsoft services)
- Dataverse Copilot for model-driven apps
- Power Automate
- Chat for Dynamics 365
- Dynamics 365 Sales
- Dynamics 365 Customer Service
- Dynamics 365 Customer Insights - Data
- Dynamics 365 Field Service
- Dynamics 365 Retail
- Dynamics 365 Finance (Finance and operations)
- Dynamics 365 Intelligent Order Management (Finance and operations)
- Dynamics 365 Project Operations (Finance and operations)
- Dynamics 365 Supply Chain Management (Finance and operations)
- Copilot Studio
Sovereign cloud - GCC High
- Dataverse (Custom solutions and Microsoft services)
- Dataverse Copilot for model-driven apps
- Chat for Dynamics 365
- Dynamics 365 Sales
- Dynamics 365 Customer Service
- Dynamics 365 Customer Insights - Data
- Copilot Studio
Note
- Contact a representative for services not listed above for information about customer-managed key support.
- Nuance Conversational IVR and maker welcome content are excluded from customer-managed key encryption.
- The connection settings for connectors continue to be encrypted with a Microsoft-managed key.
- Power Platform environment settings continue to be encrypted with a Microsoft-managed key.
- The configured CMK doesn't encrypt the data sent from Copilot Studio as part of the Agent 365 security audit logging.
- Power Apps display names, descriptions, and connection metadata continue to be encrypted with a Microsoft-managed key.
- The download results link and other data produced by solution checker enforcement during a solution check continues to be encrypted with a Microsoft-managed key.
Environments with finance and operations apps where Power Platform integration is enabled can also be encrypted. Finance and operations environments without Power Platform integration continue to use the default Microsoft-managed key to encrypt data. Learn more in Encryption in finance and operations apps.
Introduction to customer-managed key
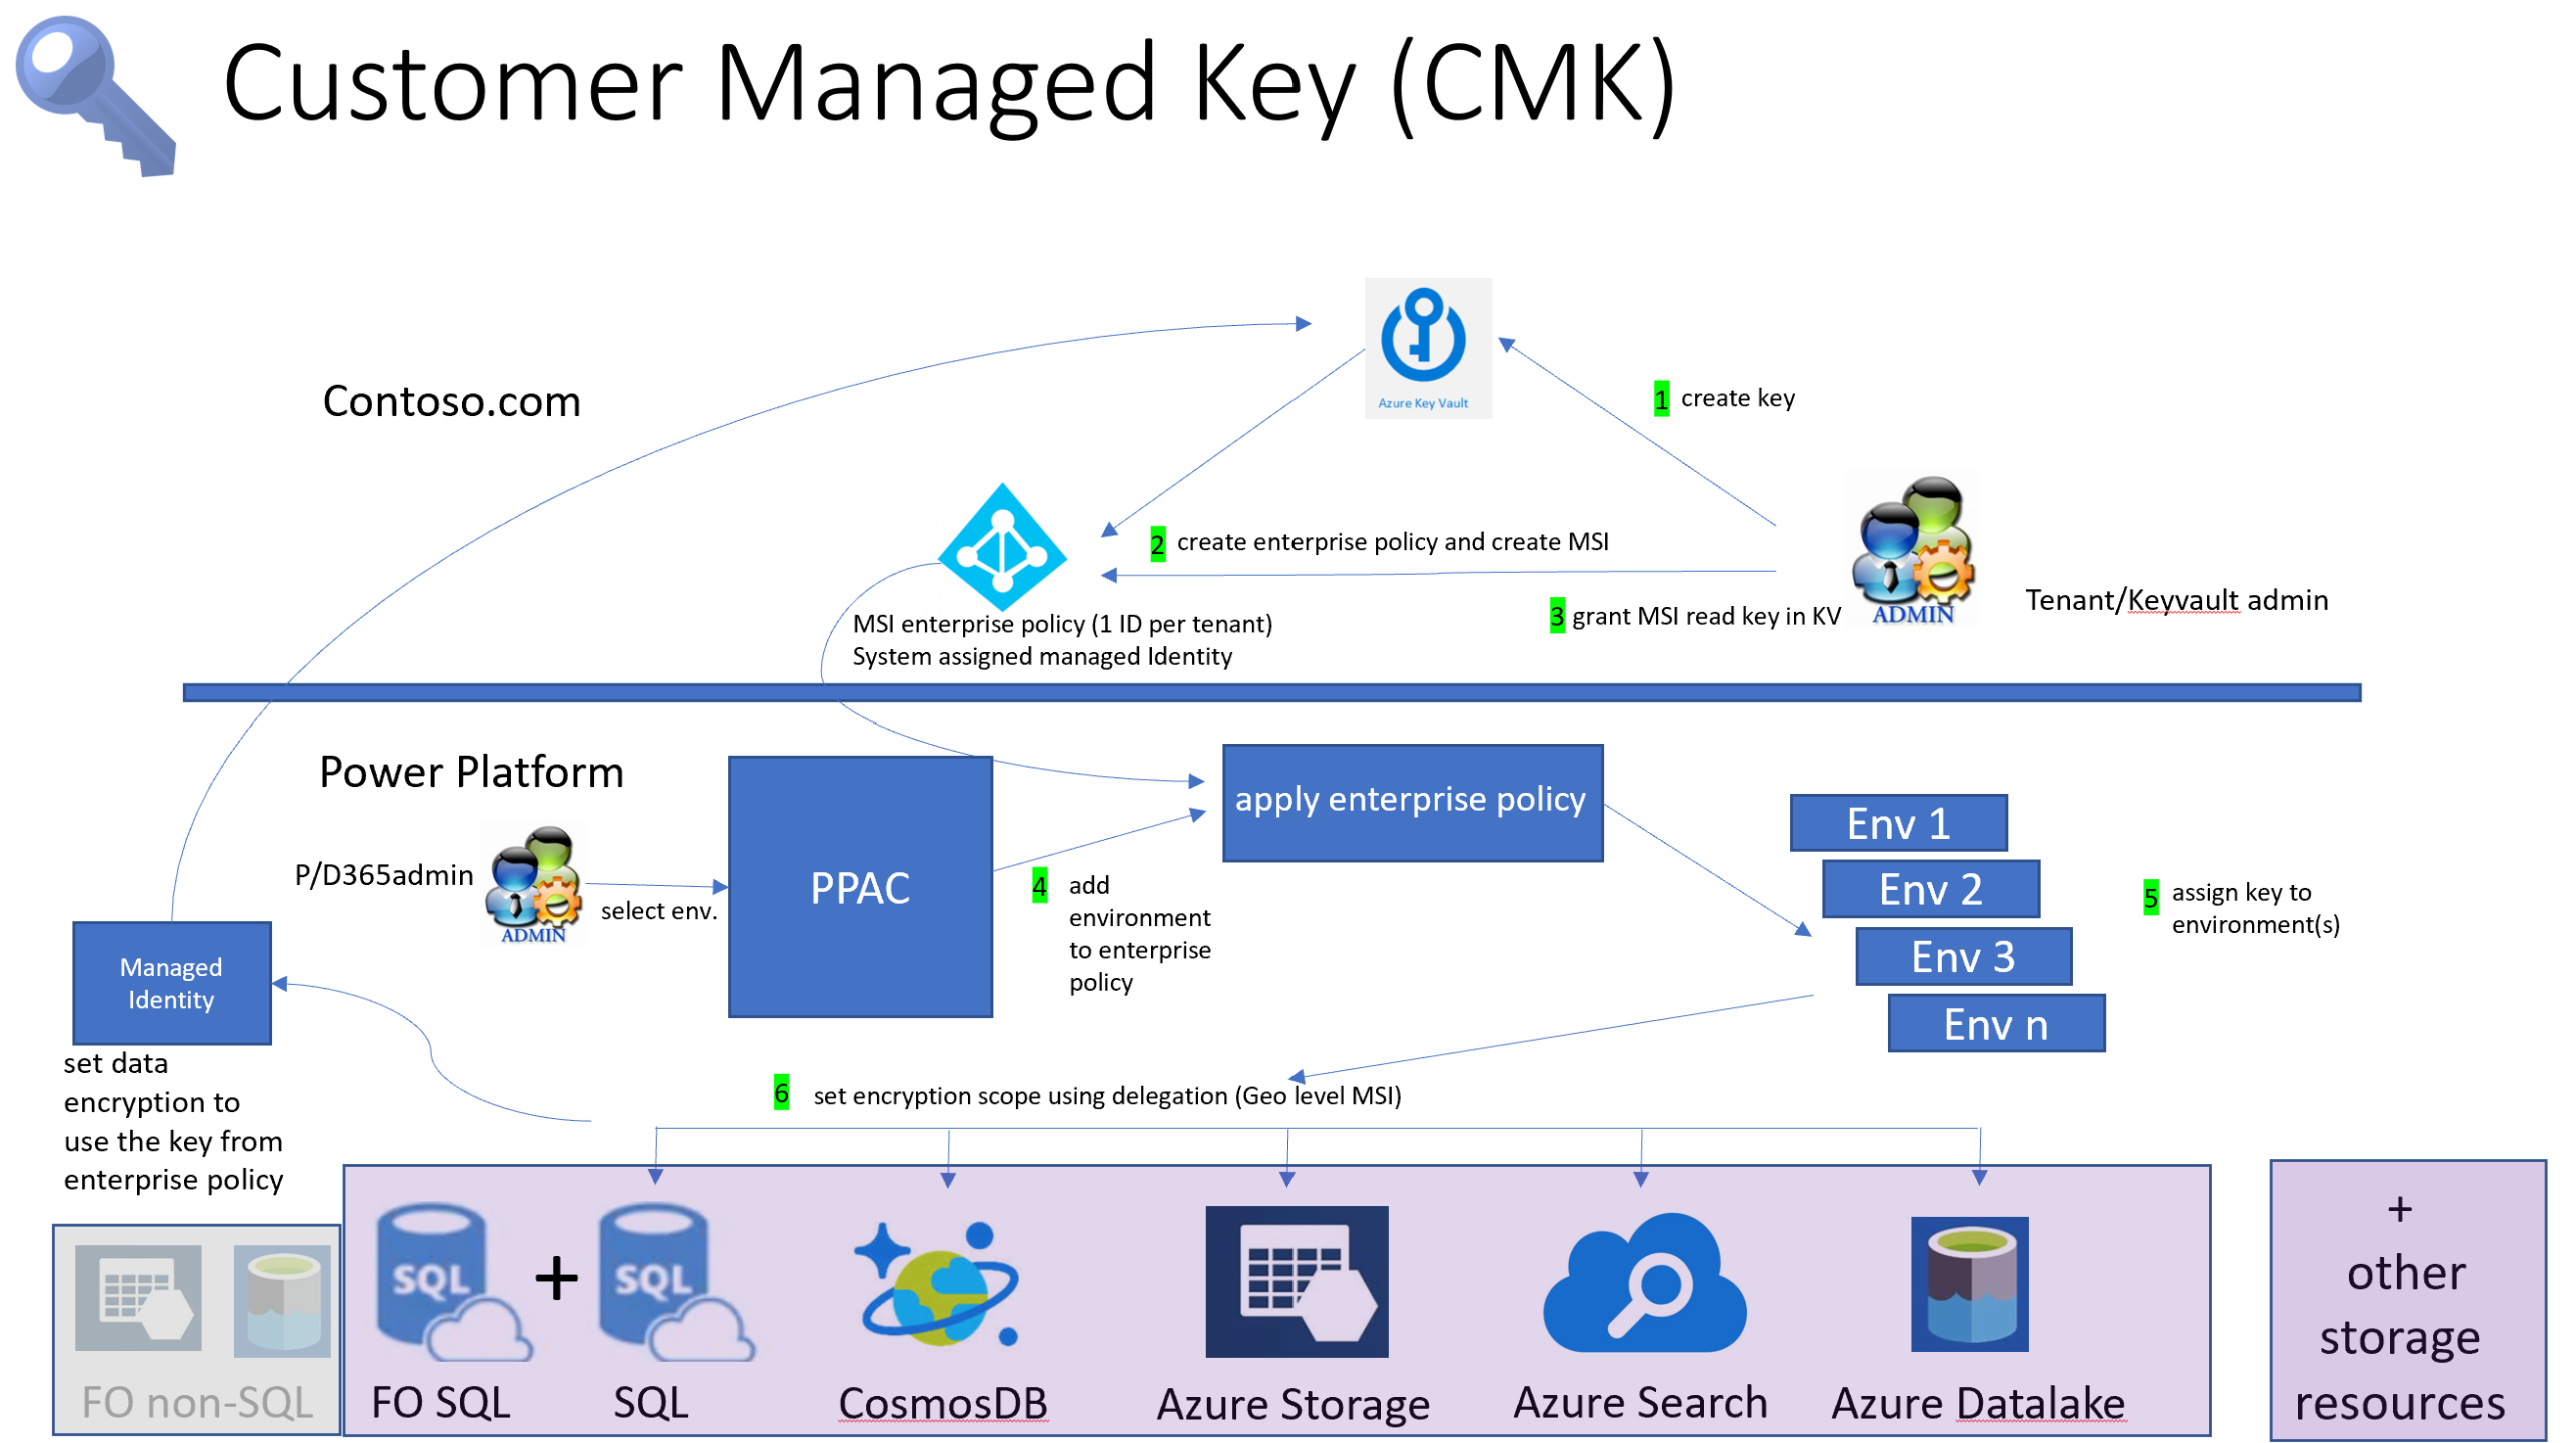
With customer-managed key, administrators can provide their own encryption key from their own Azure Key Vault to the Power Platform storage services to encrypt their customer data. Microsoft doesn't have direct access to your Azure Key Vault. For Power Platform services to access the encryption key from your Azure Key Vault, the administrator creates a Power Platform enterprise policy, which references the encryption key and grants this enterprise policy access to read the key from your Azure Key Vault.
The Power Platform service administrator can then add Dataverse environments to the enterprise policy to start encrypting all the customer data in the environment with your encryption key. Administrators can change the environment's encryption key by creating another enterprise policy and add the environment (after removing it) to the new enterprise policy. If the environment no longer needs to be encrypted using your customer-managed key, the administrator can remove the Dataverse environment from the enterprise policy to revert the data encryption back to Microsoft-managed key.
The administrator can lock the customer-managed key environments by revoking key access from the enterprise policy and unlock the environments by restoring the key access. More information: Lock environments by revoking key vault and/or key permission access
To simplify the key management tasks, the tasks are broken down into three main areas:
- Create encryption key.
- Create enterprise policy and grant access.
- Manage environment's encryption.
Warning
When environments are locked, they can't be accessed by anyone, including Microsoft support. Environments that are locked become disabled and data loss can occur.
Licensing requirements for customer-managed key
Customer-managed key policy is only enforced on environments that are activated for Managed Environments. Managed Environments are included as an entitlement in standalone Power Apps, Power Automate, Microsoft Copilot Studio, Power Pages, and Dynamics 365 licenses that give premium usage rights. Learn more about Managed Environment licensing, with the Licensing overview for Microsoft Power Platform.
In addition, access to using customer-managed key for Microsoft Power Platform and Dynamics 365 requires users in the environments where the encryption key policy is enforced to have one of these subscriptions:
- Microsoft 365 or Office 365 A5/E5/G5
- Microsoft 365 A5/E5/F5/G5 Compliance
- Microsoft 365 F5 Security & Compliance
- Microsoft 365 A5/E5/F5/G5 Information Protection and Governance
- Microsoft 365 A5/E5/F5/G5 Insider Risk Management
Learn more about these licenses.
Understand the potential risk when you manage your key
As with any business critical application, personnel within your organization who have administrative-level access must be trusted. Before you use the key management feature, you should understand the risk when you manage your database encryption keys. It's conceivable that a malicious administrator (a person who is granted or has gained administrator-level access with intent to harm an organization's security or business processes) working within your organization might use the manage keys feature to create a key and use it to lock your environments in the tenant.
Consider the following sequence of events.
The malicious key vault administrator creates a key and an enterprise policy on the Azure portal. The Azure Key Vault administrator goes to Power Platform admin center, and adds environments to the enterprise policy. The malicious administrator then returns to the Azure portal and revokes key access to the enterprise policy thus locking all the environments. This causes business interruptions as all the environments become inaccessible, and if this event isn't resolved, that is, the key access restored, the environment data can be potentially lost.
Note
- Azure Key Vault has built-in safeguards that help restoring the key, which require the Soft Delete and Purge protection key vault settings enabled.
- Another safeguard to be considered is to make sure that there's separation of tasks where the Azure Key Vault administrator isn't granted access to the Power Platform admin center.
Separation of duty to mitigate the risk
This section describes the customer-managed key feature duties that each admin role is responsible for. Separating these tasks helps mitigate the risk involved with customer-managed keys.
Azure Key Vault and Power Platform/Dynamics 365 service admin tasks
To enable customer-managed keys, first the key vault administrator creates a key in the Azure key vault and creates a Power Platform enterprise policy. When the enterprise policy is created, a special Microsoft Entra ID managed identity is created. Next, the key vault administrator returns to the Azure key vault and grants the enterprise policy/managed identity access to the encryption key.
The key vault administrator then grants the respective Power Platform/Dynamics 365 service admin read access to the enterprise policy. Once read permission is granted, the Power Platform/Dynamics 365 service admin can go to the Power Platform Admin Center and add environments to the enterprise policy. All added environments customer data is then encrypted with the customer-managed key linked to this enterprise policy.
Prerequisites
- An Azure subscription that includes Azure Key Vault or Azure Key Vault managed hardware security modules.
- A Microsoft Entra ID with:
- Contributor permission to the Microsoft Entra subscription.
- Permission to create an Azure Key Vault and key.
- Access to create a resource group. This is required to set up the key vault.
Create the key and grant access using Azure Key Vault
The Azure Key Vault administrator performs these tasks in Azure.
- Create an Azure paid subscription and Key Vault. Ignore this step if you already have a subscription that includes Azure Key Vault.
- Go to the Azure Key Vault service, and create a key. More information: Create a key in the key vault
- Enable the Power Platform enterprise policies service for your Azure subscription. Do this only once. More information: Enable the Power Platform enterprise policies service for your Azure subscription
- Create a Power Platform enterprise policy. More information: Create enterprise policy
- Grant enterprise policy permissions to access the key vault. More information: Grant enterprise policy permissions to access key vault
- Grant Power Platform and Dynamics 365 administrators permission to read the enterprise policy. More information: Grant the Power Platform admin privilege to read enterprise policy
Power Platform/Dynamics 365 service admin Power Platform admin center tasks
Prerequisite
Power Platform administrator must be assigned to either the Power Platform or Dynamics 365 Service administrator Microsoft Entra role.
Manage environment's encryption in Power Platform admin center
The Power Platform administrator manages customer-managed key tasks related to the environment in Power Platform admin center.
- Add the Power Platform environments to the enterprise policy to encrypt data with the customer-managed key. More information: Add an environment to the enterprise policy to encrypt data
- Remove environments from enterprise policy to return encryption to Microsoft-managed key. More information: Remove environments from policy to return to Microsoft managed key
- Change the key by removing environments from the old enterprise policy and adding environments to a new enterprise policy. More information: Create encryption key and grant access
- If you're using the earlier self-managed encryption key feature, you can migrate your key to customer-managed key. Learn more in Manage your customer-managed encryption key.
Create encryption key and grant access
Create an Azure paid subscription and key vault
In Azure, perform the following steps:
Create a Pay-as-you-go or its equivalent Azure subscription. This step isn't needed if the tenant already has a subscription.
Create a resource group. More information: Create resource groups
Note
Create or use a resource group that has a location, for example, Central US, that matches the Power Platform environment's region, such as United States.
Create a key vault using the paid subscription that includes soft-delete and purge protection with the resource group you created in the previous step.
Important
To ensure that your environment is protected from accidental deletion of the encryption key, the key vault must have soft-delete and purge protection enabled. You won’t be able to encrypt your environment with your own key without enabling these settings. More information: Azure Key Vault soft-delete overview More information: Create a key vault using Azure portal
Create a key in the key vault
- Make sure you've met the prerequisites.
- Go to the Azure portal > Key Vault and locate the key vault where you want to generate an encryption key.
- Verify the Azure key vault settings:
- Select Properties under Settings.
- Under Soft-delete, set or verify that it's set to Soft delete has been enabled on this key vault option.
- Under Purge protection, set or verify that Enable purge protection (enforce a mandatory retention period for deleted vaults and vault objects) is enabled.
- If you made changes, select Save.
Create RSA keys
Create or import a key that has these properties:
- On the Key Vault properties pages, select Keys.
- Select Generate/Import.
- On the Create a key screen set the following values, and then select Create.
- Options: Generate
- Name: Provide a name for the key
- Key type: RSA
- RSA key size: 2048 or 3072
Important
If you set an expiration date in your key and the key expired, all the environments that're encrypted with this key will be down. Set an alert to monitor expiry certificates with email notifications for your local Power Platform admin and Azure key vault admin as a reminder to renew the expiration date. This is important to prevent any unplanned system outages.
Import protected keys for Hardware Security Modules (HSM)
You can use your protected keys for hardware security modules (HSM) to encrypt your Power Platform Dataverse environments. Your HSM-protected keys must be imported into the key vault so an Enterprise policy can be created. For more information, see Supported HSMs Import HSM-protected keys to Key Vault (BYOK).
Create a key in the Azure Key Vault Managed HSM
You can use an encryption key created from the Azure Key Vault Managed HSM to encrypt your environment data. This gives you FIPS 140-2 Level 3 support.
Create RSA-HSM keys
Make sure you've met the prerequisites.
Go to the Azure portal.
Create a Managed HSM:
Enable Purge Protection in your Managed HSM.
Grant the Managed HSM Crypto User role to the person who created the Managed HSM key vault.
- Access the Managed HSM key vault on the Azure portal.
- Navigate to Local RBAC and select + Add.
- In the Role drop-down list, select the Managed HSM Crypto User role on the Role assignment page.
- Select All keys under Scope.
- Select Select security principal, and then select the admin on the Add Principal page.
- Select Create.
Create an RSA-HSM key:
- Options: Generate
- Name: Provide a name for the key
- Key type: RSA-HSM
- RSA key size: 2048
Note
Supported RSA-HSM key sizes: 2048-bit and 3072-bit.
Encrypt your environment with key from Azure Key Vault with private link
You can update your Azure Key vault's networking by enabling a private endpoint and use the key in the key vault to encrypt your Power Platform environments.
You can either create a new key vault and establish a private link connection or establish a private link connection to an existing key vault, and create a key from this key vault and use it to encrypt your environment. You can also establish a private link connection to an existing key vault after you have already created a key and use it to encrypt your environment.
Encrypt data with key from key vault with private link
Create an Azure Key vault with these options:
- Enable Purge Protection
- Key type: RSA
- Key size: 2048 or 3072
Copy the key vault URL and the encryption key URL to be used for creating the enterprise policy.
Note
Once you've added a private endpoint to your key vault or disabled the public access network, you won’t be able to see the key unless you have the appropriate permission.
Create a virtual network.
Return to your key vault and add private endpoint connections to your Azure Key vault.
Note
You need to select the Disable public access networking option and enable the Allow trusted Microsoft services to bypass this firewall exception.
Create a Power Platform enterprise policy. More information: Create enterprise policy
Grant enterprise policy permissions to access the key vault. More information: Grant enterprise policy permissions to access key vault
Grant Power Platform and Dynamics 365 administrators permission to read the enterprise policy. More information: Grant the Power Platform admin privilege to read enterprise policy
Power Platform admin center admin selects the environment to encrypt and enable Managed environment. More information: Enable Managed environment to be added to the enterprise policy
Power Platform admin center admin adds the Managed environment to the enterprise policy. More information: Add an environment to the enterprise policy to encrypt data
Enable the Power Platform enterprise policies service for your Azure subscription
Register Power Platform as a resource provider. You only need to do this task once for each Azure subscription where your Azure Key vault resides. You need to have access rights to the subscription in order to register the resource provider.
- Sign in to the Azure portal and go to Subscription > Resource providers.
- In the list of Resource providers, search for Microsoft.PowerPlatform, and Register it.
Create enterprise policy
- Install PowerShell MSI. More information: Install PowerShell on Windows, Linux, and macOS
- After the PowerShell MSI is installed, go back to Deploy a custom template in Azure.
- Select the Build your own template in the editor link.
- Copy this JSON template into a text editor such as Notepad. More information: Enterprise policy json template
- Replace the values in the JSON template for: EnterprisePolicyName, location where EnterprisePolicy needs to be created, keyVaultId, and keyName. More information: Field definitions for json template
- Copy the updated template from your text editor then paste it into the Edit template of the Custom deployment in Azure, and select Save.
- Select a Subscription and Resource group where the enterprise policy is to be created.
- Select Review + create, and then select Create.
A deployment is started. When it's done, the enterprise policy is created.
Enterprise policy json template
 {
    "$schema": "https://schema.management.azure.com/schemas/2019-04-01/deploymentTemplate.json#",
    "contentVersion": "1.0.0.0",
    "parameters": {},
    "resources": [
        {
            "type": "Microsoft.PowerPlatform/enterprisePolicies",
            "apiVersion": "2020-10-30",
            "name": {EnterprisePolicyName},
            "location": {location where EnterprisePolicy needs to be created},
            "kind": "Encryption",
            "identity": {
                "type": "SystemAssigned"
            },
            "properties": {
                "lockbox": null,
                "encryption": {
                    "state": "Enabled",
                    "keyVault": {
                        "id": {keyVaultId},
                        "key": {
                            "name": {keyName}
                        }
                    }
                },
                "networkInjection": null
            }
        }
    ]
   }
Field definitions for JSON template
name. Name of the enterprise policy. This is the name of the policy that appears in Power Platform admin center.
location. One of the following. This is the location of the enterprise policy and it must correspond with the Dataverse environment’s region:
- '"unitedstates"'
- '"southafrica"'
- '"uk"'
- '"japan"'
- '"india"'
- '"france"'
- '"europe"'
- '"germany"'
- '"switzerland"'
- '"canada"'
- '"brazil"'
- '"australia"'
- '"asia"'
- '"uae"'
- '"korea"'
- '"norway"'
- '"singapore"'
- '"sweden"'
Copy these values from your key vault properties in the Azure portal:
- keyVaultId: Go to Key vaults > select your key vault > Overview. Next to Essentials select JSON View. Copy the Resource ID to the clipboard and paste the entire contents into your JSON template.
- keyName: Go to Key vaults > select your key vault > Keys. Notice the key Name and type the name into your JSON template.
Grant enterprise policy permissions to access key vault
Once the enterprise policy is created, the key vault administrator grants the enterprise policy’s managed identity access to the encryption key.
- Sign into the Azure portal and go to Key vaults.
- Select the key vault where the key was assigned to the enterprise policy.
- Select the Access control (IAM) tab, and then select + Add.
- Select Add role assignment from the drop-down list,
- Search Key Vault Crypto Service Encryption User and select it.
- Select Next.
- Select + Select members.
- Search for the enterprise policy you have created.
- Select the enterprise policy, and then choose Select.
- Select Review + assign.
The above permission setting is based on your key vault's Permission model of Azure role-based access control. If your key vault is set to Vault access policy, it's recommended that you migrate to the role-based model. To grant your enterprise policy access to the key vault using Vault access policy, create an Access policy, select Get on Key management operations and Unwrap key and Wrap key on Cryptographic Operations.
Note
To prevent any unplanned system outages, it's important that the enterprise policy has access to the key. Make sure that:
- The key vault is active.
- The key is active and not expired.
- The key isn't deleted.
- The above key permissions aren't revoked.
The environments which are using this key are disabled when the encryption key isn't accessible.
Grant the Power Platform admin privilege to read enterprise policy
Administrators who have Dynamics 365 or Power Platform administration roles can access the Power Platform admin center to assign environments to the enterprise policy. To access the enterprise policies, the admin with Azure key vault access is required to grant the Reader role to the Power Platform admin. Once the Reader role is granted, the Power Platform administrator is able to view the enterprise policies on the Power Platform admin center.
Note
Only Power Platform and Dynamics 365 administrators who are granted the reader role to the enterprise policy can add an environment to the policy. Other Power Platform or Dynamics 365 administrators might be able to view the enterprise policy but they get an error when they try to Add environment to the policy.
Grant reader role to a Power Platform administrator
- Sign into the Azure portal.
- Copy the Power Platform or Dynamics 365 admin’s object ID. To do this:
- Go to the Users area in Azure.
- In the All users list, find the user with Power Platform or Dynamics 365 admin permissions using Search users.
- Open the user record, on the Overview tab copy the user’s Object ID. Paste this into a text editor such as NotePad for later.
- Copy the enterprise policy resource ID. To do this:
- Go to Resource Graph Explorer in Azure.
- Enter
microsoft.powerplatform/enterprisepoliciesin the Search box, and then select the microsoft.powerplatform/enterprisepolicies resource. - Select Run query on the command bar. A list of all the Power Platform enterprise policies is displayed.
- Locate the enterprise policy where you want to grant access.
- Scroll to the right of the enterprise policy and select See details.
- On the Details page, copy the id.
- Start Azure Cloud Shell, and run the following command replacing objId with the user’s object ID and EP Resource Id with the
enterprisepoliciesID copied in the previous steps:New-AzRoleAssignment -ObjectId { objId} -RoleDefinitionName Reader -Scope {EP Resource Id}
Manage environment's encryption
To manage the environment's encryption, you need the following permission:
- Microsoft Entra active user who has a Power Platform and/or Dynamics 365 admin security role.
- Microsoft Entra user who has either a Power Platform or Dynamics 365 service admin role.
The key vault admin notifies the Power Platform admin that an encryption key and an enterprise policy were created and provides the enterprise policy to the Power Platform admin. To enable the customer-managed key, the Power Platform admin assigns their environments to the enterprise policy. Once the environment is assigned and saved, Dataverse initiates the encryption process to set all the environment data, and encrypt it with the customer-managed key.
Enable Managed environment to be added to the enterprise policy
- Sign in to the Power Platform admin center.
- In the navigation pane, select Manage.
- In the Manage pane, select Environments, and then select an environment from the available list of environments.
- Select Enable Managed Environments.
- Select Enable.
Add an environment to the enterprise policy to encrypt data
Important
The environment is disabled when it's added to the enterprise policy for data encryption. The duration of the system downtime is dependent on the size of the database. We recommended that you do a test run by making a copy of the target environment into a test environment to determine the estimated system downtime. The system downtime can be determined by checking the environment's encryption status. The system downtime is between the Encrypting and Encrypting - online statuses. To reduce the system downtime, we change the encryption status to Encrypting - online when all the core encryption steps that required the system to be down are complete. The system can be used by your users while the remaining storage services, such as search and Copilot index, continue to encrypt the data with your customer-managed key.
- Sign in to the Power Platform admin center.
- In the navigation pane, select Security.
- In the Security pane, select Data and Privacy under Settings.
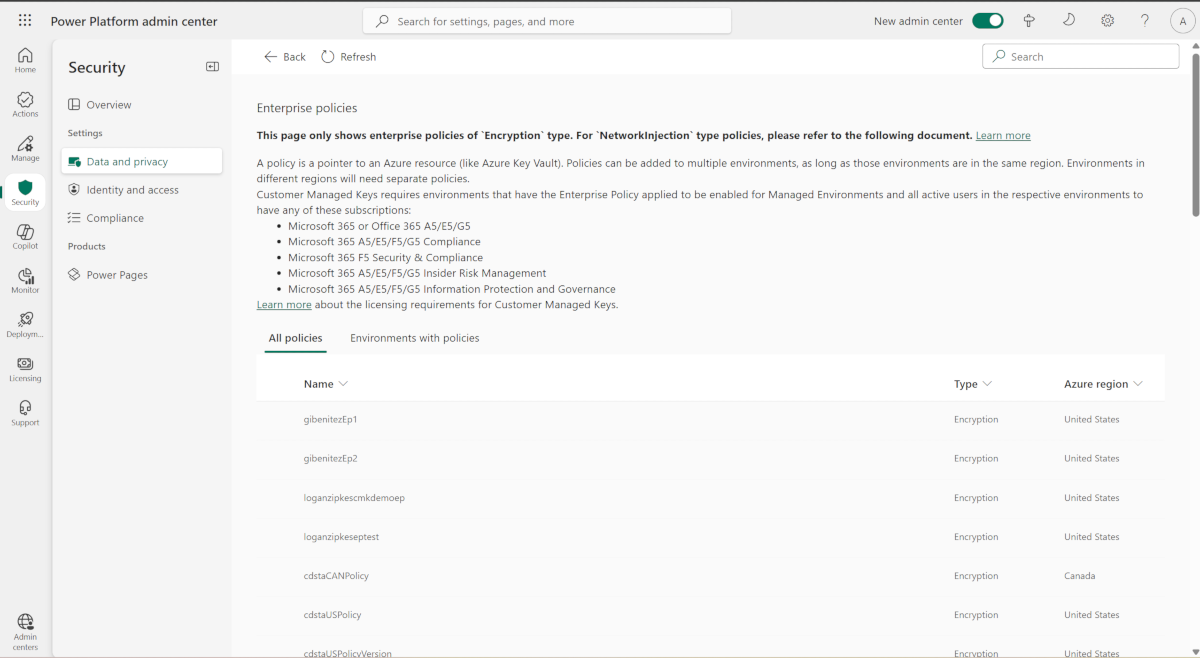
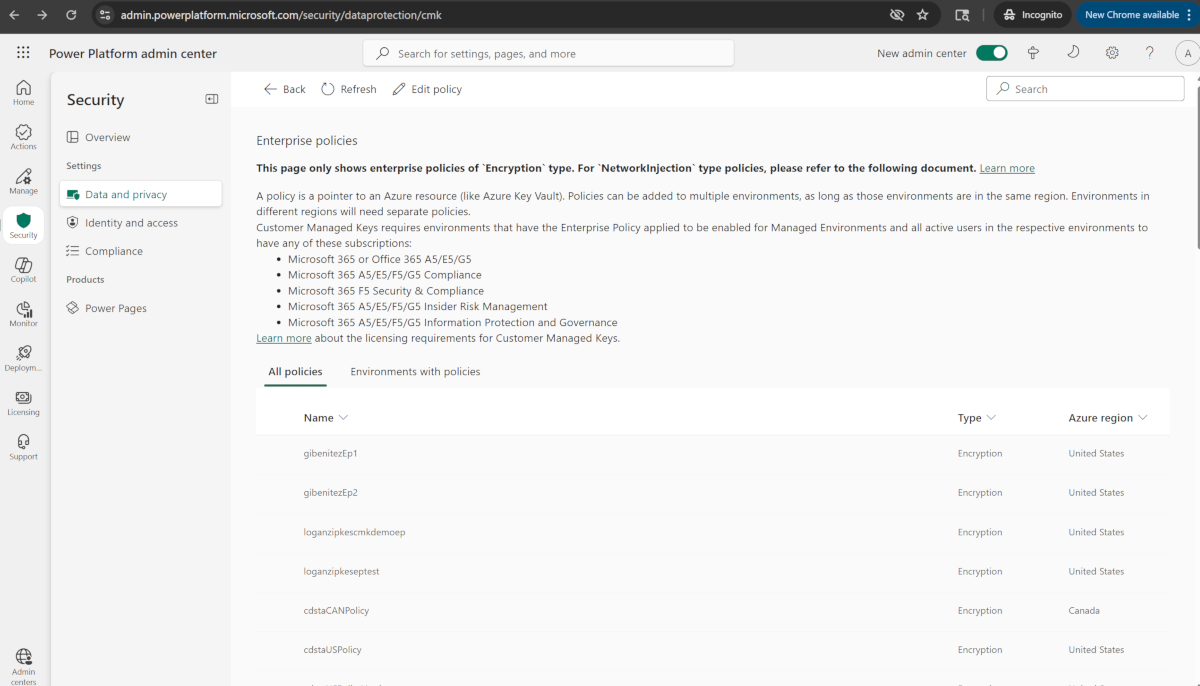
- Select Customer-managed encryption key to go to the Enterprise Policies page.
- Select a policy and then select Edit policy.
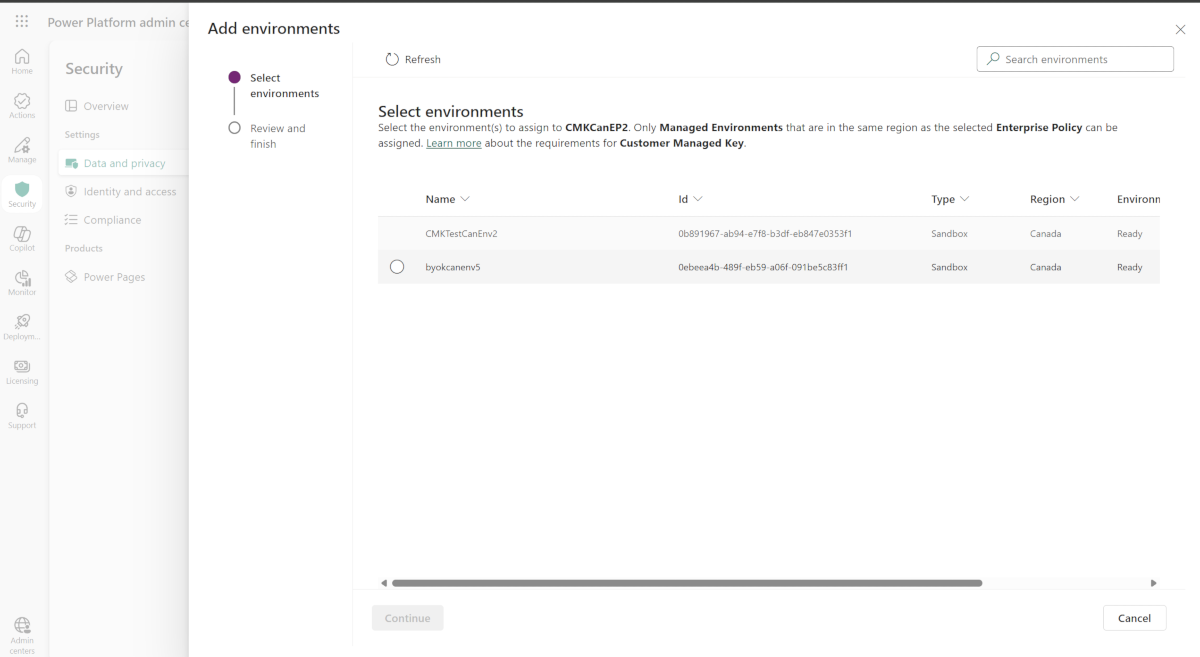
- Select Add environments, select the environment you want, and then select Continue.
- Select Save, and then select Confirm.
Important
- Only environments that are in the same region as the enterprise policy are displayed in the Add environments list.
- The encryption can take up to four days to complete, but the environment might be enabled before the Add environments operation completes.
- The operation might not complete and if it fails, your data continues to be encrypted with Microsoft-managed key. You can rerun the Add environments operation again.
Note
You can only add environments that are enabled as Managed Environments. Trial and Teams environment types can't be added to the enterprise policy.
Remove environments from policy to return to Microsoft-managed key
Follow these steps if you want to return to a Microsoft-managed encryption key.
Important
The environment is disabled when it's removed from the enterprise policy to return data encryption using the Microsoft-managed key.
- Sign in to the Power Platform admin center.
- In the navigation pane, select Security.
- In the Security pane, select Data and Privacy under Settings.
- Select Customer-managed encryption key to go to the Enterprise Policies page.
- Select the Environment with policies tab, and then find the environment you want to remove from customer-managed key.
- Select the All policies tab, select the environment you verified in step 2, and then select Edit policy on the command bar.
- Select Remove environment on the command bar, select the environment you want to remove, and then select Continue.
- Select Save.
Important
The environment is disabled when it's removed from the enterprise policy to revert the data encryption to the Microsoft-managed key. Do not delete or disable the key, delete or disable the key vault, or remove the enterprise policy's permissions to the key vault. The key and key vault's access is necessary to support database restoration. You can delete and remove the enterprise policy's permissions after 30 days.
Review the environment's encryption status
Review the encryption status from Enterprise policies
Sign in to the Power Platform admin center.
In the navigation pane, select Security.
In the Security pane, select Data and Privacy under Settings.
Select Customer-managed encryption key to go to the Enterprise Policies page.
Select a policy, and then on the command bar, select Edit policy.
Review the environment's Encryption status in the Environments with this policy section.
Note
The environment's encryption status can be:
Encrypting - The customer-managed key encryption process is running and the system is disabled for online use.
Encrypting - online - All core services encryption that required system downtime is complete and system is enabled for online use.
Encrypted - The enterprise policy encryption key is active and the environment is encrypted with your key.
Reverting - The encryption key is being changed from customer-managed key to Microsoft-managed key and the system is disabled for online use.
Reverting - online - All core services encryption that required system downtime have reverted the key and the system is enabled for online use.
Microsoft Managed key - The Microsoft-managed key encryption is active.
Failed - The enterprise policy encryption key isn't used by all Dataverse storage services. They require more time to process and you can rerun the Add environment operation. Contact Support if the rerun operation fails.
A Failed encryption status doesn't impact your environment data and its operations. This means that some of the Dataverse storage services are encrypting your data with your key and some continue to use the Microsoft-managed key. A revert isn't recommended as when you rerun the Add environment operation, the service resumes from where it left off.
Warning - The enterprise policy encryption key is active and one of the service's data continues to be encrypted with the Microsoft-managed key. Learn more in Power Automate CMK application warning messages.
Review the encryption status from the Environment History page
You can see the environment history.
Sign in to the Power Platform admin center.
In the navigation pane, select Manage.
In the Manage pane, select Environments, and then select an environment from the available list of environments.
On the command bar, select History.
Locate the history for Update Customer Managed Key.
Note
The Status shows Running when the encryption is in progress. It shows Succeeded when the encryption is complete. The status shows Failed when there's some problem with one of the services not able to apply the encryption key.
A Failed state can be a warning and you don't need to rerun the Add environment option. You can confirm if it's a warning.
Change the environment's encryption key with a new enterprise policy and key
To change your encryption key, create a new key and a new enterprise policy. You can then change the enterprise policy by removing the environments and then adding the environments to the new enterprise policy. The system is down two times when changing to a new enterprise policy - 1) to revert the encryption to Microsoft-managed key and 2) to apply the new enterprise policy.
Tip
To rotate the encryption key, we recommend using the Key vaults' New version or setting a Rotation policy.
- In the Azure portal, create a new key and a new enterprise policy. More information: Create encryption key and grant access and Create an enterprise policy
- Grant the new enterprise policy access to the old key.
- After the new key and enterprise policy are created, Sign in to the Power Platform admin center.
- In the navigation pane, select Security.
- In the Security pane, select Data and Privacy under Settings.
- Select Customer-managed encryption key to go to the Enterprise Policies page.
- Select the Environment with policies tab, and then find the environment you want to remove from customer-managed key.
- Select the All policies tab, select the environment you verified in step 2, and then select Edit policy on the command bar.
- Select Remove environment on the command bar, select the environment you want to remove, and then select Continue.
- Select Save.
- Repeat steps 2-10 until all environments in the enterprise policy have been removed.
Important
The environment is disabled when it's removed from the enterprise policy to revert the data encryption to the Microsoft-managed key. Do not delete or disable the key, delete or disable the key vault, or remove the enterprise policy's permissions to the key vault. Grant the new enterprise policy to the old key vault. The key and key vault's access is necessary to support database restoration. You may delete and remove the enterprise policy's permissions after 30 days.
- After all the environments are removed, from the Power Platform admin center go to Enterprise policies.
- Select the new enterprise policy, and then select Edit policy.
- Select Add environment, select the environments that you want to add, and then select Continue.
Important
The environment is disabled when it's added to the new enterprise policy.
Rotate the environment's encryption key with a new key version
You can change the environment’s encryption key by creating a new key version. When you create a new key version, the new key version is automatically enabled. All the storage resources detect the new key version and start applying it to encrypt your data.
When you modify the key or the key version, the protection of the root encryption key changes, but the data in the storage always remains encrypted with your key. There's no more action required on your part to ensure that your data is protected. Rotating the key version doesn't impact performance. There's no downtime associated with rotating the key version. It can take 24 hours for all the resource providers to apply the new key version in the background. The previous key version must not be disabled as it's required for the service to use it for the re-encryption and for the support of database restoration.
To rotate the encryption key by creating a new key version, use the following steps.
- Go to the Azure portal > Key Vaults and locate the key vault where you want to create a new key version.
- Navigate to Keys.
- Select the current, enabled key.
- Select + New Version.
- The Enabled setting defaults to Yes, which means that the new key version is automatically enabled upon creation.
- Select Create.
Tip
To comply with your key rotation policy, you can rotate the encryption key using the Rotation policy. You can either configure a rotation policy or rotate, on demand, by invoking Rotate now.
Important
The new key version is automatically rotated in the background and there's no action required by the Power Platform admin. It's important that the previous key version must not be disabled or deleted for, at least, 28 days to support database restoration. Disabling or deleting the previous key version too early can take your environment offline.
View the list of encrypted environments
- Sign in to the Power Platform admin center.
- In the navigation pane, select Security.
- In the Security pane, select Data and Privacy under Settings.
- Select Customer-managed encryption key to go to the Enterprise Policies page.
- On the Enterprise policies page, select the Environments with policies tab. The list of environments that were added to enterprise policies are displayed.
Note
There might be situations where the Environment status or the Encryption status show a Failed status. When this occurs, you can try rerunning the Add environment operation or submit a Microsoft Support request for help.
Environment database operations
A customer tenant can have environments that are encrypted using the Microsoft-managed key and environments that are encrypted with the customer-managed key. To maintain data integrity and data protection, the following controls are available when managing environment database operations.
Restore The environment to overwrite (the restored to environment) is restricted to the same environment that the backup was taken from or to another environment that is encrypted with the same customer-managed key.
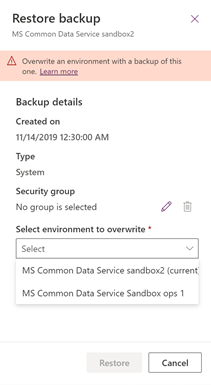
-
The environment to overwrite (the copied to environment) is restricted to another environment that is encrypted with the same customer-managed key.
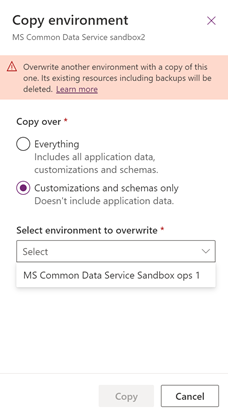
Note
If a Support Investigation environment was created to resolve support issue in a customer-managed environment, the encryption key for the Support Investigation environment must be changed to customer-managed key before the Copy environment operation can be performed.
Reset The environment's encrypted data is deleted including backups. After the environment is reset, the environment encryption will revert back to the Microsoft-managed key.