Note
Access to this page requires authorization. You can try signing in or changing directories.
Access to this page requires authorization. You can try changing directories.
APPLIES TO: All API Management tiers
This article describes how to import an Azure container app to Azure API Management as an API and test the imported API by using the Azure portal.
Note
Currently, this feature isn't available in workspaces.
In this article, you learn how to:
- Import a container app that exposes a web API
- Test the API in the Azure portal
Expose a container app by using API Management
Azure Container Apps allows you to deploy containerized apps without managing complex infrastructure. API developers can write code with their preferred programming language or framework, build microservices with full support for Distributed Application Runtime (Dapr), and scale based on HTTP traffic or other events.
By using API Management to expose a web API that's hosted in a container app, you gain the following benefits:
- Decouple managing and securing the frontend that's exposed to API consumers from managing and monitoring the backend web API.
- Manage web APIs hosted as container apps in the same environment as your other APIs.
- Apply policies to change API behavior, such as call-rate limiting.
- Direct API consumers to the customizable API Management developer portal so they can discover and learn about your APIs, request access, and try APIs.
For more information, see About API Management.
OpenAPI specification vs. wildcard operations
API Management supports importing container apps that provide an OpenAPI specification (a Swagger definition). An OpenAPI specification isn't required, but we recommend that you provide one. API Management can import individual operations, which allows you to validate, manage, secure, and update configurations for each operation separately.
If the container app exposes an OpenAPI specification, API Management creates API operations that map directly to the definition. API Management will look in several locations for an OpenAPI specification:
- The container app configuration
/openapi.json/openapi.yml/swagger/v1/swagger.json
If an OpenAPI specification isn't provided, API Management generates wildcard operations for the common HTTP verbs (GET, PUT, and so on). You can still take advantage of the same API Management features, but operations aren't defined at the same level of detail.
In either case, you can edit or add operations to the API after you import it.
Example
Your backend container app might support two GET operations:
https://<app-service>.azurewebsites.net/customer/{id}https://<app-service>.azurewebsites.net/customers
You import the container app to your API Management service at a path like https://<api>.azure-api.net/store. The following table shows the operations that are imported to API Management, either with or without an OpenAPI specification:
| Type | Imported operations | Sample requests |
|---|---|---|
| OpenAPI specification | GET /customer/{id}GET /customers |
GET https://<api>.azure-api.net/store/customer/1GET https://<api>.azure-api.net/store/customers |
| Wildcard | GET /* |
GET https://contosoapi.azure-api.net/store/customer/1GET https://<api>.azure-api.net/store/customers |
The wildcard operation allows the same requests to the backend service as the operations in the OpenAPI specification. However, the OpenAPI-specified operations can be managed separately in API Management.
Prerequisites
- Complete the Create an Azure API Management instance quickstart.
- Make sure there's a container app that exposes a web API in your subscription. For more information, see Container Apps documentation.
Import and publish a backend API
Navigate to your API Management service in the Azure portal and select APIs > APIs in the left pane.
Under Create from Azure resource, select Container App:
Select Browse to see a list of container apps in your subscription.
Select a container app. If an OpenAPI definition is associated with the selected container app, API Management fetches it and imports it. If an OpenAPI definition isn't found, API Management exposes the API by generating wildcard operations for common HTTP verbs.
Add an API URL suffix. The suffix is a name that identifies the API in the API Management instance. It has to be unique in the API Management instance.
Associate the API with a product. Select Full and then, in Product, select the product. In this case, the Unlimited product is used. If you want the API to be published and be available to developers, you need to add it to a product.
Note
Products are associations of one or more APIs. You can include many APIs and offer them to developers through the developer portal. Developers must first subscribe to a product to get access to the API. When they subscribe, they get a subscription key that's good for any API in that product. If you created the API Management instance, you're an administrator and subscribed to every product by default.
In some pricing tiers, an API Management instance comes with two sample products when you create it:
- Starter
- Unlimited
Enter other API settings. You can set these values when you create the API or configure them later on the Settings tab. These settings are explained in the Import and publish your first API tutorial.
Select Create.


Test the new API in the Azure portal
You can call operations directly from the Azure portal. This method is a convenient way to view and test the operations of an API. You can also test the API in the developer portal or by using your own REST client tools.
To test the API in the Azure portal:
Select the API you created in the previous step.
Select the Test tab.
Select an operation.
The page displays fields for query parameters and fields for the headers. One of the headers is
Ocp-Apim-Subscription-Key. This header is for the subscription key of the product that's associated with the API. If you created the API Management instance, you're an administrator, so the key is filled in automatically.Select Send.
When the test is successful, the backend responds with 200 OK and some data.
Test wildcard operation in the portal
When wildcard operations are generated, the operations might not map directly to the backend API. For example, a wildcard GET operation imported in API Management uses the path / by default. However, your backend API might support a GET operation at the following path:
/api/TodoItems
To test the /api/TodoItems path:
Select the API that you created, and then select the operation.
Select the Test tab.
In Template parameters, update the value next to the wildcard (*) name. For example, enter
api/TodoItems. This value is appended to the path/for the wildcard operation.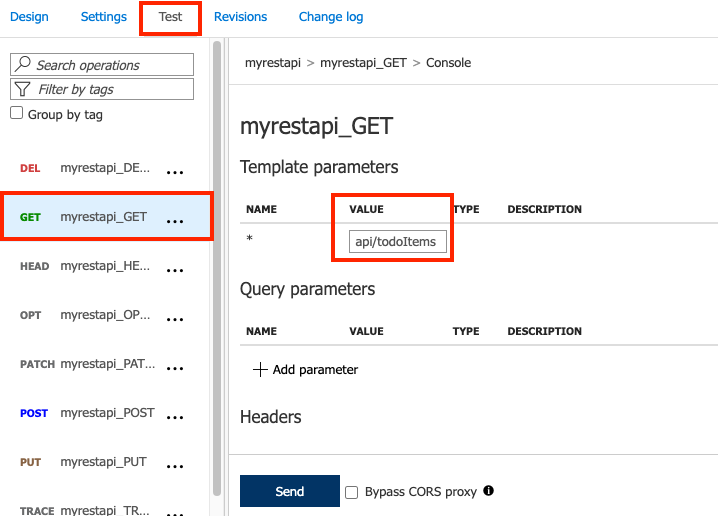
Select Send.

Append other APIs
You can compose an API out of APIs that are exposed by different services, including:
- An OpenAPI specification
- A SOAP API
- A GraphQL API
- A Web App that's hosted in Azure App Service
- Azure Functions
- Azure Logic Apps
- Azure Service Fabric
Note
When you import an API, the operations are appended to your current API.
To append an API to an existing API:
Go to your Azure API Management instance in the Azure portal:

Select APIs on the Overview page or select APIs > APIs in the menu on the left.

Select the ellipsis (...) next to the API that you want to append another API to.
Select Import from the drop-down menu:
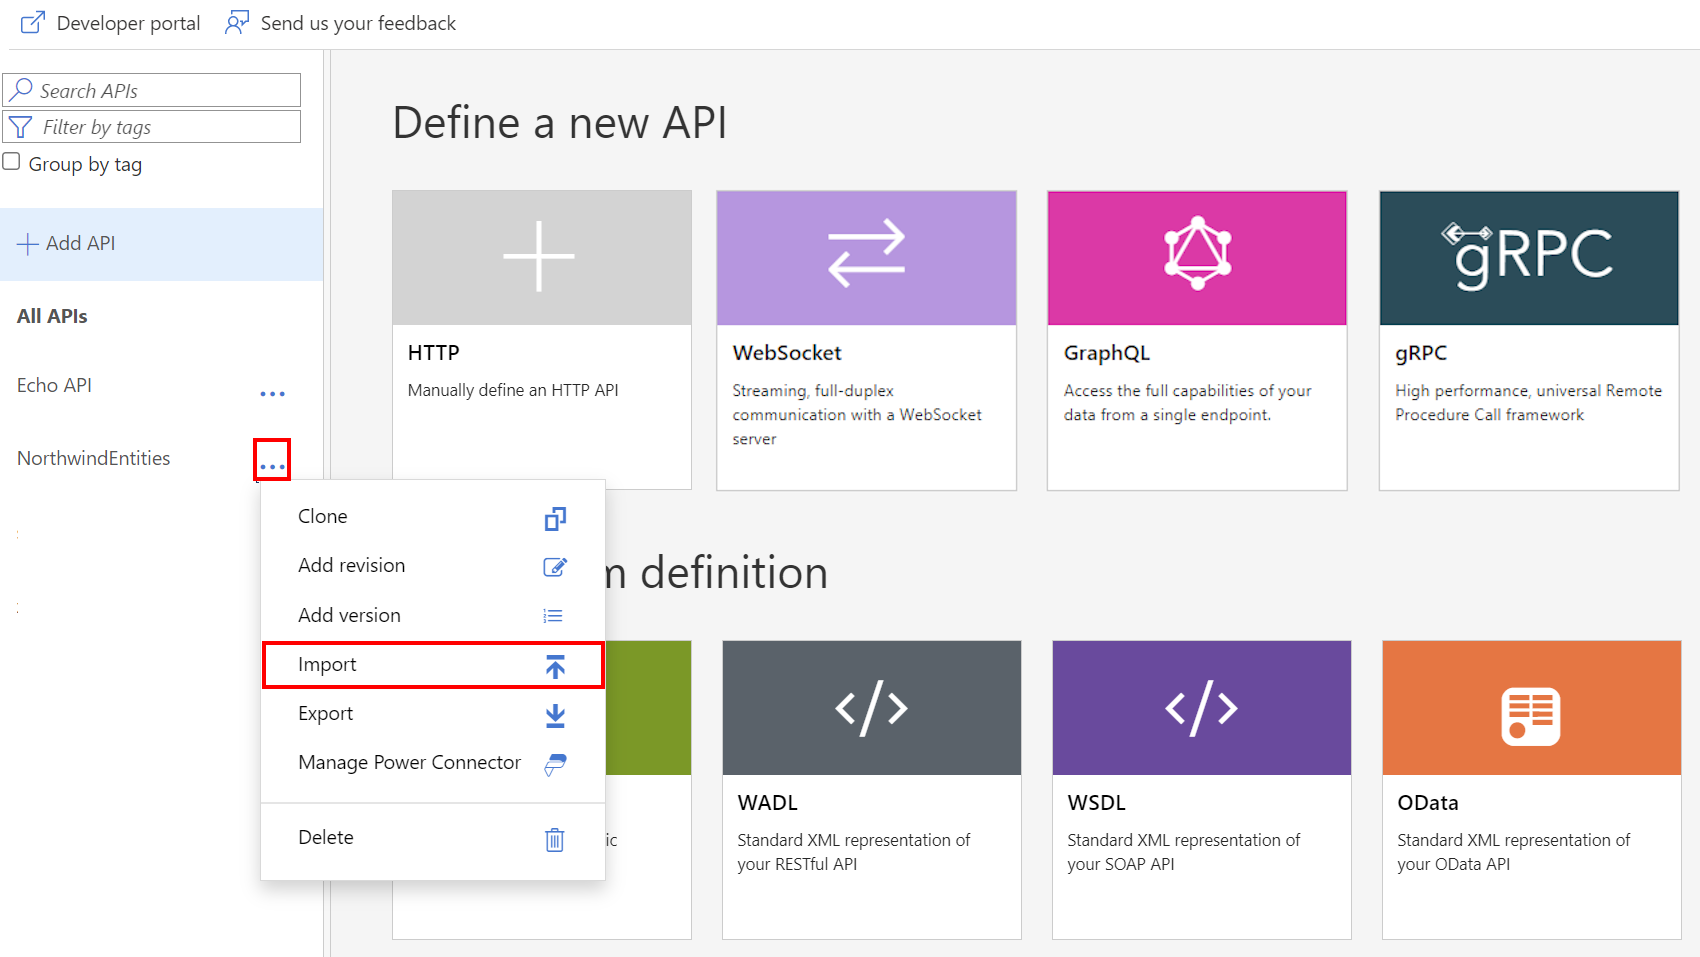
Select a service from which to import an API.


Related content
- API import limitations
- Import an OpenAPI specification
- Import a SOAP API
- Import a SOAP API and convert it to REST
- Import an App Service API
- Import a container app API
- Import a WebSocket API
- Import a GraphQL API
- Import a GraphQL schema and set up field resolvers
- Import a function app API
- Import a logic app API
- Import a Service Fabric service
- Import an Azure AI Foundry API
- Import an Azure OpenAI API
- Import an LLM API
- Import an OData API
- Export a REST API as an MCP server
- Expose an existing MCP server
- Import an A2A agent API
- Import SAP OData metadata
- Import a gRPC API
- Edit an API