Note
Access to this page requires authorization. You can try signing in or changing directories.
Access to this page requires authorization. You can try changing directories.
Staging is a predeployment step that allows you to validate and download resources before they are deployed to the edge cluster. This process helps ensure that all configurations, images, and dependencies are correctly set up, ensuring reliable deployments within limited maintenance windows.
Some common scenarios where staging is beneficial are:
- Users with factories located in remote areas where network latency can increase the risk of deployment failures.
- Users manage large-scale deployments, and downloading sizable container images from Azure Container Registry (ACR) during limited maintenance windows can be challenging.
Prerequisites
- An Azure subscription. If you don't have an Azure subscription, create one for free before you begin.
- Set up your environment for workload orchestration. If you haven't, go to Prepare your environment for workload orchestration to set up the prerequisites.
Set up Azure Container Registry (ACR)
To stage resources, you need to set up an Azure Container Registry (ACR) to store the container images and other artifacts required for your deployments.
Create an ACR in the Azure portal with premium SKU.
acrName="<acr_name>"
rg="<resource_group>"

az acr create --resource-group "$rg" --name "$acrName" --sku Premium
az acr update --name "$acrName" --data-endpoint-enabled
Place any repository in the ACR. The connected registry requires at least one repository to be present in the ACR.
# Login to the ACR for pulling operations
az acr login --name "$acrName"
docker pull hello-world
docker tag hello-world:latest "$acrName.azurecr.io/hello-world:latest"
docker push "$acrName.azurecr.io/hello-world:latest"
Create connected registry for the ACR.
connectedRegistryName="<any connected registry name>" # leave "staging-temp" as default value, connected registry doesn't need this repo to be existing but it needs at least one repo.
az acr connected-registry create --registry "$acrName" --name "$connectedRegistryName" --repository "staging-temp" --mode ReadOnly --log-level Debug --yes
Check the connected registry state on ACR. It should show as Offline.
az acr connected-registry list --registry "$acrName" --output table # shows offlineAdd Contributor and Container Registry Contributor and Data Access Configuration Administrator permissions to grant the service principal EdgeConfigurationManagerApp, with object ID
cba491bc-48c0-44a6-a6c7-23362a7f54a9.az role assignment create --assignee "cba491bc-48c0-44a6-a6c7-23362a7f54a9" --role "Contributor" --scope --scope "/subscriptions/$subId/resourceGroups/$rg/providers/Microsoft.ContainerRegistry/registries/$acrName" az role assignment create --assignee "cba491bc-48c0-44a6-a6c7-23362a7f54a9" --role "Container Registry Contributor and Data Access Configuration Administrator" --scope "/subscriptions/$subId/resourceGroups/$rg/providers/Microsoft.ContainerRegistry/registries/$acrName"Check available IP range on cluster to use for connected registry service.
resourceGroup="<resource_group>"
arcCluster="<arc_cluster>"

az aks show --resource-group "$rg" --name "$arcCluster" --query "networkProfile.serviceCidr"
# check IPs which are in use
kubectl get services -A

# Pick an IP which is within the available IP range and is not in use to host the connected registry service
available_ip="<valid_IP>"
Configure a connection string for the connected registry and store it in a JSON file. This connection string is used to authenticate the local connected registry to the cloud.
subId="<subscription_id>"

connectionString=$(az acr connected-registry get-settings \
  --name "$connectedRegistryName" \
  --registry "$acrName" \
  --parent-protocol https \
  --generate-password 1 \
  --query ACR_REGISTRY_CONNECTION_STRING \
  --subscription "$subId" \
  --output tsv \
  --yes)
# Remove carriage return characters (Linux/Mac)
connectionString=$(echo "$connectionString" | tr -d '\r')
# Create valid JSON and write it to the file
echo "{\"connectionString\": \"$connectionString\"}" > protected-settings-extension.json
Open protected-settings-extension.json file in editor. If the file is encoded with "UTF-8 with BOM", change it to "UTF-8" and save the file.
Install connected registry CLI extension on your ARC cluster to enable staging.
resourceGroup="<resource_group>"
arcCluster="<arc_cluster>"

az k8s-extension create --cluster-name "$arcCluster" --cluster-type connectedClusters --extension-type Microsoft.ContainerRegistry.ConnectedRegistry --name "$connectedRegistryName" --resource-group "$resourceGroup" --config service.clusterIP="$available_ip" --config pvc.storageRequest=20Gi --config cert-manager.install=false --config-protected-file protected-settings-extension.json
# if you want to use a storage class other than the default one, add below flag: #--config pvc.storageClassName=<storage class name>

# confirm installation successful: (you should see 3 pods running, one for connected-registry and others for containerd on each node)
kubectl get pods -n connected-registry

# check connected-registry state on ACR:
az acr connected-registry list --registry "$acrName" --output table # shows online
Note
If you use Tanzu Kubernetes Grid (TKG) clusters, you need to follow additional steps to install the connected registry CLI extension. See the Install connected registry for Tanzu Kubernetes clusters section.
(Optional) You can verify the installation status of the connected registry on Azure portal. Navigate to the Azure Container Registry resource, select Connected Registries, and check the status of your connected registry. It should show as Online.
Create a new client token or add an existing one to the connected registry.
az acr scope-map create --name "all-repos-read" --registry "$acrName" --repository "staging-temp" content/read metadata/read --description "Scope map for pulling from ACR"

az acr token create --name "all-repos-pull-token" --registry "$acrName" --scope-map "all-repos-read"

az acr connected-registry update --name "$connectedRegistryName" --registry "$acrName" --add-client-token "all-repos-pull-token"
Save the client token in a k8s secret to use it later in a secret.yaml file. You can choose any of the two passwords generated by the previous command.
apiVersion: v1
data:
    password: <base64-encoded-password>
    username: <base64-encoded-username>
kind: Secret
metadata:
    name: my-acr-secret
    namespace: default
type: Opaque
You can encode the password in base64 format using the following command:
echo -n "<tokenname/value>" | base64Save the secret to cluster.
kubectl apply -f secret.yaml
Install connected registry for Tanzu Kubernetes clusters (Only for TKG clusters)
If you are using Tanzu Kubernetes Grid (TKG) clusters, you need to follow these additional steps to install the connected registry CLI extension. Once the connected registry is installed, you can proceed with steps in the Set up Azure Container Registry (ACR) section.
Add the privilege label to the connected registry namespace.
kubectl label --overwrite ns connected-registry pod-security.kubernetes.io/enforce=privilegedInstall the connected registry CLI extension. You must provide an IP within the valid IP range on Tanzu.
az k8s-extension create --cluster-name "$cluster"  --cluster-type connectedClusters --extension-type Microsoft.ContainerRegistry.ConnectedRegistry --name "$storageName" --resource-group "$rg" --config service.clusterIP=<serviceIP> --config pvc.storageClassName=<storage_class_name> --config pvc.storageRequest=20Gi --config cert-manager.install=false --config-protected-file protected-settings-extension.json
# you can find a valid storage class name in tanzu by the following command:
# kubectl get sc
Enable staging at solution level
To enable staging for a solution, you need to add the staged field to the properties field in the specs.json solution template file associated to a solution version. This field indicates that the solution should be staged before deployment. You need to specify the Azure Container Registry (ACR) resource ID and the image file paths.
    properties: {
      "staged": {
        "acrResourceId": "/subscriptions/<subscription-id>/resourceGroups/<resource-group>/providers/Microsoft.ContainerRegistry/registries/<acr-name>",
        "images": [
            "demo-image:latest"
        ]
      }
    }
Staging is triggered automatically once the solution is configured.
Note
If you run into any issues while staging a solution, see the Troubleshooting guide.
Prepare the solution template version for staging
Upload an image
Upload a container image to the Azure Container Registry (ACR) that you created in the previous step.
image="<image_name>"

# Copy your existing file into the build context (optional, if not already there)
cp /path/to/your/file ./bigfile
# Build the Docker image
docker build -t "$image" .
# Tag the image for Azure Container Registry
docker tag "$image" "$acrName.azurecr.io/$image:latest"
# Push the image to ACR
docker push "$acrName.azurecr.io/$image:latest"
You can confirm that the image is successfully uploaded.
az acr repository list --name "$acrName" --output table
Create a target
scopename="staging"
targetName="Line01"

az workload-orchestration target create \
    --resource-group "$rg" \
    --location "$l" \
    --name "$targetName" \
    --display-name "$targetName" \
    --hierarchy-level line \
    --capabilities "This is the capability" \
    --description "This is Line01 Site" \
    --solution-scope "$scopename" \
    --target-specification "@targetspecs.json" \
    --extended-location "@custom-location.json" \
    --context-id "/subscriptions/$subId/resourceGroups/$rg/providers/private.edge/contexts/$contextName"
Create solution template
Create the solution schema file.
az workload-orchestration schema create --resource-group "$rg" --version "1.0.0" --schema-name "${resourcePrefix}-SS" --schema-file ./demo-app-schema.yaml -l "$l"Make sure to set the correct schema name and input the image that you build in demo-app-config-template.yaml repository:
configs:
  image:
    repository: ${{$val(LocalConnectedRegistryIP)}}+/<image_name>
In spec.json, change the stage image to your own image:
"staged": {
    "acrResourceId": "<your_acr_resource_ID>",
    "images": [
        "<your-image-name>:<tag>"
    ]
}
Create a solution template file.
solutionTemplateName="Line01-Solution"

az workload-orchestration solution-template create \
    --solution-template-name "$solutionTemplateName" \
    -g "$rg" \
    -l "$l" \
    --capabilities "This is the capability" \
    --description "This is Staging Solution" \
    --config-template-file "./demo-app-config-template.yaml" \
    --specification "@demo-app-spec.json" \
    --version "1.0.0"
Set configuration at target level
Specify the service IP address that you assigned to the connected registry service. This configuration step is required only once and does not need to be repeated for subsequent deployments.
az workload-orchestration configuration set -g "$rg" --solution-template-name "$solutionTemplateName" --target-name "$targetName"
Resolve and review the template version
Resolve the solution template version.
az workload-orchestration target resolve --solution-name "$solutionTemplateName" --solution-version "1.0.0" --resource-group "$rg" --target-name "$targetName"Review the template version.
az workload-orchestration target review --solution-template-version-id /subscriptions/$subId/resourceGroups/$rg/providers/Microsoft.Edge/solutionTemplates/$solutionTemplateName/versions/1.0.0 --resource-group "$rg" --target-name "$targetName"
Publish and install the solution
Publish the template version.
reviewId="<input the ID from previous step>"
subId="<your subscription id>"

az workload-orchestration target publish --solution-version-id /subscriptions/$subId/resourceGroups/$rg/providers/private.edge/targets/$targetName/solutions/$solutionName/versions/1.0.0 --resource-group "$rg" --target-name "$targetName"
Check the solution status. It should change from "inReview" to "staging".
curl -H "Authorization: Bearer <access_token>" \
  "https://eastus2euap.management.azure.com/subscriptions/$subId/resourceGroups/$rg/providers/Microsoft.Edge/targets/$targetName/solutions/$solutionName/versions?api-version=2025-01-01-preview"
After publish completed, run the following commands to check that the images are staged locally:
kubectl exec -it <connected_registry_pod> -n $cr -- bash
# (inside the pod)
# cd maestro-tmp
# ./check-acr-images.sh "demo-image-0x:latest"
Install the solution.
az workload-orchestration target install --resource-group "$rg" --target-name "$targetName" --solution-version-id /subscriptions/$subId/resourceGroups/$rg/providers/private.edge/targets/$targetName/solutions/$solutionName$/versions/1.0.0After installation, check that the image is used in deployment.
kubectl describe pod -n "$scopename"
View staged resources
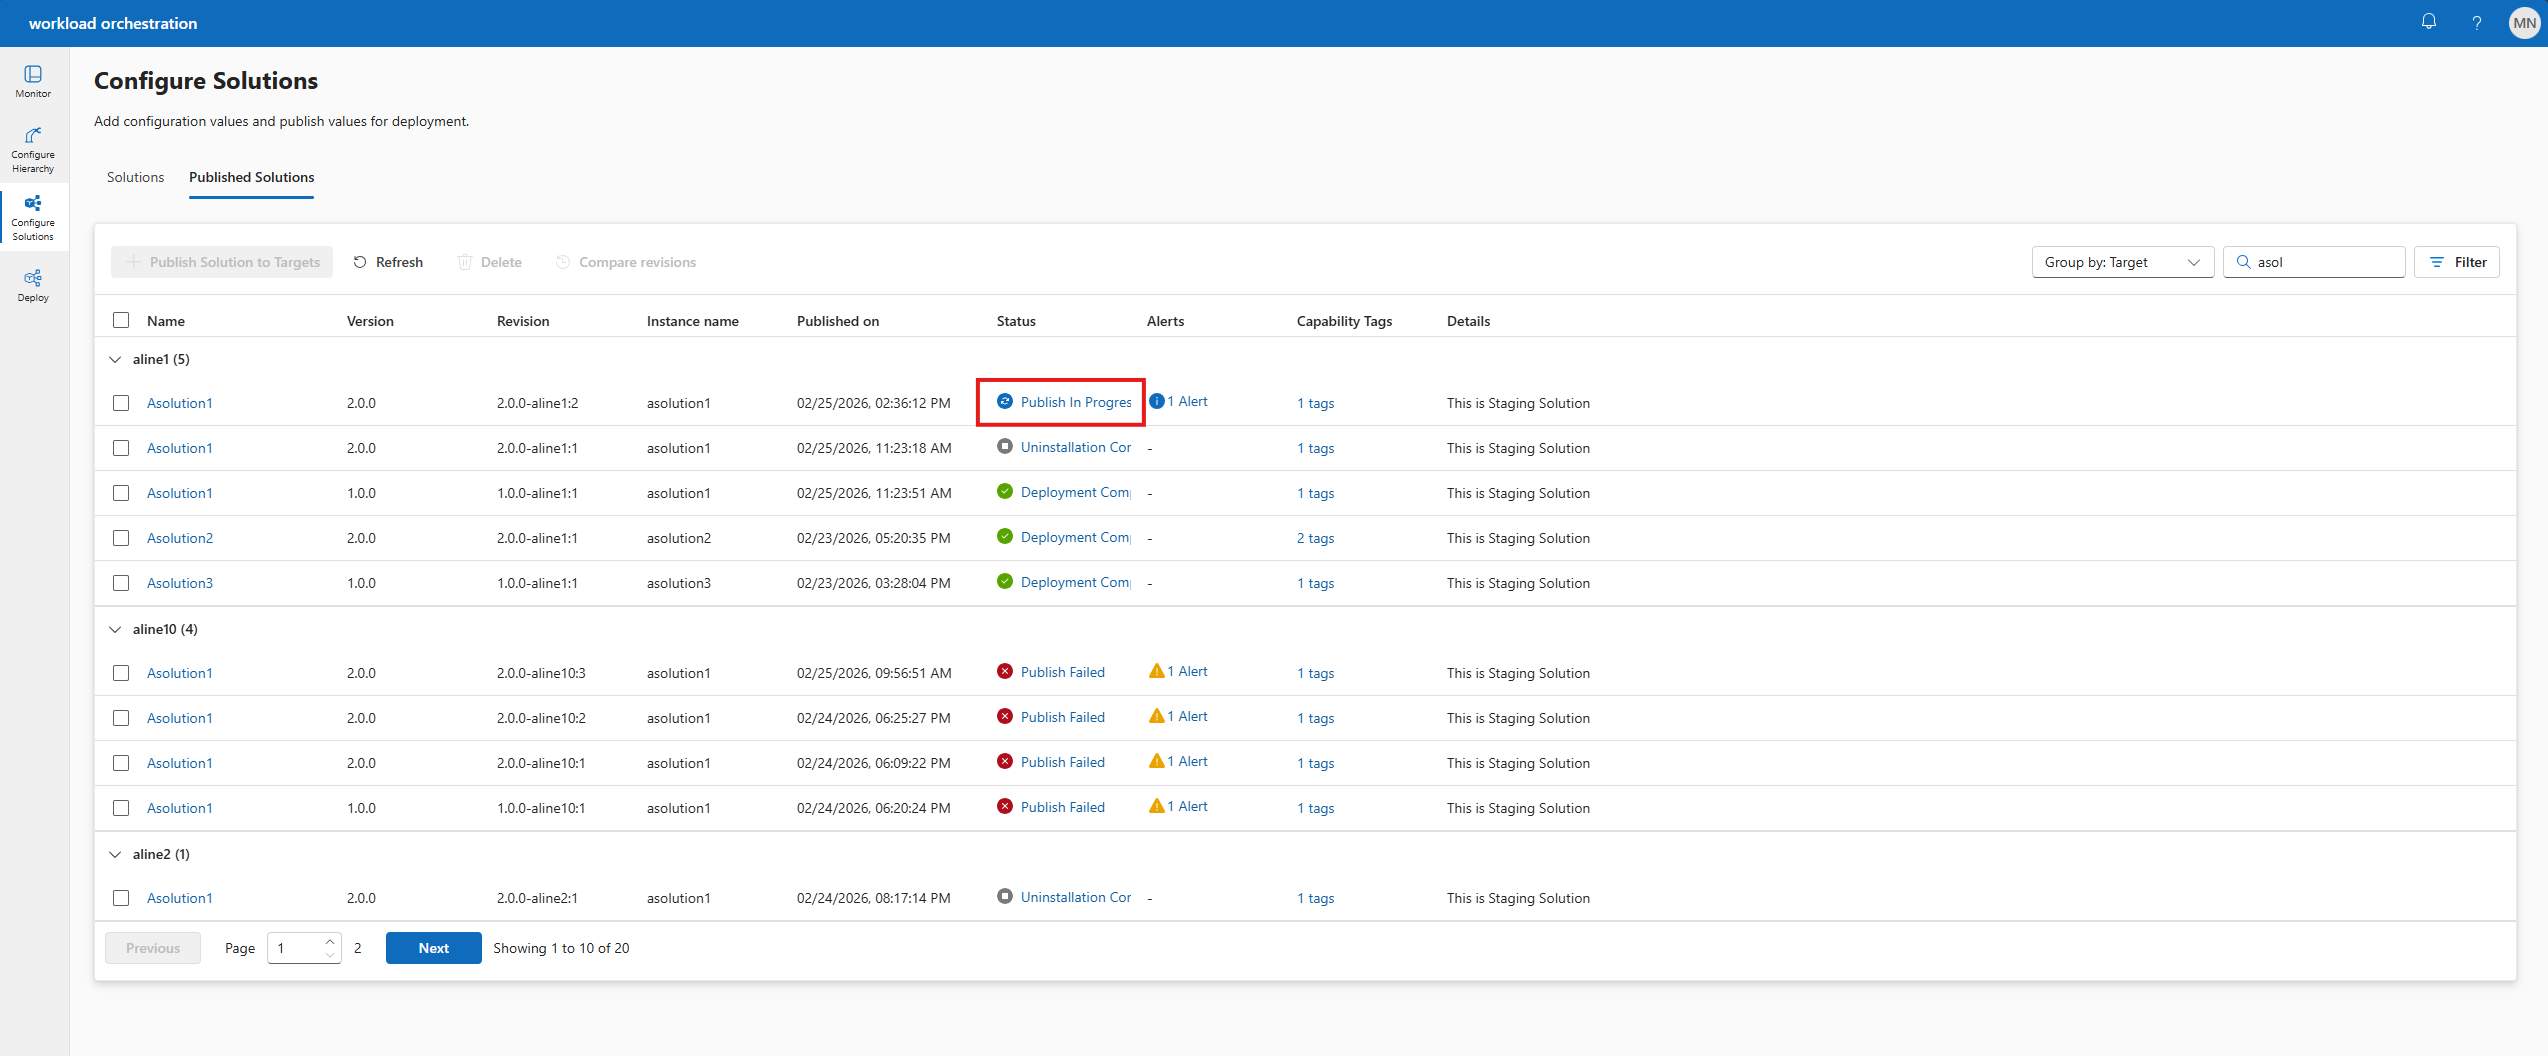
You can view staging details in the Published solutions tab of the workload orchestration portal.
Sign in to the workload orchestration portal and go to the Configure tab on the left side of the page.
Select the Published solutions tab.
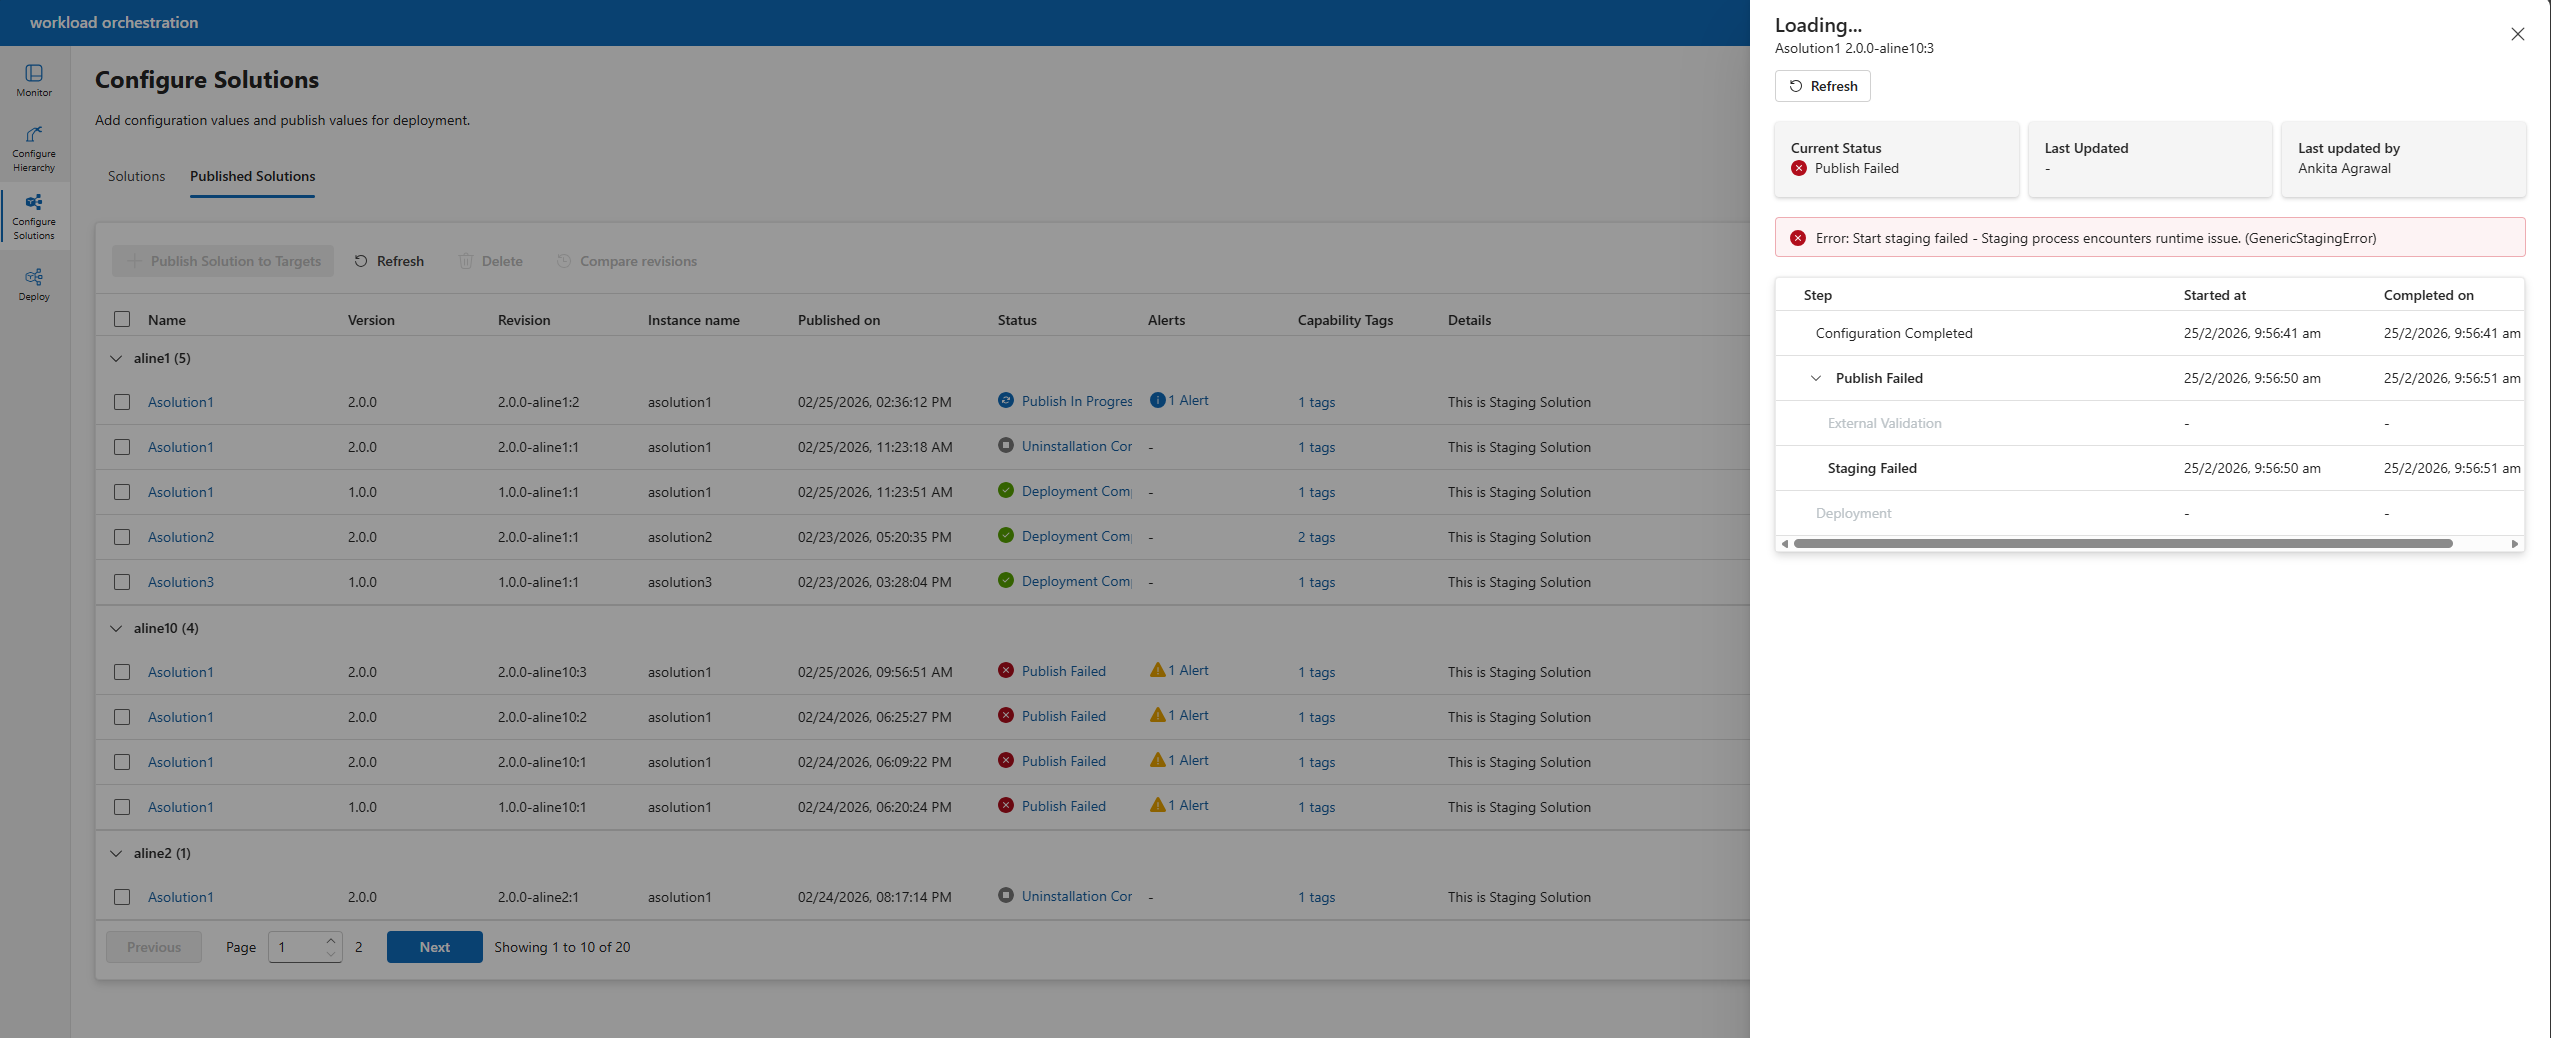
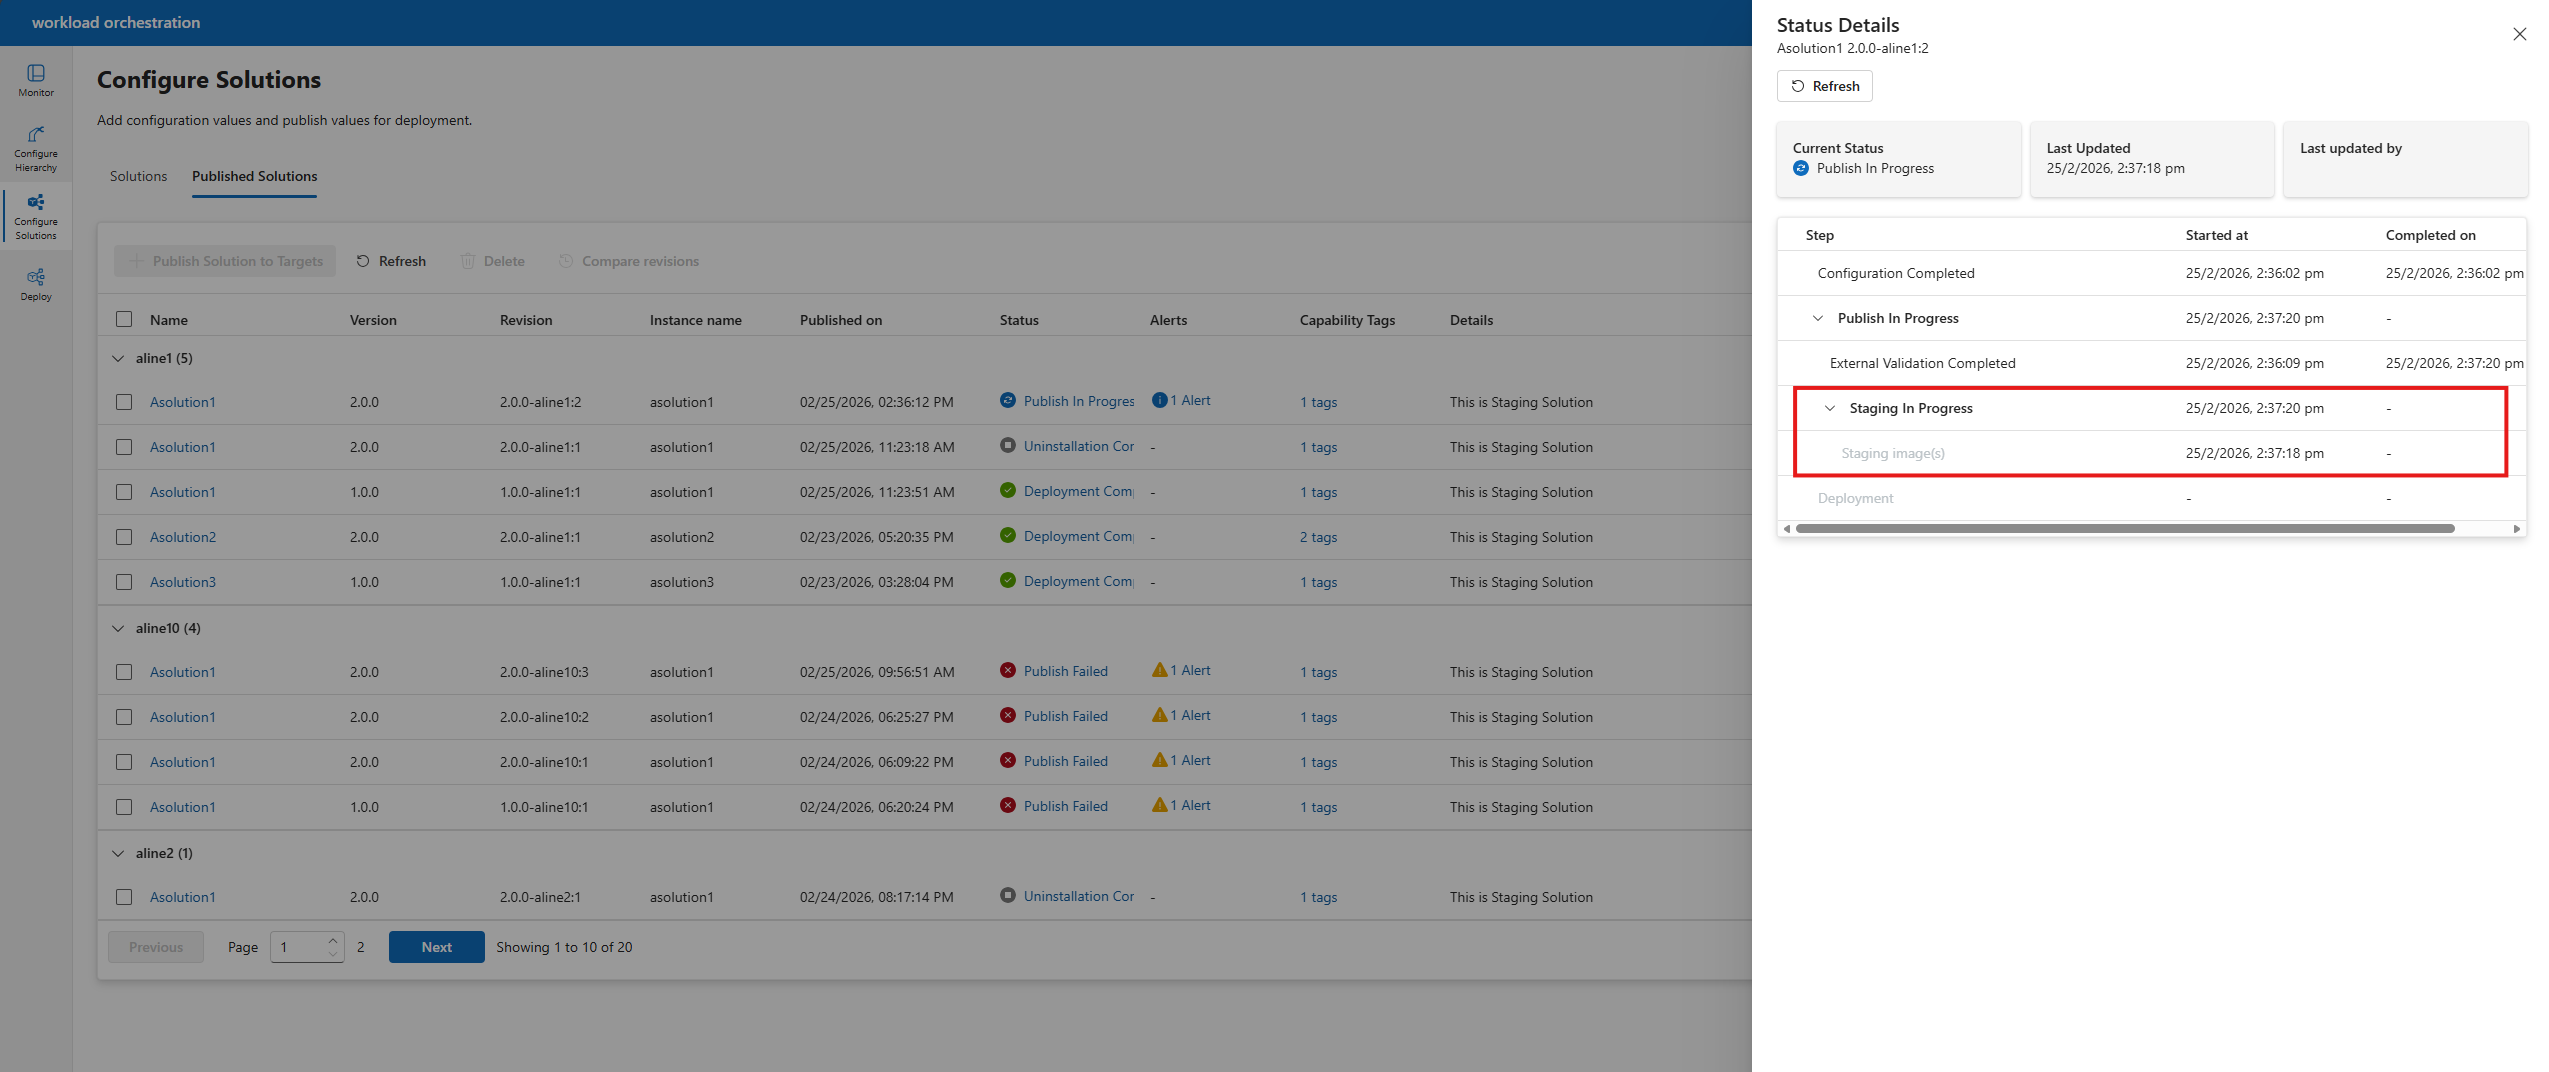
Choose a solution with status Publishing in progress and click on the alert icon to view the details of the staging process.
The status of the staging process is displayed. If the staging is successful, you see a message indicating that images are downloaded to the edge cluster.
If the staging fails, you see an error message indicating the failure. For more information, contact your IT administrator.