Note
Access to this page requires authorization. You can try signing in or changing directories.
Access to this page requires authorization. You can try changing directories.
Azure NetApp Files backup supports policy-based (scheduled) backups and manual (on-demand) backups at the volume level. You can use both types of backups in the same volume. During the configuration process, you'll enable the backup feature for an Azure NetApp Files volume before policy-based backups or manual backups can be taken.
This article explains how to configure policy-based backups. For manual backup configuration, see Configure manual backups.
About policy-based backups
Backups are long-running operations. The system schedules backups based on the primary workload (which is given a higher priority) and runs backups in the background. Depending on the size of the volume being backed up, a backup can run in background for hours. There's no option to select the start time for backups. The service performs the backups based on the internal scheduling and optimization logic.
Assigning a policy creates a baseline snapshot that is the current state of the volume and transfers the snapshot to Azure storage. This baseline snapshot is deleted automatically when the first scheduled backup is complete (based on the policy). If the backup policy is attached to a volume, the backup list will be empty until the baseline snapshot is transferred. When the backup is complete, the baseline backup entry appears in the list of backups for the volume. After the baseline transfer, the list will be updated daily based on the policy. An empty list of backups indicates that the baseline backup is in progress. If a volume already has existing manual backups before you assign a backup policy, the baseline snapshot isn't created. A baseline snapshot is created only when the volume has no prior backups.
If you need to delete a resource group or subscription that contains backups, you should delete any backups first. Deleting the resource group or subscription doesn't delete the backups. You can delete backups by manually.
Configure a backup policy
A backup policy enables a volume to be protected on a regularly scheduled interval. It does not require snapshot policies to be configured. Backup policies will continue the daily cadence based on the time of day when the backup policy is linked to the volume, using the time zone of the Azure region where the volume exists. Weekly schedules are preset to occur each Monday after the daily cadence. Monthly schedules are preset to occur on the first day of each calendar month after the daily cadence. If backups are needed at a specific time/day, consider using manual backups.
You need to create a backup policy and associate the backup policy to the volume that you want to back up. A single backup policy can be attached to multiple volumes. Backups can be temporarily suspended by disabling the policy. A backup policy can't be deleted if it's attached to any volumes.
Before creating the policy, review Azure NetApp Files resource limits.
To enable a policy-based (scheduled) backup:
Sign in to the Azure portal and navigate to Azure NetApp Files.
Select your Azure NetApp Files account.
Select Backups.
Select Backup Policies.
Select Add.
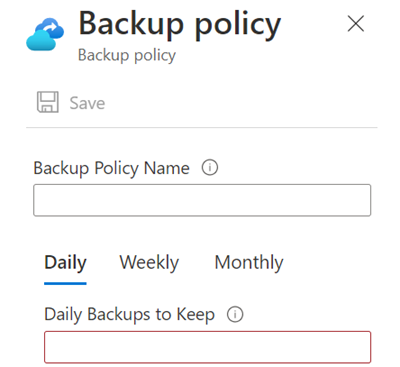
In the Backup Policy page, specify the backup policy name. Enter the number of backups that you want to keep for daily, weekly, and monthly backups. Select Save.
The minimum value for Daily Backups to Keep is 2.

Example of a valid configuration
The following example configuration shows you how to configure a data protection policy on the volume. This configuration results in backing up 15 latest daily snapshots, 6 latest weekly snapshots, and 4 latest monthly snapshots.
- Backup policy:
Daily:Daily Backups to Keep = 15
Weekly:Weekly Backups to Keep = 6
Monthly:Monthly Backups to Keep = 4
Example of an invalid configuration
The following example configuration has a backup policy configured for daily backups. The daily backup policy is below the minimum of two. This configuration would back up only weekly and monthly snapshots.
- Backup policy:
Daily:Daily Backups to Keep = 1
Weekly:Weekly Backups to Keep = 6
Monthly:Monthly Backups to Keep = 4
Assign backup vault and backup policy to a volume
Every Azure NetApp Files volume must have a backup vault assigned before any backups (policy-based or manual) can be taken.
After you assign a backup vault to the volume, you need to assign a backup policy to the volume for policy-based backups to take effects. (For manual backups, a backup policy is optional.)
Note
The active and most current snapshot is required for transferring the backup. As a result, you may see 1 extra snapshot beyond the number of snapshots to keep per the backup policy configuration. If your number of daily backups to keep is set to 2, you may see 3 snapshots related to the backup in the volumes the policy is applied to.
To configure backups for a volume:
Navigate to Volumes then select the volume for which you want to configure backups.
From the selected volume, select Backup then Configure.
In the Configure Backups page, select the backup vault from the Backup vaults drop-down. For information about creating a backup vault, see Create a backup vault.
In the Backup Policy drop-down menu, assign the backup policy to use for the volume. Select OK.
The Vault information is prepopulated.

Next steps
- Understand Azure NetApp Files backup
- Requirements and considerations for Azure NetApp Files backup
- Resource limits for Azure NetApp Files
- Configure manual backups
- Manage backup policies
- Search backups
- Restore a backup to a new volume
- Delete backups of a volume
- Volume backup metrics
- Azure NetApp Files backup FAQs