Quickstart: Create an Azure Cosmos DB account, database, container, and items from the Azure portal
APPLIES TO: ![]() NoSQL
NoSQL
Azure Cosmos DB is Microsoft's globally distributed multi-model database service. You can use Azure Cosmos DB to quickly create and query key/value databases, document databases, and graph databases. This approach benefits from the global distribution and horizontal scale capabilities at the core of Azure Cosmos DB.
This quickstart demonstrates how to use the Azure portal to create an Azure Cosmos DB API for NoSQL account. In that account, you create a document database, and container, and add data to the container. Without a credit card or an Azure subscription, you can set up a free Try Azure Cosmos DB account.
Prerequisites
An Azure subscription or free Azure Cosmos DB trial account.
-
If you don't have an Azure subscription, create an Azure free account before you begin.
-
You can try Azure Cosmos DB for free, without an Azure subscription, and with no commitment required. Alternatively, you can create an Azure Cosmos DB free tier account, with the first 1000 RU/s and 25 GB of storage for free. You can also use the Azure Cosmos DB emulator with a URI of
https://localhost:8081. For the key to use with the emulator, see Authenticating requests.
Create an Azure Cosmos DB account
From the Azure portal menu or the Home page, select Create a resource.
Search for Azure Cosmos DB. Select Create > Azure Cosmos DB.
On the Create an Azure Cosmos DB account page, select the Create option within the Azure Cosmos DB for NoSQL section.
Azure Cosmos DB provides several APIs:
- NoSQL, for document data
- PostgreSQL
- MongoDB, for document data
- Apache Cassandra
- Table
- Apache Gremlin, for graph data
To learn more about the API for NoSQL, see Welcome to Azure Cosmos DB.
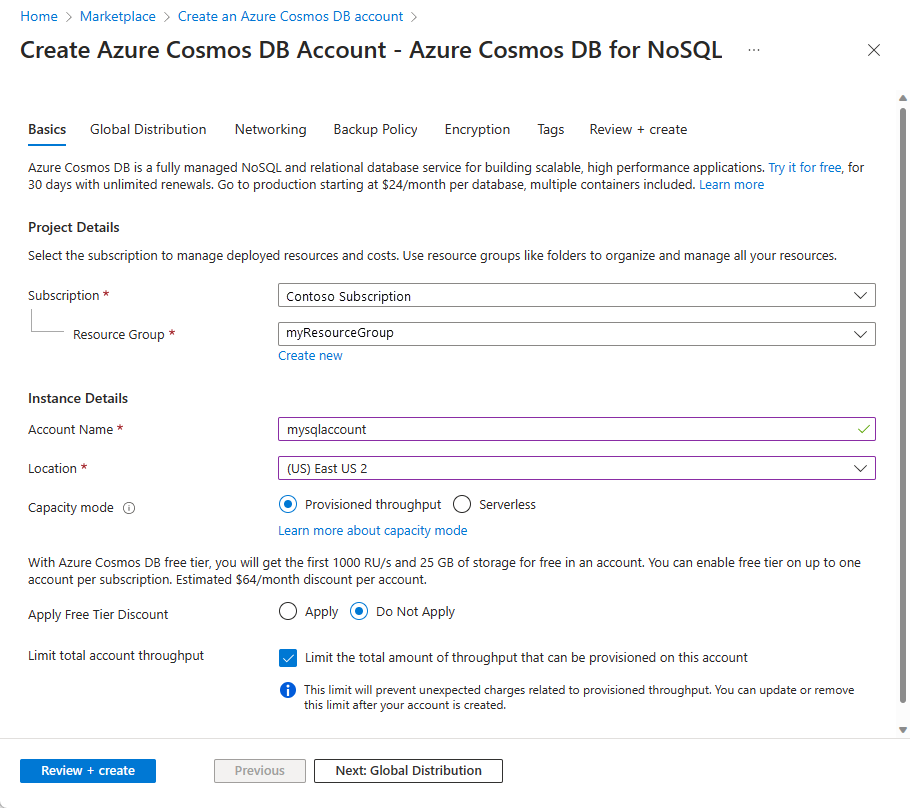
In the Create Azure Cosmos DB Account page, enter the basic settings for the new Azure Cosmos DB account.
Setting Value Description Subscription Subscription name Select the Azure subscription that you want to use for this Azure Cosmos DB account. Resource Group Resource group name Select a resource group, or select Create new, then enter a unique name for the new resource group. Account Name A unique name Enter a name to identify your Azure Cosmos DB account. Because documents.azure.com is appended to the name that you provide to create your URI, use a unique name. The name can contain only lowercase letters, numbers, and the hyphen (-) character. It must be 3-44 characters. Location The region closest to your users Select a geographic location to host your Azure Cosmos DB account. Use the location that is closest to your users to give them the fastest access to the data. Capacity mode Provisioned throughput or Serverless Select Provisioned throughput to create an account in provisioned throughput mode. Select Serverless to create an account in serverless mode. Apply Azure Cosmos DB free tier discount Apply or Do not apply With Azure Cosmos DB free tier, you get the first 1000 RU/s and 25 GB of storage for free in an account. Learn more about free tier. Limit total account throughput Selected or not Limit the total amount of throughput that can be provisioned on this account. This limit prevents unexpected charges related to provisioned throughput. You can update or remove this limit after your account is created. You can have up to one free tier Azure Cosmos DB account per Azure subscription and must opt in when creating the account. If you don't see the option to apply the free tier discount, another account in the subscription has already been enabled with free tier.
Note
The following options are not available if you select Serverless as the Capacity mode:
- Apply Free Tier Discount
- Limit total account throughput
In the Global Distribution tab, configure the following details. You can leave the default values for this quickstart:
Setting Value Description Geo-Redundancy Disable Enable or disable global distribution on your account by pairing your region with a pair region. You can add more regions to your account later. Multi-region Writes Disable Multi-region writes capability allows you to take advantage of the provisioned throughput for your databases and containers across the globe. Availability Zones Disable Availability Zones help you further improve availability and resiliency of your application. Note
The following options are not available if you select Serverless as the Capacity mode in the previous Basics page:
- Geo-redundancy
- Multi-region Writes
Optionally, you can configure more details in the following tabs:
- Networking. Configure access from a virtual network.
- Backup Policy. Configure either periodic or continuous backup policy.
- Encryption. Use either service-managed key or a customer-managed key.
- Tags. Tags are name/value pairs that enable you to categorize resources and view consolidated billing by applying the same tag to multiple resources and resource groups.
Select Review + create.
Review the account settings, and then select Create. It takes a few minutes to create the account. Wait for the portal page to display Your deployment is complete.
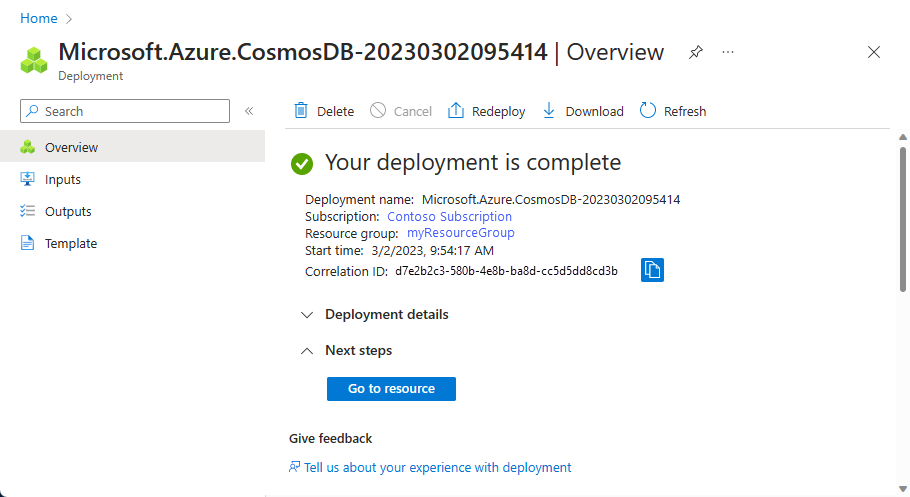
Select Go to resource to go to the Azure Cosmos DB account page.


Add a database and a container
You can use the Data Explorer in the Azure portal to create a database and container.
Select Data Explorer from the left navigation on your Azure Cosmos DB account page, and then select New Container > New Container.
You may need to scroll right to see the New Container window.
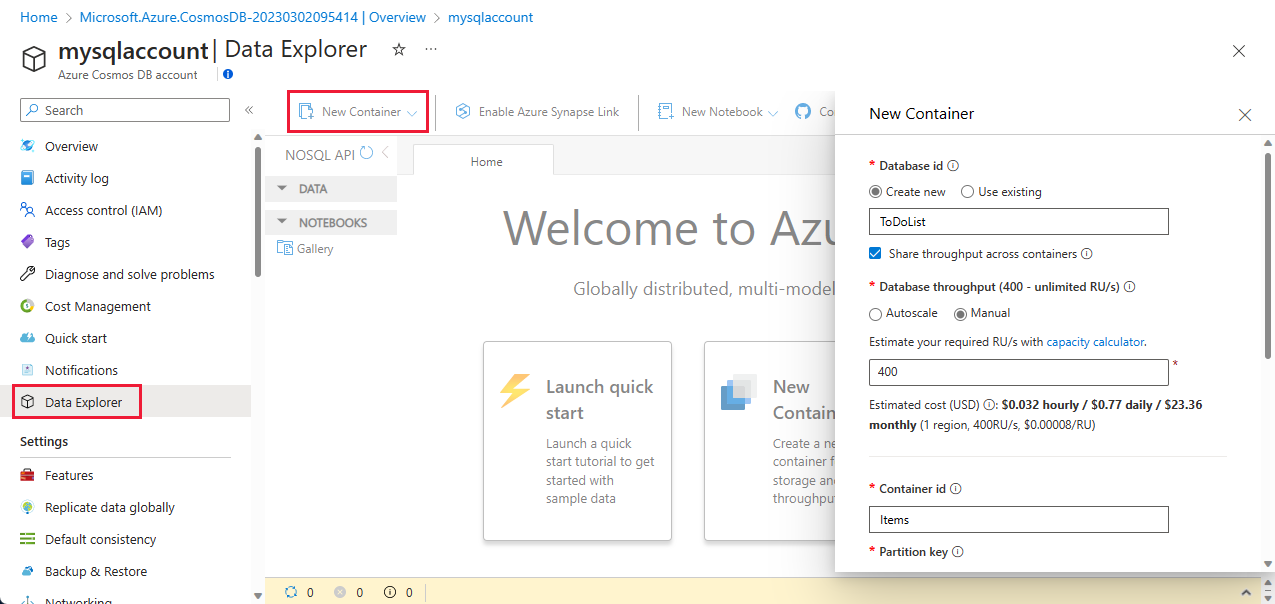
In the New Container pane, enter the settings for the new container.
Setting Suggested value Description Database id ToDoList Enter ToDoList as the name for the new database. Database names must contain 1-255 characters, and they can't contain /,\,#,?, or a trailing space. Check the Share throughput across containers option. It allows you to share the throughput provisioned on the database across all the containers within the database. This option also helps with cost savings.Database throughput Autoscale or Manual Manual throughput allows you to scale request units per second (RU/s) yourself whereas autoscale throughput allows the system to scale RU/s based on usage. Select Manual for this example. Database Max RU/s 400 RU/s If you want to reduce latency, you can scale up the throughput later by estimating the required RU/s with the capacity calculator. Note: This setting isn't available when creating a new container in a serverless account. Container id Items Enter Items as the name for your new container. Container IDs have the same character requirements as database names. Partition key /category The sample described in this article uses /category as the partition key. Don't add Unique keys or turn on Analytical store for this example.
- Unique keys let you add a layer of data integrity to the database by ensuring the uniqueness of one or more values per partition key. For more information, see Unique keys in Azure Cosmos DB.
- Analytical store is used to enable large-scale analytics against operational data without any effect on your transactional workloads.
Select OK. The Data Explorer displays the new database and the container that you created.

Add data to your database
Add data to your new database using Data Explorer.
In Data Explorer, expand the ToDoList database, and expand the Items container.
Next, select Items, and then select New Item.
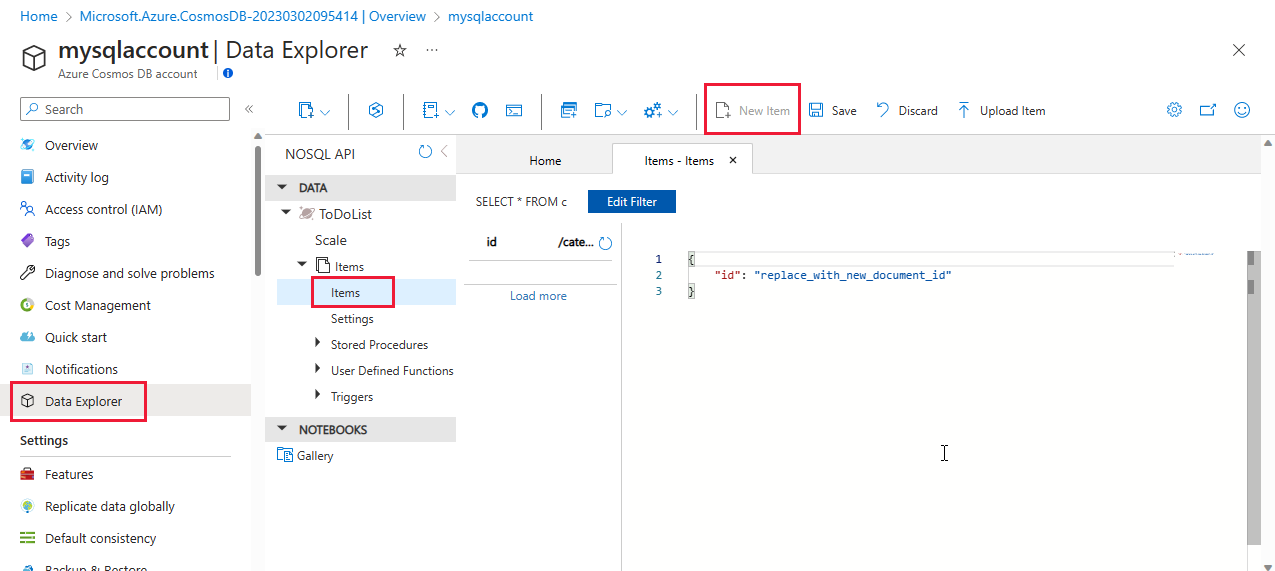
Add the following structure to the document on the right side of the Documents pane:
{
    "id": "1",
    "category": "personal",
    "name": "groceries",
    "description": "Pick up apples and strawberries.",
    "isComplete": false
}
Select Save.

Select New Item again, and create and save another document with a unique
id, and any other properties and values you want. Your documents can have any structure, because Azure Cosmos DB doesn't impose any schema on your data.


Query your data
You can use queries in Data Explorer to retrieve and filter your data.
At the top of the Items tab in Data Explorer, review the default query
SELECT * FROM c. This query retrieves and displays all documents from the container ordered by ID.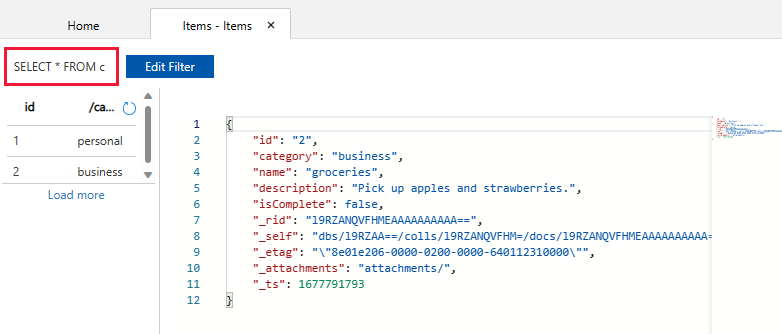
To change the query, select Edit Filter, replace the default query with
ORDER BY c._ts DESC, and then select Apply Filter.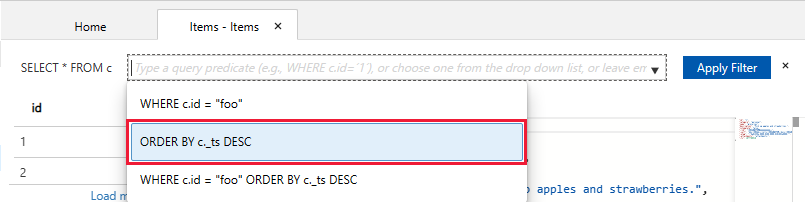
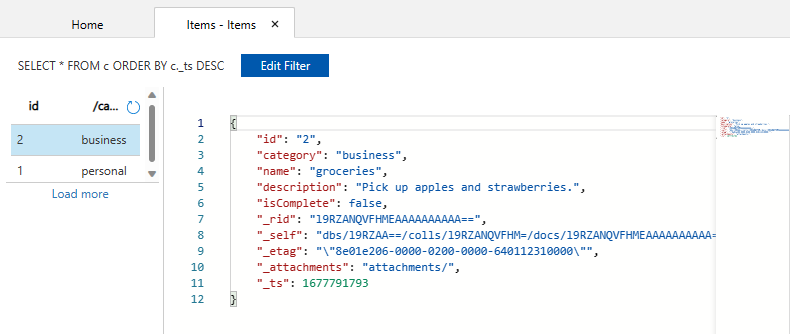
The modified query displays the documents in descending order based on their timestamp, so now your second document is listed first.


If you're familiar with SQL syntax, you can enter any supported SQL queries in the query predicate box. You can also use Data Explorer to create stored procedures, user defined functions, and triggers for server-side business logic.
Data Explorer provides easy access in the Azure portal to all of the built-in programmatic data access features available in the APIs. You can also use the Azure portal to scale throughput, get keys and connection strings, and review metrics and SLAs for your Azure Cosmos DB account.
Clean up resources
When you're done with your app and Azure Cosmos DB account, you can delete the Azure resources you created so you don't incur more charges. To delete the resources:
In the Azure portal Search bar, search for and select Resource groups.
From the list, select the resource group you created for this quickstart.
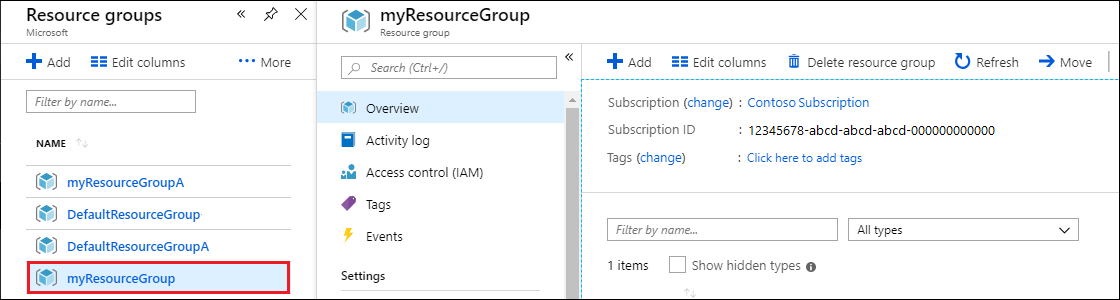
On the resource group Overview page, select Delete resource group.
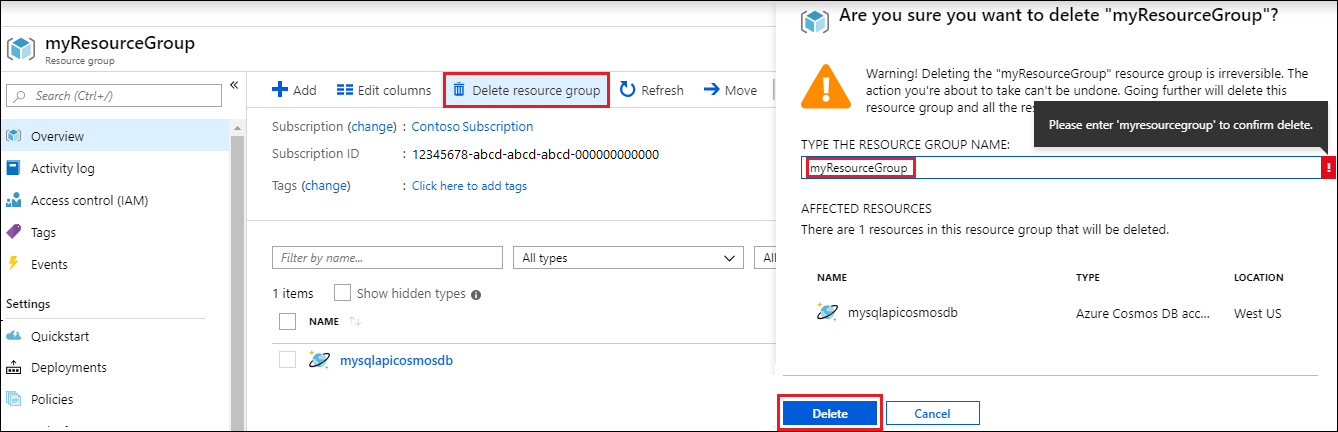
In the next window, enter the name of the resource group to delete, and then select Delete.
If you wish to delete just the database and use the Azure Cosmos DB account in future, you can delete the database with the following steps:
- Go to your Azure Cosmos DB account.
- Open Data Explorer, select the More (...) for the database that you want to delete and select Delete Database.
- Enter the database ID or database name to confirm the delete operation.
Next steps
You can now import more data to your Azure Cosmos DB account.
Feedback
Coming soon: Throughout 2024 we will be phasing out GitHub Issues as the feedback mechanism for content and replacing it with a new feedback system. For more information see: https://aka.ms/ContentUserFeedback.
Submit and view feedback for