Note
Access to this page requires authorization. You can try signing in or changing directories.
Access to this page requires authorization. You can try changing directories.
Azure DevOps Services | Azure DevOps Server | Azure DevOps Server 2022
The product backlog is your project plan, which shows what your team intends to deliver. It contains user stories, backlog items, or requirements that you add to it. Your backlog is a flat list of work items, as the following image illustrates, which shows a Scrum process for Azure Boards. For the Agile, Basic, and Capability Maturity Model Integration (CMMI) process models, the Backlog items selection appears as Stories, Issues, and Requirements.
Your product backlog is one of three classes of backlogs available to you: backlogs, boards, and plans.

Note
For more information, see the following articles:
Prerequisites
| Category | Requirements |
|---|---|
| Project access | Project member. |
| Permissions | - Member of the Contributors or Project Administrators security group. - To view or modify work items: View work items in this node and Edit work items in this node permissions set to Allow. By default, the Contributors group has this permission set to Allow. For more information, see Set work tracking permissions. |
| Access levels | To add or modify work items: At least Basic access. Users with Stakeholder access for public projects have full access to backlog and board features, like users with Basic access. For more information, see Stakeholder access quick reference. |
| Defined iterations | To use the Planning pane: Ensure your team administrator defined iteration paths (sprints) and configure team iterations. |
| Category | Requirements |
|---|---|
| Project access | Project member. |
| Permissions | - Member of the Contributors or Project Administrators security group. - To view or modify work items: View work items in this node and Edit work items in this node permissions set to Allow. By default, the Contributors group has this permission set to Allow. For more information, see Set work tracking permissions. |
| Access levels | To add or modify work items: At least Basic access. |
| Defined iterations | To use the Planning pane: Ensure your team administrator defined iteration paths (sprints) and configure team iterations. |
Tip
You can use AI to help with this task later in this article, or see Enable AI assistance with Azure DevOps MCP Server to get started.
Backlog and sprint work item filtering
Your product Backlog, Board, and sprint backlogs display work items based on the following criteria:
| Process | Work Item Type | Backlog Name |
|---|---|---|
| Basic | Issue | Issues |
| Agile | User Story | Stories |
| Scrum | Product Backlog Item | Backlog items |
| CMMI | Requirement | Requirements |
More filtering criteria:
- Area Path matches one of your team's selected Area Paths
- Iteration Path is under your team's Default Iteration Path
Sprint backlogs and Taskboards apply these same filters plus the selected Iteration Path. You can only select Iteration Paths preselected by your team. Sprint backlogs display only work items assigned to the selected sprint—child tasks assigned to other sprints aren't displayed.

For more information, see Define area paths and assign to a team and Define sprint paths and configure team iterations.
Add a backlog
Every project includes a default team with backlogs. To support more teams, see Create or add a team.
Each process defines the following specific backlog levels:
- Agile: Stories, Features, and Epics
- Basic: Issues and Epics
- Scrum: Backlog items, Features, and Epics
- CMMI: Requirements, Features, and Epics
To customize your backlog, see Inherited process model or On-premises XML process model.
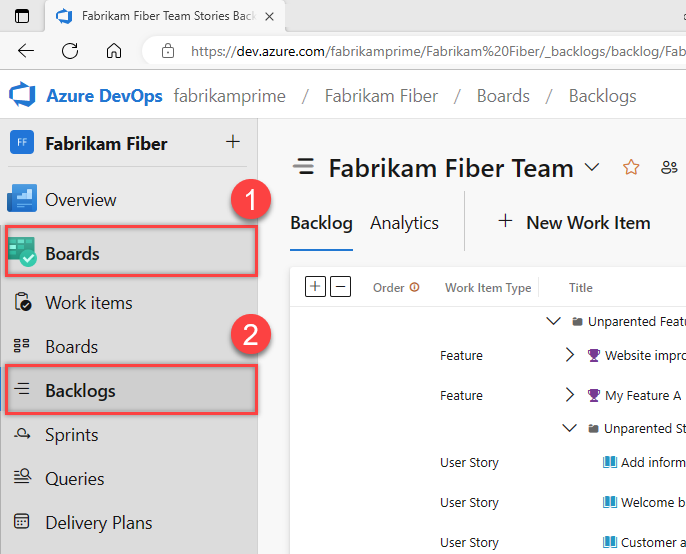
Open your backlog
From your web browser, follow these steps to open your product backlog.
Sign in to your project (
https://dev.azure.com/{Your_Organization}/{Your_Project}).Select Boards > Backlogs.
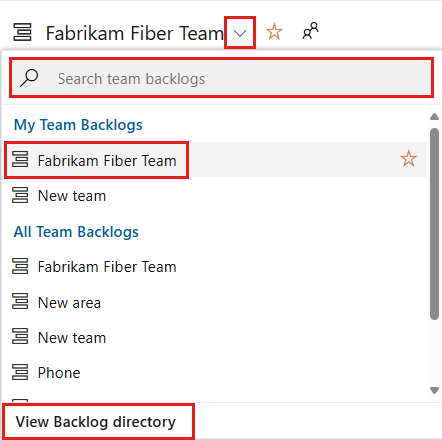
To select a different backlog, choose a different team or select the View Backlog directory option. You can also enter a keyword in the search box to filter the team backlogs for the project.
Tip
Choose the
 star icon to favorite a team backlog. Favorited artifacts (
 favorited icon) appear at the top of the team selector list.
Check that you selected Stories (for Agile), Issues (for Basic), Backlog items (for Scrum), or Requirements (for CMMI) as the backlog level.

(Optional) To select which columns display and in what order, select the
 actions icon and Column options. For more information, see Change column options.
Tip
Each team member has several tools to configure their backlog view: Expand/Collapse one level, Column Options, Backlog level selector, View options, and Filter toolbar. Options set for each backlog level are distinct and persist until changed. For more information, see Configure your backlog view.
Track bugs on your backlog
Some teams track bugs along with requirements on the backlog. Other teams track bugs as tasks completed in support of a requirement, so bugs appear on their Taskboard. Before you determine how to manage bugs, see Bugs as requirements or tasks and Show bugs on backlogs and boards.
Convert ideas into backlog items
Your backlog shows work that you plan to do or that's in progress. As soon as the State of a work item is set to Done or Completed, the work item doesn't appear on your backlog. You can use the backlog controls to filter or change your view.
If you already defined a long list of items, you don't need to reenter them one at a time. Instead, use bulk work items with CSV files or Microsoft Excel to import them to your backlog.
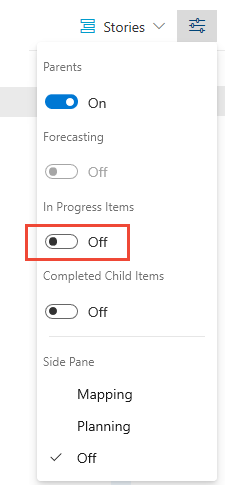
Before you add work items, select
 View options and turn the slider for Parents and Forecasting to Off. Optionally, turn In Progress Items on or off.
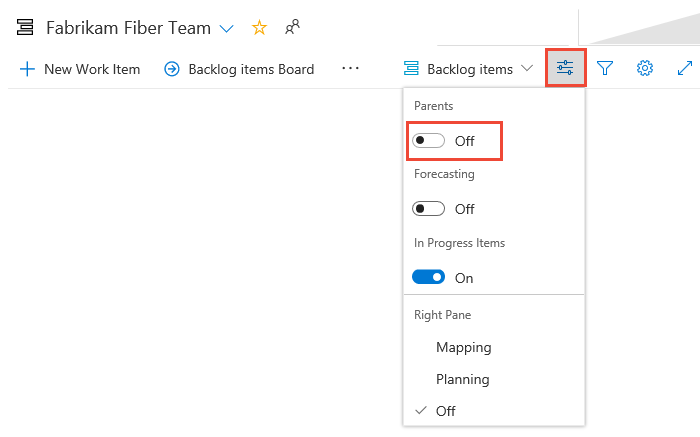
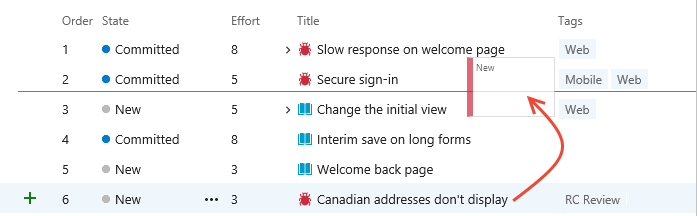
To add a work item, select
 New Work Item and enter a title. Select Enter or select Add to top. The default Area Path and Iteration Path selected for the team are assigned to work items. For more information, see Manage and configure team tools.
Note
If you have Stakeholder access, you can only add work items to the bottom of the backlog. For more information, see Stakeholder access quick reference.
Depending on whether you create your project with Basic, Agile, Scrum, or CMMI, the items in your backlog might be called issues, user stories, PBIs, or requirements. All of these terms describe the customer value to be delivered and the work to be performed.
By default, user stories appear on Agile backlogs, issues on Basic backlogs, PBIs and bugs appear on Scrum backlogs, and requirements appear on CMMI backlogs.
Reorder your backlog
Reorder your items to create a prioritized list of work. Review and prioritize your backlog frequently to help your team know what's most important to deliver next.
You can't sort your backlog on a column. To view a sorted list, select Create query. Save and open the query, and sort the query results. For more information about queries, see Use the query editor to list and manage queries.
To reorder your backlog, drag the work items. Or, if you prefer to use the keyboard, hold down the Alt key and use the up and down arrows.
Note
To reorder a backlog, have at least Basic access. If you have Stakeholder access, you can't reorder backlog items. For more information, see Stakeholder access quick reference.
Backlogs that participate in portfolio management or that contain nested same-type child items might not allow you to reorder the items. For more information, see the following articles:
Add details and estimates to backlog items
Add detailed information to each backlog item. This information helps your team estimate effort and deliver successfully.
To edit a work item:
- Double-click the item or select Enter to open the work item form.
- Add descriptions, field values, or discussion notes.
- Use the
 Attachments tab to share supporting files.
Provide enough detail for your team to understand scope, estimate work, create tests, and deliver the expected outcome.
Note
You can only assign work to a single user. If you need to assign work to more than one user, add a work item for each user and distinguish the work to be done by title and description. The Assigned To field only accepts user accounts that have been added to a project or team.
For example, assign the story to Raisa Pokrovskaya and add a discussion note that at-mentions Raisa.
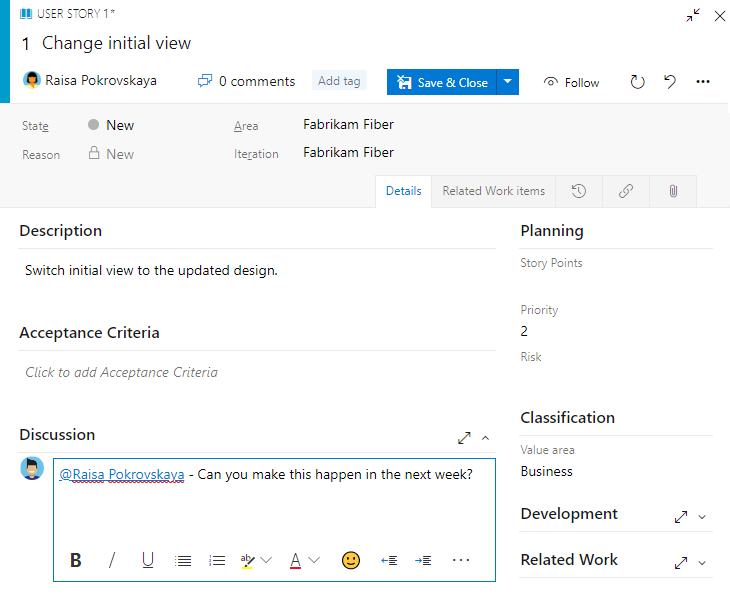
Select Save & Close when you're done.
Key fields for backlog planning
Use these essential fields to estimate effort and define requirements for sprint planning:
| Field | Purpose |
|---|---|
| Effort, Story Points, Size | Estimate work required - Use relative sizing (powers of 2, Fibonacci sequence, or your team's preferred scale). These estimates calculate velocity and forecast sprints. |
| Business Value | Set priority - Assign relative value compared to other items. Higher numbers indicate greater business value. |
| Description | Define scope - Provide clear details about user needs and requirements. Focus on what users want to accomplish and why. |
| Acceptance Criteria | Define "Done" - Describe specific criteria for completion. Establish shared understanding between team and customers for acceptance testing. |
| Impact Assessment | Assess risk (CMMI only) - Document customer impact of not implementing the requirement. |
Show or hide In Progress items
Use the View options selector to toggle In Progress Items visibility. When turned off, items in Active, Committed, or Resolved states (or states that map to the In Progress category state) don't appear in the backlog.
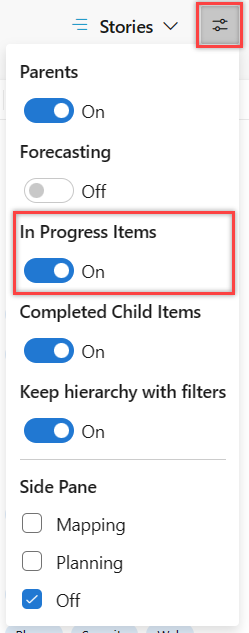
Hide in progress items when forecasting work.
Show or hide work items in Completed state
Use the View options selector to toggle Completed Child items visibility based on your needs.
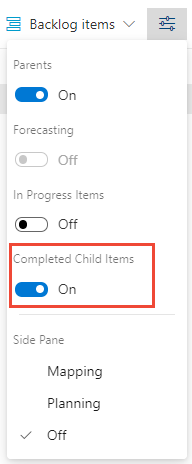
Show completed child items to view rollup columns.
Hide completed child items when forecasting work.
Note
Completed or closed work items don't display on the backlogs and boards after their Changed Date value is greater than 183 days (about a half a year). You can still list these items by using a query. If you want them to show up on a backlog or board, you can make a minor change to them, which resets the clock.
Note
Completed or closed work items don't display on the backlogs and boards after their Changed Date value is greater than a year old. You can still list these items by using a query. If you want them to show up on a backlog or board, you can make a minor change to them, which resets the clock.
Review checklist for work items, backlogs, and boards
If you don't see the work items you expect on your product Backlog or board, complete the following checks:
Make sure you selected the team backlog or board of interest. To learn how, see Use breadcrumbs and selectors to go to and open artifacts.
Create a query of your backlog items, specifying the work item types that belong to your Requirements category and the Area Path associated with your team, for example:
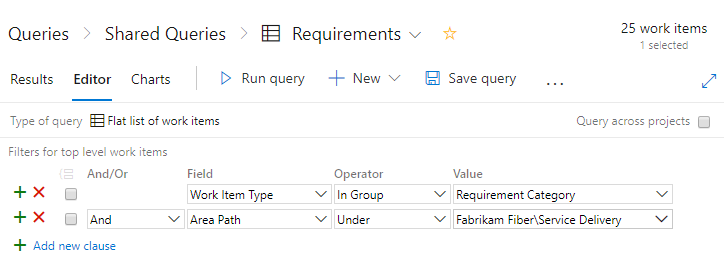
Add the State, Area Path, and Iteration Path fields to the column options.
Check the query results and that the values of the work items you expect to show up on your backlog meet these criteria:
- Area Path belongs to your team's area path(s)
- Iteration Path belongs under your team's default iteration path
- State isn't Closed, Completed, Done, or Removed.
Note
You can also filter your product backlog to show or hide work items that are in an In Progress state category, corresponding to an Active, Resolved, Committed, Doing workflow state.
Other factors that affect work items in your backlogs and boards
The following settings influence the type and number of work items that appear in your backlogs and boards.
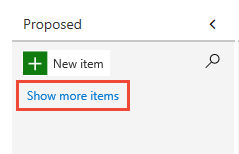
In your board, newly added work items don't appear if they're stack ranked lower within the product backlog. By choosing Show more items, you can cause the board to refresh and display more work items.
If you turn off the In Progress view, work items where work has started don't appear in the backlog list.
Work items appear in the priority order in which you add or move them. You manage this order or sequence by the Stack Rank (Basic, Agile, and CMMI processes) or Backlog Priority (Scrum) field. For more information, see the Stack rank section in Backlogs, portfolios, and Agile project management.
Each backlog displays up to 999 work items. If your backlog exceeds this limit, consider adding a team and moving some of the work items to the other team's backlog.
Sprint backlogs show only those work items that meet the team's area path and the Iteration Path defined for the sprint.
Inheritance process model: If an administrator disables or deletes a work item type, it doesn't appear on backlogs and boards.
On-premises XML process model: If an administrator deletes or destroys a work item type, it doesn't appear on backlogs and boards.
Use AI to manage your backlog
If you configure the Azure DevOps MCP Server, you can use AI assistants to manage your backlog by using natural language prompts.
Example prompts for backlog management
| Task | Example prompt |
|---|---|
| Get backlog items | Get list of work items for <Stories> backlog in <Contoso> project |
| View my work items | Get my work items for project <Contoso> |
| Create work items | Create a new user story in <Contoso> project with title '<Add search functionality>' |
| Update work items | Update work item <1234> with Story Points = <5> and State = <Active> |
| Prioritize backlog | Get all work items in the product backlog for <Contoso> and prioritize them for a <two-week> sprint with <three> developers |
| Triage work | List work items for <Stories> backlog, find all security-related bugs, and assign the first <4> to the current iteration |
| Find backlog gaps | List features in <Contoso> that have no child user stories |
| Estimate effort | Show all user stories in <Contoso> project that are active but have no story points assigned |
| Backlog health check | List all work items in <Contoso> backlog that have been in the New state for more than 30 days |
| Split large items | Show user stories in <Contoso> with story points greater than 13 that are still in the New state |
| Balance workload | Show the count of active backlog items per team member in area path <Contoso\\Frontend> |
| Track dependencies | List user stories in <Contoso> that have predecessor links to items that aren't yet completed |
Tip
If you're using Visual Studio Code, agent mode is especially helpful for troubleshooting complex backlog scenarios.
- To avoid using stale or cached data from previous queries, add to your prompt, "Do not use previously fetched data."
Next step
With your backlog in place, your team can begin work on the top-priority items. Now it's time to decide how you want to work as a team. Choose your team's workflow: Scrum for structured sprints or Kanban for continuous flow. You can use these methods independently or together.