Customer Card Add-in for Dynamics 365 apps (preview)
[This article is prerelease documentation and is subject to change.]
Tip
We recommend using the default option to customize your apps with Dataverse data. It ensures you benefit from our integration into Dataverse.
Get a 360-degree view of your customers directly in Dynamics 365 apps. With the Customer Card Add-in installed in a supported Dynamics 365 app, you can choose to display customer profile fields, insights, and activity timeline. The add-in will retrieve data from Dynamics 365 Customer Insights without affecting the data in the connected Dynamics 365 app.
Important
- This is a preview feature.
- Preview features aren't meant for production use and may have restricted functionality. These features are available before an official release so that customers can get early access and provide feedback.
Limitations
- The card add-in does not respect Dataverse's permission when retreiving data.
Prerequisites
- Dynamics 365 model-driven apps, such as Sales or Customer Service, version 9.0 and later.
- For your Dynamics 365 data to map to the unified customer profiles, we recommend it's ingested from the Dynamics 365 app using the Microsoft Dataverse connector. If you use a different method to ingest Dynamics 365 contacts (or accounts), make sure the
contactid(oraccountid) field is set as the primary key for that data source during the data unification process. - All Dynamics 365 users of the Customer Card Add-in must be added as users in Customer Insights - Data.
- Configured search and filter capabilities.
- Some data and controls are only available in environments of specific types. The add-in configuration will inform you if a control isn't available due to the selected environment type. This error will show within the control when rendering it.
- Each add-in control relies on specific data:
- Measure control requires configured customer attribute measures.
- Intelligence control requires data generated using predictions or custom models.
- Customer details control shows all fields from the profile available in the unified customer profile.
- Enrichment control requires active enrichments applied to customer profiles. The card add-in supports these enrichments: Brands provided by Microsoft and Interests provided by Microsoft.
- Contacts control requires a contact semantic table type.
- Timeline control requires configured activities.
Install the Customer Card Add-in
The Customer Card Add-in is a solution for customer engagement apps in Dynamics 365. To install the solution:
Go to AppSource and search for Dynamics Customer Card.
Select the Customer Card Add-in on AppSource and select Get It Now.
You may need to sign in with your admin credentials for the Dynamics 365 app to install the solution. It can take some time for the solution to be installed to your environment.
Configure the Customer Card Add-in
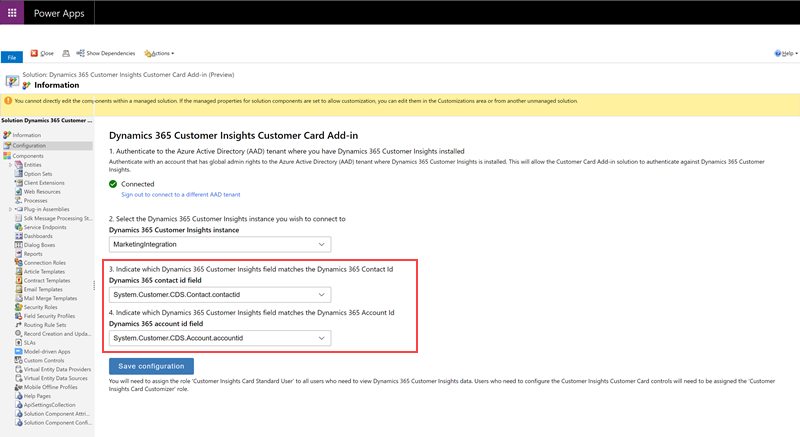
As an admin, go to the Settings section in Dynamics 365 and select Solutions.
Select the Display Name link for the Dynamics 365 Customer Insights Customer Card Add-in (Preview) solution.

Select Sign in and enter the credentials for the admin account you use to configure Customer Insights - Data.
Note
Check that the browser pop-up blocker does not block the authentication window when you select the Sign in button.
Select the environment you want to fetch data from.
Define the field mapping to records in the Dynamics 365 app. Depending on your data, you can choose to map the following options:
- To map with a contact, select the field in the Customer table that matches the ID of your contact table.
- To map with an account, select the field in the Customer table that matches the ID of your account table.

Select Save configuration to save the settings.
Next, you need to assign security roles in Dynamics 365 so users can customize and see the customer card. In Dynamics 365, go to Settings > Permissions > Users. Select the users to edit user roles and select Manage roles.
Assign the Customer Insights Card Customizer role to users who will customize the content shown on the card for the whole organization.
Add Customer Card controls to forms
Depending on your scenario, you can choose to add controls to either the Contact form or Account form.
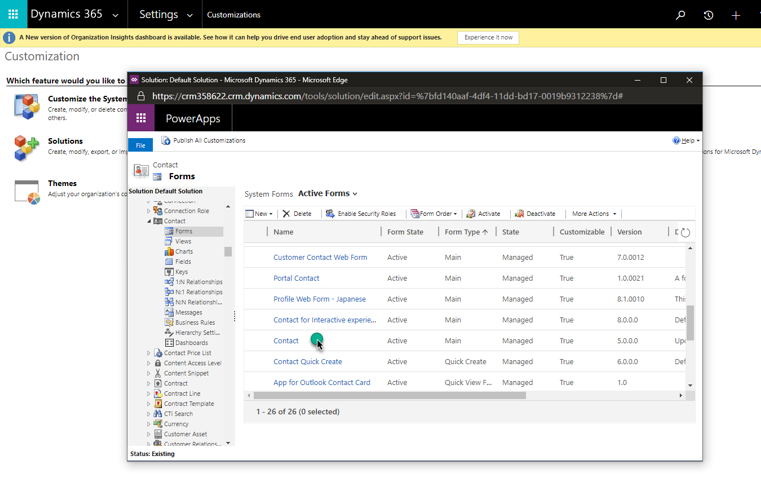
To add the Customer Card controls to your Contact form, go to the Settings > Customizations in Dynamics 365.
Select Customize the System.
Browse to the Contact table, expand it, and select Forms.
Select the contact form you want to add the Customer Card controls to.

To add a control, in the form editor, drag any field from the Field Explorer to where you want the control to appear.
Select the field on the form that you just added and select Change Properties.
Go to the Controls tab and select Add Control. Choose one of the available custom controls and select Add.
In the Field Properties dialog, clear the Display label on the form check box.
Select the Web option for the control. For the Enrichment control, select which enrichment type you want to display by configuring the enrichmentType field. Add a separate enrichment control for each enrichment type.
Select Save and Publish to publish the updated contact form.
Go to the published contact form. You'll see the newly added control. You might need to sign in the first time you use it.
To customize what you want to show on the custom control, select the edit button in the upper-right corner.
Upgrade Customer Card Add-in
The Customer Card Add-in doesn't upgrade automatically. To upgrade to the latest version, follow these steps in the Dynamics 365 app that has the add-in installed.
In the Dynamics 365 app, go to Settings > Customization and select Solutions.
In the table of add-ins, look for CustomerInsightsCustomerCard and select the row.
Select the Apply Solution Upgrade in the action bar.

After starting the upgrade process, you'll see a loading indicator until the upgrade completes. If there's no newer version, the upgrade will show an error message.
Tip
For troubleshooting information, go to Microsoft Dynamics 365 Customer Insights troubleshooting.