Review data unification

Review the summary of changes, create the unified profile, and review the results.

Review and create customer profiles

This last step in the unification process shows a summary of the steps in the process and provides a chance to make changes before you create the unified profile.

The following steps and images reflect the first time you go through the unification process. To edit existing unification settings, see Update the unification settings.

Screenshot of Review and create customer profiles.

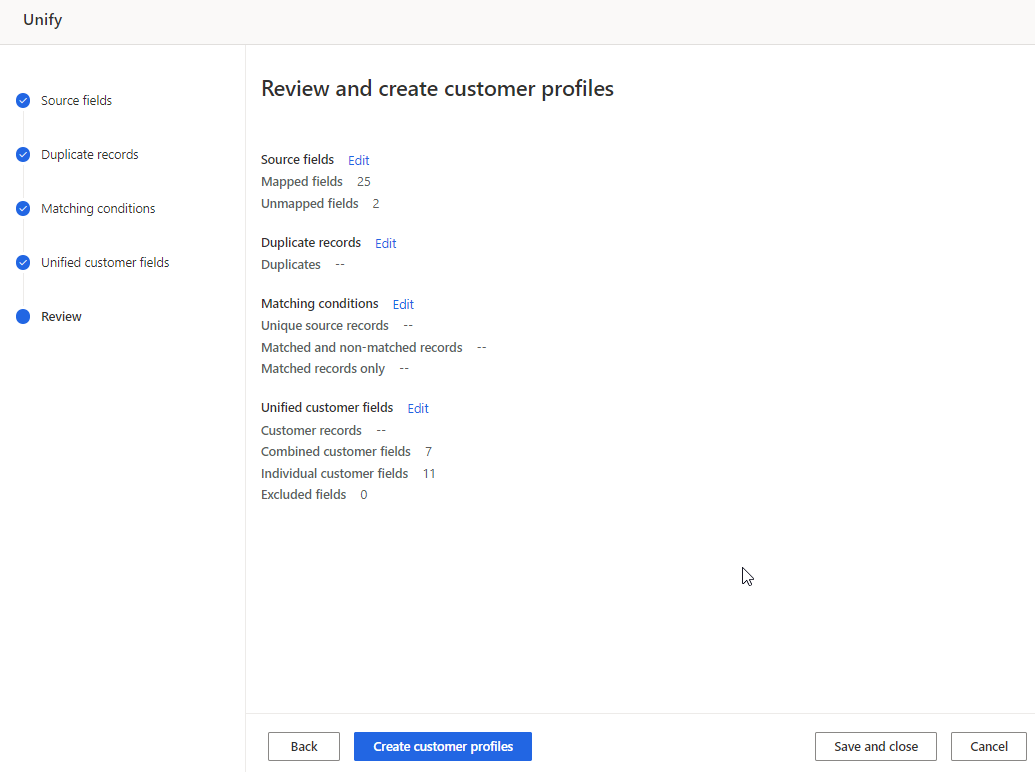
  1. Select Edit on any of the data unification steps to review and make any changes.

  2. If you're satisfied with your selections, select Create customer profiles. The Unify page displays while the unified customer profile is being created.

    Screenshot of Unify page with tiles showing Queued or Refreshing.

    Tip

    There are statuses for tasks and processes. Most processes depend on other upstream processes, such as data sources and data profiling refreshes.

    Select the status to open the Progress details pane and view the progress of the tasks. To cancel the job, select Cancel job at the bottom of the pane.

    Under each task, you can select See details for more progress information, such as processing time, the last processing date, and any applicable errors and warnings associated with the task or process. Select the View system status at the bottom of the panel to see other processes in the system.

The unification algorithm takes some time to complete and you can't change the configuration until it completes.

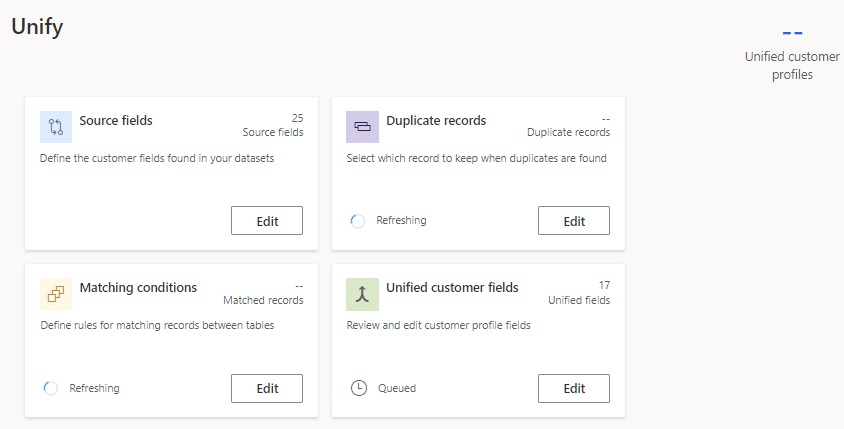
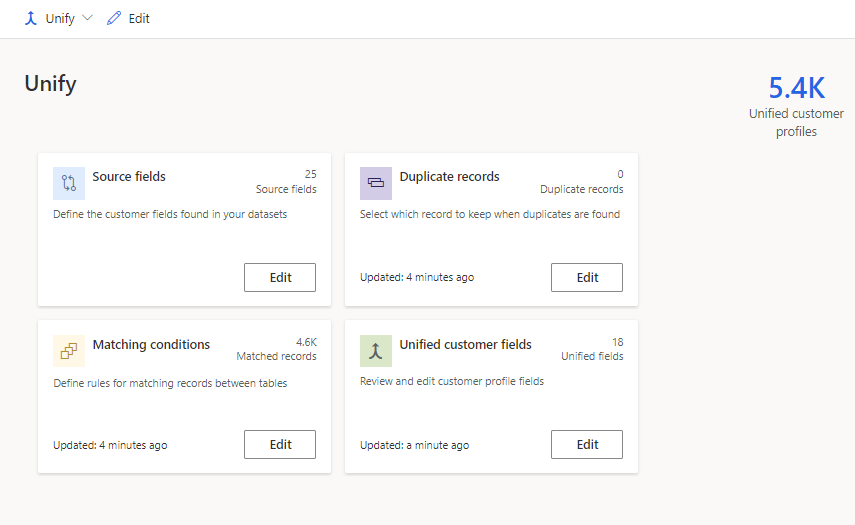
View the results of data unification

After unification, the Data > Unify page shows the number of unified customer profiles. The results of each step in the unification process display on each tile. For example, Customer data shows the number of mapped columns and Deduplication rules shows the number of duplicate records found.

Screenshot of the Data Unify page after data is unified.

Tip

The Matching rules tile displays only if multiple tables were selected.

We recommend you review the results, particularly the quality of your match rules and refine them if necessary.

When needed, make changes to the unification settings and rerun the unified profile.

Verify output tables from data unification

Go to Data > Tables to verify the output tables.

The unified customer profile table, called Customer, displays in the Profiles section. The first successful unification run creates the unified Customer table. All subsequent runs expand that table.

Deduplication and conflation tables are created and display in the System section. A deduplicated table for each of the source tables is created with the name Deduplication_DataSource_Table. The ConflationMatchPairs table contains information about cross-table matches.

A deduplication output table contains the following information:

  • IDs / Keys
    • Primary key and Alternate ID fields. Alternate ID field consists of all the alternate IDs identified for a record.
    • Deduplication_GroupId field shows the group or cluster identified within a table that groups all the similar records based on the specified deduplication fields. It's used for system processing purposes. If there are no manual deduplication rules specified and system defined deduplication rules apply, you may not find this field in the deduplication output table.
    • Deduplication_WinnerId: This field contains the winner ID from the identified groups or clusters. If the Deduplication_WinnerId is same as the Primary key value for a record, it means that the record is the winner record.
  • Fields used to define the deduplication rules.
  • Rule and Score fields to denote which of the deduplication rules got applied and the score returned by the matching algorithm.

Resolve unexpected unification results

If unification completed successfully without any errors but the result is not as expected, check the following:

  • Verify data input: Double-check the accuracy and completeness of the data provided for the unification process. Ensure that all relevant records and information are included.
  • Check data quality: Assess the quality of the input data. Look for any anomalies, inconsistencies, or errors that might impact the unification results. It's essential to clean and normalize the data before the unification process to ensure reliable outcomes.
  • Review unification settings: Examine the configuration and settings used for the unification process. Check if the specified criteria for deduplication and profile generation are correctly defined and aligned with the desired outcome.
    • Validate deduplication results.
    • Check the order of priority between tables and rules.
    • Validate matching rules.
      • Evaluate the matching rules employed by the unification system. Confirm that the rules accurately identify and match records based on the intended criteria. Adjust the matching rules if necessary.
      • Check the normalization and customer match step that happens as part of the Match process (if any). For example, Mike is normalized to Michael to ensure source records are matched correctly even when nickname is used in one source record, and full name is used in another source record. To bypass common normalization, set up custom normalization logic.
    • Check merge policies.
    • Test with sample data: Perform tests using a subset of sample data to simulate the unification process. Compare the expected results with the actual outcomes to identify any discrepancies or unexpected behaviors.
  • Rerun Deduplication and Matching rules. Go to Data > Unify > Run matching conditions only and compare the results. If the rules provide the expected results, rerun Merge and compare the results. Go to Data > Unify > Unify customer profiles.

If the issue persists or remains unresolved, engage the support or technical team. Please provide detailed information about the problem, including source data records, expected unified customer profile records, reasons why you expect that result, steps to reproduce it, sample data if applicable, and any relevant error messages.

Next steps

Configure activities, enrichments, relationships, or measures to gain more insights about your customers.