Note
Access to this page requires authorization. You can try signing in or changing directories.
Access to this page requires authorization. You can try changing directories.
Applies to: Dynamics 365 Customer Service and Dynamics 365 Contact Center—standalone only
Important
Azure Active Directory is being renamed to Microsoft Entra ID. No action is needed from you. For more information, see New name for Azure Active Directory.
This article explains how to customize Power BI data models for historical and real-time analytics reports in Dynamics 365 Customer Service. Extend out-of-the-box data models, add custom metrics and KPIs, and integrate with other semantic models to create reports that fit your organization’s needs.
Key capabilities of model customization include the ability to:
Edit the out-of-the-box data model and add new metrics.
Bring in your own custom entities from Dataverse or any other source and extend the Power BI data model.
Publish the customized report to a specific Microsoft Fabric workspace.
Customize the report site map and enable users to access the reports natively from the Copilot Service workspace app.
Auto refresh reports as soon as source data is updated.
Enable data model customization for historical and real-time analytics reports in Copilot Service admin center, and then complete the following tasks:
- Select a Microsoft Fabric workspace
- Provision the data models and copy of reports
- Grant permissions for semantic models and reports
- Embed customized reports back to Dynamics 365
Prerequisites
Before you begin, complete the following prerequisites:
Licenses
Specific licensing requirements apply for:
- All report users to access reports.
- All report authors, developers, supervisors, and administrators to build Power BI reports and extend the default Power BI data model.
Learn more at Microsoft Product Terms and Power Platform Pricing.
Enable insights features in Customer Service
- If you're enabling historical data model customization, you must enable at least one of the historical reports, such as Customer Service historical analytics, Omnichannel historical analytics, or Knowledge analytics. For more information, see Configure analytics and insights dashboards.
- If you're enabling real-time data model customization, you must enable real-time analytics for Omnichannel. For more information, see Configure analytics and insights dashboards.
Create a Microsoft Entra ID security group
Your Microsoft Entra ID administrator must create a security group with your preferred name in Microsoft Entra ID and add Dynamics 365 Analytics service account as a member of this security group. For more information, see Create a basic group and add members using Microsoft Entra ID.
The out-of-the-box Service Principal Dynamics 365 Analytics is used to deploy the data model and make changes to the Microsoft Fabric workspace on behalf of Customer Service.
Power BI lets you grant permissions to groups only, not individual service principals, so you need to create a group or directly grant access to the relevant workspace.
Note
If the Dynamics 365 Analytics service account isn't available in your organization, use the Dynamics CCA Data Analytics service account.
Enable Power BI service features from the Microsoft Fabric Admin portal
The Power BI administrator must enable the following features, either for the entire organization or for the security group created earlier. Learn more in Microsoft Fabric tenant settings.
In Workspace settings, enable Create workspace (new workspace experience): Enabling this feature creates two workspaces, a managed workspace and a customer workspace to deploy Dynamics data model and reports.
In Developer settings, enable Service principals can call Fabric APIs: This feature uses the Fabric APIs for creating workspaces, deploying reports and models.
In Developer settings, enable Service principals can create workspaces, connections, and deployment pipelines.
In Export settings, enable Allow DirectQuery connections to Power BI semantic models: When report authors build new metrics or bring more data sources, they create composite models, so DirectQuery needs to be enabled. Users who view reports built on top of data model in Dynamics 365 require this permission. Work with your Microsoft Entra ID administrator to identify a security group that has all the required Dynamics users.
In Integration settings, enable Allow XMLA endpoints and Analyze in Excel with on-premises datasets: When report authors build new metrics or bring more data sources, they create composite models, so this feature needs to be enabled. Users who view reports built on top of data model in Dynamics 365 require this permission.
Embed content in apps: Enabling this feature embeds customized reports in Dynamics 365 (Step 4: Embed customized reports back to Dynamics 365). Users who view the custom reports from Dynamics 365 Customer Service require this permission. Work with your Microsoft Entra ID administrator to identify a security group that has all the required Dynamics users.
Enable Power BI data model customization
- In the Copilot Service admin center site map, select Insights in Operations.
- On the Insights page in the Report settings section:
- For historical, select Embedded Power BI extensibility - Historical data model customization and then select Manage.
- For real time, select Embedded Power BI extensibility - Real-time data model customization and then select Manage.
- On the selected page, switch the Enable embedded Power BI data model customization toggle to On.
Step 1: Select a Microsoft Fabric workspace
Note
If you plan to use an existing Microsoft Fabric workspace to host the copy of the out-of-the-box reports (customer workspace), make sure that the Dynamics Administrator (user sign in) enabling the model customization is a workspace administrator of that Microsoft Fabric workspace.
Specify the Microsoft Fabric workspace where the Dynamics data model and reports are provisioned.
From the Insights page, go to the data model for which you want to select a Microsoft Fabric workspace.
Select Create new workspace, or to use an existing workspace, select the workspace from the dropdown list.
Select Save. This action initiates the provisioning of the reports.
The specified workspace applies only to the customer's workspace. Microsoft creates a new managed workspace for historical and real-time reports each, when configured. For more information, see How data model customization works. You can also specify the same workspace for both historical and real-time analytics reports.
Step 2: Provision the data models
Note
For successful provisioning of the data models, make sure that you created a Microsoft Entra ID security group and added Dynamics 365 Analytics service account as a member of this security group.
It could take up to 24 hours for the provisioning to complete. You can leave the Settings page and check back after a few hours. Select Refresh to check the provisioning status.
Step 3: Grant permissions for semantic models and reports
After the report is set up, give Write permissions to users who author reports in Power BI, and Read permissions to supervisors and other report consumers.
You must be a Workspace Administrator on both managed and customer workspaces (configured on Step 1) in Power BI to complete this step. By default, the user who starts the provisioning (Step 2) has the necessary permissions added.
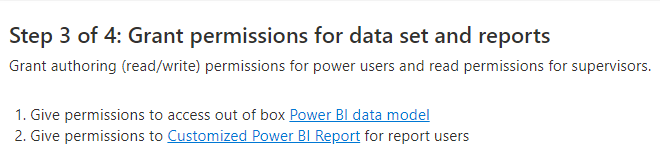
Grant access to the Power BI data model
Report authors connect to the specified data model to build custom reports. When you select the Power BI Data model link, the managed workspace opens up and the details of the data model are displayed. Use the Share dialog to provide access to users by entering their email address. For more information, see Share access to a semantic model.
You need to provide report authors and viewers with Allow recipients to build content with the data associated with this semantic model access.
Grant permissions to the customized Power BI report (optional)
When you select the Customized Power BI Report link, the Microsoft Fabric workspace with sample reports appears in a lineage view. These reports are copies of your out-of-the-box reports and can be edited or modified. Give access to the workspace only if your organization plans to use these copies to develop reports.
Select Access, and provide Contributor access to your report authors and Viewer access to users who view these or any other reports built in this Microsoft Fabric workspace. If you plan to embed the report back to Dynamics 365 Customer Service, you must provide Member access to the supervisors for them to view the embedded report within the Copilot Service workspace. For more information on data permissions, see Manage semantic model access permissions (preview).
Step 4: Embed customized reports back to Dynamics 365
After your report authors create and publish the customized reports, you can allow Dynamics users to access these reports from the Copilot service workspace. This step is optional.
- Select the data model reports.
- From the Embedded Power BI extensibility - Historical data model customization page, go to Step 4.
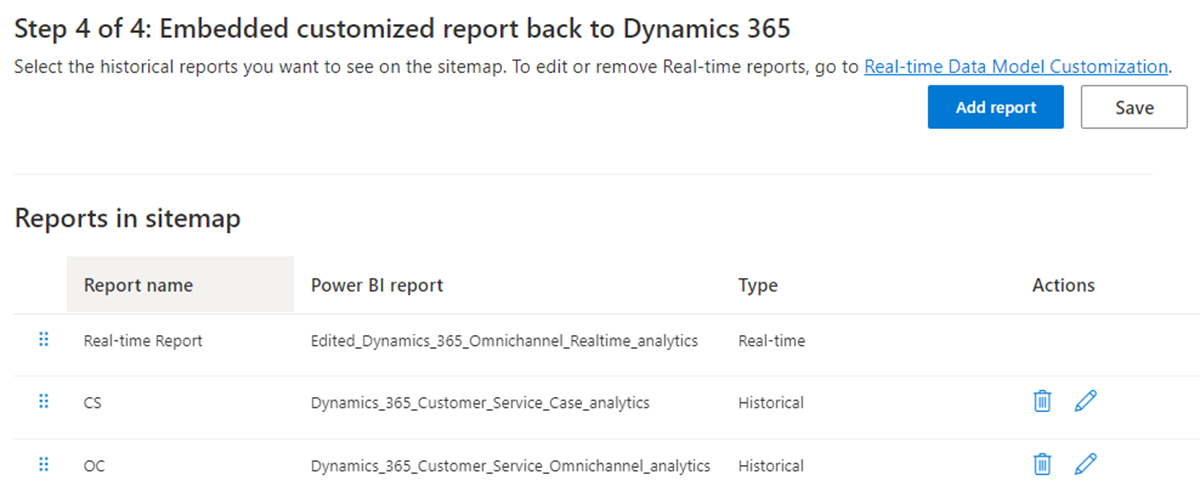
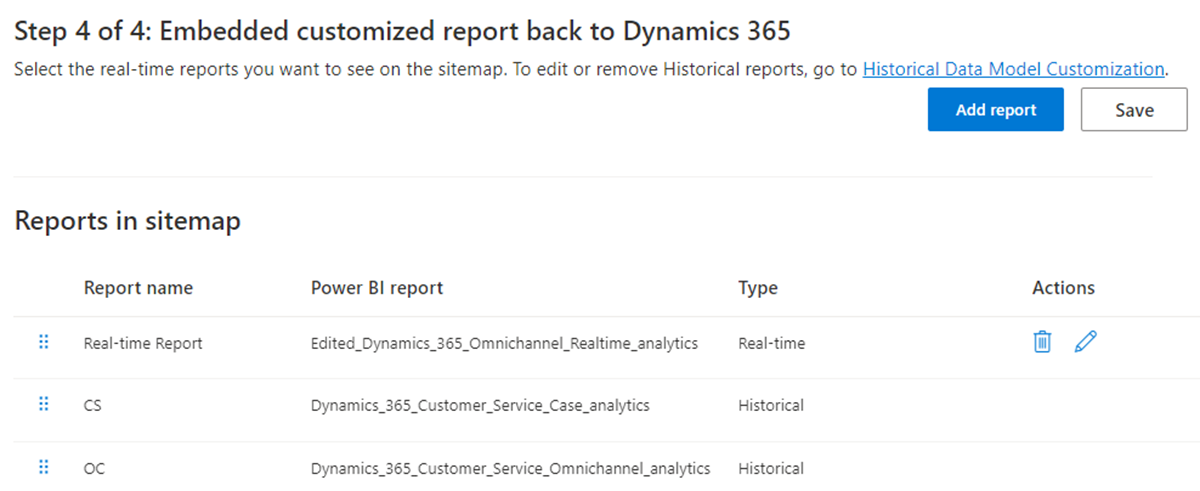
- Select Add report. The Add report dialog appears.
- Enter a preferred name in the Report name text box.
- From the Select Power BI report dropdown list, select the Power BI report in the workspace.
- Select Add and Save.
The dropdown list is populated with the reports in the workspace configured on Step 1. The preferred report name appears for your Dynamics users when they access the reports. You can add a maximum of 40 reports.
The customized reports site map in the Copilot service workspace is shared between historical and real-time data model customization features. You can reorder the reports on both historical and real-time admin pages. For both historical and real time, you can modify or delete reports added from the respective historical and real-time data model customization pages only.
Note
For custom reports that you deploy in Copilot Service workspace, manually update the semantic data model to get the updates, then refresh and redeploy the custom reports.
Enable automatic page refresh for reports
Automatic page refresh is available only for real-time reports.
You can enable automatic page refresh for your reports at fixed intervals so that you always see the latest data. For more information, see Authoring reports with automatic page refresh in Power BI Desktop.
As an administrator, you must first enable automatic page refresh from the Microsoft Fabric Admin portal. You need to use the fixed interval refresh type with either 5 or 10 seconds as the interval.
To enable automatic page refresh for specific reports, complete the following steps:
- Download the real-time report from your Copilot Service workspace app.
- Go to Visualizations > Format page.
- Switch the Page refresh toggle to On.
- Select Auto page refresh from the Refresh type dropdown list.
- Set the refresh period to either 5 or 10 seconds.
- Select Publish to publish the updated report to the customized workspace.
In case you change the report name, perform the steps provided in Step 4: Embed customized reports back to Dynamics 365.
Monitor capacity and performance
Monitoring capacity and performance gives you a complete picture of how well your custom semantic models and reports scale, perform, and function under load.
Monitor capacity with Microsoft Fabric Capacity Metrics app
Note
When you install the Microsoft Fabric Capacity Metrics app, it creates a workspace in your Microsoft Fabric tenant. To share the report, you must be a capacity admin. Learn more in Share the Fabric Capacity Metrics report.
The Microsoft Fabric Capacity Metrics app shows how customized data models and reports consume shared capacity in Microsoft Fabric. It shows capacity‑unit usage so teams can see whether complex measures, semantic model changes, or high query volumes are driving compute demand.
Views like Compute, Timepoint, and Item Detail, help correlate data model customizations with throttling, overloads, or autoscale events. This makes it easier to validate whether custom report designs scale effectively and when to resize or autoscale capacity. Overall, the app links data model design choices to capacity health, enabling proactive optimization before performance or costs are affected.
Monitor performance with Performance Analyzer
Use Performance Analyzer to measure how long each visual in your report takes to load and how that time is split across DAX queries, DirectQuery calls, visual rendering, and other steps. This information is especially useful for customized semantic models because it helps identify the impact of complex measures, relationships, and storage modes. You can copy a visual’s DAX query to DAX Query View to inspect how your model logic is translated. By capturing performance during real interactions like applying slicers or filters and exporting logs after refreshes, teams can validate whether model simplifications and optimizations result in measurable performance improvements.
View customized reports
If you customized the Copilot Service workspace app, you must complete the following steps to view the reports.
- On the Copilot Service workspace app tile, select the ellipsis for More Options and then select Open in App Designer.
- Select New.
- On the New page dialog, select URL, and then select Next.
- Enter the following information and then select Add.
- URL: [Organization Url]/main.aspx?pagetype=control&controlName=MscrmControls.Analytics.ModernReportingControl&data={"featureIds":"f2266eb4-226f-4cf1-b422-89c5f48b40cb,09c168be-efe2-4f08-a986-3aab7095c863"}
- Title: Customized Reports
- From Navigation, select Customized Reports.
- Enter the following information for Display options.
- Title: Customized Reports
- Icon: Select Use web resource.
- Select icon: msdyn_/Analytics/imgs/CustomizedReportsIcon.svg
- ID: CustomizedReportsSubArea
- Select Advanced Settings and then select the following checkboxes:
- SKU: All, On premise, Live, and SPLA
- Client: Web
- Outlook shortcut: Pass parameters and Offline availability
- Select Save and then select Publish.
Use report metrics
Learn more about the metrics in your reports in:
- Calculate conversation metrics
- Calculate session metrics
- Calculate customer service representative metrics
Related information
Customize the display of analytics reports
Introduction to Customer Service Insights
Configure Customer Service analytics and insights
Configure Customer Service Analytics dashboards in Power BI
Configure Omnichannel historical analytics