Note
Access to this page requires authorization. You can try signing in or changing directories.
Access to this page requires authorization. You can try changing directories.
The 2023 release wave 2 of Dynamics 365 Field Service introduces a refreshed user experience to manage work orders. The new experience simplifies how you create, manage, and schedule work orders, provides more information at a glance, and features more visually appealing forms with fields that you can update quickly. This article contains information about the new work order form, the components that it uses, and considerations for customizing the form.
Watch this brief video to learn more about the new work order experience in Field Service:
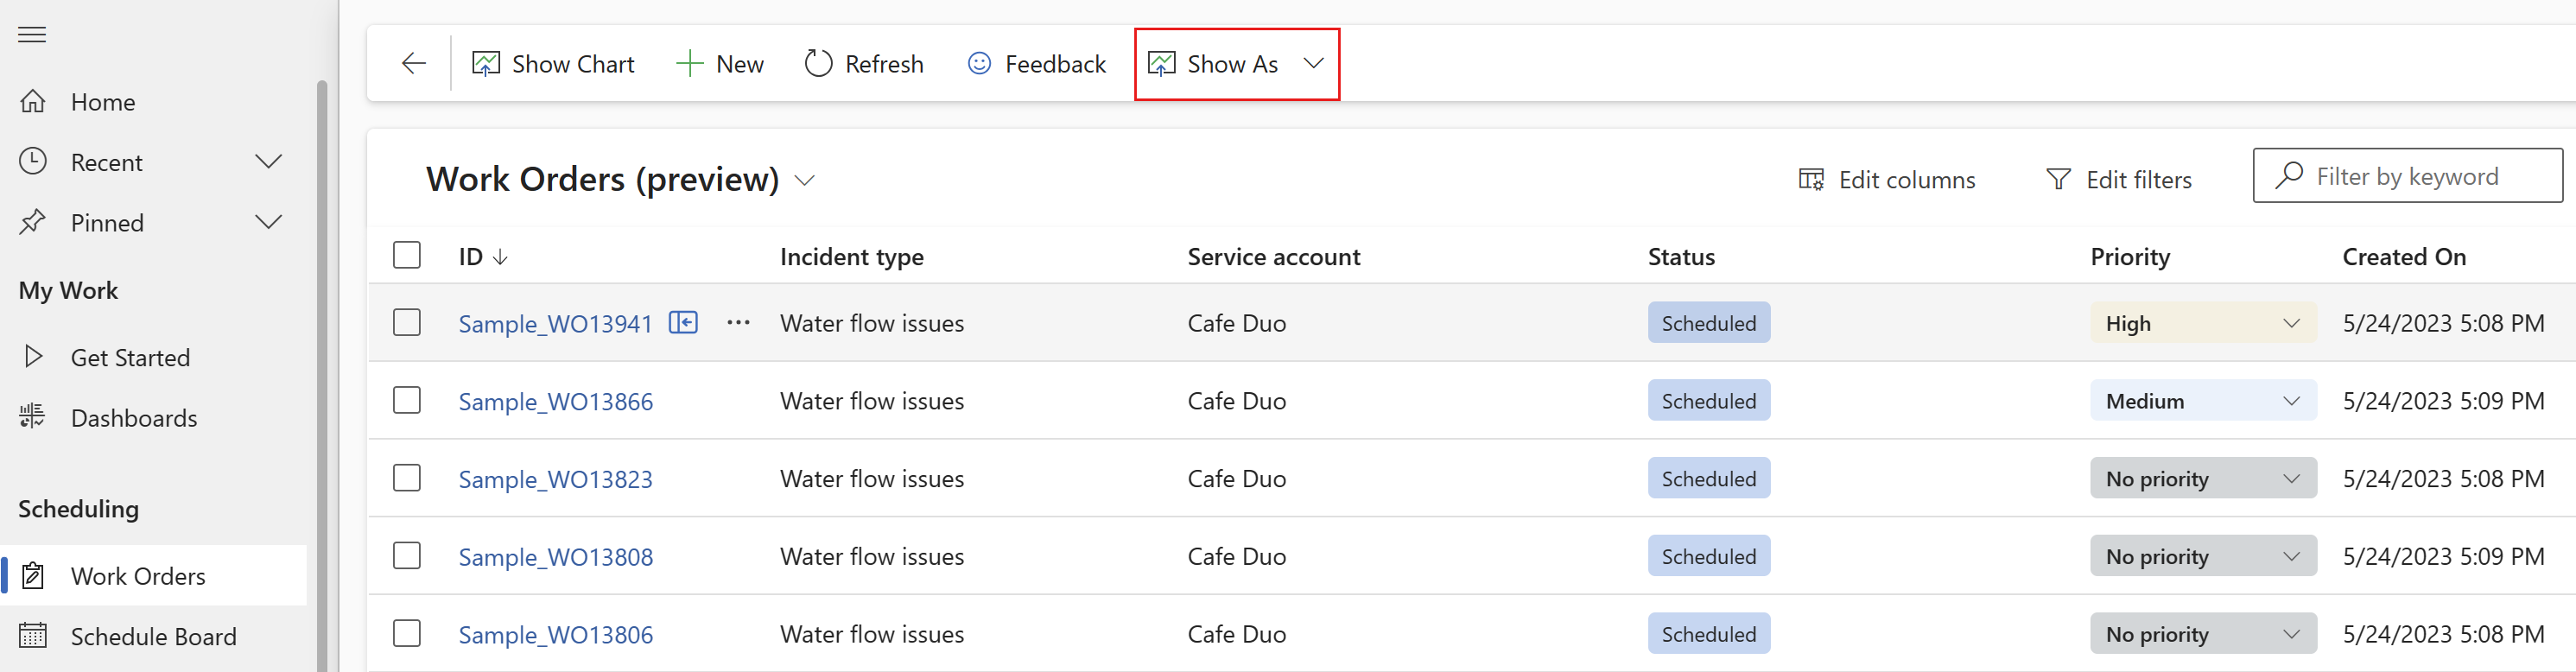
Work order list
The new work order list saves you time and effort. Make quick updates right in the list, and easily access common actions in the new side pane so that you don't have to open the work order details.
The view called Work Orders displays columns you often need to update quickly. Use the view switcher to get to other views. The view you used most recently is set as the default view.
The work order list control isn't available for mobile devices.
Editable work order grid
The new editable grid shows key information, such as status, service account, priority, and booked resources for your work orders. Links take you to related records. You can update the status and priority of work orders directly on the grid. Update more more fields in a side pane. To find information quickly, apply filters to the grid. To switch between the legacy read-only grid and the new editable grid, select Show As in the command bar.
Tip
The new work order experience doesn't support filters. However, you can select Show as and switch to the read-only grid to bring back the classic experience with filtering capabilities.
Side pane
The work order side pane is a simplified version of the work order details form. It provides easy access to quick actions like status updates, booking a work order, and editing instructions.
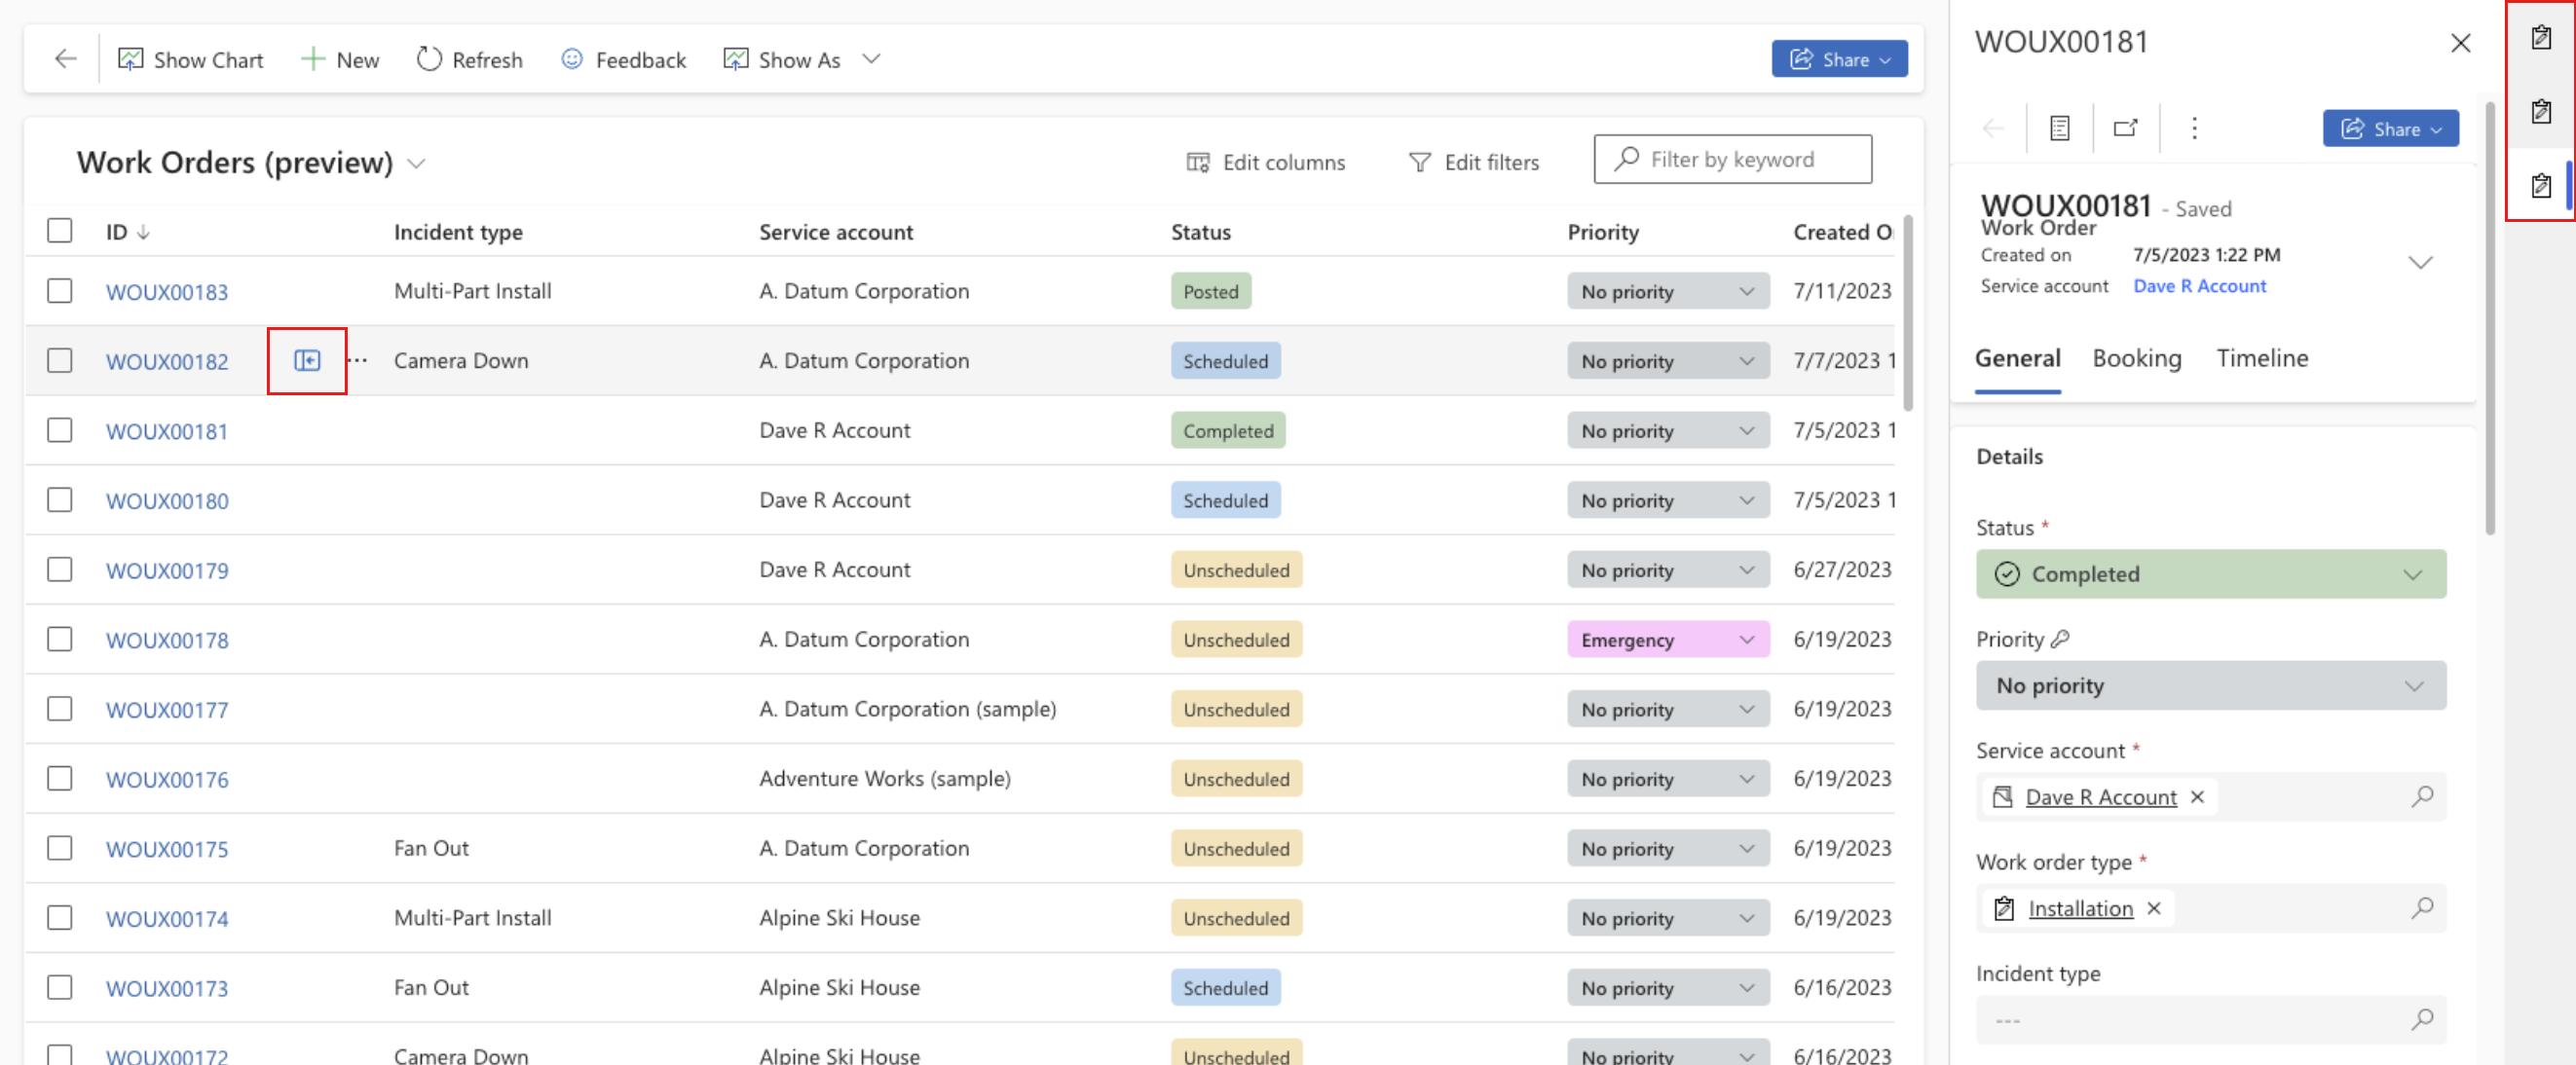
To open a work order in the side pane, hover over a work order in the list and select the Work Order Side Pane icon.
Work order form
The work order form shows all the available details about a work order. It consists of a header and multiple sections, or tabs, that contain contextual information displayed as cards. The form header contains the price and cost not-to-exceed, the work order's creation date, and the service account.
To switch between the classic work order form and the new form, use the form switcher under the work order name.
General tab
The General tab on the work order form contains the following cards:
Details card
The Details card contains a high-level overview of the work order. Here you can see and change its status, substatus, priority, and committed dates, and add instructions for the technician and a summary of the work order.
Location or Functional location card
The Location or Functional location card contains the service address, information about where to find the asset at the address (the functional location), and a map. To help you find a functional location more easily, the card includes the hierarchy breadcrumb. For example, Room 1 is on Floor 2 of Building A at Campus Z.
If no functional location is available, the card shows only the service address. If no service address is available, the card shows the address of the contact who reported the issue that initiated the work order.
Financial card
The Financial card contains all the financial information for a work order, such as the billing account, whether the work order is taxable, the price list to apply, and the not-to-exceed amount, if applicable.
Dynamic Booking card
The new, dynamic card for bookings is the key change in the new work order form. It replaces the business process flow in the classic form. Its design helps you take the next action to move a work order through its lifecycle.
For now, the dynamic card supports only work orders with a single requirement.
Work orders are primarily designed for less than 5 bookings. It can support more if you don't use the new work order form's booking control and instead use the related bookings tab. However, hundreds of bookings lead to unexpected behavior.
The Booking card contains different information, depending on the work order's status.
Unscheduled: Get booking suggestions that fit the required or promised timeframe and the required skills. For each resource, the card shows the suggested appointment time and the travel time from the technician's previous appointment. If no suggestion works, select Find more availability to open the schedule assistant and choose a resource to book.
Scheduled: View the technician's contact information, the time and duration of the appointment, and the expected travel time. You can start a phone call or email using the default client set in your browser. The Message link opens Microsoft Teams. You can change the booking's status and rebook it if needed.
Completed: View a summary of the work, including the resolution and the number of products and services the technician used. If the work order isn't posted, you can review the information and then post it or print a service report. If the work order has been posted, you can print the service report and view or print the invoice.
Contacts card
The Contacts card contains the name and address book information for the account contact and the person who reported the issue. Select a name to open the contact details page to view or edit the contact's information.
The phone number defaults to the account's business phone. If a business phone number isn't available, the card shows the contact's mobile phone number. You can start a phone call or email using the default client set in your browser. The Message link opens Microsoft Teams.
Assets card
The Assets card shows a tree view of all the assets that are associated with the work order across products, services, and tasks.
If the Assets card is empty, you can select the primary asset for the work order. You can also create an asset in the side pane and assign it as the primary asset. The primary asset establishes a relationship with each of the products and services that are associated with the work order. If you add products and services, you can associate them with different assets.
Expand or collapse the assets in the tree to get information about their subassets. Select an asset in the tree to make changes to it in the side pane.
Products and services tab
The Products and services tab contains information about the products and services that are associated with the work order. Products are items that a technician uses to complete the work order. Services refers to work that a technician completes and bills the customer for.
For products, you can view the name, description, whether it's an inventory or noninventory product, estimated and used quantities, estimated and total price, and whether the product was used or not.
For services, you can view the name, description, duration, estimated and total price, and status.
You can update the status and change the quantity of an item inline or make more extensive updates in the side pane. To add products or services to the work order, select + Add service or + Add product.
A summary above the item list aggregates the financial details for the products and services used in the work order.
Tasks tab
The Tasks tab contains an at-a-glance overview of how many tasks are in the work order, how many are completed, and the estimated and actual duration of the work. Below this summary, individual tasks are listed with their estimated duration, progress, and result. Tasks that have an associated inspection or a Dynamics 365 Guide include a link to the inspection or embedded guide.
Reference tab
The Reference tab is the hub for information that's associated with either how to do the work or what work was completed. It contains cards for guides, media such as asset or procedure photos, and knowledge articles. You can link existing knowledge articles, create an article, and review or edit attached articles.
Timeline tab
The Timeline tab contains a log of the activity that's associated with the work order, such as phone calls, emails, and notes. This tab can also contain attachments such as repair manuals, troubleshooting tips, photos, images, or other documents pertinent to the work order.
To add attachments, select the Attachment icon. Browse and select the item, and then select Add note and close.
Related tab
The Related tab lists tables that have a relationship with the work order table.
Trade coverage validation
Depending on how your administrator has set up trade coverage, work orders might check whether the selected account or functional location is covered. Trade coverage defines which trades are covered for an account or a location to make sure the right level of service is provided. For example, if a location doesn't have air conditioning, it shouldn't be possible to create an incident related to an air conditioning system at that location. Similarly, if an account's service contract doesn't include HVAC (heating, ventilation, and air conditioning) maintenance, it shouldn't be possible to create a work order for HVAC maintenance.
If trade coverage is set to not cover a trade, a warning is displayed in the work order. You can still save the work order, however. If no trade coverage is set for a trade, the system assumes that the trade is covered for all parameters. If no trade coverage is defined at all, the work order doesn't display any warnings.
Customization considerations
For more information about customizing work orders, see Customization considerations for the work order form.
Important
The components that the new work order experience introduces aren't supported for mobile or tablet devices. While they're built to adapt to the screen size of the form factor, features like offline profiles or undo actions don't work.
New work order as default experience
In the near future, the new work order experience becomes the new default view for all organizations automatically. To opt out from the planned change, an admin needs to change a setting for your organization.
Note
The update to the new work order experience won't override any of your custom logic to set default forms.
Opt out from the new experience
To opt out from changing the default experience.
- Go to the Power Platform Environment Settings app.
- Select Customizations > Customize the System > Components > Entities > Field Service Setting > Forms > Information.
- In the Other tab on the form configuration, double-click the Advanced Settings field and enable the Visible by default option.
- Save and publish the customization.
- In Field Service, change to the Settings area and select Field Service Settings.
- Select the Other tab and append the flag
workorderexperienceOptOut=truein the Advanced Settings field.
Caution
Don't apply any other changes to the advanced settings field and revert the setting to make the field visible by default after following the procedure. Other changes to this field can lead to unexpected consequences up to blocking the working system.
Revert the change when the new experience is set as default
You can change back to the classic work order experience if the new experience was updated for your organization.
- In the Power Platform Environment Settings app, go to Customizations > Solutions.
- Uninstall the msdyn_FieldServiceDefaultComponents solution.
- Opt out from the new experience and skip installing the solution in subsequent updates.