Note
Access to this page requires authorization. You can try signing in or changing directories.
Access to this page requires authorization. You can try changing directories.
This article answers frequently asked questions about Lead management in Dynamics 365 Sales, Sales premium, and Sales professional.
FAQs about lead qualification experience
What happens when a lead is qualified?
Depending on the settings configured by your system administrator, your experience may vary. Here are possible experiences:
Where can I find the qualified and disqualified leads?
Select Leads in the sitemap, and then select the Closed Leads view to find your qualified and disqualified leads. You can reactivate the leads if you want to qualify them again.
What happens to notes and attachments when leads are qualified?
When salespeople work on a lead, they use notes to store key information on the things they've researched about the lead. This could be information like new contacts at the site, current value of the contract, vendor information, and so on. When a lead is qualified, these notes are displayed in the Opportunity record so that the information isn't lost.
What is the difference between the new and old lead qualification experiences?
The new lead qualification experience allows for customization of the lead qualification process, including automatic or manual creation of account, contact, and opportunity records, or a combination of both. It also allows for the creation of multiple opportunities for a single lead, and the ability to summarize the lead after it's qualified. The legacy experience only allows for automatic creation of the records.
What if I had previously defined the lead qualification experience?
The new lead qualification experience is turned on by default irrespective of whether you had previously defined the lead qualification experience or not. However, the experience you had previously defined is retained. For example, if you had previously turned on Auto-create records for newly qualified leads in the legacy experience, record creation is set to Automatic in the new experience. Otherwise, record creation is set to Seller in the new experience. Learn more about how to customize the lead qualification experience.
How can I create multiple opportunities for a single lead?
If multiple opportunities creation is enabled by your admin, you can create additional opportunities by selecting +New Opportunity on the Qualify lead side pane. Note that the records aren't created until you select Qualify.
Why can't I edit or create multiple opportunities for a lead in the new lead qualification experience?
The New Opportunity button is disabled in the following scenarios:
- Your admin has disabled the creation of multiple opportunities for a single lead.
- You're using a custom app that doesn't have the Opportunity qualify lead form.
For more information, see Customize opportunity creation experience for qualified leads.
Why can't I see the business process flow on all the newly created opportunities?
A lead's business process flow can only be associated with one opportunity record. If you create multiple opportunities for a lead, the business process flow is only associated with the default opportunity record.
To associate the business process flow with a different opportunity,
- Open the lead record and select the Qualify section of the process bar.
- Select Set Active and then select Next Stage. You'll see all the opportunities you created for the lead.
- Select the opportunity you want to associate with the business process flow and save the record.
- Open the opportunity record to verify whether the business process flow is associated with the record.
Why can't I edit the account and contact records in the Qualify lead side pane?
If your admin has set account and contact records to be created automatically, these records aren't editable in the Qualify lead side pane. To make changes, you need to close the side pane, edit the details in the Lead form, and then select Qualify again.
Can I customize the Opportunity form that appears when a lead is qualified?
Yes, your admin can customize the fields in the Opportunity form that appears during lead qualification. Customization of opportunity forms is only possible in the following scenarios:
- Your admin has enabled the new lead qualification experience.
- Your admin has selected Seller for Opportunity creation in the new lead qualification experience.
What is lead summarization, and how does it work?
Lead summarization, if enabled by your admin, generates an AI-powered summary of the lead after it's qualified. This summary includes key details from the lead record and is added to the timeline of both the primary opportunity record and the lead record, providing a concise overview of the lead's information. More information: Summarize the lead after it's qualified
Why don't I see lead summary after qualification?
The lead summary feature is only available when the following features are enabled in your organization:
How are fields mapped from leads to other entities upon qualification?
When a lead is qualified, certain fields from the lead are automatically mapped to corresponding fields in accounts, contacts, and opportunities. This ensures that key information is transferred and maintained across these related records. More information: Field mappings to other entities
How do I handle lead qualification errors?
While qualifying a lead, one of the following errors occurs due to duplicate leads:
- Lead record was not created or updated because a duplicate of the current record already exists.
- Opportunity record was not created or updated because a duplicate of the current record already exists.
If the duplicate detection rules feature is enabled in your organization, the application won't allow qualification of leads if duplicates of that lead exist. To mitigate the issue, try the following resolutions:
Remove the duplicates for the lead and qualify again. More information: Merge duplicate rows
Go to the leads grid view, select the lead and qualify.
Unpublish the rule that is causing the error and qualify the lead again. Contact your administrator to unpublish the rules using the following steps:
- In the sales app, go to Settings > Advanced settings.
- Go to System > Data Management > Duplicate detection rules.
- Select the rule, and then select Unpublish on the command bar.
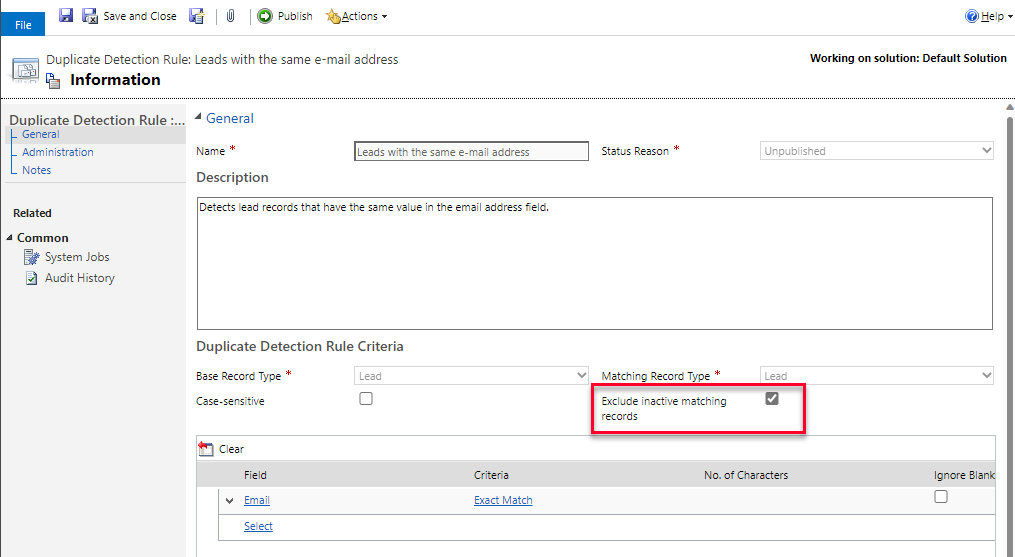
If a rule is required only to create or update the lead, but not required for qualification, ensure that duplicate detection rules don’t run on qualified leads. Enable the Exclude inactive matching records option and qualify the lead. Contact your administrator to enable the option using the following steps:
In the sales app, go to Settings > Advanced settings.
Go to System > Data Management > Duplicate detection rules.
Open and unpublish the rule.
Select the Exclude inactive matching records option.

Publish the rule.
Why isn't the Company Name column available in the Edit Columns pane for lead views?
The Company Name column is included in the out-of-the-box lead views, but it's hidden in the Edit Columns pane by design. So, you can't hide, remove, or reorder the Company Name column in the out-of-the-box lead views or views that are based on these out-of-the-box views. To show the Company Name column in the Edit Columns pane, reach out to your admin. Your admin can add the Company Name field to the view using the Power Apps view designer.
Why can't I delete out-of-the-box field mappings between lead and opportunity?
As of March 2024, the ability to delete any out-of-the-box field mappings was removed. If you deleted the field mapping between lead and opportunity prior to March 2024, the map would have been restored in the next update. If you want to override an out-of-the-box field map, you can create a post-operation plugin on opportunity create that checks whether the originatingleadid field is populated and update the fields targeted in out-of-the-box field maps as per your business requirements.
FAQs about lead scoring
What do I need in order to use lead scoring?
Install Dynamics 365 Sales Insights and use the standard lead entity or the standard opportunity entity. A minimum number of leads or opportunities is required to build a scoring model:
- To build a lead scoring model, you need to have a minimum of 40 qualified and 40 disqualified leads.
- To build an opportunity scoring model, you need to have a minimum of 40 won and 40 lost opportunities.
- The leads and opportunities must have been created on or after January 1 of the previous year.
How do I verify whether I have the required number of leads or opportunities to create a scoring model?
Before you create a lead or opportunity scoring model, you need to ensure that you have a minimum of 40 qualified and 40 disqualified leads or 40 won and 40 lost opportunities to train the model. You can select a time frame between 3 months and 2 years to train the model.
Let's understand the minimum requirement with an example scenario:
You want to build a lead scoring model and train it with leads created and closed in the last 6 months. You want to include only those leads that are using the Lead to opportunity Sales Process business process flow. Use the following steps to verify whether you have the required number of leads. You can follow similar steps to verify the minimum requirement for opportunity scoring. If you plan to use the per stage model in your opportunity scoring, see this section.
On the Leads page, select All leads from the view selector.
Select Edit Filters.
Select Add and set the following filters:
- Created On = Last 6 months.
- Status = Qualified.
Select Add > Add related entity and set the following filters:
- Related entity = Lead to opportunity Sales Process
- Operator = Contains data
- Field = Status Reason
- Operator = Does not equal
- Value = Aborted
The following screenshot shows the filters that you need to set:
Verify the number of leads that meet the criteria. If the number of leads is less than 40, you can increase the time frame to include more leads. To verify the number of disqualified leads, change the Status filter to Disqualified.
Why aren't my leads or opportunities scored or rescored?
If a lead or opportunity is not scored or the score is not updated, ensure that the following conditions are met:
- The scoring model is published.
- The record is in the Open state.
- The record meets all the conditions defined in the scoring model.
- The record is using the same business process flow that is configured in the scoring model.
- The record was created within the last 2 years from the current date. The model checks the date every time it scores a record. If a record was scored earlier but goes outside the 2-year window in the next scoring cycle, the score won't be updated.
How frequently are the predictive lead scores updated?
For new leads, the scoring happens in near real time. The score will be displayed within five minutes of saving a new lead. For updated leads, the scores are refreshed after every 24 hours.
Why aren't my leads scored in real time?
Real-time scoring is supported only for new leads. If you don't see the score even after 15 minutes of saving or importing the new lead, contact your administrator. Your administrator can verify whether the model that's scoring the new lead was created or edited, and published after the real-time scoring feature was rolled out. More information: Real-time scoring
Can I customize the predictive scoring model?
Yes, you can modify the attributes that are selected to train the model. That said, the out-of-the-box model automatically selects the attributes it determines are most relevant for your business.
Can I create multiple models for leads?
Yes, you can add and publish multiple models that are specific to each line of business in your organization.
What's the difference between a score and a grade?
Scores are generated by the machine learning model.
Grades are just a grouping of scores in four buckets that the admin can configure.
FAQs about duplicate lead detection
What happens when duplicates are found while qualifying leads?
When qualifying a lead, if a duplicate account or contact is detected while creating new records, you'll see a duplicate warning. Depending on whether your system administrator has enabled the improved duplicate detection and merge experience, you'll see the options to resolve duplicates. More information: Enable the improved duplicate detection and merge experience
What's the difference between the duplicate detection capability in Power Platform and Dynamics 365 Sales?
Power Platform detects duplicates by comparing the matchcode that is created for each record. More information: Detect duplicate data so you can fix or remove it
Dynamics 365 Sales detects duplicates with an AI model that compares leads using fuzzy logic and the matchcode that is generated for each lead.
The following table shows an example of the two methods for detecting duplicates.
| Rule type | Applied for |
|---|---|
| Fuzzy logic | - Similar lead name and company name - Similar lead name and the same email domain |
| Matchcode | - Email address - Phone number |
More information: Enable duplicate lead detection
What happens when the improved duplicate detection and merge experience is disabled?
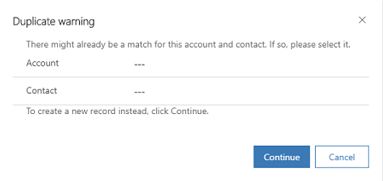
When the improved duplicate detection experience is disabled, you'll see the Duplicate warning dialog box.

In the Account and Contact fields, select the matching account and contact record and then select Continue. To ignore the duplicate warning and create new records, leave the Account and Contact fields blank, and select Continue.
The Account and Contact lookup fields are filtered with matched results and shown along with additional information to precisely identify the record to which the lead should be linked. For example, when you select the Contact lookup search icon, you'll see only matched contact records.
What happens when the improved duplicate detection and merge experience is enabled?
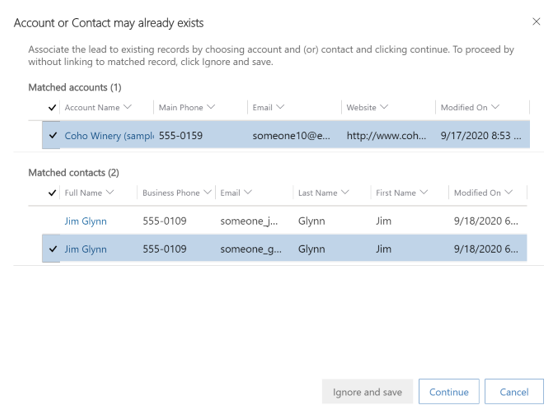
When the improved duplicate detection and merge experience is enabled, you'll see the Account or Contact may already exist dialog box.

The Matched accounts and Matched contacts sections will show all the matching records (based on the duplicate detection rules) along with additional information to precisely identify the record to which the lead should be linked.
To associate the lead record to an existing matching record, select the record and then select Continue. To create a new account or contact record, select Ignore and save without selecting a matching record.
The lead is qualified.