Build a Power Automate connector
![]() Microsoft Cloud for Sustainability
Microsoft Cloud for Sustainability
Important
Some or all of this functionality is available as part of a preview release. The content and the functionality are subject to change.
This article shows partners how to create a Power Automate connector for Microsoft Sustainability Manager.
If you need to build a Power Query template connector, go to Build a Power Query template connector.
Step 1: Create an environment
In this step, you create a solution to distribute to Sustainability Manager users who need to import data with your connector.
Create a new unmanaged solution in Power Apps by following the instructions in Create a solution.
Install Sustainability Manager into that environment.
Step 2: Create a connector record
In your preferred text editor, create a new file named msdyn_dataconnectors.xml.
Copy and modify the following XML to fit your details:
   <msdyn_dataconnectors>
     <msdyn_dataconnector msdyn_dataconnectorid="a1a87c17-40f1-ee11-1fd-6045bdef542d">
       <iscustomizable>1</iscustomizable>
     <msdyn_name>Demo 3P Connector</msdyn_name>
     <msdyn_title>Demo 3P Connector</msdyn_title>
       <msdyn_connectorstatus>700610001</msdyn_connectorstatus>
       <msdyn_connectortype>700610006</msdyn_connectortype>
       <msdyn_description>Demo 3P connector</msdyn_description>
       <msdyn_supportlinkurl>https://www.microsoft.com</msdyn_supportlinkurl>
       <msdyn_logo_text>
       </msdyn_logo_text>
       <msdyn_parameterconfiguration>
       </msdyn_parameterconfiguration>
     </msdyn_dataconnector>
   </msdyn_dataconnectors>
Parameter Details msdyn_dataconnectorid Generate a new GUID to identify your connector, adhering to GUID format. In our example, we use GUID = a1a87c17-40f1-ee11-1fd-6045bdef542d. Your GUID is your connector identifier, which you need in later steps. msdyn_name msdyn_title Change Demo 3P Connector to the name of your connector. msdyn_connectorstatus Leave this value at 700610001. This value represents a published connector. msdyn_connectortype Leave this value at 700610006. This value represents the type of connector. In this case, it's the value for a Power Automate connector. msdyn_description Add a brief description for your connector. msdyn_supportlinkurl Replace the text with the URL you want your users to reach out to if the connection fails. For information about testing failed connections, go to Test for error handling. Your connector won't show up in Sustainability Manager without this URL. msdyn_logo_text Use an encoder of your choice to encode and save your logo image to Base 64. The image should be 36 x 36 px. Paste the base 64 encoding in this parameter. msdyn_parameterconfiguration The credential form is represented in JSON, which Sustainability Manager parses to show the UI for the form. Change the sample JSON provided after this table as needed, and then add it to this parameter. For msdyn_parameterconfiguration, you can use this sample JSON as a starting point.
Note
The full schema definition for msdyn_parameterconfiguration is coming soon.
{
    "parameterGroups": [
        {
            "label": "Login",
            "fields": [
                {
                    "displayLabel": "Username",
                    "type": "text",
                    "key": "username",
                    "required": true,
                    "description": "Enter the username to login with"
                },
                {
                    "displayLabel": "Password",
                    "type": "text",
                    "key": "password",
                    "mask": true,
                    "required": true
                }
            ]
        },
        {
            "label": "Data extraction parameters",
            "fields": [
                {
                    "displayLabel": "Watermark Date",
                    "type": "datetime",
                    "key": "watermarkDate"
                },
                {
                    "displayLabel": "Organization Unit",
                    "type": "text",
                    "key": "organizationUnit"
                },
                {
                    "displayLabel": "Facility",
                    "type": "text",
                    "key": "facility"
                },
                {
                    "displayLabel": "Installation instructions",
                    "type": "note",
                    "text": "To use this connector, you should first create an environment variable that contains the login credentials. Then create a flow that uses this connector."
                },
                {
                    "displayLabel": "How to create an environment variable in Azure Key Vault",
                    "type": "link",
                    "url": "https://docs.microsoft.com/azure/azure-functions/functions-how-to-use-azure-function-app-settings#settings"
                }
            ]
         }
   ]
};
This JSON displays as:


Step 3: Create a Power Automate flow
In this step, you create a Power Automate flow to retrieve user credentials and to import, transform, and store data.
In Power Automate, select Create, and then select Automated cloud flow.
Enter a Flow name. Under Choose your flow's trigger, select the When a row is added, modified, or deleted Dataverse trigger.

Select Create.
Enter the properties of the trigger for When a row is added, modified, or deleted according to this table.
Field Value Change type Added Table name Data import jobs Scope Organization Select columns N/A Filter rows _msdyn_dataconnector_value eq <GUID you created earlier> Add a Get a row by ID action to fetch credentials from Dataverse. Each data import you create in Sustainability Manager has an associated connection record in the msdyn_dataconnection table. That data connection record has a lookup to the msdyn_providercredential table, which links credentials to connections. This action reads from the msdyn_dataconnection table and then expands a query on msdyn_providercredentialid. It also loads the associated credential record linked to the connection. The connection row ID is provided with the trigger outputs.
You can now use the Parse JSON function to parse the credentials JSON.
Note
If you decided to use Key Vault and prompt users to create environment variable storing credentials, you can refer to this article to learn how to fetch the credentials from Key Vault: Use environment variables for Azure Key Vault secrets.
Now that you have the credentials to pull users' data from the data source, you need to add actions to fetch data from the source using Power Automate connectors. Your logic only needs to pull incremental data since the last successful refresh. You can use the msdyn_lastrefresh column in msdyn_dataconnection table to check the last refresh time. If the value is null or empty, you can assume it's the first run.
After fetching the data, transform it to Cloud for Sustainability data model and store it in a CSV table. One way is to add a Create CSV Table action. The header for this table is the logical name of the columns for the entity the connector is importing. The value is either hard coded or comes from the data that you've extracted from the source. For example:

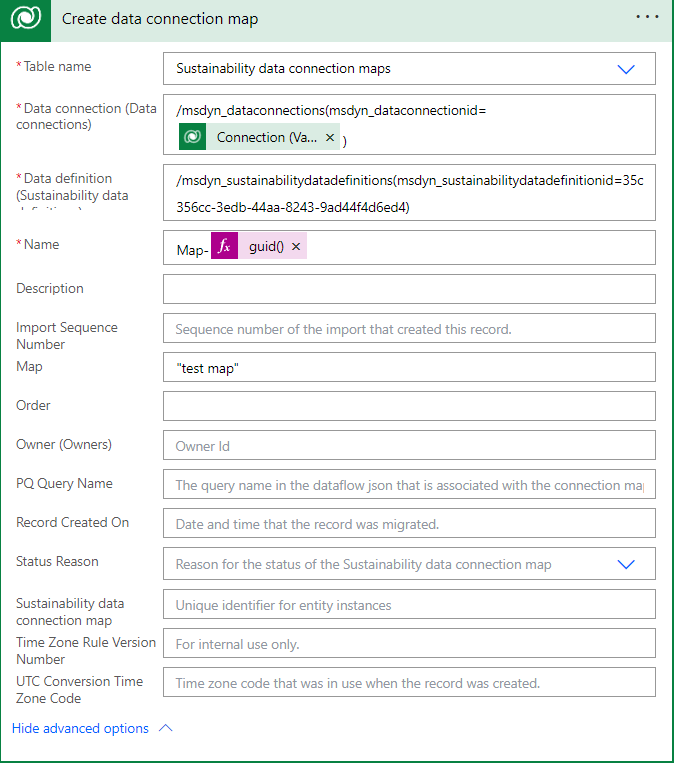
Create a Sustainability data connection map. Add a Dataverse action to create a new record in the Sustainability data connection maps record.
Before creating this record, get the sustainability data definition ID for the entity to ingest with the connector. To get the sustainability data definition id, in the Power Apps portal, select Tables tab. Select all tables and search for Sustainability data definition.
In this example, complete the required columns along with the map column. Enter any string in the Map column. You get the connection ID from the trigger.
Create a connection refresh, which is the instance a connection ran. In this example, msdyn_dataimportjobid and msdyn_dataconnectionid come from the trigger output. msdyn_sustainabilitydataconnectionmapid is the ID of the record you created earlier.

Upload the CSV file to the data connection refresh record. Add an action to upload the CSV file to the connection refresh record you created earlier with the Dataverse action. Your file shouldn't be over 2 GB.
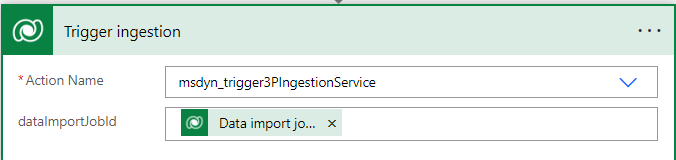
Finally, trigger the unbound action using a Dataverse action, which triggers the import. Provide the dataimportJobId that you received as part of the trigger.