Test and distribute a custom connector
![]() Microsoft Cloud for Sustainability
Microsoft Cloud for Sustainability
Important
Some or all of this functionality is available as part of a preview release. The content and the functionality are subject to change.
This article provides information about how to test and distribute your custom data import connector in Microsoft Sustainability Manager.
Test the connector UI
By following these steps, you can see what the UI for your connector looks like.
Export the Power Platform solution that you created earlier by following the steps in Export solutions. Ensure that the solution version number you export is higher than the current version. You'll reimport the solution after adding the XML file that you created earlier.
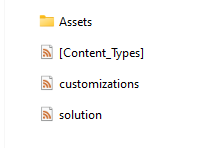
Extract the ZIP file(s) that you exported and create a new folder named Assets.
Save the msdyn_dataconnectors.xml file (and the msdyn_dataflowtemplates.xml file for a Power Query template connector) in the Assets folder.
For a Power Automate connector, your folder structure should now look like:
For a Power Query template connector, your folder structure should look like:
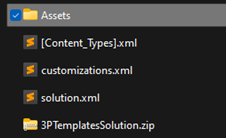
Select all the files and compress them to a ZIP file. When you open your newly created ZIP file, the top level folder structure should have these items:
- Assets folder
- [Content-Types] file
- customizations.xml file
- solution.xml file
- Templates solution ZIP file (for Power Query template connectors)
Reimport the ZIP file into the same Power Platform environment that you exported it from by following the steps in Import solutions.
After the import successfully completes, a connector appears in that environment. In Sustainability Manager, in the Data area of the left navigation, select Imports. Select New, and then select DATA PROVIDER CONNECTORS. Your connector tile displays on the next page. Select your connector tile, and then select Next.
For a Power Automate connector, the UI for the credentials form that you designed appears. You can make sure it looks right and debug the form through this page.
For a Power Query template connector, the Power Query template import experience appears.
If you want to make any changes, follow the steps to export the solution, update the msdyn_dataconnectors.xml file, and then reimport. Make sure the version you're exporting is higher than the current version.
You can fill the form with sample values and save it. To check how these values are stored, in Power Apps, select Tables. Select All and search for msdyn_providercredential. The data in the table displays. If this is your first time creating the connection, there should only be one credential record. Check the Credential column to see how the values you provided in the form are stored.


Test for error handling
For Power Automate connectors, it's important to handle errors in your connection flow. If, for some reason, any step in the flow fails, the data import status remains stuck as Scheduled.
To test for this event, add your actions in the flow in a try/catch block. In the catch block, fail the connection and connection refresh.
If the connection fails, your users should be able to reach out to you by using the support link that you included in the JSON for your connector's UI. This JSON appears in Step 2: Create a connector record.
To fail the connection and connection refresh, use the Update a row Dataverse action for both the Connection refresh and the Connection records.
For the Connection refresh record, set the Refresh status field to Failed:

For the Connection record, set the Status field to Error:


For more information, go to Use a flow to update a row.
For more information about error handling, go to Best practices for error handling in Power Automate flows.
Test your connector
After you create your connector, you can export it as a managed solution by following the steps in Export solutions.
Import your exported solution into other environments that have Sustainability Manager installed, and test your solution to ensure it works as intended.
Distribute your connector
After you complete your testing, you can either privately distribute your solution directly to your users, or you can distribute it publicly through Microsoft AppSource. For more information about distribution through AppSource, go to Publish your app on AppSource.


