Note
Access to this page requires authorization. You can try signing in or changing directories.
Access to this page requires authorization. You can try changing directories.
ADFS Overview
This document outlines the necessary steps for LinkedIn Learning administrators to set up Single Sign-on with ADFS 3.0. This guide also describes troubleshooting steps for common issues in the SSO-ADFS configuration.
What this Document Tells You
The following steps outline the SSO-ADFS configuration process:
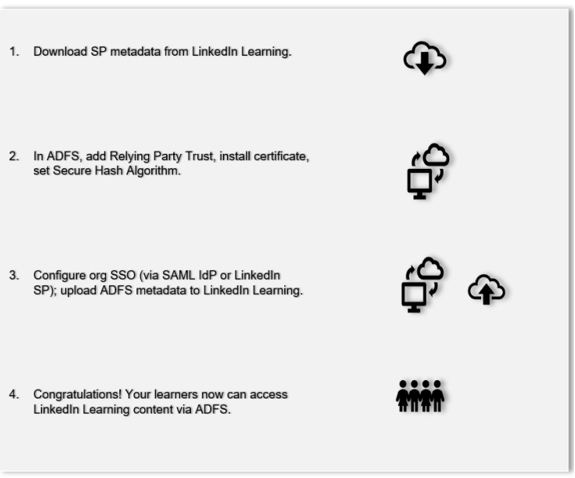
Download Service Provider Metadata from LinkedIn Learning
After you log in, if you are not already in the Admin screen, select Go to Admin, then select Me > Authentication.

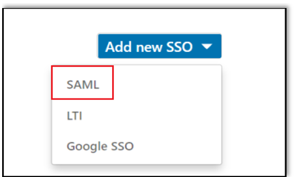
From the side navigation menu, select Configure single sign-on and click Add new SSO.
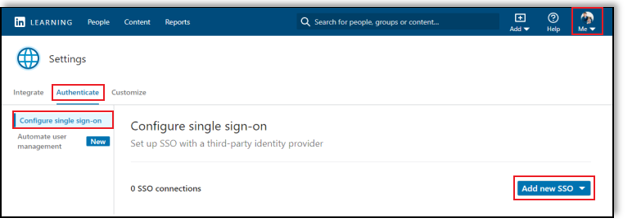
Click Add new SSO and select "SAML".
In the Authenticate users with SAML SSO screen, under Identity provider settings, click Download.

LinkedIn Learning downloads the SP metadata as an XML file. You need this file for the next section.
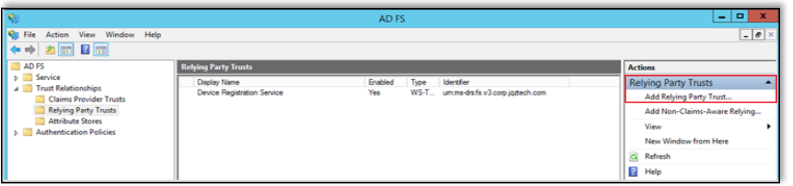
Add Relying Party Trust
In ADFS, navigate to Trust Relationships > Relying Party Trusts. You should see the previously-added relying party trusts.
In the right hand column, select "Add Relying Party Trust".
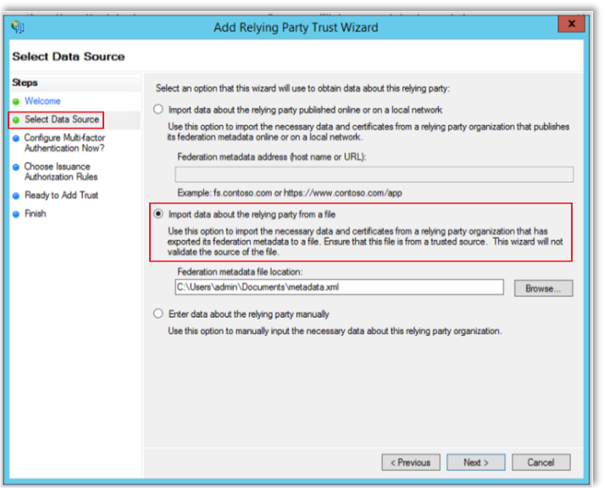
In the left-hand side navigation, click Select Data Source, then choose “Import data about the relying party from a file” and select the SP Metadata file downloaded from LinkedIn Learning.
Select Specify Display Name, then in the Display name field, enter a display name (i.e., "LinkedIn Learning").

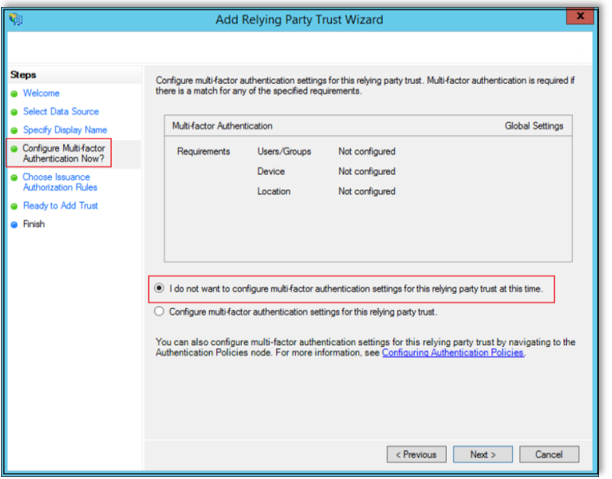
Select Configure Multi-factor Authentication Now?, then select "I do not want to configure multi-factor authentication settings for this relying party trust at this time".
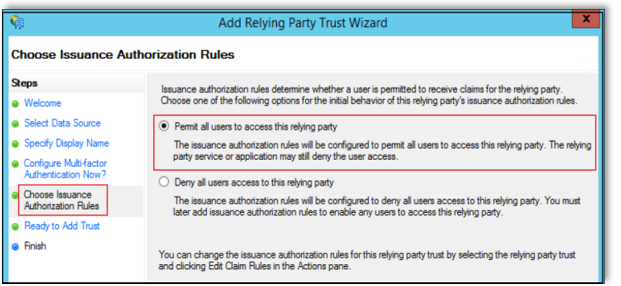
Select Choose Issuance Authorization Rules, then select "Permit all users to access this relying party".
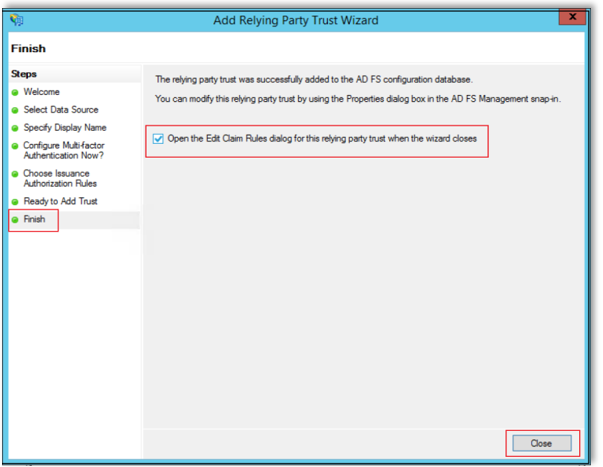
Select Finish, then select "Open the Edit Claim Rules dialog for this relying party trust when the wizard closes", then click Close.
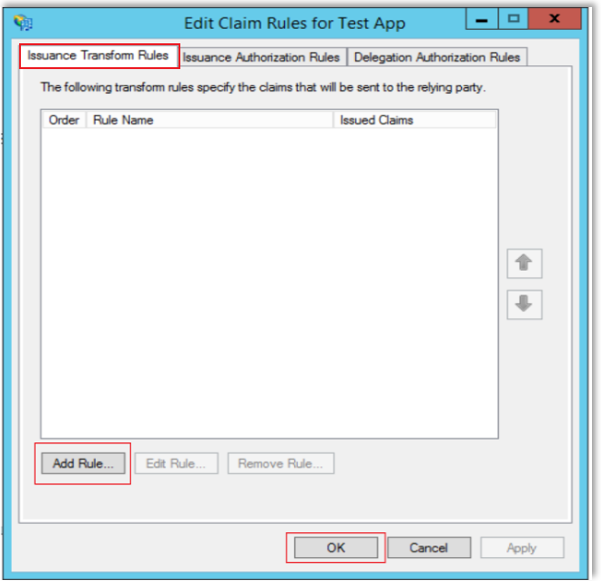
In the Issuance Transform Rules tab, select Add Rule..., then click OK.
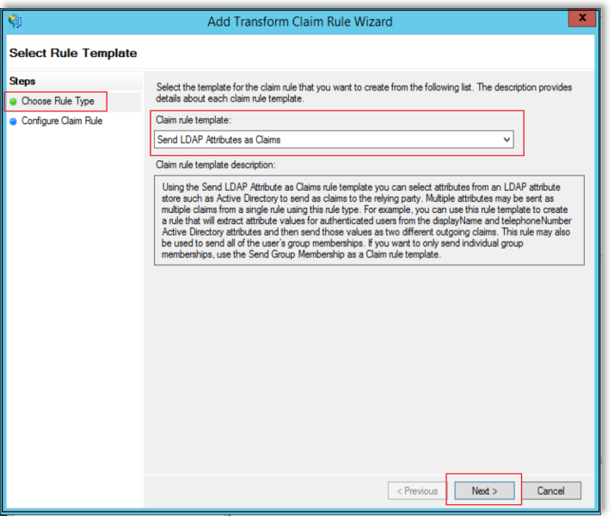
In the Add Transform claim Rule Wizard window, select Choose Rule Type.
Select “Send LDAP Attributes as Claims” from the dropdown, then click Next.
Select Configure Claim Rule, then enter a name in the Claim rule name field.
Select “Active Directory” in the Attribute Store dropdown.
Choose your mappings. We recommend the values shown below, but you can select the values that align with your organization's needs.
Important
For authentication to be successful, you must map a unique identifier to the Name ID claim type. Linkedin Learning uses this value to identify users and should be unique and unchanging, like an Employee ID or a UPN.
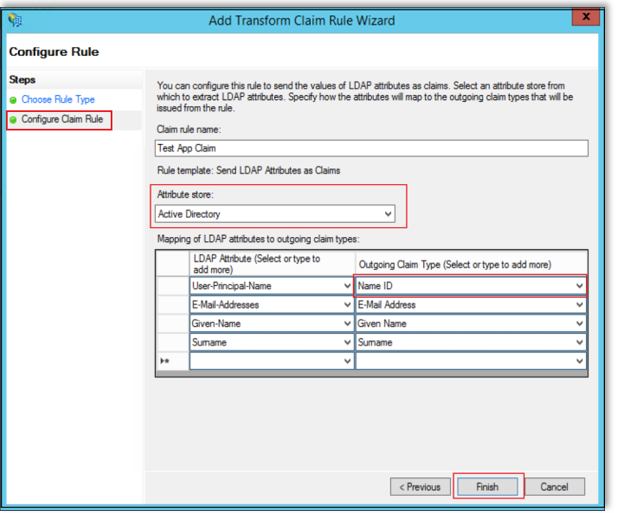
Note
You can create additional claim rules such as "Job Title" or "Department" for reporting or grouping purposes.
Click Finish and OK on the next screen.
Install the Certificate
In ADFS, go to the Properties of the Relying Party Trust you just created and click the Signature tab. Double-click the certificate. If the window looks like this, skip to the next section.
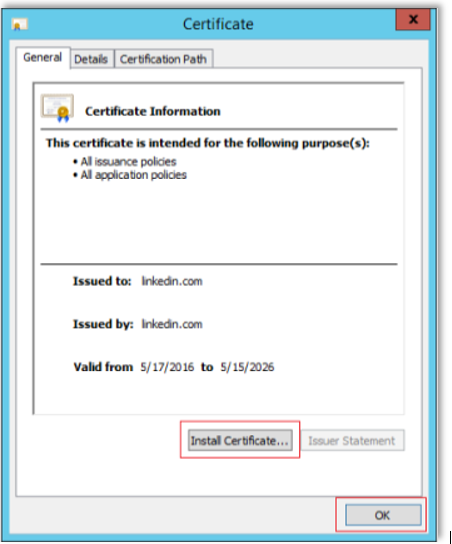
If the above window does not appear, install the certificate.
Click Install Certificate… to open the wizard.
For Store Location, choose "Local Machine".
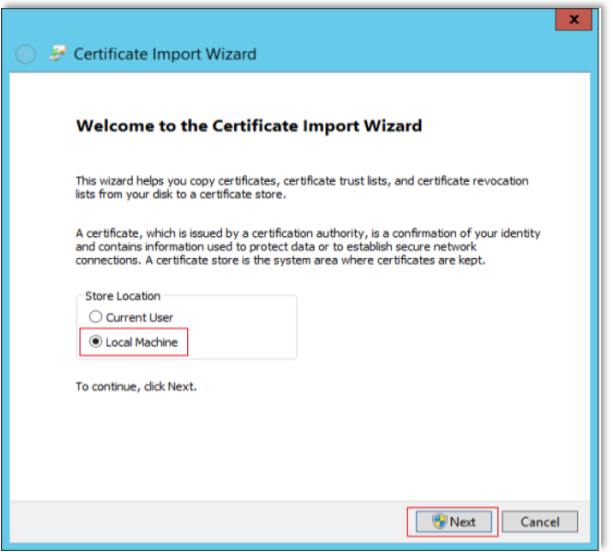
Click Next.
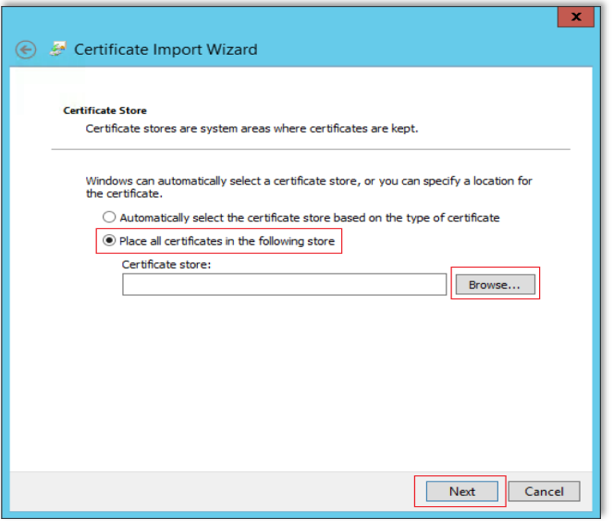
On the next screen, choose "Place all certificates in the following store" and click Browse.
Choose "Trusted Root Certification Authorities".
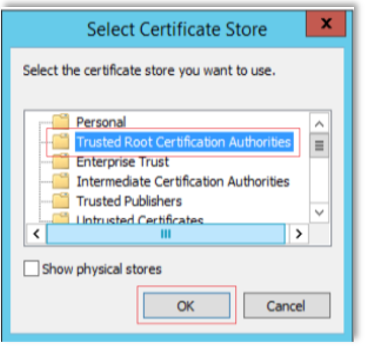
Click OK and then Finish. Your Certificate window should now look similar to the one above.
Set Secure Hash Algorithm
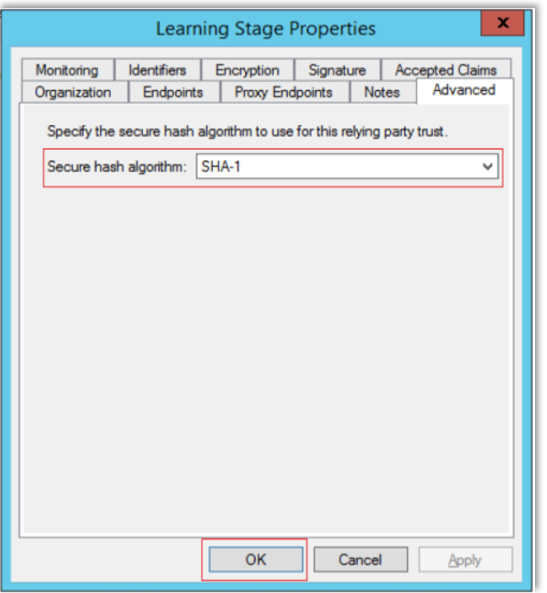
On the properties of the Relying Party Trust you created, go to the Advanced tab.
In the Secure Hash Algorithm section, choose either "SHA-1" or "SHA-256".
Important
LinkedIn Learning defaults to "SHA-1". If you select "SHA-256", make sure you also choose "SHA-256" when completing the configuration in LinkedIn Learning.
Configure SAML SSO
To configure SAML SSO in ADFS and LinkedIn Learning, take the following steps:
In ADFS, navigate to the Endpoints tab.
Open the SP Metadata XML file you downloaded from LinkedIn Learning, locate the
AssertionConsumerServiceURL, and paste it in the Endpoint. For example:https://www.linkedin.com/checkpoint/enterprise/saml/1234567?application=learning&appInstanceId=1234567&authModeId=1234567
This field maps to the Assertion Consumer Service URL, where a SAML response sends a "POST" via the user agent. In other words, you (the admin) trigger the IdP-initiated flows by sending the response to this endpoint.
Upload ADFS Metadata to LinkedIn Learning
Download your ADFS metadata using the following format (replace
your.adfsserver.comwith your server name):https://your.adfsserver.com/FederationMetadata/2007-06/FederationMetadata.xml.Save the XML file to your computer.
In the Authenticate users with SAML SSO screen, select SSO settings.
Click Upload XML file.
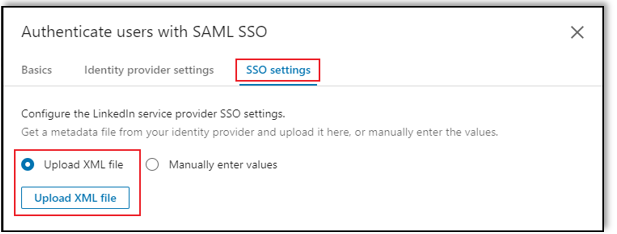
Select the ADFS metadata XML file you downloaded.
If you selected SHA-256 when configuring your relying party trust in ADFS, select the same value for Authentication Request Signing Algorithm. If you did not select SHA-256, leave the SSO options as the default values.
Click Save.
Toggle the connection to Active.

Trigger the IdP-Initiated Authentication Flow
To test Identity Provider-initiated SSO, use the following format (replace your.adfsserver.com with your server):
https://your.adfsserver.com/adfs/ls/IdpInitiatedSignOn.aspx
Trigger the SP-Initiated Authentication Flow
First, locate your Account ID from the URL in the browser where you configured SSO. Example:
https://www.linkedin.com/learning-admin/settings/global?account=1234567To create the Service Provider-initiated URL, use the following format:
https://www.linkedin.com/checkpoint/enterprise/login/[accountid]?application=learningExample:https://www.linkedin.com/checkpoint/enterprise/login/1234567?application=learning
Note
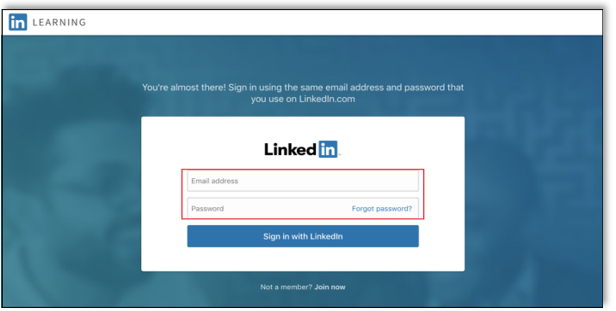
If your LinkedIn Learning account has LinkedIn Profile binding enabled, you may be prompted to log in to LinkedIn after successful SSO authentication. This login is used to associate your LinkedIn Learning login with your personal LinkedIn account in order to drive content recommendations. If you have any questions about this prompt, contact your dedicated LinkedIn Learning Customer Success Manager to learn more.
Congratulations! Your learners now can authenticate to LinkedIn Learning using ADFS.
Support
Below you can find supporting documentation and other resources.
Supporting Documentation
Technical Issues
If you have technical issues with the SSO setup, contact your account team or application support team through the LinkedIn Learning Help Center.
LinkedIn's Privacy and Data Security Policy
https://www.linkedin.com/legal/privacy-policy
LinkedIn Security Contacts
If you have any security questions or you would like to report a security issue, write to us at security@linkedin.com.