Note
Access to this page requires authorization. You can try signing in or changing directories.
Access to this page requires authorization. You can try changing directories.
Have you ever wanted to create a custom projectile in Minecraft? While you have to build new projectiles around the properties of existing ones, there's a lot of flexibility in what you can do. Maybe you'd like a custom version of an arrow, or of a snowball. This tutorial explains how to create them using a combination of different item and entity components.
Prerequisites
Before tackling custom projectiles, you should be familiar with these other tutorials:
- Introduction to Resource Packs
- Introduction to Behavior Packs
- Getting Started with Add-On Development
- Adding Custom Items
Overview
You can find the samples for this tutorial in the Minecraft Samples repository.
Important
These examples currently require the Custom Projectiles experimental toggle to be enabled!
In making custom projectiles, we'll take advantage of some existing item and entity components. Some of these have similar (or even identical!) names, but they have slightly different functions depending on whether they're entity or item components.
Item components
minecraft:projectile: defines an item as a projectile that can be shot from dispensers or spawned/used as ammunition. The entity defined in itsprojectile_entityproperty must have theminecraft:projectileentity component.minecraft:throwable: makes an item, like a snowball, throwable by the player. This defines behaviors like swinging, draw duration, and launch power. The item requires theminecraft:projectileitem component to specify the target entity to be thrown.minecraft:shooter: makes an item, like a bow, shoot projectiles. The item must have theminecraft:use_modifiersitem component to function properly, and the items defined in itsammunitionproperty must also have theminecraft:projectileitem component.
Entity components
minecraft:projectile: defines core projectile behavior including trajectory, physics, damage, sounds, particles, and on hit effects.minecraft:shooter: defines ranged attack behavior. This is required for theminecraft:behavior.ranged_attackgoal to determine which projectiles to shoot. The entities defined in itsprojectilesproperty must have theminecraft:projectileentity component. If you use theminecraft:behavior.fire_at_targetgoal instead, theshootercomponent is unnecessary, as that goal defines the target projectile in itsprojectile_defproperty.
Create a custom snowball
To create our custom snowball, we're going to create a throwable item that spawns a projectile entity. First, let's work on the entity.
The snowball entity
- The custom_snowball.json file goes into the behavior_pack/entities/ folder.
{
  "format_version": "1.26.0",
  "minecraft:entity": {
    "description": {
      "identifier": "my:custom_snowball",
      "is_experimental": false,
      "is_summonable": true,
      "is_spawnable": false,
      "spawn_category": "misc"
    },
    "components": {
      "minecraft:collision_box": {
        "height": 0.25,
        "width": 0.25
      },
      "minecraft:physics": {},
      "minecraft:projectile": {
        "angle_offset": 0.0,
        "on_hit": {
          "impact_damage": {
            "apply_knockback_to_blocking_targets": true,
            "damage": 3,
            "knockback": true,
            "filter": "blaze"
          },
          "particle_on_hit": {
            "num_particles": 6,
            "on_other_hit": true,
            "on_entity_hit": true,
            "particle_type": "snowballpoof"
          },
          "remove_on_hit": {}
        },
        "gravity": 0.03,
        "power": 1.5,
        "isolated_physics": true
      },
      "minecraft:pushable": {
        "is_pushable": true,
        "is_pushable_by_piston": true
      },
      "minecraft:damage_sensor": {
        "triggers": {
          "cause": "all",
          "deals_damage": "no"
        }
      }
    }
  }
}
This entity definition is pretty similar to the Vanilla snowball. We've just made two additions:
- the
isolated_physicsproperty disables outside forces like friction and drag, giving it a longer trajectory similar to other Vanilla projectiles. - the
minecraft:damage_sensorproperty ensures the snowball can't be damaged or killed.
Important
The isolated_physics property requires the Custom Projectiles experimental toggle to be enabled. (Note that when that toggle is enabled, isolated_physics gets a default value of true, so it isn't strictly needed in the entity JSON.)
- Next, we'll need to add resource_pack/animations/custom.animation.json to ensure the snowball, which is just a 2D sprite, always faces the camera. (This is called "billboarding.")
{
  "format_version" : "1.10.0",
  "animations" : {
	"animation.custom.billboard" : {
	  "loop" : true,
	  "bones": {
		"body": {
		  "rotation": [ "query.camera_rotation(0)", "query.camera_rotation(1) - query.body_y_rotation", 0.0 ]
		}
	  }
	}
  }
}
- In resource_pack/render_controllers/custom_snowball.render_controllers.json, we'll set the
is_hurt_colorto 0 to prevent the red flash whenever the snowball is destroyed.
{
  "format_version": "1.10.0",
  "render_controllers": {
    "controller.render.custom_snowball": {
      "geometry": "Geometry.default",
      "materials": [ { "*": "Material.default" } ],
      "textures": [ "Texture.default" ],
      "filter_lighting": true,
      "is_hurt_color": {
        "r": 0.0,
        "g": 0.0,
        "b": 0.0,
        "a": 0.0
      }
    }
  }
}
- Next, the snowball needs a texture. Add this image to resource_pack/textures/items:

- Last but not least, its resource definition uses the render controller, animation, and texture we just added. Add resource_pack/entity/custom_snowball.entity.json:
{
  "format_version": "1.10.0",
  "minecraft:client_entity": {
    "description": {
      "identifier": "my:custom_snowball",
      "materials": {
        "default": "entity_alphatest"
      },
      "textures": {
        "default": "textures/items/custom_snowball"
      },
      "geometry": {
        "default": "geometry.item_sprite"
      },
      "render_controllers": [ "controller.render.custom_snowball"],
      "animations": {
        "flying": "animation.custom.billboard"
      },
      "scripts": {
        "animate": [
          "flying"
        ]
      }
    }
  }
}
The snowball item
We're done with the entity! On to the custom snowball item.
- First, since the snowball is a 2D sprite, we can use its texture again as its own icon by defining it in resource_pack/textures/item_texture.json:
{
  "resource_pack_name": "Custom Projectiles",
  "texture_data": {
    "my:custom_snowball": {
      "textures": "textures/items/custom_snowball"
    }
  }
}
- Now, we can define the item itself in behavior_pack/items/custom_snowball.json:
{
  "format_version": "1.21.3",
  "minecraft:item": {
    "description": {
      "identifier": "my:custom_snowball"
    },
    "components": {
      "minecraft:icon": "my:custom_snowball",
      "minecraft:projectile": {
        "projectile_entity": "my:custom_snowball"
      },
      "minecraft:throwable": {
        "do_swing_animation": true
      },
      "minecraft:display_name": {
        "value": "Custom Snowball"
      }
    }
  }
}
The key parts to the item definition are:
minecraft:iconcorresponds to the texture defined in item_texture.json.projectile_entitydefines what entity to spawn when thrown (in this case, the custom snowball entity we just created).minecraft:throwableallows the item to be thrown.
The finished snowball
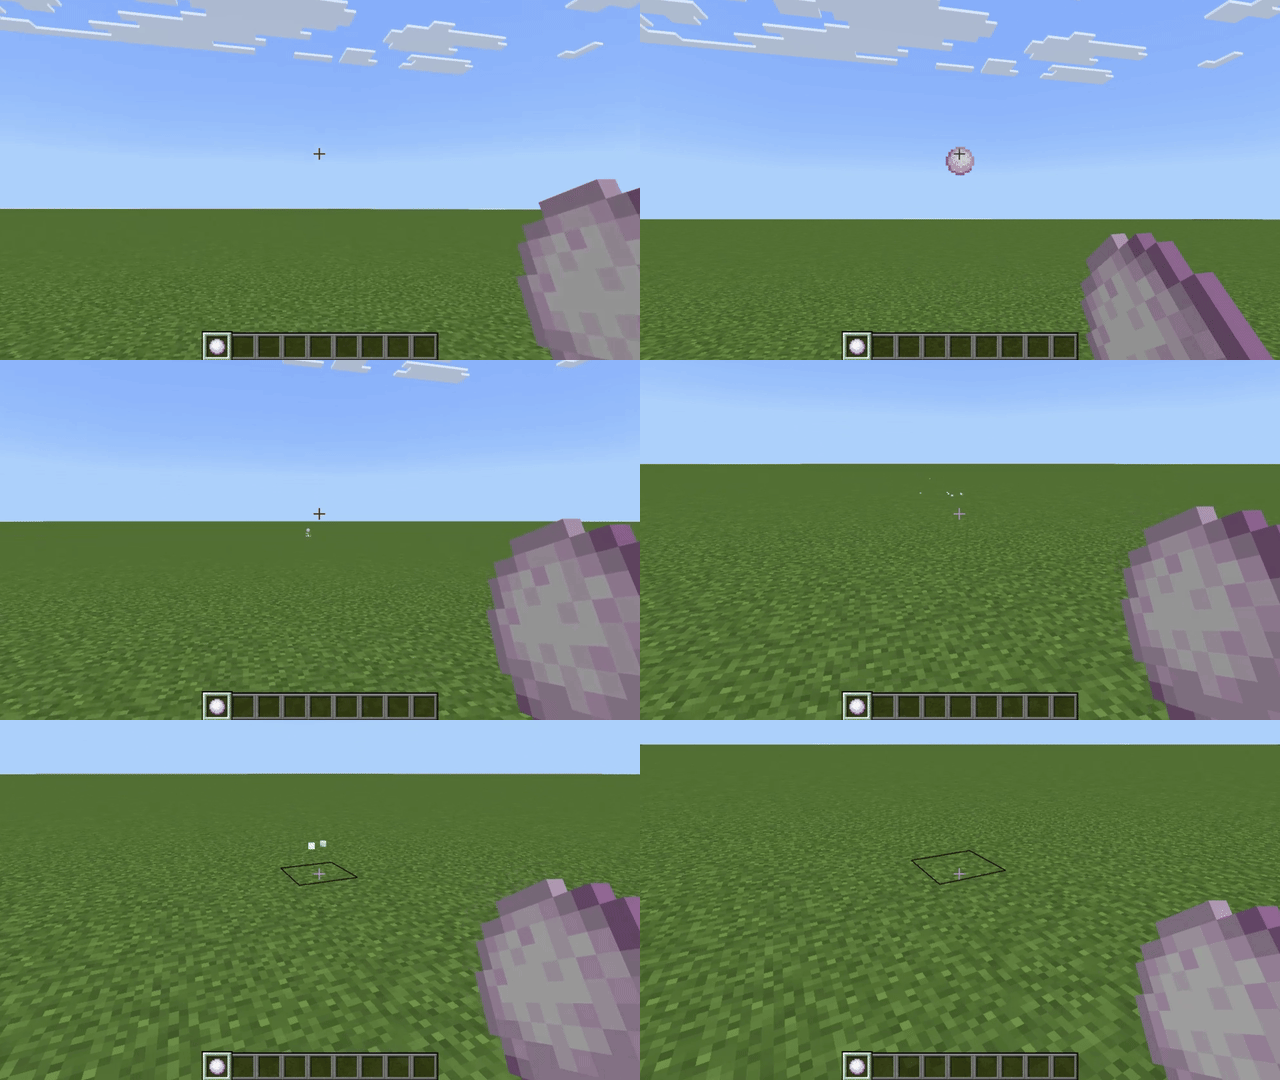
Put it all together, and now we should be able to launch a custom snowball in game that looks like this!
Create a custom bow and arrow
This is similar to the snowball example, but it needs a model to render as a 3D object, making it a little more complicated. As before, we'll start with the entity.
The arrow entity
- Put this in behavior_pack/entities/custom_arrow.json:
{
  "format_version": "1.26.0",
  "minecraft:entity": {
    "description": {
      "identifier": "my:custom_arrow",
      "is_experimental": false,
      "is_summonable": true,
      "is_spawnable": false,
      "spawn_category": "misc"
    },
    "components": {
      "minecraft:collision_box": {
        "height": 0.25,
        "width": 0.25
      },
      "minecraft:dimension_bound": {},
      "minecraft:hurt_on_condition": {
        "damage_conditions": [
          {
            "cause": "lava",
            "damage_per_tick": 4,
            "filters": {
              "operator": "==",
              "test": "in_lava",
              "subject": "self",
              "value": true
            }
          }
        ]},
      "minecraft:physics": {},
      "minecraft:projectile": {
        "anchor": 1,
        "gravity": 0.05,
        "power": 5.0,
        "hit_sound": "bow.hit",
        "on_hit": {
          "arrow_effect": {},
          "impact_damage": {
            "apply_knockback_to_blocking_targets": true,
            "damage": 1,
            "knockback": true,
            "power_multiplier": 0.97,
            "destroy_on_hit": true,
            "semi_random_diff_damage": true,
            "max_critical_damage": 10,
            "min_critical_damage": 9
          },
          "stick_in_ground": {
            "shake_time": 0.35
          }
        },
        "offset": [0, -0.1, 0],
        "should_bounce": true,
        "uncertainty_base": 1,
        "uncertainty_multiplier": 0,
        "isolated_physics": true
      },
      "minecraft:pushable": {
        "is_pushable": false,
        "is_pushable_by_piston": true
      },
      "minecraft:damage_sensor": {
        "triggers": {
          "cause": "all",
          "deals_damage": "no"
        }
      }
    }
  }
}
As with the snowball, this is a simplified version of the Vanilla definition, adding the isolated_physics and minecraft:damage_sensor properties. (Also, like the snowball, you'll need to turn on the Custom Projectiles experimental toggle.)
- Add this to resource_pack/animations/custom.animation.json:
{
  "format_version" : "1.10.0",
  "animations" : {
	"animation.custom_arrow.move" : {
	  "loop" : true,
	  "bones": {
		"body": {
          "rotation" : [ "variable.shake_power - query.target_x_rotation", "-query.head_y_rotation(0) - query.body_y_rotation", 0.0 ],
		  "scale" : [ 0.7, 0.7, 0.9 ]
		}
	  }
	}
  }
}
- The render controller again sets
is_hurt_colorto 0. In resource_pack/render_controllers/custom_arrow.render_controllers.json:
{
  "format_version": "1.10.0",
  "render_controllers": {
    "controller.render.custom_arrow": {
      "geometry": "Geometry.default",
      "materials": [ { "*": "Material.default" } ],
      "textures": [ "Texture.default" ],
      "filter_lighting": true,
      "is_hurt_color": {
        "r": 0.0,
        "g": 0.0,
        "b": 0.0,
        "a": 0.0
      }
    }
  }
}
- Now, here's where we stop following the snowball's path: the arrow is a true 3D model, not a sprite, so we'll need to define a geometry for it (resource_pack/models/entity/custom_arrow.geo.json):
{
  "format_version" : "1.12.0",
  "minecraft:geometry" : [
	{
	  "description" : {
		"identifier" : "geometry.custom_arrow",
		"texture_width" : 32.0,
		"texture_height" : 32.0
	  },
	  "bones" : [
		{
		  "name" : "body",
		  "pivot" : [ 0.0, 1.0, 0.0 ],
		  "cubes" : [
			{
			  "origin" : [ 0.0, -1.5, -3.0 ],
			  "rotation" : [ 0.0, 0.0, 45.0 ],
			  "size" : [ 0.0, 5.0, 16.0 ],
			  "uv" : {
				"east" : {
				  "uv" : [ 0.0, 0.0 ]
				}
			  }
			},
			{
			  "origin" : [ 0.0, -1.5, -3.0 ],
			  "rotation" : [ 0.0, 0.0, -45.0 ],
			  "size" : [ 0.0, 5.0, 16.0 ],
			  "uv" : {
				"east" : {
				  "uv" : [ 0.0, 0.0 ]
				}
			  }
			},
			{
			  "origin" : [ -2.5, -1.5, 12.0 ],
			  "rotation" : [ 0.0, 0.0, 45.0 ],
			  "size" : [ 5.0, 5.0, 0.0 ],
			  "uv" : {
				"south" : {
				  "uv" : [ 0.0, 5.0 ]
				}
			  }
			}
		  ]
		}
	  ]
	}
  ]
}
- Now the arrow needs a texture saved as resource_pack/textures/entity/custom_arrows.png:

- And, finally, the resource definition brings everything together (resource_pack/entity/custom_arrow.entity.json):
{
  "format_version": "1.10.0",
  "minecraft:client_entity": {
    "description": {
      "identifier": "my:custom_arrow",
      "materials": {
        "default": "entity_alphatest"
      },
      "textures": {
        "default": "textures/entity/custom_arrows"
      },
      "geometry": {
        "default": "geometry.custom_arrow"
      },
      "animations": {
        "move": "animation.custom_arrow.move"
      },
      "scripts": {
        "pre_animation": [
          "variable.shake = query.shake_time - query.frame_alpha;",
          "variable.shake_power = variable.shake > 0.0 ? -Math.sin(variable.shake * 200.0) * variable.shake : 0.0;"
        ],
        "animate": [
          "move"
        ]
      },
      "render_controllers": [ "controller.render.custom_arrow" ]
    }
  }
}
The arrow item
- Unlike the snowball, the arrow needs a separate texture for its icon. Save this image as resource_pack/textures/items/custom_arrow.png:

- We'll refer to it in resource_pack/textures/item_texture.json:
{
  "resource_pack_name": "Custom Projectiles",
  "texture_data": {
    "my:custom_arrow": {
      "textures": "textures/items/custom_arrow"
    }
  }
}
- Add the item definition JSON (custom_projectiles_behavior_pack/items/custom_arrow.json):
{
  "format_version": "1.21.3",
  "minecraft:item": {
    "description": {
      "identifier": "my:custom_arrow"
    },
    "components": {
      "minecraft:icon": "my:custom_arrow",
      "minecraft:projectile": {
        "projectile_entity": "my:custom_arrow"
      },
      "minecraft:display_name": {
        "value": "Custom Arrow"
      }
    }
  }
}
The key parts to the item definition are:
- minecraft:icon - Corresponds to the texture defined in item_texture.json
- minecraft:projectile - Its projectile_entity property defines what entity to spawn when dispensed/shot (in this case, the custom arrow entity we just created)
The finished arrow
Now we have a custom arrow that can be shot by a dispenser, but not thrown like a snowball.

The bow
We're not finished yet, though—the custom arrow needs its custom bow! We'll go through the item definition more quickly this time.
- Save this image to resource_pack/textures/items/custom_bow_standby.png (the name will be explained in a minute):

- Add the texture to resource_pack/textures/item_texture.json:
{
  "format_version": "1.21.3",
  "minecraft:item": {
    "description": {
      "identifier": "my:custom_bow"
    },
    "components": {
      "minecraft:icon": "my:custom_bow_standby",
      "minecraft:use_modifiers": {
        "use_duration": 72000
      },
      "minecraft:shooter": {
         "ammunition": [
          {
            "item": "my:custom_arrow",
            "search_inventory": true,
             "use_in_creative": true
          }
        ],
        "max_draw_duration": 1.5,
        "scale_power_by_draw_duration": true
      },
      "minecraft:display_name": {
        "value": "Custom Bow"
      }
    }
  }
}
The important new property here is minecraft:shooter, which defines the bow's ammunition to be our custom arrow item. The minecraft:use_modifiers component determines how long an item (the bow) takes to use, and it's required for shooters.
- As with the arrow, we want the bow to render as a 3D object, so we need to add a bow model. Actually, we need to add four bow models: one at standby (rest), and three for different states of charging (being pulled back) before releasing the arrow. We'll define the geometry in resource_pack/models/entity/custom_bow.geo.json:
{
  "format_version" : "1.16.0",
  "minecraft:geometry" : [
	{
	  "description" : {
		"identifier" : "geometry.custom_bow_pulling_0",
		"texture_width" : 16.0,
		"texture_height" : 16.0
	  },
	  "bones" : [
		{
		  "name" : "rightitem",
		  "texture_meshes" : [
			{
			  "local_pivot" : [ 6.0, 0.0, 6.0 ],
			  "position" : [ 2.0, 1.0, -1.0 ],
			  "rotation" : [ 0.0, -135.0, 90.0 ],
			  "texture" : "custom_bow_pulling_0"
			}
		  ]
		}
	  ]
	},
	{
	  "description" : {
		"identifier" : "geometry.custom_bow_pulling_1",
		"texture_width" : 16.0,
		"texture_height" : 16.0
	  },
	  "bones" : [
		{
		  "name" : "rightitem",
		  "texture_meshes" : [
			{
			  "local_pivot" : [ 6.0, 0.0, 6.0 ],
			  "position" : [ 2.01, 1.0, -1.0 ],
			  "rotation" : [ 0.0, -135.0, 90.0 ],
			  "texture" : "custom_bow_pulling_1"
			}
		  ]
		}
	  ]
	},
	{
	  "description" : {
		"identifier" : "geometry.custom_bow_pulling_2",
		"texture_width" : 16.0,
		"texture_height" : 16.0
	  },
	  "bones" : [
		{
		  "name" : "rightitem",
		  "texture_meshes" : [
			{
			  "local_pivot" : [ 6.0, 0.0, 6.0 ],
			  "position" : [ 2.01, 1.0, -1.0 ],
			  "rotation" : [ 0.0, -135.0, 90.0 ],
			  "texture" : "custom_bow_pulling_2"
			}
		  ]
		}
	  ]
	},
	{
	  "description" : {
		"identifier" : "geometry.custom_bow_standby",
		"texture_width" : 16.0,
		"texture_height" : 16.0
	  },
	  "bones" : [
		{
		  "name" : "rightitem",
		  "texture_meshes" : [
			{
			  "local_pivot" : [ 6.0, 0.0, 6.0 ],
			  "position" : [ 2.0, 1.0, -2.0 ],
			  "rotation" : [ 0.0, -135.0, 90.0 ],
			  "texture" : "default"
			}
		  ]
		}
	  ]
	}
  ]
}
- Next, we'll define an attachable for the bow. Ensure you've saved the following images to your textures/items folder for the different charging state textures.

custom_bow_pulling_2.png

custom_bow_pulling_1.png

custom_bow_pulling_0.png
- Add resource_pack/attachables/custom_bow.json:
{
  "format_version": "1.10.0",
  "minecraft:attachable": {
    "description": {
      "identifier": "my:custom_bow",
      "materials": {
        "default": "entity_alphatest",
        "enchanted": "entity_alphatest_glint"
      },
      "textures": {
        "default": "textures/items/custom_bow_standby",
        "custom_bow_pulling_0": "textures/items/custom_bow_pulling_0",
        "custom_bow_pulling_1": "textures/items/custom_bow_pulling_1",
        "custom_bow_pulling_2": "textures/items/custom_bow_pulling_2",
        "enchanted": "textures/misc/enchanted_item_glint"
      },
      "geometry": {
        "default": "geometry.bow_standby",
        "custom_bow_pulling_0": "geometry.custom_bow_pulling_0",
        "custom_bow_pulling_1": "geometry.custom_bow_pulling_1",
        "custom_bow_pulling_2": "geometry.custom_bow_pulling_2"
      },
      "animations": {
        "wield": "animation.bow.wield",
        "wield_first_person_pull": "animation.bow.wield_first_person_pull"
      },
      "scripts": {
        "pre_animation": [
          "variable.charge_amount = math.clamp((query.main_hand_item_max_duration - (query.main_hand_item_use_duration - query.frame_alpha + 1.0)) / 10.0, 0.0, 1.0f);",
          "variable.bow_tex_idx = query.main_hand_item_use_duration == 0.0f ? 0 : variable.charge_amount / 0.5f + 1;"
        ],
        "animate": [
          "wield",
          {
            "wield_first_person_pull": "query.main_hand_item_use_duration > 0.0f && c.is_first_person"
          }
        ]
      },
      "render_controllers": [ "controller.render.custom_bow" ]
    }
  }
}
The key parts to the attachable are:
- The geometries listed correspond to the identifiers used by the model definition, and the textures to the location you just added the images to.
bow_tex_idxis defined and updated in thepre_animationscript. This will be used by its render controller to determine what texture and model the bow should use based on its charging state. This in turn usescharge_amountto determine its charge state based on item use duration.
- Bring it all together in resource_pack/render_controllers/custom_bow.render_controllers.json:
{
  "format_version": "1.10",
  "render_controllers": {
    "controller.render.custom_bow": {
      "arrays": {
        "textures": {
          "array.bow_texture_frames": [
            "texture.default",
            "texture.custom_bow_pulling_0",
            "texture.custom_bow_pulling_1",
            "texture.custom_bow_pulling_2"
          ]
        },
        "geometries": {
          "array.bow_geo_frames": [
            "geometry.default",
            "geometry.custom_bow_pulling_0",
            "geometry.custom_bow_pulling_1",
            "geometry.custom_bow_pulling_2"
          ]
        }
      },
      "geometry": "array.bow_geo_frames[variable.bow_tex_idx]",
      "materials": [ { "*": "variable.is_enchanted ? material.enchanted : material.default" } ],
      "textures": [ "array.bow_texture_frames[variable.bow_tex_idx]", "texture.enchanted" ]
    }
  }
}
As with the attachable definition, the bow_tex_idx variable tracks charging state, selecting the proper texture and geometry to use. The textures and geometries correspond to the ones defined in the attachable.
Animating the player
We're not quite finished: we need to adjust the player animation so that when the custom bow is in use, the player model moves correctly.
Make a copy of the Vanilla player.animation_controller and add query.get_equipped_item_name == 'custom_bow' to the "third_person_bow_equipped" animation:
resource_pack/animation_controllers/player.animation_controllers.json
Note
This only shows what's changed, not the full animation controller!
{
  "format_version" : "1.10.0",
  "animation_controllers" : {
	"controller.animation.player.root" : {
	  "initial_state" : "first_person",
	  "states" : {
		"third_person" : {
		  "animations" : [
			{
              // BEFORE:
              // "third_person_bow_equipped" : "query.get_equipped_item_name == 'bow' && (variable.item_use_normalized > 0 && variable.item_use_normalized < 1.0)"
              // AFTER:
			  "third_person_bow_equipped" : "(query.get_equipped_item_name == 'bow' ||  query.get_equipped_item_name == 'custom_bow') && (variable.item_use_normalized > 0 && variable.item_use_normalized < 1.0)"
			}
		  ]
		}
	  }
	}
  }
}
The finished bow and arrow
Now we have a custom bow that changes models/textures based on charging status and shoots custom arrows that persist in the world upon impact!

Mobs and custom projectiles
Players can use the snowball and the bow and arrow we've created, but what about non-player mobs? They can span custom projectiles through mob goals.
There are two different ways for a mob to specify a projectile attack, but both require that the mob has a navigation component and a targeting goal. We'll reuse our custom snowball from the previous examples and create a snow golem that launches our snowballs at chickens.
Let's define a render controller for our custom snow golem, which just repurposes the Vanilla snow golem's assets.
{
  "format_version": "1.8.0",
  "minecraft:client_entity": {
    "description": {
      "identifier": "my:custom_snow_golem",
      "min_engine_version": "1.8.0",
      "materials": {
        "default": "snow_golem",
        "head": "snow_golem_pumpkin"
      },
      "textures": {
        "default": "textures/entity/snow_golem"
      },
      "geometry": {
        "default": "geometry.snowgolem.v1.8"
      },
      "animations": {
        "move": "animation.snowgolem.move.v1.8",
        "look_at_target": "animation.common.look_at_target"
      },
      "animation_controllers": [
        { "move": "controller.animation.snowgolem.move.v1.8" }
      ],
      "render_controllers": [ "controller.render.snowgolem" ]
    }
  }
}
Now we'll create the entity's behavior definition. There are two ways to do this; we'll look at both.
Using fire_at_target
{
  "format_version": "1.26.0",
  "minecraft:entity": {
    "description": {
      "identifier": "my:custom_snow_golem",
      "is_spawnable": true,
      "is_summonable": true,
      "is_experimental": false
    },
    "components": {
      "minecraft:collision_box": {
        "height": 1.8,
        "width": 0.4
      },
      "minecraft:navigation.generic": {},
      "minecraft:behavior.fire_at_target": {
        "projectile_def": "my:custom_snowball",
        "priority": 1,
        "attack_range": [
          0,
          10
        ]
      },
      "minecraft:behavior.nearest_attackable_target": {
        "priority": 1,
        "entity_types": [
          {
            "filters": { "test" :  "is_family", "subject" : "other", "value" :  "chicken"}
          }
        ],
        "must_reach": true,
        "must_see": true
      },
      "minecraft:persistent": {},
      "minecraft:physics": {}
    }
  }
}
Here's some key parts to this definition:
- A navigation component is required for an entity to find targets, like
minecraft:navigation.generic. minecraft:behavior.nearest_attackable_targetdefines which entities to target.minecraft:behavior.fire_at_targetgives the entity a ranged projectile attack, using the projectiles defined byprojectile_def.
Note
The fire_at_target goal overrides definitions in the projectile component.
Using ranged_attack
Alternatively, minecraft:behavior.fire_at_target can be replaced with minecraft:behavior.ranged_attack. However, the entity definition must now also have the minecraft:shooter component to determine what projectile to shoot.
{
    // Simplified from the above
    "minecraft:entity": {
        "components": {
            // BEFORE:
            // "minecraft:behavior.fire_at_target": {
            //   "projectile_def": "my:custom_snowball",
            //   "priority": 1,
            //   "attack_range": [
            //     0,
            //     10
            //   ]
            // },
            // AFTER:
            "minecraft:behavior.ranged_attack": {
                "priority": 1,
                "speed_multiplier": 1.25,
                "attack_interval": 1,
                "attack_radius": 10
            },
            "minecraft:shooter": {
                "def": "my:custom_snowball"
            }
            //...additional components
        }
    }
}
Here are some points to note:
- When you use
minecraft:behavior.ranged_attack, you must also useminecraft:shooterto define the projectile to shoot. - Unlike
minecraft:behavior.fire_at_target, this doesn't override the projectile component's anchor and offset. - The
navigationandnearest_attackable_targetcomponents are still required.
The finished snow golem
Regardless of whether you use fire_at_target or ranged_attack, you'll get a chicken-attacking snow golem!
