Note
Access to this page requires authorization. You can try signing in or changing directories.
Access to this page requires authorization. You can try changing directories.
Event-based activation automatically triggers your add-in to complete their tasks without explicitly launching it. This allows the add-in to validate, insert, or refresh critical content without any manual operations. The add-in is opened in the background to avoid disrupting the user. You can also integrate event-based activation with the task pane and function commands.
Overview
While the particular steps to add event-based functionality to your add-in vary by platform and manifest type, the general flow is as follows.
- Update the manifest with an extension for the event.
- Connect the event in the manifest with a JavaScript function to handle the event.
- Have the event handler function perform its actions, then call
event.completedwhen it finishes. - Call Office.actions.associate to connect the event handler function with the ID specified in the manifest.
Try out event-based activation
Discover how to streamline workflows and improve user experiences with event-based activation. Try out the samples to see the feature in action.
Outlook samples
- Automatically set the subject of a new message or appointment
- Automatically check for an attachment before a message is sent
- Automatically update your signature when switching between mail accounts
- Encrypt attachments, process meeting request attendees, and react to appointment date/time changes using Outlook event-based activation
- Set your signature using Outlook event-based activation
- Identify and tag external recipients using Outlook event-based activation
- Verify the color categories of a message or appointment before it's sent using Smart Alerts
- Verify the sensitivity label of a message
Word samples
Supported events
The following tables list events that are currently available and the supported clients for each event. When an event is raised, the handler receives an event object which may include details specific to the type of event. The Description column includes a link to the related object where applicable.
Excel, PowerPoint, Word events
| Event canonical name and add-in only manifest name |
Unified manifest for Microsoft 365 name | Description | Supported clients and channels |
|---|---|---|---|
OnDocumentOpened |
Not yet supported | Occurs when a user opens a document or creates a new document, spreadsheet, or presentation. |
|
Outlook events
Support for this feature in Outlook was introduced in requirement set 1.10, with additional events now available in subsequent requirement sets. The following table lists each event's minimum requirement set and the clients and platforms that support it. For more information on Outlook clients and the requirement sets they support, see Requirement sets supported by Exchange servers and Outlook clients.
| Event canonical name and add-in only manifest name |
Unified manifest for Microsoft 365 name | Description | Minimum requirement set and supported clients |
|---|---|---|---|
OnNewMessageCompose |
newMessageComposeCreated | On composing a new message (includes reply, reply all, and forward) but not on editing, for example, a draft. | 1.10
|
OnNewAppointmentOrganizer |
newAppointmentOrganizerCreated | On creating a new appointment but not on editing an existing one. | 1.10
|
OnMessageAttachmentsChanged |
messageAttachmentsChanged | On adding or removing attachments while composing a message. Event-specific data object: AttachmentsChangedEventArgs |
1.11
|
OnAppointmentAttachmentsChanged |
appointmentAttachmentsChanged | On adding or removing attachments while composing an appointment. Event-specific data object: AttachmentsChangedEventArgs |
1.11
|
OnMessageRecipientsChanged |
messageRecipientsChanged | On adding or removing recipients while composing a message. Event-specific data object: RecipientsChangedEventArgs |
1.11
|
OnAppointmentAttendeesChanged |
appointmentAttendeesChanged | On adding or removing attendees while composing an appointment. Event-specific data object: RecipientsChangedEventArgs |
1.11
|
OnAppointmentTimeChanged |
appointmentTimeChanged | On changing date/time while composing an appointment. Event-specific data object: AppointmentTimeChangedEventArgs Important: If you drag and drop an appointment to a different date/time slot on the calendar, the OnAppointmentTimeChanged event doesn't occur. It only occurs when the date/time is directly changed from an appointment. |
1.11
|
OnAppointmentRecurrenceChanged |
appointmentRecurrenceChanged | On adding, changing, or removing the recurrence details while composing an appointment. If the date/time is changed, the OnAppointmentTimeChanged event also occurs.Event-specific data object: RecurrenceChangedEventArgs |
1.11
|
OnInfoBarDismissClicked |
infoBarDismissClicked | On dismissing a notification while composing a message or appointment item. Only the add-in that added the notification will be notified. Event-specific data object: InfobarClickedEventArgs |
1.11
|
OnMessageSend |
messageSending | On sending a message item. To learn more, try the Smart Alerts walkthrough. | 1.12
|
OnAppointmentSend |
appointmentSending | On sending an appointment item. To learn more, see Handle OnMessageSend and OnAppointmentSend events in your Outlook add-in with Smart Alerts. | 1.12
|
OnMessageCompose |
messageComposeOpened | On composing a new message (includes reply, reply all, and forward) or editing a draft. | 1.12
|
OnAppointmentOrganizer |
appointmentOrganizerOpened | On creating a new appointment or editing an existing one. | 1.12
|
OnMessageFromChanged |
messageFromChanged | On changing the mail account in the From field of a message being composed. To learn more, see Automatically update your signature when switching between Exchange accounts. | 1.13
|
OnAppointmentFromChanged |
appointmentFromChanged | On changing the mail account in the organizer field of an appointment being composed. To learn more, see Automatically update your signature when switching between Exchange accounts. | 1.13
|
OnSensitivityLabelChanged |
sensitivityLabelChanged | On changing the sensitivity label while composing a message or appointment. To learn how to manage the sensitivity label of a mail item, see Manage the sensitivity label of your message or appointment in compose mode. Event-specific data object: SensitivityLabelChangedEventArgs |
1.13
|
OnMessageReadWithCustomAttachment |
Not available | On opening a message that contains a specific attachment type in read mode. | Preview3
|
OnMessageReadWithCustomHeader |
Not available | On opening a message that contains a specific internet header name in read mode. | Preview3
|
Note
1 Event-based add-ins in classic Outlook on Windows require a minimum of Windows 10 Version 1903 (Build 18362) or Windows Server 2019 Version 1903 to run.
2 For more information, see Implement event-based activation in Outlook mobile add-ins.
3 To preview the OnMessageReadWithCustomAttachment and OnMessageReadWithCustomHeader events, you must install classic Outlook on Windows Version 2312 (Build 17110.10000) or later. Then, join the Microsoft 365 Insider program and select the Beta Channel option to access Office beta builds.
Event-based activation in Outlook on mobile devices
Outlook on mobile supports APIs up to Mailbox requirement set 1.5. However, support is now enabled for additional APIs and features introduced in later requirement sets, such as the OnNewMessageCompose event. To learn more, see Implement event-based activation in Outlook mobile add-ins.
Behavior and limitations
As you develop an event-based add-in, be mindful of the following feature behaviors and limitations.
Event-based add-ins work only when deployed by an administrator. If users install them directly from AppSource or the Office Store, they will not automatically launch (for workarounds to the AppSource limitation, see AppSource listing options for your event-based add-in). Admin deployments are done by uploading the manifest to the Microsoft 365 admin center.
APIs that interact with the UI or display UI elements are not supported for Word, PowerPoint, and Excel on Windows. This is because the event handler runs in a JavaScript-only runtime. For more information, see Runtimes in Office Add-ins.
Event-based add-ins require an internet connection to be able to launch when a specific event occurs. Add-in event handlers are expected to be short-running, lightweight, and as noninvasive as possible. After activation, your add-in will time out within approximately 300 seconds, the maximum length of time allowed for running event-based add-ins. To signal that your add-in has completed processing a launch event, your associated event handler must call the event.completed method. (Note that code included after the
event.completedstatement isn't guaranteed to run.) Each time an event that your add-in handles is triggered, the add-in is reactivated and runs the associated event handler, and the timeout window is reset. The add-in ends after it times out, or the user closes the compose window or sends the item.The behavior of multiple add-ins that subscribe to the same event isn't deterministic. Outlook launches the add-ins in no particular order. For Excel, PowerPoint, and Word, only one random add-in will be activated. For example, if multiple Word add-ins that handle
OnDocumentOpened, only one of those handlers will run.Currently, only five event-based add-ins can be actively running.
In all supported Outlook clients, the user must remain on the current mail item where the add-in was activated for it to complete running. Navigating away from the current item (for example, switching to another compose window or tab) terminates the add-in operation. However, an add-in that activates on the
OnMessageSendevent handles item switching differently depending on which Outlook client it's running on. To learn more, see the "User navigates away from current message" section of Handle OnMessageSend and OnAppointmentSend events in your Outlook add-in with Smart Alerts.In addition to item switching, an event-based add-in also ceases operation when the user sends the message or appointment they're composing.
Event-based add-in limitations in the new Outlook on Windows
In the new Outlook on Windows, you must keep the main window of the client open for the add-in to process the mail item. If the main window is minimized, the add-in will pause or stop working.
Event-based add-in limitations in Excel, PowerPoint, Word, and classic Outlook on Windows
When developing an event-based add-in to run on a Windows client, be mindful of the following:
Imports aren't supported in the JavaScript file where you implement the handling for event-based activation.
Only the JavaScript file referenced in the manifest is supported for event-based activation. You must bundle your event-handling JavaScript code into this single file. The location of the referenced JavaScript file in the manifest varies depending on the type of manifest your add-in uses.
- Add-in only manifest: <Override> child element of the <Runtime> node
- Unified manifest for Microsoft 365:
"script"property of the"code"object
Note that a large JavaScript bundle may cause issues with the performance of your add-in. We recommend preprocessing heavy operations, so that they're not included in your event-handling code.
When the JavaScript function specified in the manifest to handle an event runs, code in
Office.onReady()andOffice.initializeisn't run. We recommend adding any startup logic needed by event handlers, such as checking the user's Outlook version, to the event handlers instead.
Event-based add-in limitations in Excel, PowerPoint, and Word
The following platforms or features are not yet supported.
- Office on Mac
- The unified manifest for Microsoft 365
Unsupported APIs
Some Office.js APIs that change or alter the UI aren't allowed from event-based add-ins. The following are blocked APIs.
| API | Methods |
|---|---|
Office.devicePermission |
|
Office.context.auth* |
|
Office.context.mailbox |
|
Office.context.mailbox.item |
|
Office.context.ui |
|
Note
* OfficeRuntime.auth is supported in all versions that support event-based activation and single sign-on (SSO), while Office.auth is only supported in certain Outlook builds. For more information, see Use single sign-on (SSO) or cross-origin resource sharing (CORS) in your event-based or spam-reporting Outlook add-in.
Preview features in event handlers (classic Outlook on Windows)
Classic Outlook on Windows includes a local copy of the production and beta versions of Office.js instead of loading from the content delivery network (CDN). By default, the local production copy of the API is referenced. To reference the local beta copy of the API, you must configure your computer's registry. This will enable you to test preview features in your event handlers in classic Outlook on Windows.
In the registry, navigate to
HKEY_CURRENT_USER\SOFTWARE\Microsoft\Office\16.0\Outlook\Options\WebExt\Developer. If the key doesn't exist, create it.Create an entry named
EnableBetaAPIsInJavaScriptand set its value to1.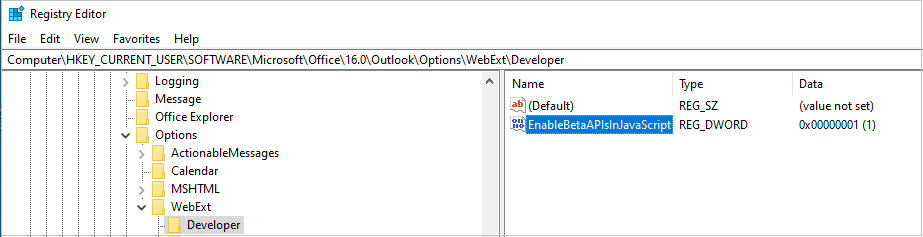
Enable single sign-on (SSO)
To enable SSO in your event-based add-in, you must add its JavaScript file to a well-known URI. For guidance on how to configure this resource, see Use single sign-on (SSO) or cross-origin resource sharing (CORS) in your event-based or spam-reporting Office Add-in.
Request external data
You can request external data by using an API like Fetch or by using XMLHttpRequest (XHR), a standard web API that issues HTTP requests to interact with servers.
Note
If your add-in will operate in a JavaScript-only runtime, use absolute URLs in your Fetch API calls. Relative URLs in Fetch API calls aren't supported in a JavaScript-only runtime.
Be aware that you must use additional security measures when using XMLHttpRequest objects, requiring Same Origin Policy and CORS (Cross-Origin Resource Sharing).
Note
Full CORS support is available in Office on the web, Mac, and Windows (starting in Version 2201, Build 16.0.14813.10000) clients.
To make CORS requests from your event-based add-in, you must add the add-in and its JavaScript file to a well-known URI. For guidance on how to configure this resource, see Use single sign-on (SSO) or cross-origin resource sharing (CORS) in your event-based or spam-reporting Office Add-in.
Troubleshoot your add-in
As you develop your event-based add-in, you may need to troubleshoot issues, such as your add-in not loading or the event not occurring. For guidance on how to troubleshoot an event-based add-in, see Troubleshoot event-based and spam-reporting add-ins.
Deploy your add-in
Event-based add-ins are restricted to admin-managed deployments only, even if they're acquired from AppSource. If users acquire the add-in from AppSource or the in-app Office Store, they won't be able to activate the event-based function of the add-in. To learn more about listing your event-based add-in in AppSource, see AppSource listing options for your event-based add-in.
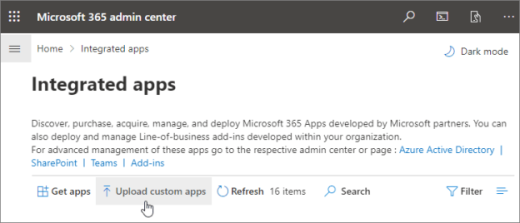
Admin deployments are done by uploading the manifest to the Microsoft 365 admin center. To do so, follow these steps.
- In the admin portal, expand the Settings section in the navigation pane then select Integrated apps.
- On the Integrated apps page, choose the Upload custom apps action.
Important
Add-ins that use the Smart Alerts feature can only be published to AppSource if the manifest's send mode property is set to the prompt user or soft block option. If an add-in's send mode property is set to block, it can only be deployed by an organization's admin as it will fail AppSource validation.
For more information about how to deploy an add-in, please refer to Deploy and publish Office Add-ins in the Microsoft 365 admin center.
Deploy manifest updates
Because event-based add-ins are deployed by admins, any change you make to the manifest requires admin consent through the Microsoft 365 admin center. Until the admin accepts your changes, users in their organization are blocked from using the add-in. To learn more about the admin consent process, see Admin consent for installing event-based add-ins.
See also
Collaborate with us on GitHub
The source for this content can be found on GitHub, where you can also create and review issues and pull requests. For more information, see our contributor guide.
Office Add-ins