Note
Access to this page requires authorization. You can try signing in or changing directories.
Access to this page requires authorization. You can try changing directories.
You can use the 3D object and View in MR controls to view items in 3D, or to see how a particular item might fit within a specified space.
In this article, you'll learn how to use the 3D and mixed reality controls in Power Apps.
Watch this video to learn how to build mobile apps with View in MR control:
Prerequisites
See prerequisites for mixed-reality capable devices.
Create an app with View in MR control
The View in MR control creates a button in your app. When app users selects the button, it overlays a selected 3D model (in the .glb file format) or image (in .jpg or .png file formats) onto the live camera feed of the device.
Tip
You can also take photos and upload them to OneDrive.
In this section, we will build a screen in an app that will allow a user to view the selected item in mixed reality using the View in MR control.
Open an app in Power Apps Studio.
Select the OnStart property of the app, copy and paste the following:
ClearCollect(
    col3dObjects,
    {
        ObjectName: "Forklift",
        ObjectURL: "https://raw.githubusercontent.com/microsoft/experimental-pcf-control-assets/master/forklift.glb"
    },
    {
        ObjectName: "HVAC",
        ObjectURL: "https://raw.githubusercontent.com/microsoft/experimental-pcf-control-assets/master/hvac.glb"
    },
    {
        ObjectName: "Machine",
        ObjectURL: "https://raw.githubusercontent.com/microsoft/experimental-pcf-control-assets/master/machine.glb"
    },
    {
        ObjectName: "Pallet w/ Boxes",
        ObjectURL: "https://raw.githubusercontent.com/microsoft/experimental-pcf-control-assets/master/pallet_with_boxes.glb"
    },
    {
        ObjectName: "Robot Arm",
        ObjectURL: "https://raw.githubusercontent.com/microsoft/experimental-pcf-control-assets/master/robot_arm.glb"
    }
)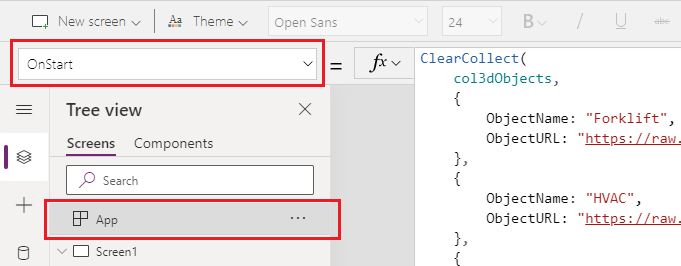
This formula will create a collection containing the names and links of the 3D objects to be viewed in mixed reality.
Add a Text label to the screen by dragging and dropping it from the Insert tab.
Position the added text label at the top-left corner of the screen, and modify the following properties in the Properties tab:
Property Value Text "View In MR" Font size 24 Font weight FontWeight.SemiboldText alignment Align.CenterWidth 640 In the Advanced tab, modify the following properties for the text label:
Property Value Color RGBA(255, 255, 255, 1)Fill RGBA(56, 96, 178, 1)This change provides a header for the screen.
Insert a Blank vertical gallery from the Layout section of the Insert tab.
Position the gallery below the "View in MR" header you added earlier and expand it to use rest of the screen.
Change the following properties of the gallery:
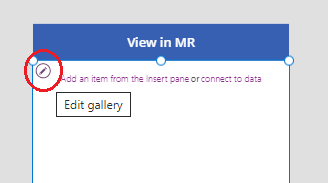
Property Value Data source col3dObjectsTemplate size 80 X 0 Y 92 Width 640 Height 1044 Select Edit gallery to edit the gallery.
Insert a Text label into the gallery.
Change the following properties of the added text label:
Property Value Text ThisItem.ObjectNameX 10 Y 5 Width 540 Edit the gallery again.
From the Mixed Reality section of the Insert tab, drag and drop the View in MR control into the gallery.
Change the following properties of the View in MR control.
| Property | Value |
|---|---|
| Text | "View In MR" |
| Display type | Icon |
| Source | ThisItem.ObjectURL |
| X | Parent.TemplateWidth - Self.Width - 5 |
| Y | 5 |
| Width | 70 |
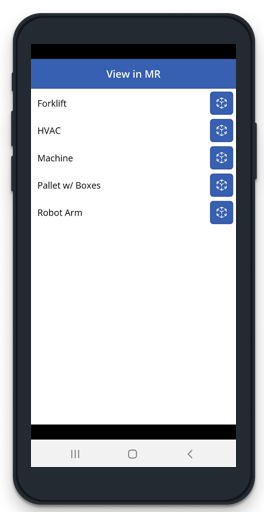
This change will provide a gallery that has a list of 3D objects and a button to press for the user to view those objects in mixed reality.
Test the mixed reality control
Now that all the controls have been added, save and publish the app. On a mixed-reality capable device, open the app, and press the button that corresponds with the object you would like to view. This will open the View in MR experience.
Follow the on-screen instructions to calibrate the device by slowly moving it left and right while pointing the camera at a surface to be measured. Once the calibration is complete, you'll see an array of dots on the surface as well as a circle near the center of the screen. This circle shows where the 3D object can be placed initially. Once the cube has been placed it can be moved or rotated by using touch controls.
To move the object, press on it and slide it to where you would like it to be placed. To rotate the object, press one finger to the screen then swipe with another finger right or left.
Use the back button in the top left corner to return to the app screen and select another object. Repeat this process as desired to view each of the objects.
Create an app with 3D object control
The 3D object control allows you to view an item in 3D inside Power Apps. When app loads, it shows the 3D models (in the .glb file format) or image (in .jpg or .png file formats) inside the app through the control. You can select the 3D model to rotate, zoom in or out.
In this section, we will build a screen in an app that will allow a user to view the selected items in 3D using the 3D object control.
Follow the steps 1 and 2 from the Create an app with View in MR control section to create an app with the collection of 3D objects for the app.
Add a Text label to the screen by dragging and dropping it from the Insert tab.
Position the added text label at the top-left corner of the screen, and modify the following properties in the Properties tab:
Property Value Text "3D object" Font size 24 Font weight FontWeight.SemiboldText alignment Align.CenterWidth 640 In the Advanced tab, modify the following properties for the text label:
Property Value Color RGBA(255, 255, 255, 1)Fill RGBA(56, 96, 178, 1)This change provides a header for the screen.
Insert a Blank vertical gallery from the Layout section of the Insert tab.
Position the gallery below the "View in MR" header you added earlier and expand it to use rest of the screen.
Change the following properties of the gallery:
Property Value Data source col3dObjectsTemplate size 80 X 0 Y 92 Width 640 Height 1044 Select Edit gallery to edit the gallery.

Insert a Text label into the gallery.
Change the following properties of the added text label:
Property Value Text ThisItem.ObjectNameWidth 640 Edit the gallery again.
From the Media section of the Insert tab, drag and drop the 3D object control into the gallery.
Change the following properties of the View in MR control.
| Property | Value |
|---|---|
| Source | ThisItem.ObjectURL |
| X | 18 |
| Y | 138 |
| Width | 600 |
| Height | 550 |
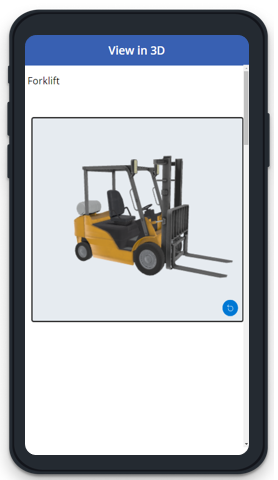
This change will provide a gallery that has a list of 3D objects that you can view in 3D.
Test the 3D control
Now that all the controls have been added, save and publish the app. On a mixed-reality capable device, open the app, touch the screen to zoom in, zoom out, or turn the object being viewed in 3D.
Since the gallery contains several objects in 3D, swipe down on the screen to see other objects and use the zoom or turn capabilities to work with the objects in 3D.