Note
Access to this page requires authorization. You can try signing in or changing directories.
Access to this page requires authorization. You can try changing directories.
The timeline helps app users review all activity history. The timeline control is used to capture activities like notes, appointments, emails, phone calls, and tasks to ensure that all interactions with the related table are tracked and visible over time. Use the timeline to quickly catch up on all of the latest activity details.
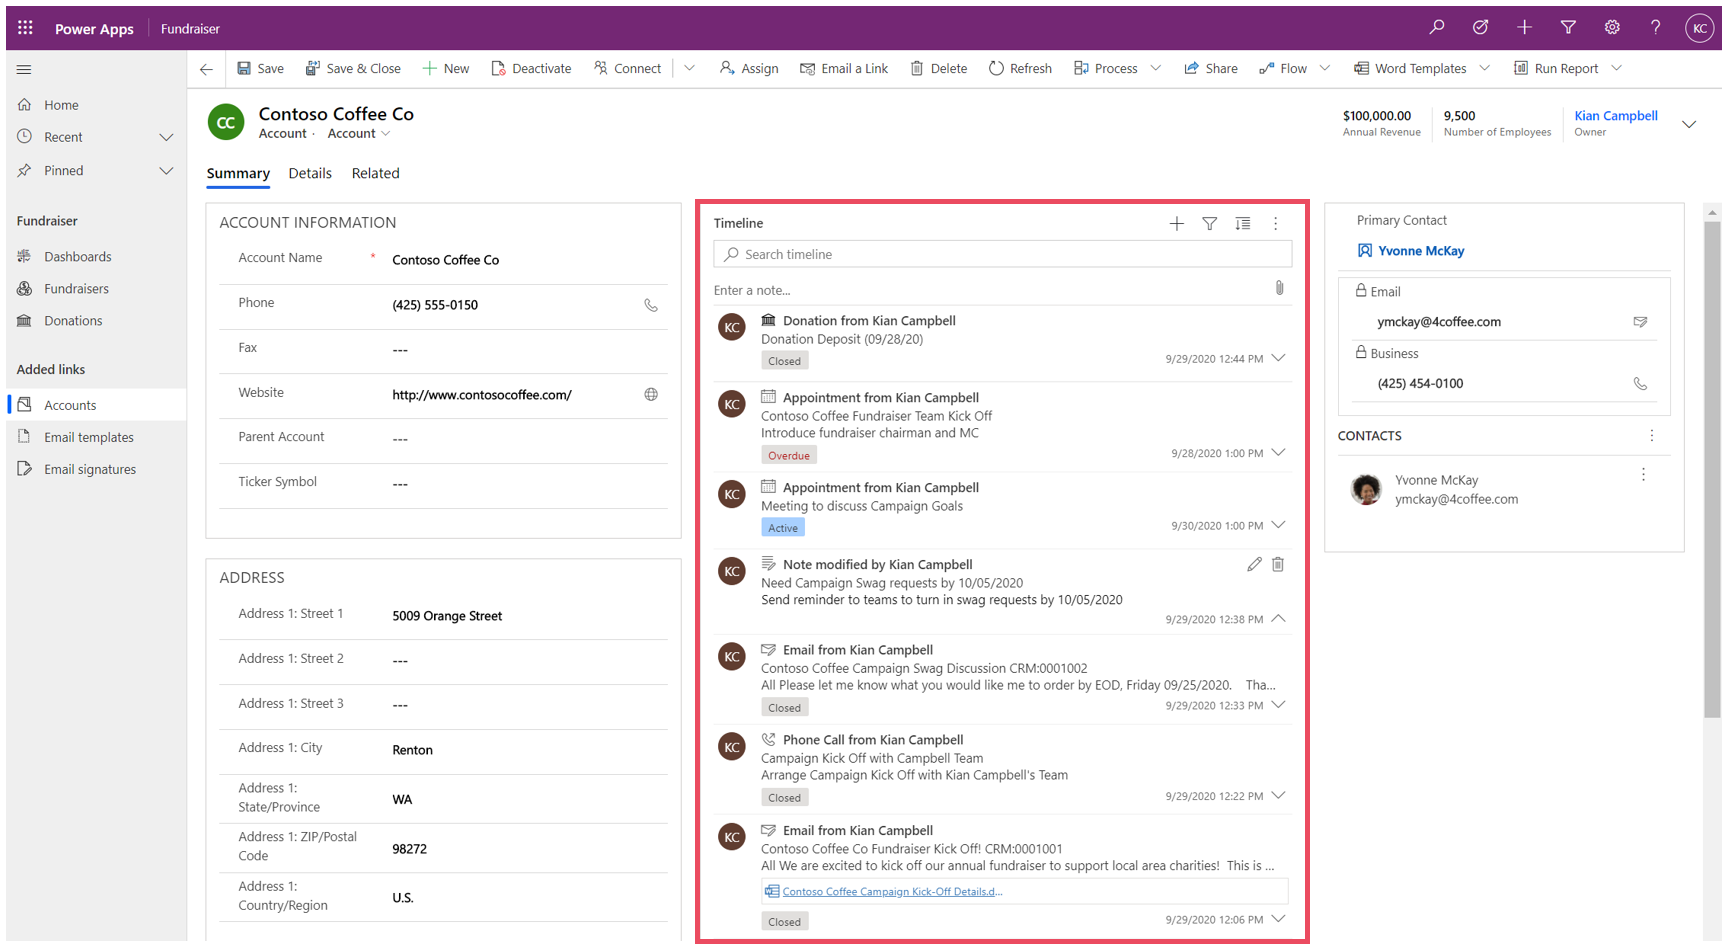
The timeline control provides an easy way to view information related to a table, such as accounts or contacts. This immersive experience helps give users a better understanding of their customer interactions, and helps them deliver more personalized service in an efficient and effective manner.
App makers can configure the information displayed on the timeline to help users access information and create new activity records, such as email and tasks, directly from the timeline quickly so they can deliver more personalized service.
Add a timeline
A timeline control is located on a form within a table. Any timeline control on a form can be configured. For example, an account table has three standard forms, and each of those forms can have a timeline that can be configured.
Display a custom table in a timeline
For custom tables to appear in the list of activities that can be added to a timeline control, make sure that when you create the table you configure the following settings:
- Set the table Type as Activity.
- Check the Enable attachments setting if you want app users to be able to add attachments and notes to the custom activity record.
More information: Create a custom table
Add the timeline component to a form
- Sign in to Power Apps.
- Select Tables on the left navigation pane, and then open the table you want. If the item isn’t in the side panel pane, select …More and then select the item you want.
- Select the Forms area, and then open the form where you want to add or configure a timeline.
- In the form designer, select Components from the left navigation, and then scroll down to the Timeline component on the left side. Drag and drop it into a section on the form.

- Make the changes you want to the timeline settings. More information: Configure the timeline component
- Before you can view any configuration changes on the table form, you must save and publish your updates on the timeline component. Select Save, and then select Publish to make your form changes available on the table form for the environment.
Note the following when you work with the timeline control in the form designer.
- You can add multiple timelines to a form.
- To remove the timeline component from a form, select the Timeline component area, and then press the Delete key.
- Since the timeline component relies exclusively on underlying related data, Almost there is displayed in the timeline section.
- Because you are in a create and/or edit state on the form, there's no underlying data, so the timeline section is blank in the form designer.
Configure the timeline component
The timeline component is rich in features and functionality that can be configured and tailored to support specific business needs. The timeline is composed of features and functionality that you configure in the timeline component, which is then displayed in the table form.
Display options
This section describes the settings available in the Display options area of the timeline control settings.
Timeline component name
The Name column under the Properties tab in Display options is the unique name of the timeline control and is only used by the app maker to reference.
Note
- The Name column has limitations. For example, you can't use spaces between words. Instead, you must use an underscore (_)
- You can't change the default heading label that is displayed as Timeline on the form during app runtime.
Records shown on page
This section allows you to control the number of records that appear before displaying Load more at the bottom of the section.
| Form designer configuration View | Form designer display View |
|---|---|
 |
 |
| The default setting on the Records shown on page column is set to 10 records, but you can change it to display up to 50 records. | 1. Per the default setting shown in this example, the form displays a maximum of 10 records. 2. Once records exceed 10, the Load more option appears at the bottom of the form. |
Record types to show
There are three primary record types: Activities, notes, and posts. All record types are enabled by default.
- Activities. Activities can have a large number of customizable subactivity record types to support business needs. Depending on what you install, the administrator can create, add, and display many different customized subactivity record types under the Activity section of the dropdown menu on the timeline.
- Notes. Notes allow you to capture details related to the table record. For example, you can use notes to capture thoughts, summarize information, and provide feedback on a case, and then update the case details later.
- Posts There are two types of posts: auto and user:
- Auto Posts are system-generated posts that notify you of account activity.
- User Posts allow you to leave a message for another user on a record.
Note
Posts require a Dynamics 365 app, such as an app for Dynamics 365 Customer Service.
Enable these record types to be displayed in the timeline
| Form designer configuration view | Form designer display view |
|---|---|
 |
 |
| To enable Record types shown for Activities, Notes, and Posts on a form, check the box next to the record type. | 1. To confirm that the record type is displaying on the form, select Create a timeline record 2. When Activities are enabled, the system displays Activity record types for appointments, email, phone calls, and tasks. 3. When Notes are enabled, the system displays the note record types on the form. 4. When Posts are enabled, the post record types display on the form. |
Note
Activities and notes are standard entities. If additional solutions have been imported into the environment, other tables may also be displayed.
Activity, notes, post icons, and date / timestamp display on timelines
The timeline shows a simple icon before the activity, note, post, and custom table, making it easy for you to identify the record type.
Dates and timestamps always appear on each record on the bottom-right side of the preview, and are always viewable.
Note
When a custom table has a custom icon, activities related to the custom table are displayed using the default custom table icon not the custom icon.
Advanced
This section describes the settings available in the Advanced area of the timeline control settings. The Advanced settings apply to all record types.
When enabling and disabling Advanced features, you aren't able to view updates (even though it may appear that there's activity occurring on the timeline component) until you save and publish your configuration updates and refresh the table form.
Advanced covers common settings that span across an activity, note, or post, which are the three primary record types that appear in the timeline section.
Quick entry record type and sort order default
The following is a detailed overview of the Advanced configuration options, starting with selecting your Quick entry record type:
| Form designer configuration View | Form designer display View |
|---|---|
 |
 |
| 1.Select Advanced to expand this area in the configuration view. The Quick entry record type provides you with quick access to create either a Note or a Post. The default setting for this setting is set to Notes. 2.The Sort order default setting controls the order of how all data is sorted on the timeline. The default setting for this setting is set to Descending. |
1. When you select Notes, it displays under the Search bar in the timeline. Also, the system displays the paperclip 2. If you select Posts, it also displays under the Search bar in timeline. |
Enable filter pane
Filters provide a quick option to sort and look for specific data quickly.
| Form designer configuration View | Form designer display View |
|---|---|
 |
 |
| The filter pane setting allows you to enable or disable filter functionality on timeline. It's enabled by default. | Enable the filter pane by checking the box next to the setting. This setting enables the filter icon to display on the timeline. To disable the filter pane, clear the box next to the setting and the filter icon no longer appears on the timeline. |
Filter records on timeline
Filters are valuable for sorting data. You can quickly filter activities, notes, and posts with multiple options to display what matters to you. The filter is available for the activities, notes, posts, and custom tables that are present in the timeline. The timeline filters and displays the records and the count that are present in the timeline.
When you select filters based on an activity status then those activities, notes, and posts are displayed in your timeline. You can customize data using data filters and either choose to keep filters in place or clear them when you're done.
When the Filter icon is transparent
 on the table form, it means no items were selected, so the filter pane is empty.
When the Filter icon is dark
 , it means filters are set. To view which filters are set, select the Filter icon and the filter pane displays the filters that have been set.
Choose how you want to filter data by selecting the box next to the filter.
Clear filters by selecting the Clear all filters
 icon on the filter pane.
The following category and subcategory options are available on the filer menu:
| Category | Subcategory |
|---|---|
| Record type | |
| Activity type | |
| Activity status | |
| Activity status reason | Allows you to filter using specific status reasons. The values are a unique list of all of the status reasons from the activities in the timeline. The status reasons change depending on the activity. If there are multiple activities on the timeline that have the same status reason, it reflects once, but then the number next to it indicates how many occurrences of that status reason appear in the timeline. |
| Activity due date (active) | |
| Posts by | |
| Modified date |
Note
By default, the fax and letter records are disabled on the timeline.
1 Requires a Dynamics 365 app
Expand filter pane
The Expand filter pane setting provides quick access to sorting options within the timeline. It's enabled by default.
| Form designer configure view | Form designer display view |
|---|---|
 |
 |
| The Expand filter pane by default setting displays an expanded filter pane at the top of the form anytime it's opened and refreshed. It's disabled by default. | Enable the Expand filter pane by checking the box next to the setting. This setting enables the filter pane to appear at the top of the form anytime the form is opened and refreshed. To disable the Expand filter pane, clear the box next to the setting and the filter pane doesn't appear on the timeline. |
Enable search bar
You can search for records in the timeline. When you search for a phrase in the timeline, it searches in the title of the record or body and description column of the record then displays the record for you.
| Form designer configure view | Form designer display view |
|---|---|
 |
 |
| Select Enable search bar to enable the Search timeline bar functionality. It's enabled by default. | Enable the search bar setting to display a search bar at the top of the timeline. Disable the search bar by clearing the box next to the setting and the search bar doesn't appear on the timeline. |
Expand all records in timeline
Expand all records by default displays all activities in an expanded view in timeline.
| Form designer configure view | Form designer display view |
|---|---|
 |
 |
| Select Expand all records to set the default view to display all records in the expanded view format in the form each time the timeline is opened. Expand all records is disabled by default. | 1. When enabled, the Expand all records icon is displayed in the top-right corner of the timeline nav. 2. Records can be expanded or collapsed by using the Expand all records icon. When expanded, all records are displayed in the expanded view in the form each time it's opened. When you clear Expand all records, it no longer displays activities in an expanded view. When disabled, the Expand all records icon doesn't display in the top-right nav of the timeline. Records are always be displayed in a collapsed view. |
Edit filter pane
You can configure the default filters that are applied when a form loads or is refreshed using Edit filter pane. Remove filter groups by turning the setting Off. Users can remove the default filters to display all the records unless Enable filter pane is disabled.

Configure email commands for timeline
You can configure email options for the timeline so that users can reply, reply-all, and forward messages. You can select the order in which the options are displayed for users, and exclude them if they're not needed. Reply-all is the default order setting.
Select the form for which you want to apply the email settings, and then in Properties in Conversation Tabs, select the Email activity type. The Email properties pane is displayed.
In Select and order commands, check the boxes for the email commands you want to configure for users. You can drag and drop the options to choose the order in which you want each option to display.
Select Done, and then save and publish your changes.
Expand records with images in timeline
You can send and receive records with images, but they don't display when the record is collapsed. To view the images, you must expand the records.

Records when collapsed provide a visual summary. To expand an individual record, select anywhere on the timeline record to expand and collapse a record view. In the bottom-right corner of the record, there's a caret:
- When the caret is facing downward (˅), the record is collapsed.
- When the caret is facing upward (^), the record is expanded.
Records with images might display the following notice:
This email has been blocked due to potentially harmful content. View full email content.When you select the message, the warning goes away, and the image appears.
Enable "What you’ve missed" summary
What you’ve missed helps you stay on top of updates and changes made to records by displaying updates at the top of the timeline when you access a record.
| Form designer configure view | Form designer display view |
|---|---|
 |
 |
| The What you’ve missed setting displays new records you haven't reviewed. It's enabled by default. To disable it, clear the box next to the setting. | When enabled, when you view an account record, the newest activities appear at the top of the list. |
Record settings
This section describes the settings available in the Record settings area of the timeline control settings. The Record types to show setting determines the record types that are affected by the Record settings described here.
Record settings let you manage the settings within the record types.
- The Activities record type is tied to Activities in record settings.
- Notes record type is tied to Notes in record settings.
- Posts record type is tied to Posts in record settings.
To enable or disable a record type, select or clear the checkbox. Then, that record type either displays or no longer appears in the Record settings section.

- When Posts is checked in the Record types to show section, it's enabled in the Record settings section.
- When Posts is cleared in the Record types to show section, it's disabled in the Record settings section.
Configure activity record types
When you expand the Activities record settings on the timeline component section, a list is displayed that shows all the activity types that can be either enabled or disabled on the table form.
| Form designer configuration view | Form designer display view |
|---|---|
 |
 |
| 1. Expand and view Activities under the Record settings section using the caret (^). 2. A list of Activity types is displayed in the expanded view. 3. You can enable or disable an activity by selecting an activity type. For example, enable Email. To enable an Activity type, check the box next to Enable and select Done. To disable an Activity type, clear the box next to Enable, and then select Done. This action disables all other items in the box and disables the activity type from displaying on the timeline. This action also disables the activity type from being created or viewed in the timeline. |
1. When enabled, an Activity type appears under the Create a timeline record 2. The activity type is displayed as an option the user can choose from the dropdown menu. 3. Also, the Activity type record is displayed in the body of the timeline. |
Note
A checkmark appears next to enabled Activity types. Additional record type settings are disabled until they're enabled under that specific record type.
Show status tags on activity record types
Status tags match the status filter that display in the timeline to help you be able to quickly review whether the state of an activity record is Active, Overdue, or Closed, such as on a task, appointment, or email. Makers enable or disable status tags for any Activity type in the default form configuration. Status tags are enabled by default.
| Form designer configuration view | Form designer display view |
|---|---|

|
 |
| To display email status tags, select Default form (pencil icon) > Show in the Display option dropdown list under STATUS TAG. | When enabled, status tags such as Active, Overdue, or Closed appear in the timeline next to that activity record. |
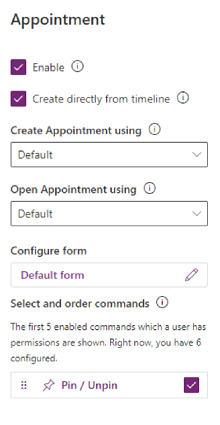
Enable the ability to create directly from timeline
App makers have the ability to enable activity types so they can be created directly on the timeline. Having the ability to quickly select and create an activity, such as email, tasks, and appointments, helps to streamline productivity.
| Form designer configuration view | Form designer display view |
|---|---|
 |
 |
| To allow users to create activity types directly from the timeline, check the box next to Create directly from timeline. |
When enabled, the activity type appears in a dropdown box on the Create a timeline record |
Set form types to create and open activities
Set the Create activities using and Open activities using individually for an activity type or for all activity types to set the form type users use based on your business needs. You can set these fields as follows:
- Select an activity type in Activities and specify the values.
- Specify the value for these fields in the Activities pane.

If you set the following form type for a specific activity, the application considers the following settings:
- Default: The form type in the Create activities using or Open activities using in Activities.
- Quick create form, Main form, or Main form dialog: The activity specific setting irrespective of the form type set in Create activities using or Open activities using in Activities.
When the user selects the activity from the create a timeline record or opens an activity from the timeline, the activity is either created or opens in the selected form type.
Enable command actions on activity record types (Preview)
Note
These features are part of an early access release. You can opt in early to enable the features in your environment, which allows you to test them and then adopt them across your environments. For information about how to enable these features, refer to Opt in to early access updates.
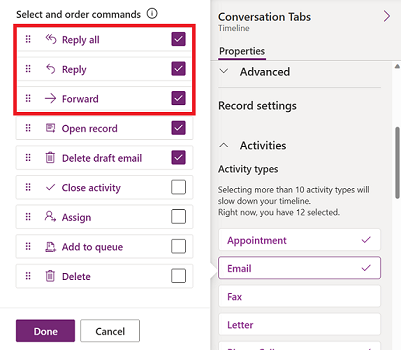
Command actions allow users to assign, close, delete, open a record, or add a record to a queue for activities from the timeline. You can enable or disable the command actions for a specific activity type.
Based on the activity type, you can also enable other command actions. For example, for an email you can also enable actions such as Reply, Reply All, and Forward.
| Form designer configuration view | Form designer display view |
|---|---|
 |
 |
| To allow users to enable command actions for an activity directly from the timeline, check the box next to command action in Select and order commands. You can only enable five command actions for an activity. |
|
| You can also move the position of the command actions to change the order in which they're displayed on the timeline. | When enabled, the command action appears on the activity record in the timeline. |
Display related records on the timeline
Accounts, contacts, cases, and opportunities linked to an activity are displayed on the timeline record. The administrator can enable or disable the records in Regarding records.
| Form designer configuration view | Form designer display view |
|---|---|
 |
 |
| 1. Expand and view activities under the Record settings section using the caret (^). 2. A list of records are displayed in Regarding records. 3. To enable records, select the box next to Enable and select Done. |
When the checkbox is enabled, users can view the linked records to an activity. The record linked to the activity is then displayed on the timeline. The linking of the record isn't manual and it occurs due to the rollup of the record. More information: Set the activity rollup type in timeline |
Note
A check mark appears next to the enabled record. Disabling the table type only disables the linked record for the Timeline records rolled up for that table.
Create and use card forms in timeline
Records are displayed using the default setting for each activity type. However, if you want to display record information for an appointment or email, for example, you can either edit the existing card form, use a different card form from record settings, or customize your own.
| Form designer configure view | Form designer display view |
|---|---|
 |
 |
| You can change the default card settings to a different card form if one has been created. | If you create a new card form, you must go to the parent table and add the new form of card type there before it appears in the timeline list for configuration. If Default is displayed, you aren't using the card form. You can't use the Email card form in a timeline unless you select and publish it first. |
Note
Not all activity types allow you to create card types, so the default selection is your only option for those records.
Customize a card from within timeline
All card forms are separated into the following four sections:

Legend
- ColorStrip: This section doesn't appear on the timeline record. The ColorStrip is located on the left of the card form.
- Header: This section is displayed on the timeline record; however, only the first two columns are displayed on the timeline record. For this example, only the Subject and Modified On columns are visible.
- Details: This section is displayed on timeline record; however, only the first three columns are displayed on the timeline record. For this example, only the To, CC, and Description columns are visible on the timeline record.
- Footer: This section isn't displayed on the timeline record.
- Table columns: You can select which columns you want to add to your card form from the column options listed. You can customize your card form by dragging and dropping the columns you want to use into the sections you want that column to appear in on the timeline record.
Each individual card form must be customized for each activity record, such as email, tasks, posts, and so forth.
Header section
The card Header displays the title/subject in your timeline email form. You can have up to six columns in the Header section, but only the first two columns display on the timeline record. The form ignores empty columns in all sections.
| Form designer configuration view | Form designer display view |
|---|---|
 |
 |
| Column 1 1. Regardless of the column you choose for this section, it appears as a bold header at the top of your timeline record. For this example, we selected Subject for this column. Column 2 2. Again, regardless of the column you choose for this section, this column always appears in the bottom-right corner of the timeline record. For this example, Modified On is selected for this column. |
Column 1 1. Column 1 from the card header is always displayed in this section of the timeline record. Column 2 2. Column 2 from the card header is always displayed in this section of the timeline record. |
Details section
The card Details section displays in the body of your timeline email record. You can have up to four columns in the Details section, but only the first three columns are viewable on the timeline record.
| Form designer configuration view | Form designer display view |
|---|---|
 |
 |
| The card details always appears below the header regardless of the column you choose. Column 1 1. In the card details, Column 1 acts as a subheader on the timeline record. For this example, To is selected for this column. Column 2 2. This column only displays one line of text in a summary view on the timeline record. When you expand your timeline record, content in this column is fully displayed and formatted. For this example, CC is selected for this column. Column 3 3. This column follows the content of Column 2 and is part of the main body of your timeline record that is only viewable when you expand the record. For this example, Description is selected for this column. |
Column 1 1. This column always displays in this section and acts as a subheader on the timeline record. Column 2 2. This column always displays in this section and only displays one line of text in the summary view but when expanded, content is fully displayed. Column 3 3. This column always displays in this section and is only viewable when the record is expanded. |
Footer section
This section isn't visible on the timeline record.
| Form designer configuration view | Form designer display view |
|---|---|
 |
|
| Column 1 1. For this example, we selected Owner for this column. Column 2 2. For this example, we selected Regarding for this column. Column 3 3. For this example, we selected Priority for this column. |
These columns aren't visible on the timeline record |
Note
Records Modified On are all updated to the same time by which the modification occurred and & Modified By is assigned to one user when the table is assigned to a new user. This occurs due to the cascading behavior. More information: Configure table relationships cascading behavior
Set the date to use when sorting activities in timeline
How users view data is important, and setting a default display view of the data varies based on the needs of your business. App makers can choose how data is sorted and create a default setting for Activity types in Record settings. Last Updated is on all activities, which is why it's set as the default in ascending order.

Legend
- The Sort activity by setting in the Activities record settings allows you to control how data is sorted in timeline.
- The Sort activities by column displays a list when selected. You can select from this list how you want your data to be sorted and displayed on timeline in the form.
Sort date
Some dates can only exist on specific types of activities. For example, Date sent or Date delivery last attempted only apply to email. If you sort by such dates, then non-email activities end up grouped together without any ordering. You can't create a custom date column, but if you need more flexibility, you can use Sort date, which is empty by default and requires that you populate it for each activity record with the date you want to use for sorting. Some of the ways you can populate the date are by using Microsoft Power Automate, business rules, or JavaScript.
When using Sort date, keep in mind the following details:
- If you set a value in Sort date, you can use it for more customized sorting, but you have to populate it for every activity record or it doesn't work. The sort date has to be configured for each timeline instance, and must be set up for all three main forms in the account table.
- If the DateTime column is on the same calendar day, the date doesn't display if DateTime was earlier in the day compared to the current time.
- The sort date isn't based on a 24-hour period, but rather, compares the DateTime column value with the current date and time (based on the user's preferred time zone). If the value entered occurred earlier in the day, the date isn't displayed.
Set the activity rollup type in timeline
The activity rollup type can be configured for timelines on forms for the account and contact tables. The available types of rollups are Extended, Related, and None. Activity rollup only affects accounts and contacts in Dynamics 365 apps, such as Dynamics 365 Customer Service applications. To only show activities that are directly related to the table in timeline, select None.
More information on rollup types is available from RollupType EnumType.

Timeline performance
Only enable the activities that you need on the form. If you select more than 10 Activity types, a warning notice displays to let you know that the number of activity types you have selected impacts the performance of your timeline. To improve timeline performance, consider limiting activity types to 10 or less.

Notes on timeline
| Form designer configuration view | Form designer display view |
|---|---|
 |
 |
| The Notes section expands when enabled and allows you to: 1. Sort notes by date created or date modified. The Modified On date is the default setting. 2. Add a relative web resource path in the Rich text editor configuration URL column for customized note capability. More information: Add the rich text editor control to a model-driven app |
1. When enabled, Notes can be access via the Create a timeline record 2. A dropdown list appears where you can access Notes. 3. Use Notes to create a note to add to a record using rich text editing. You can set the font and size for the notes from the timeline, without having to set it multiple times. |
Configure the form for notes
In the Notes area, under Configure form, select Default form to configure how information is displayed in notes, such as relevant users and dates, and whether or not to include labels. This setting lets you increase or reduce the number of timeline records that display.
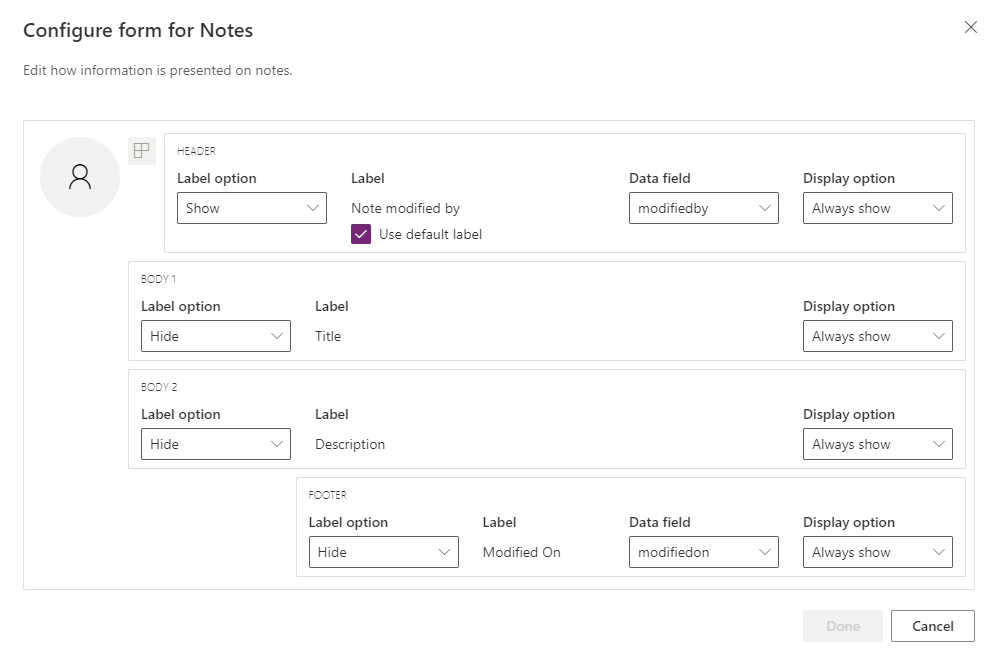
- Header
- Label option: Hide, show, or show on hover the label, "Created by" or "Modified by".
- Label: Select the Use default label checkbox label to display the label "Note modified by". Clear the checkbox to display the label "Modified by".
- Data column: Select to show either the user who created the note or the user who modified the note. The label changes to match the data column you selected.
- Display option: Always show, show on expand, or hide this header containing the user who created or modified the note.
- Body1
- Label option: Show or hide the label of the note.
- Display option: Always show, show on expand, or hide the body text.
- Body2
- Label option: Show or hide the label of the note.
- Display option: Always show, show on expand, or hide the body text.
- Footer
- Label option: Show or hide the label, "Created on", "Modified on", or "Overridden on".
- Data column: Select to show the createdon, modifiedon, or overridenon date.
- Display option: Always show, show on expand, this footer containing the createdon, modifiedon, or overridenon date.
Set the notes rollup type in timeline
Note
This is an early access feature. You can opt in early to enable these features in your environment, which allows you to test these features and then adopt them across your environments.
The rollup type can be configured for timelines on forms for notes. The available types of rollups are Extended, Related, and None. To show those records only that are directly related to the notes in timeline, select None.
More information on rollup types is available at RollupType EnumType.
Allow users to quickly save notes on timeline
You can enable Quick save, which allows users to save their notes using Ctrl+S while typing a note on the timeline. Quick save helps improve user efficiency by not requiring users to navigate to Save or Save and close on the command bar. When users save a note using Ctrl+S, a Save successful confirmation message appears in the note on the timeline.
To enable Quick save, in Power Apps, go to the timeline settings, and then select the Enable Quick save checkbox.
Posts on timeline
To enable rich text posts on the timeline, contact Microsoft Support.
Note
Posts are only available with certain Dynamics 365 apps, such as apps for Dynamics 365 Customer Service.
| Form designer configuration view | Form designer display view |
|---|---|
 |
 |
| The Posts section expands when enabled and allows you to: - Select Enable user posts enabling users to leave a message on the record. Note: You can't enable user posts in the Dynamics 365 Field Service mobile app. - Sort posts by date created or date modified. The Created On date is the default setting. - The Select and order commands (Preview) section allows users to display the command actions that can be performed on posts displayed on the timeline. You can also move the position of the commands to change the order in which they're displayed on the timeline. |
1. When enabled, posts can be accessed by selecting Create a timeline record 2. A dropdown menu displays, and you can access Posts. 3. Use Posts to create a post to add to a record. When date Created On is used to sort posts on the timeline, the location in the timeline remains constant even when there are responses to that post. When date Modified On is used to sort posts on the timeline, the location in the timeline adjusts to the top when there are responses to that post. NOTE: The timeline doesn't automatically refresh when post replies are added. |
| The Enable simple auto posts (Preview) allows auto posts to be displayed either in the existing card format or as a simple post. Clear the checkbox to display the posts in the existing card format. The checkbox is selected by default. |  |
| When the Enable simple auto posts (Preview) checkbox is enabled, the posts aren't displayed in card form. Command actions can't be performed on auto posts from the timeline. |
Configure the form for posts
You can configure how information is displayed in posts, such as relevant users and dates, and whether to include labels. This functionality enables you to increase or reduce the number of timeline records that appear onscreen.

Go to your timeline configuration in make.powerapps.com, scroll down to the Posts section containing the Configure form column, and edit the following column in the default form:
- Header
- Label option: Hide, show, or show on hover the label, "Created by" or "Modified by".
- Label: Select the Use default label checkbox label to display the label.
- Data column: Select to show the user who created the post. The label changes to match the data column you selected.
- Display option: Always show, show on expand, or hide this header containing the user who created the post.
- Body2
- Label option: Show or hide the label of the post.
- Display option: Always show, show on expand, or hide the body text.
- Footer
- Label option: Show or hide the label, "Created on", "Modified on", or "Overridden on".
- Data column: Select to show the createdon or modifiedon date.
- Display option: Always show, show on expand, this footer containing the createdon or modifiedon date.
Configure @mentions in notes and posts on timeline
To enable @mentions in notes and posts, follow the instructions provided in this article: Use @mention for collaborating with your team using notes
Important
The @mentions feature doesn't work with Power Platform environments that were created with the Enable Dynamics 365 apps option set to No. For more information about this option, go to Create an environment with a database.
Users must have the Read privilege for the msdyn_postconfig entity, and the Share privilege for the entity for which they use @mentions (for example, account, contact, case, and so forth).
Configure autopost messages to display on the timeline
Note
- The autopost functionality is only available with environments that are configured for Enable Dynamics 365 apps.
- Dynamics 365 incudes autopost rules for some standard tables such as account, contact, lead, and case. It isn't possible to create new autopost rules. However, you can use other options such as Power Automate or a custom plug-in to create a post record based on the desired conditions.
You can configure which autopost messages appear on the timeline when a system event occurs. The autopost configuration replaces the legacy Activity Feed Configuration and Activity Feed Configuration Rules.
To configure the autopost messages that should be displayed:
- In Customer Service Hub, go to Service Management, and under Timeline settings, select Auto-post rules.
- Select which autopost rules to make active using the grid and Activate and Deactivate buttons at the top.
When a system event corresponding to an active rule occurs, an autopost message displays on the timeline.

If you're using a Dynamics 365 app other than Customer Service Hub or Customer Service workspace, you need to add your own sitemap. To add your own sitemap in your app:
- Open your app in the app designer in Power Apps: make.powerapps.com
- On the app designer command bar, select Add page, select Table based view and form, and then select Next.
- In the Table list, select Post Rule Configuration, and then select Add.
Note
If you don't have the Post Rule Configuration table, your environment doesn't have the required Dynamics 365 app installed.
- Select Save, and then select Publish.
Let users pin and unpin activities to the top of timeline
You can configure the ability for users to pin or unpin activities, such as notes, to the top of the timeline so that they're easily accessible. Pinning activities helps users save time by not requiring them to scroll an entire timeline to find the information they need.
By default, notes are enabled for pinning. When you click on the activity type such as a task, appointment, and so forth, the pin and unpin option appears in the list of commands. Select the Pin / Unpin checkbox for each activity you want users to be able to pin or unpin.
Create and add custom activities to timeline
You can create custom tables that display on a timeline. More information: Display a custom table in a timeline
Configure blocked attachment file types
Power platform administrators can configure the file types that are blocked from being added as file attachments to records, including records in a timeline.
- Find the Set blocked file extensions for attachments systems setting. More information: Open the System Settings dialog box General tab
- In the text box of blocked file attachments, type the file extension type you want to block for attachments (for example, ".pdf"). Separate file types with a semi-colon.
- Select OK.
Set file size limits for attachments
Power platform administrators can restrict the file size of attachments users can upload in the rich text editor.
Note
File sizes for attachments generally can be any size under 90 MB, but for optimal system performance, smaller file sizes are recommended.
- Go to Advanced Settings, and then on the Settings menu, select System > Administration.
- On the Administration page, select System Settings.
- On the System Settings dialog, select the Email tab, and then scroll down to find the Set file size limit for attachments value.
- Enter the desired size limit for attachments, and then select Save. 131,072 KB is the maximum allowed value.
Enable and configure timeline highlights
Enable the timeline highlights widget to help users quickly get up to speed with the most important activities on a record. The widget uses Copilot to generate a list of significant activities on a record, summarized from notes, emails, tasks, appointments, phone calls, and conversations.
Important
This feature is only available for Power Platform environments with Dataverse that have the Enable Dynamics 365 apps setting enabled.
Before you set up copilot in your environment, review the FAQ about using AI responsibly in Power Apps.
Prerequisites
Copilot must be turned on in the settings of the model-driven app.
Enable timeline highlights
You can enable timeline highlights at the app level or form level, depending on whether you want to enable it for all entities/tables in an app or only for a specific form.
To enable timeline highlights at the app level:
- Go to Power Apps.
- Select Apps and then select the app for which you want to enable the feature. For example, Sales Hub app.
- Select Settings on the command bar and select Upcoming.
- Turn on the Enable Timeline Highlights feature.
- Save and publish the changes.
Enable timeline highlights at the form level
- Go to Power Apps.
- Select Tables and select the table that the form is based on. For example, select Accounts to enable timeline highlights for the account form.
- Select Forms and then select the form for which you want to enable the feature.

- Select Enable Timeline Highlights powered by Generative AI.
- Save and publish the changes.
Known issues
Duplicate posts are shown when sorting records by older to newer
The API the timeline uses to fetch posts doesn't support sorting by older to newer posts. When you sort this way, the timeline receives the wrong posts to display. When sorting the timeline by older to newer, use notes instead.
Notes can only have one attachment added from the attachment button
This functionality is by design, with plans to allow more attachments in the near future. Multiple attachments can be added inline by dragging and dropping them into the note.
Timeline fails to load with error code:"0x8004430d","message":"Number of link entity: <number> exceed limit 15
There's a limit of 15 different tables that can be associated with a timeline. Either disable some of the activities associated with the timeline, or follow one of the workarounds described in this article: Timeline doesn't render and shows "Records couldn't be loaded"
When you create a note in a timeline, the character string "$&" is converted to "{3}amp;"
This is a configuration issue for the rich text editor control. To resolve this, add "removePlugins": "stickystyles" to your RTE config file. More information: Rich text editor properties