Note
Access to this page requires authorization. You can try signing in or changing directories.
Access to this page requires authorization. You can try changing directories.
APPLIES TO:
App owns data
User owns data
Embedded analytics and Power BI Embedded (the Azure offer) allow you to embed Power BI content such as reports, dashboards, and tiles, into your application.
In this tutorial, you learn how to:
- Set up your embedded environment.
- Configure an embed for your customers (also known as app owns data) sample application.
To use your application, your users don't need to sign in to Power BI or have a Power BI license.
We recommend using the embed for your customers method to embed your Power BI content, if you're an independent software vendor (ISV) or a developer, who wants to create applications for third parties.
Important
If you are embedding content for a national/regional cloud, the first few steps of this tutorial are different. See Embed content for national/regional clouds for details.
Code sample specifications
This tutorial includes instructions for configuring an embed for your customers sample application in one of the following frameworks:
- .NET Framework
- .NET Core
- Java
- Node JS
- Python
The code samples support the following browsers:
- Microsoft Edge
- Google Chrome
- Mozilla Firefox
Prerequisites
Before you start this tutorial, verify that you have the following the Power BI and code dependencies:
Power BI dependencies
Your own Microsoft Entra tenant.
To authenticate your app against Power BI, you need one of the following:
Service principal - a Microsoft Entra service principal object that allows Microsoft Entra ID to authenticate your app.
Power BI Pro license - This is your master user and your app uses it to authenticate to Power BI.
A Power BI Premium Per User (PPU) license - This is your master user and your app uses it to authenticate to Power BI.
Note
To move to production you'll need a capacity.
Code dependencies
.NET Core 3.1 SDK (or higher)
An integrated development environment (IDE). We recommend using one of the following environments:
Method
To create an embed for your customers sample app, follow these steps:
Step 1 - Select your authentication method
Your embedded solution varies depending on the authentication method you select. Therefore, it's important to understand the differences between the authentication methods, and decide which one best suits your solution.
The following table describes a few key differences between the service principal and master user authentication methods.
| Consideration | Service principal | Master user |
|---|---|---|
| Mechanism | Your Microsoft Entra app's service principal object allows Microsoft Entra ID to authenticate your embedded solution app against Power BI. | Your Microsoft Entra app uses the credentials (username and password) of a Power BI user, to authenticate against Power BI. |
| Security | Service principal is the Microsoft Entra ID recommended authorization method. If you're using a service principal, you can authenticate using either an application secret or a certificate. This tutorial only describes using service principal with an application secret. To embed using a service principal and a certificate, refer to the service principal with a certificate article. |
This authentication method isn't as secure as a service principal. You have to be vigilant with the master user credentials (username and password). For example, don't expose them in your embedding application, and change the password frequently. |
| Microsoft Entra ID delegated permissions | Not required. | Your master user or an administrator has to grant consent for your app to access Power BI REST API permissions (also known as scopes). For example, Report.ReadWrite.All. |
| Power BI service access | You can't access Power BI service with a service principal. | You can access Power BI service with your master user credentials. |
| License | Doesn't require a Pro license. You can use content from any workspace that you're a member or an admin of. | Requires a Power BI Pro or Premium Per User (PPU) license. |
Step 2 - Register a Microsoft Entra application
Registering your application with Microsoft Entra ID allows you to:
- Establish an identity for your app
- Let your app access the Power BI REST APIs
- If you're using a master user - Specify your app's Power BI REST permissions
To register your application with Microsoft Entra ID, follow the instructions in Register your application.
Note
Before registering your application, you'll need to decide which authentication method to use, service principal or master user.
Step 3 - Create a Power BI workspace
Microsoft Fabric keeps your reports, dashboards, and tiles in a workspace. To embed these items, you need to create them and upload them into a workspace.
Tip
If you already have a workspace, you can skip this step.
To create a workspace, do the following:
- Sign in to Fabric.
- Select Workspaces.
- Select + New workspace.
- Name your workspace and select Apply.
Step 4 - Create and publish a Power BI report
Your next step is to create a report and upload it to your workspace. You can create your own report using Power BI Desktop, and then publish it to your workspace. Or, you can upload a sample report to your workspace.
Tip
If you already have a workspace with a report, you can skip this step.
To download a sample report (not Direct Lake-enabled) and publish it to your workspace, follow these steps:
Open the GitHub Power BI Desktop samples folder.
Select Code and then select Download ZIP.
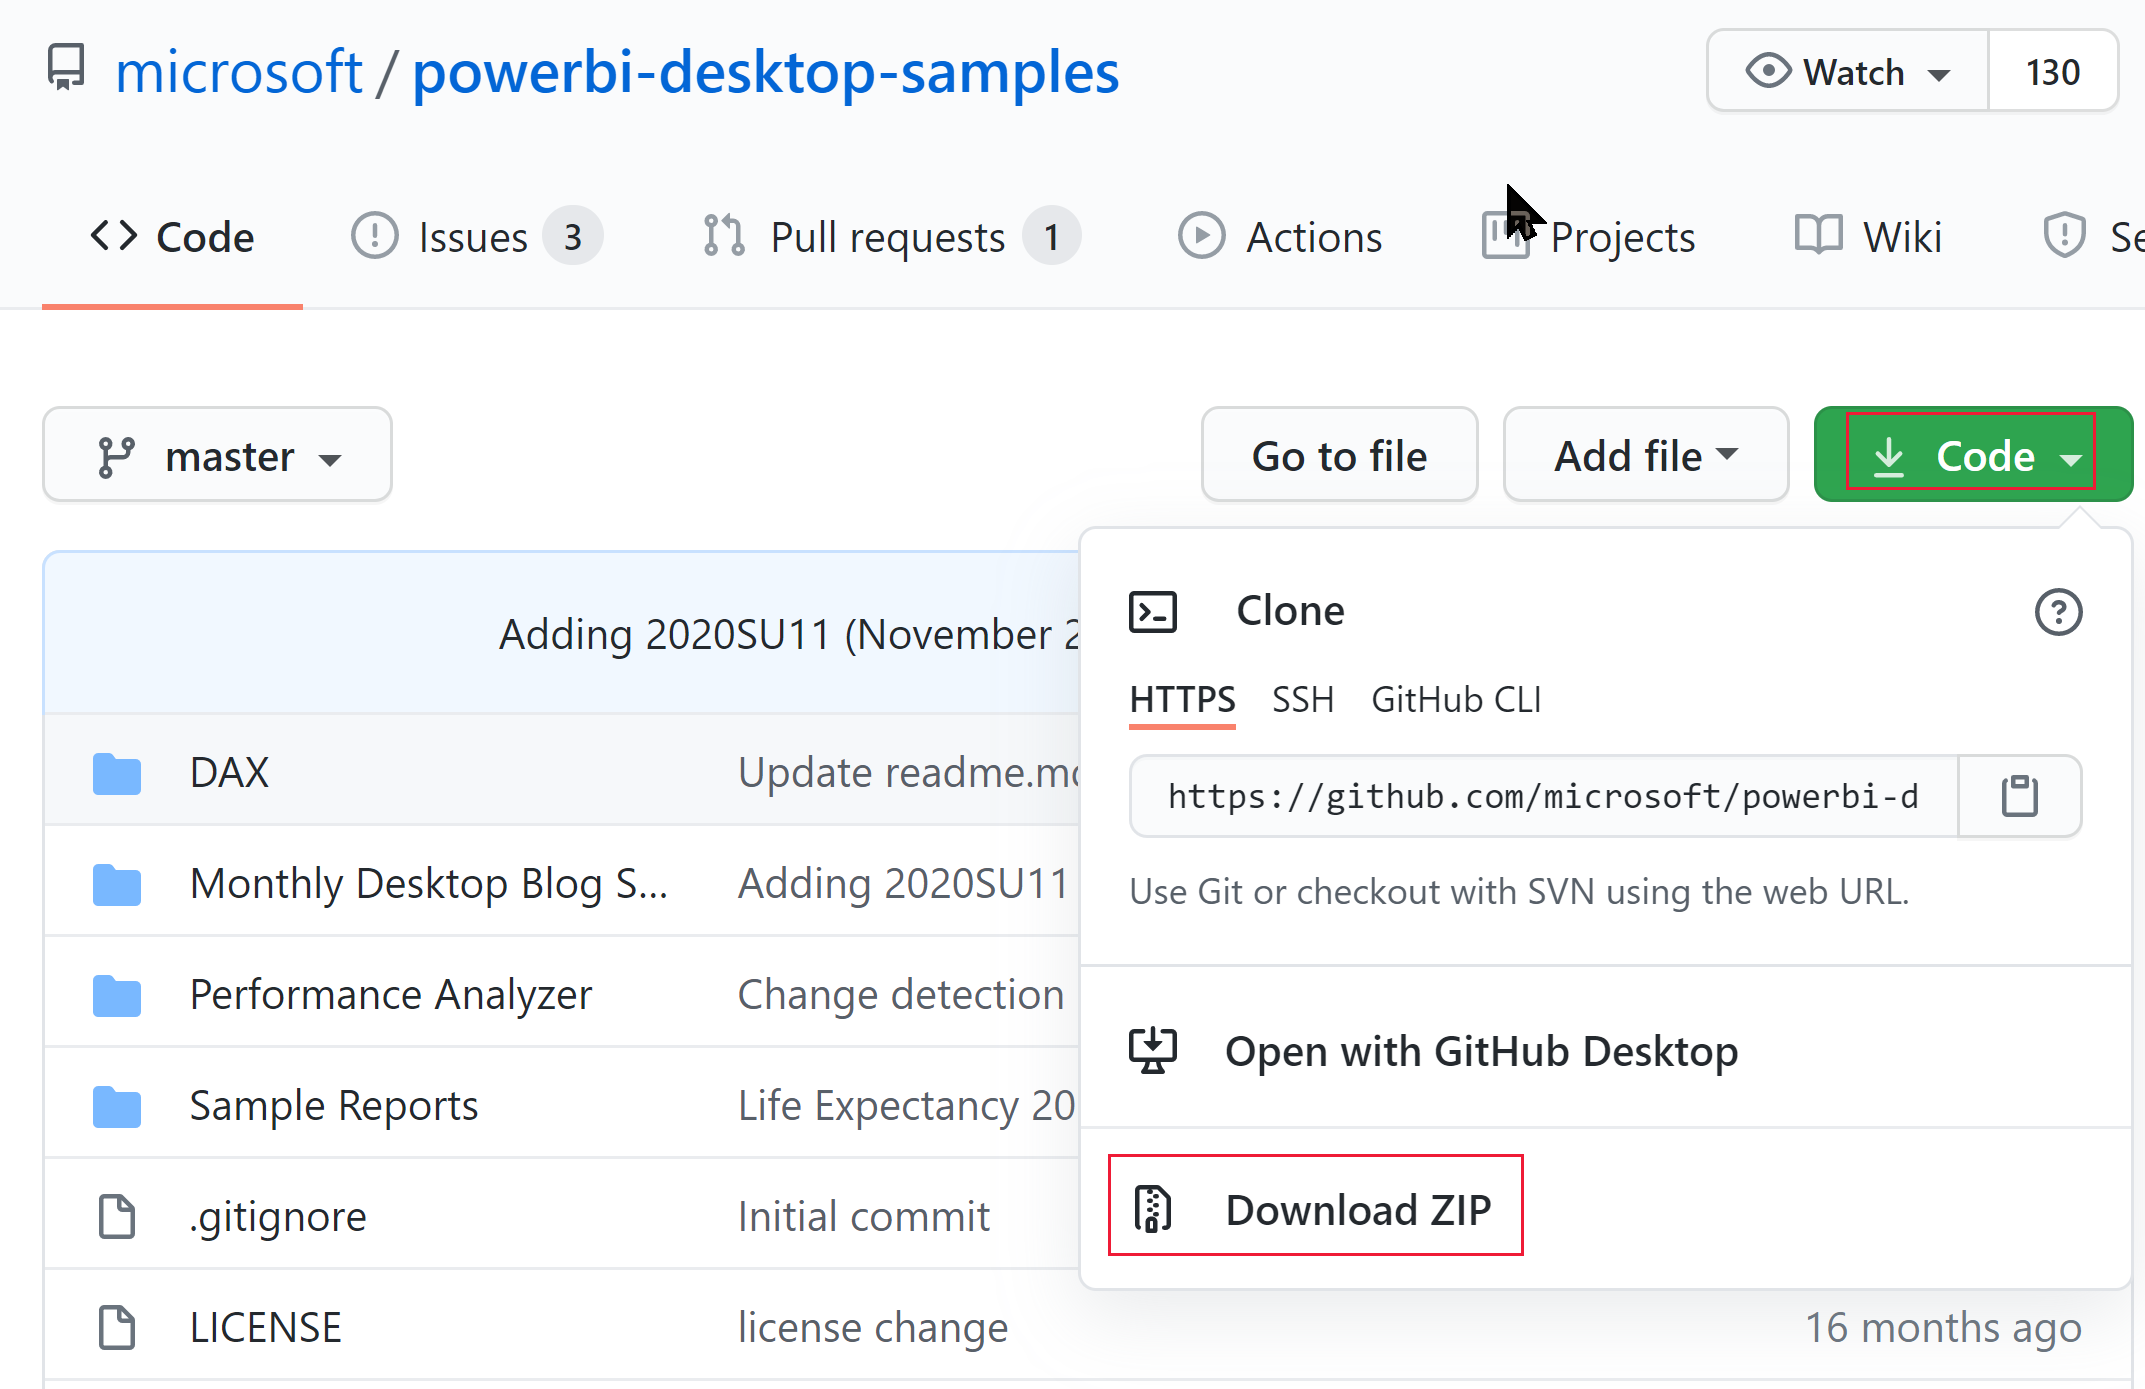
Extract the downloaded ZIP and navigate to the Sample Reports folder.
Select a report to embed, and publish it to your workspace.
Note
If your report uses a Direct Lake semantic model, make sure review these limitations.
Step 5 - Get the embedding parameter values
To embed your content, you need to obtain certain parameter values. The following table shows the required values, and indicates if they're applicable to the service principal authentication method, the master user authentication method, or both.
Before you embed your content, make sure you have all the values listed below. Some of the values might differ, depending on the authentication method you're using.
| Parameter | Service principal | Master user |
|---|---|---|
| Client ID |  |
 |
| Workspace ID |  |
 |
| Report ID |  |
 |
| Client secret |  |
 |
| Tenant ID |  |
required only for Node JS |
| Power BI username |  |
 |
| Power BI password |  |
 |
Client ID
Tip
Applies to:  Service principal
  Master user
To get the client ID GUID (also known as application ID), follow these steps:
Log into Microsoft Azure.
Search for App registrations and select the App registrations link.
Select the Microsoft Entra app you're using for embedding your Power BI content.
From the Overview section, copy the Application (client) ID GUID.
Workspace ID
Tip
Applies to:  Service principal
  Master user
To get the workspace ID GUID, follow these steps:
Sign in to Power BI service.
Open the report you want to embed.
Copy the GUID from the URL. The GUID is the number between /groups/ and /reports/.

Alternatively, you can find the workspace ID in the Admin portal settings by selecting Details next to the workspace name.

Report ID
Tip
Applies to:  Service principal
  Master user
To get the report ID GUID, follow these steps:
Sign in to Power BI service.
Open the report you want to embed.
Copy the GUID from the URL. The GUID is the number between /reports/ and /ReportSection.

Client secret
Tip
Applies to:  Service principal
  Master user
To get the client secret, follow these steps:
Log into Microsoft Azure.
Search for App registrations and select the App registrations link.
Select the Microsoft Entra app you're using for embedding your Power BI content.
Under Manage, select Certificates & secrets.
Under Client secrets, select New client secret.
In the Add a client secret pop-up window, provide a description for your application secret, select when the application secret expires, and select Add.
From the Client secrets section, copy the string in the Value column of the newly created application secret. The client secret value is your client ID.
Note
Make sure you copy the client secret value when it first appears. After navigating away from this page, the client secret will be hidden and you'll not be able to retrieve its value.
Tenant ID
Tip
Applies to:  Service principal
  Master user
To get the tenant ID GUID, follow these steps:
Log into Microsoft Azure.
Search for App registrations and select the App registrations link.
Select the Microsoft Entra app you're using for embedding your Power BI content.
From the Overview section, copy the Directory (tenant) ID GUID.
Power BI username and password
Tip
Applies to:  Service principal
  Master user
Obtain the username and password of the Power BI user you're using as your master user. This is the same user you used to create a workspace and upload a report to, in Power BI service.
Step 6 - Service principal API access
Tip
Applies to:  Service principal
  Master user
This step is only relevant if you're using the service principal authentication method. If you're using a master user, skip this step and continue with Step 7 - Enable workspace access.
For a Microsoft Entra app to be able to access the Power BI content and APIs, a Power BI admin needs to enable service principal access in the Power BI admin portal. If you're not the admin of your tenant, get the tenant's admin to enable the Tenant settings for you.
In Power BI service, select Settings > Settings > Admin portal.
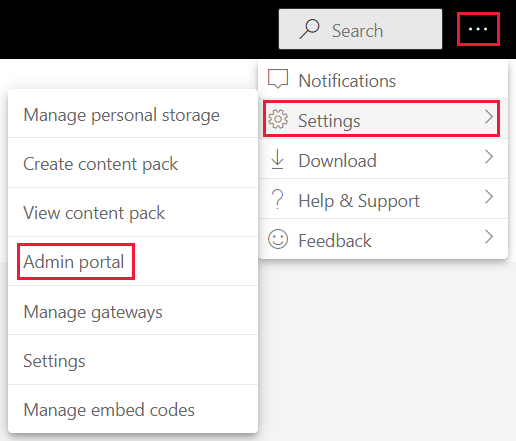
Select Tenant settings and then scroll down to the Developer settings section.
Expand Service principals can use Fabric APIs, and enable this option.
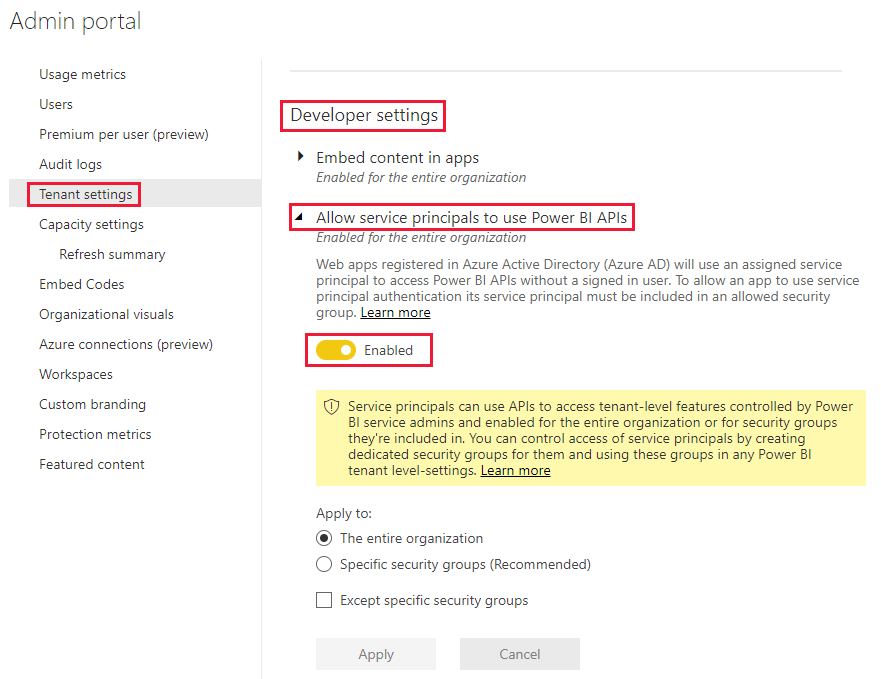
Note
When using a service principal, it's recommended to limit its access to the tenant settings using a security group. To learn more about this feature, see these sections in the service principal article:
Step 7 - Enable workspace access
To enable your Microsoft Entra app access objects such as reports, dashboards and semantic models in the Power BI service, add the service principal or master user, as a member or admin to your workspace.
Sign in to Fabric.
Scroll to the workspace you want to enable access for, and select Manage access.
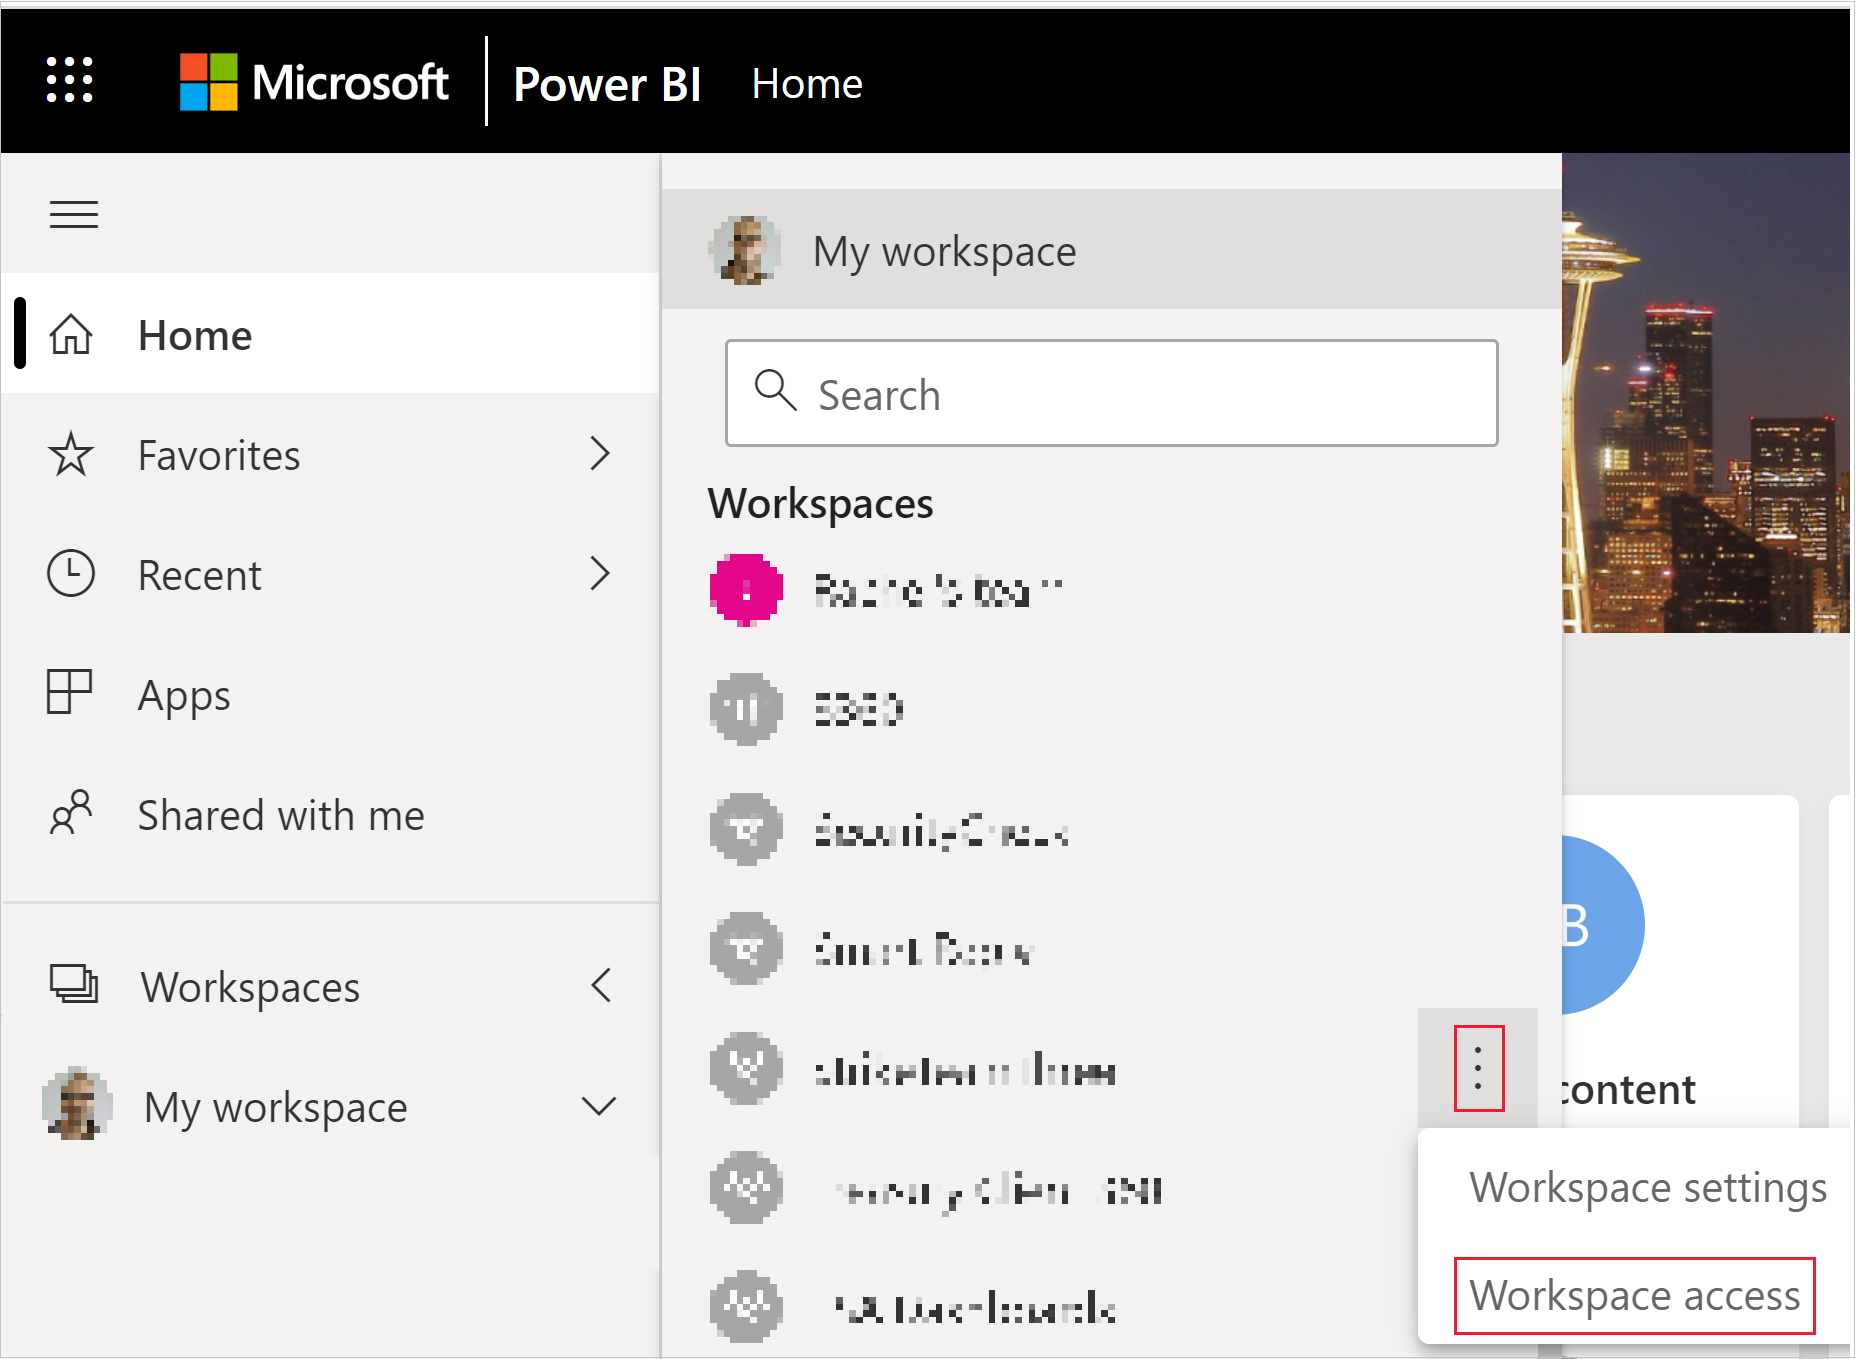
In the Access pane, depending on which authentication method you're using, copy the service principal or master user to the Enter email address text box.
Note
If you're using a service principal, its name is the name you gave your Microsoft Entra app.
Select Add.
Step 8 - Embed your content
The Power BI embedded sample application allows you to create an embed for your customers Power BI app.
Follow these steps to modify the embed for your customers sample application, to embed your Power BI report.
Open the Power BI developer samples folder.
Select Code and then select Download ZIP.
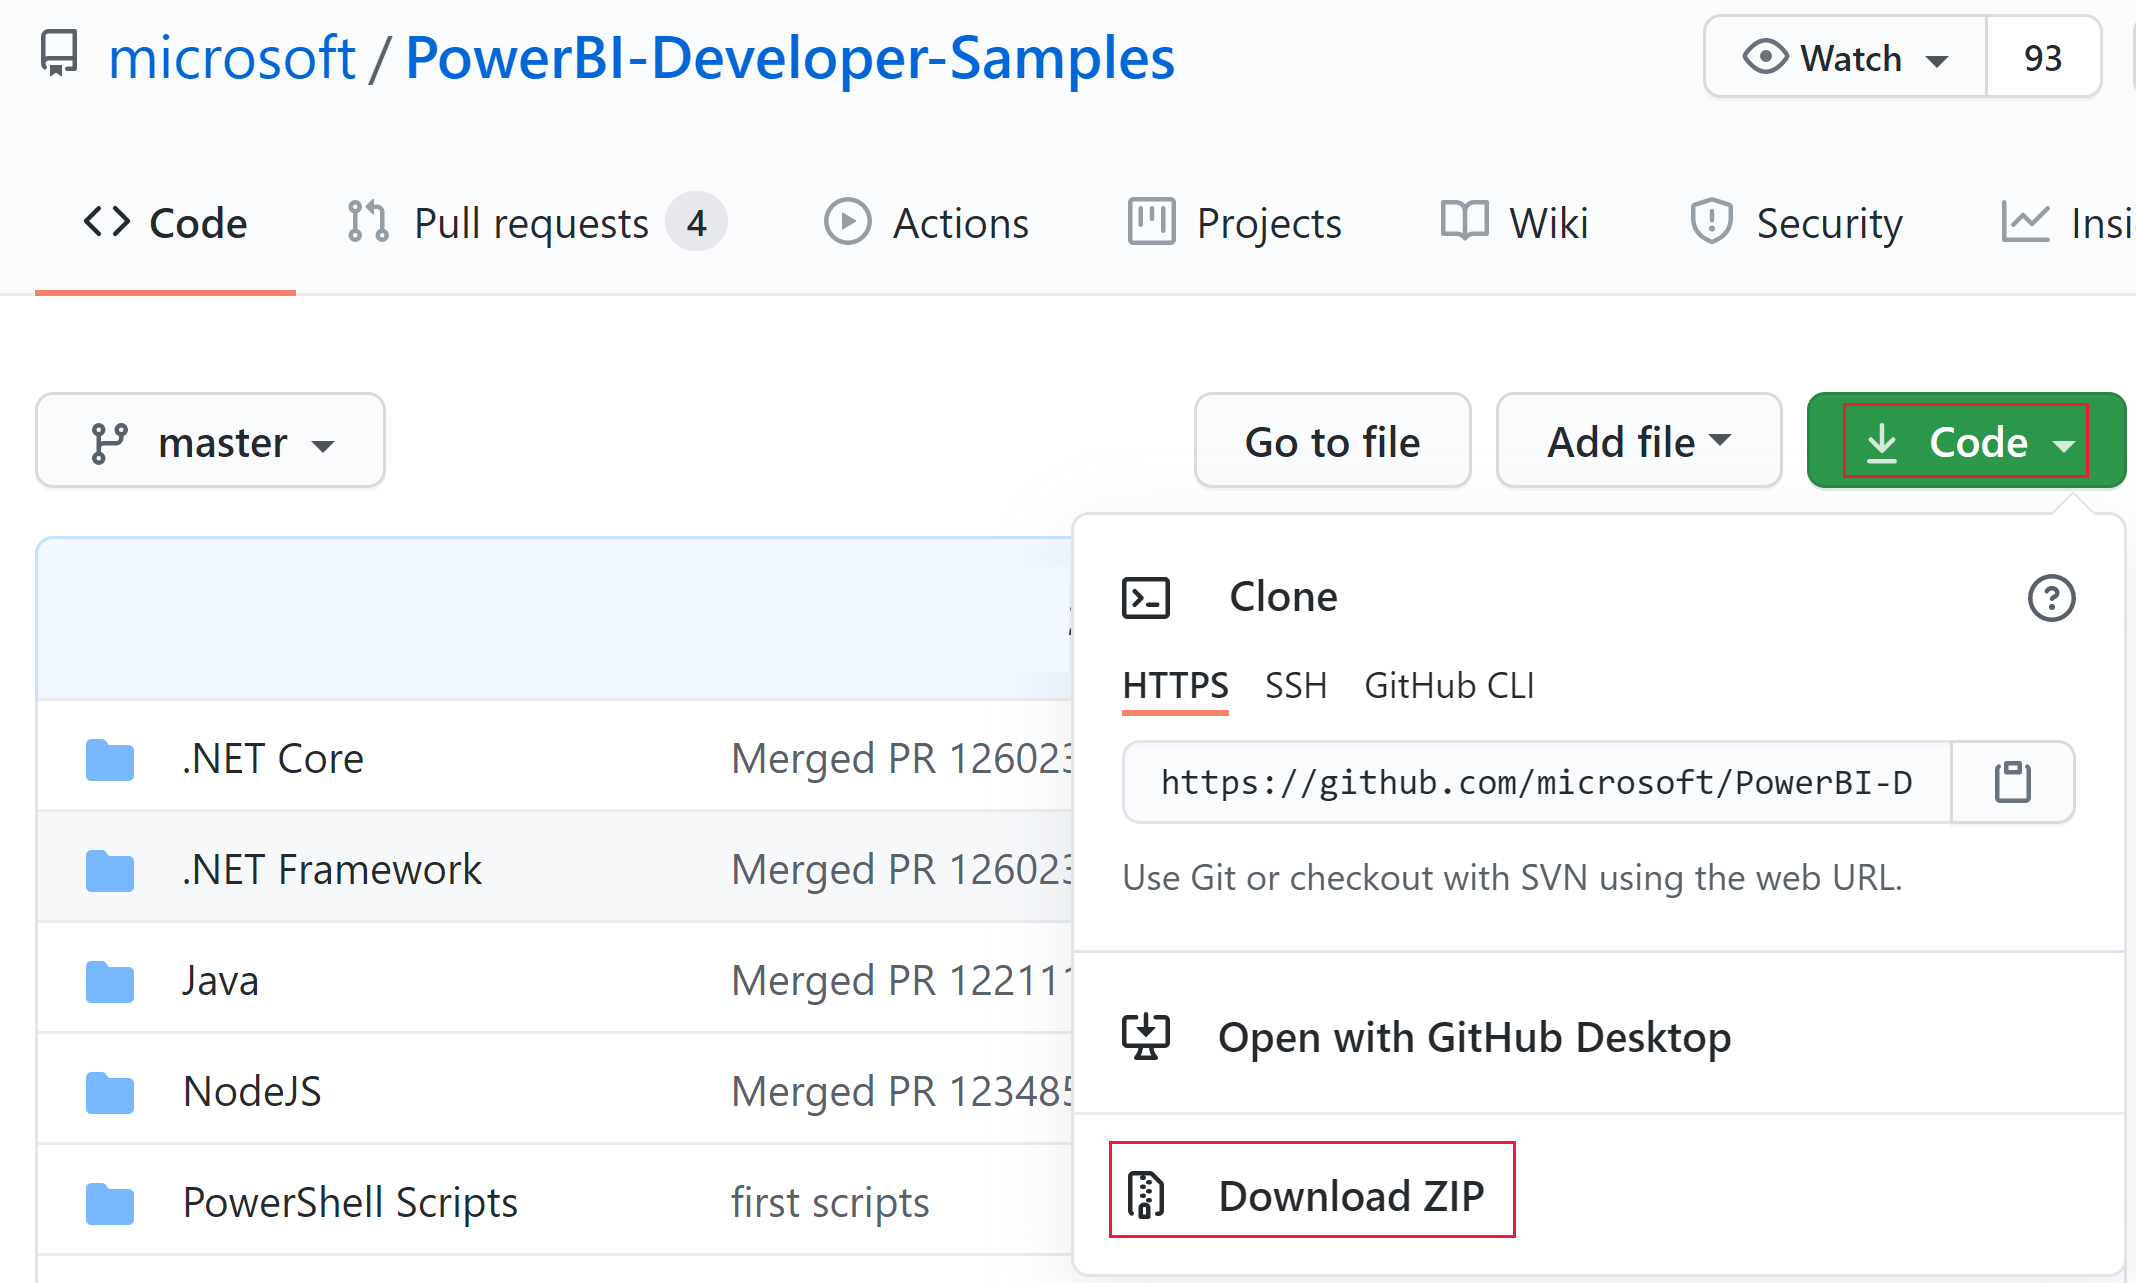
Extract the downloaded ZIP and navigate to the PowerBI-Developer-Samples-master folder.
Depending on the language you want your app to use, open one of these folders:
- .NET Core
- .NET Framework
- Java
- Node JS
- Python
Note
The embed for your customers sample applications only support the frameworks listed above. The React sample application only supports the embed for your organization solution.
Open the Embed for your customers folder.
Open the embed for your customers sample app using one of these methods:
If you're using Visual Studio, open the AppOwnsData.sln file.
If you're using Visual Studio Code, open the AppOwnsData folder.
Open appsettings.json.
Depending on your authentication method, fill in the following parameter values:
Parameter Service principal Master user AuthenticationModeServicePrincipal MasterUser ClientIdYour Microsoft Entra app client ID Your Microsoft Entra app client ID TenantIdYour Microsoft Entra tenant ID N/A PbiUsernameN/A Your master user username, see Power BI username and password PbiPasswordN/A Your master user password, see Power BI username and password ClientSecretYour Microsoft Entra ID client secret N/A WorkspaceIdThe ID of the workspace with your embedded report, see Workspace ID The ID of the workspace with your embedded report, see Workspace ID ReportIdThe ID of the report you're embedding, see Report ID The ID of the report you're embedding, see Report ID Run the project by selecting the appropriate option:
If you're using Visual Studio, select IIS Express (play).
If you're using Visual Studio Code, select Run > Start Debugging.
Developing your application
After configuring and running the embed for your customers sample application, you can start developing your own application.
Try out the Power BI embedded analytics playground to get started developing and to keep up with all the new Power BI Embedded features and updates.
When you're ready, review the move to production requirements. You'll also need a capacity, and should review the capacity planning article to establish which SKU best suits your needs.
Important
If you used free embed trial tokens for development, you must buy a capacity for production. Until a capacity is purchased, the Free trial version banner will continue to appear at the top of the embedded report.
Considerations and limitations
The following limitations apply for Direct Lake mode:
- Requires a V2 embed token.
- If you're using a service principal, you need a Fixed Identity connection (No-SSO).
- Currently, setting a service principal as the authentication method on a Fixed Identity connection is the only option supported through automation. Other methods are supported manually through the portal.
Related content
More questions? Ask the Power BI Community.