Note
Access to this page requires authorization. You can try signing in or changing directories.
Access to this page requires authorization. You can try changing directories.
In Copilot Studio, a topic defines how an agent conversation progresses.
To author topics, you can describe what you want and have AI create the topic for you, or create topics from scratch.
For more information about agent and topic limits, see Quotas, limits, app registration, certificates, and configuration values.
Selecting the right topic to respond to a user
To determine how to respond to users, agents use either generative orchestration or classic orchestration.
With generative orchestration, an agent answers user queries or responds to event triggers by selecting the most appropriate combination of topics, tools, and knowledge. Each topic has a description that informs the agent of its purpose. Learn more about authoring descriptions.
In agents configured to use classic orchestration, each topic has a set of trigger phrases—phrases, keywords, and questions that a customer is likely to use for queries related to a specific issue. These agents use natural language understanding, the customer's message, and the topic's trigger phrases to find the best topic. The customer input doesn't need to exactly match a topic trigger phrase to trigger the topic. For example, a topic about store hours might have the trigger phrase "check store hours." If a customer enters "see store opening hours," this phrase triggers your store hours topic. Learn more about authoring trigger phrases.
Topics in Copilot Studio
In Copilot Studio, a topic represents a portion of a conversation between a user and an agent. You define topics on an authoring canvas. A topic contains one or more nodes, which together determine the conversational paths that a topic can take. Each node performs an action, such as sending a message or asking a question.
An agent can have two types of topics: system and custom topics. Every new agent starts with a set of predefined system and custom topics.
System topics support essential behaviors, such as a custom request to speak to a person or end the conversation. Some system topics have trigger phrases, which you can customize to fit your agent's needs.
- You can't create system topics.
- You can't delete system topics, but you can turn them off.
- You can make changes to system topics. However, you should wait until you're comfortable creating complete agent experiences before you start editing system topics.
For more information, see Use system topics.
The predefined custom topics cover common behaviors, such as greeting a customer, ending a conversation, or restarting conversation.
- You can make changes to the predefined custom topics or remove them from your agent entirely.
- All topics that you create are custom topics.
Node types
The following types of node are available.
| Node type | Description |
|---|---|
| Message node | Send the customer a message. |
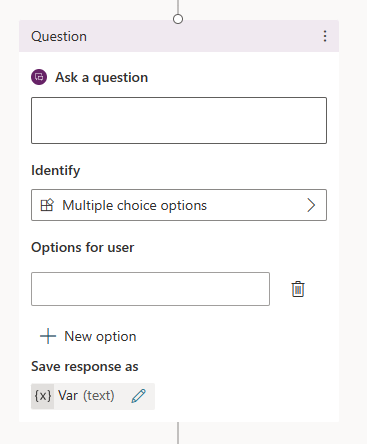
| Question node | Ask the customer a question. |
| Adaptive Card node | Show an interactive card with one or more response buttons or input fields. |
| Condition node | Branch your conversation based on a condition. |
| Variable management nodes | Set a value, parse a value, or clear variables (including the ability to clear the conversation history used by the agent). |
| Topic management | Redirect the conversation, transfer the user, or end the topic or conversation. |
| Tool nodes | Call a flow like Power Automate or Excel Online, or use a connector or another type of tool. |
| Advanced | Send generative answers, HTTP requests, events, and more. |
Tip
Rename nodes to make them easier to identify. Select the node's name field to update the name directly, or select the three dots (…) of the node and select Rename from the menu. You can also rename nodes in the code editor.
It's not possible to rename Trigger nodes and Go to step nodes.
Node names can be up to 500 characters in length.
Create a topic
Go to the Topics page for your agent. For better visibility, close the test panel.
Select Add a topic, then select From blank.
A Trigger node appears on an otherwise blank topic authoring canvas.
Select the three dots (…) of the Trigger node, then select Properties. The On Recognized Intent properties panel appears.
In On Recognized Intent properties, select the Phrases area. The Phrases secondary panel appears.
Under Add phrases, enter a trigger phrase for your topic.
Your agent needs 5 to 10 trigger phrases to train the AI to understand your customers' responses. To add more trigger phrases, you can either:
- Select the Add icon
 next to the text field, and enter the desired phrase.
 - Paste a set of trigger phrases, each one on a separate line, and select Enter.
- Type a set of trigger phrases, pressing Shift+Enter after each one to place it on a separate line, and select Enter.
- Upload a file listing trigger phrases you want to add for this topic.
You can include punctuation in a trigger phrase, but it's best to use short phrases rather than long sentences.
- Select the Add icon
Select Details on the toolbar to open the Topic details panel.
Add details for your topic:
- Enter a name to identify the topic, such as "Store hours." The Topics page lists all the topics defined in your agent by this name.
- If desired, enter a display name to show to the customer when the agent can't determine which topic matches the customer's message.
- If desired, use the Description field to describe the purpose of the topic for yourself and other agent makers on your team. Customers never see topic descriptions.
Select Save on the top menu bar to save your topic.
Important
Avoid using periods (.) in your topic names. It isn't possible to export a solution that contains an agent with periods in the name of any of its topics.
Upload trigger phrases for a topic
From the Phrases panel of a topic's Trigger node, you can add or replace the set of trigger phrases associated with the topic.
Prepare a text file (maximum 3 MB) listing all trigger phrases you want to add for your topic, with each phrase on a separate line.
Under Add phrases, select upload a file.
In Upload a file, select the desired option:
- If you want to add new trigger phrases for your topic, select Append.
- To replace all existing trigger phrases with the list from your file, select Replace.
Drop your file onto the window. Alternatively, select click to browse, navigate to your file, and select it.
Review the trigger phrases that appear, and select Add.
Save your topic.
Download trigger phrases for a topic
From the Phrases panel of a topic's Trigger node, you can download the set of trigger phrases associated with the topic.
Under Add phrases, select download.
Save the resulting text file, or open it in a text editor to review its content. Each trigger phrase appears on a separate line.

Edit a topic
When you create a topic, a Trigger node automatically appears on the authoring canvas. You can then add different types of nodes to achieve the desired conversation path for your topic.
To add a node after another node or between two nodes on your topic authoring canvas:
Select the Add node icon
 under the node after which you want to add a new node.
Select the desired node type from the list that appears.
Delete a node
Select the three dots (…) of the node you want to delete, then select Delete.
Controls for editing nodes on the canvas
Use the controls on the toolbar to cut, copy, paste, and delete the selected node or selected adjacent nodes.
The toolbar also has a control to undo edits. Select the Undo icon ![]() and select:
and select:
- Undo to undo the most recent change
- Undo to last save to revert all actions back to the last save
- Redo to redo the previous action
Paste nodes
After you use the Cut or Copy tools to place one or more nodes on the clipboard, you can paste them on the canvas in two ways:
If you select a node and then select Paste, the nodes on the clipboard are inserted after the selected node.
If you select the "+" to see the Add node menu, then select Paste, the node on the clipboard is inserted at that location.
Add input and output parameters for a topic
Topics can have input and output parameters. When a topic redirects to another topic, you can use these parameters to pass information between the topics.
Additionally, if your agent uses generative mode, it can automatically fill topic inputs from the conversation context, or after generating questions to gather values from users. This behavior is similar to how generative slot filling works for actions.
To learn more about input and output parameters for topics, see Manage topic inputs and outputs.
Edit topics with the code editor
The code editor shows the topic in YAML, a markup language that's easy to read and understand. Use the code editor to copy and paste topics from other bots—even ones created by other authors.
Important
Designing a topic entirely in the code editor and pasting complex topics isn't fully supported.
In this example, you copy and paste YAML into the code editor to quickly add a topic that asks the customer for shipping information.
On the Topics page, select Add a topic > From blank.
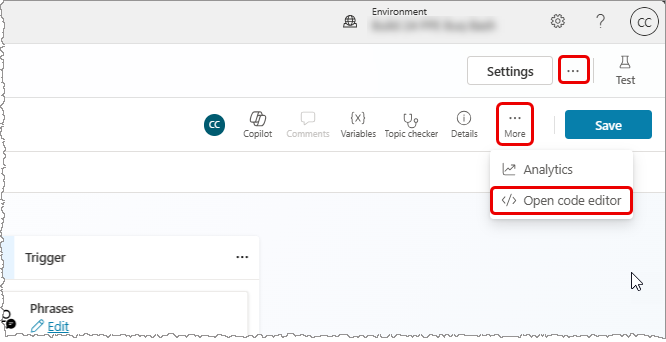
In the upper-right corner of the authoring canvas, select More, then select Open code editor.
Select and delete the contents of the code editor. Then copy and paste the following YAML code:
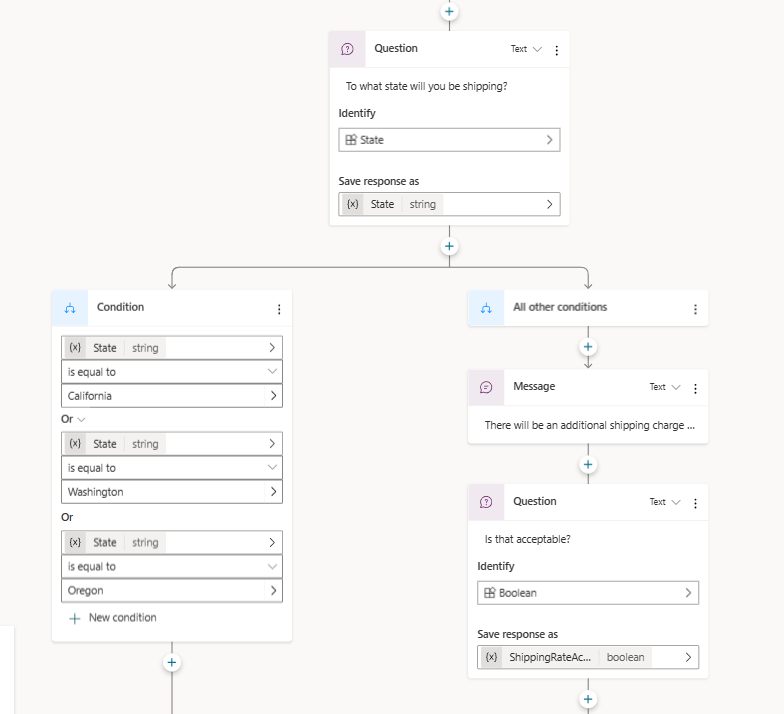
kind: AdaptiveDialog
beginDialog:
  kind: OnRecognizedIntent
  id: main
  intent:
    displayName: Lesson 3 - A topic with a condition, variables and a prebuilt entity
    triggerQueries:
      - Buy items
      - Buy online
      - Buy product
      - Purchase item
      - Order product

  actions:
    - kind: SendMessage
      id: Sjghab
      message: I am happy to help you place your order.

    - kind: Question
      id: eRH3BJ
      alwaysPrompt: false
      variable: init:Topic.State
      prompt: To what state will you be shipping?
      entity: StatePrebuiltEntity

    - kind: ConditionGroup
      id: sEzulE
      conditions:
        - id: pbR5LO
          condition: =Topic.State = "California" || Topic.State = "Washington" || Topic.State     = "Oregon"

      elseActions:
        - kind: SendMessage
          id: X7BFUC
          message: There will be an additional shipping charge of $27.50.

        - kind: Question
          id: 6lyBi8
          alwaysPrompt: false
          variable: init:Topic.ShippingRateAccepted
          prompt: Is that acceptable?
          entity: BooleanPrebuiltEntity

        - kind: ConditionGroup
          id: 9BR57P
          conditions:
            - id: BW47C4
              condition: =Topic.ShippingRateAccepted = true

          elseActions:
            - kind: SendMessage
              id: LMwySU
              message: Thank you and please come again.
Select Save, then select Close code editor. Notice the conditional logic that follows some of the Question nodes.


Test and publish
Test your agent when you make changes to your topics, to make sure everything works as expected.
Once you're satisfied, publish your agent to the desired channels.