Note
Access to this page requires authorization. You can try signing in or changing directories.
Access to this page requires authorization. You can try changing directories.
Summary: To apply Zero Trust principles to Azure virtual machines, you must configure logical isolation with dedicated resource groups, leverage Role Based Access Control (RBAC), secure virtual machine boot components, enable customer-managed keys and double encryption, control installed applications, configure secure access and maintenance of virtual machines, and enable advanced threat detection and protection.
This article provides steps to apply the principles of Zero Trust to virtual machines in Azure:
| Zero Trust principle | Definition | Met by |
|---|---|---|
| Verify explicitly | Always authenticate and authorize based on all available data points. | Use secure access. |
| Use least privileged access | Limit user access with Just-In-Time and Just-Enough-Access (JIT/JEA), risk-based adaptive policies, and data protection. | Leverage Role Based Access Control (RBAC) and control the applications running on virtual machines. |
| Assume breach | Minimize blast radius and segment access. Verify end-to-end encryption and use analytics to get visibility, drive threat detection, and improve defenses. | Isolate virtual machines with resource groups, secure their components, use double encryption, and enable advanced threat detection and protection. |
This article is part of a series of articles that demonstrate how to apply the principles of Zero Trust across an environment in Azure that includes a spoke virtual network (VNet) hosting a virtual machine-based workload. For an overview, see Apply Zero Trust principles to Azure infrastructure.
Logical architecture for virtual machines
Zero Trust principles for virtual machines are applied across the logical architecture, from the tenant and directory level down to the data and application layer within each virtual machine.
The following diagram shows the logical architecture components.

In this diagram:
- A is a set of virtual machines isolated within a dedicated resource group that resides within an Azure subscription.
- B is the logical architecture for a single virtual machine with the following components called out: applications, operating system, disks, boot loaders, OS Kernel, drivers, and the Trusted Platform Module (TPM) component.
This article walks through the steps to apply the principles of Zero Trust across this logical architecture, using these steps.

| Step | Task | Zero Trust principles applied |
|---|---|---|
| 1 | Configure logical isolation by deploying virtual machines to a dedicated resource group. | Assume breach |
| 2 | Leverage Role Based Access Control (RBAC). | Verify explicitly Use least privileged access |
| 3 | Secure virtual machine boot components including boot loaders, OS kernels, and drivers. Securely protect keys, certificates, and secrets in the Trusted Platform Module (TPM). | Assume breach |
| 4 | Enable customer-managed keys and double encryption. | Assume breach |
| 5 | Control the applications that are installed on virtual machines. | Use least privileged access |
| 6 | Configure secure access (not shown on the logical architecture figure). | Verify explicitly Use least privileged access Assume breach |
| 7 | Set up secure maintenance of virtual machines (not shown on the logical architecture figure). | Assume breach |
| 8 | Enable advanced threat detection and protection (not shown on the logical architecture figure). | Assume breach |
Step 1: Configure logical isolation for virtual machines
Begin by isolating virtual machines within a dedicated resource group. You can isolate virtual machines into different resource groups based on purpose, data classification, and governance requirements, such as the need to control permissions and monitoring.
Using dedicated resource groups allows you to set policies and permissions that apply to all the virtual machines within the resource group. You can then use role based access control (RBAC) to create least privileged access to the Azure resources contained in the resource group.
For more information on creating and managing resource groups, see Manage Azure resource groups by using the Azure portal.
You assign a virtual machine to a resource group when you first create the virtual machine, as shown here.

Step 2: Leverage Role Based Access Control (RBAC)
Zero Trust requires configuring least privileged access. To do so, you need to limit user access with just-in-time and just-enough access (JIT/JEA) based on their role, workload, and data classification.
The following built-in roles are commonly used for virtual machine access:
- Virtual Machine User Login: View virtual machines in the portal and sign-in as a regular user.
- Virtual Machine Administration Login: View virtual machines in the portal and sign-in to virtual machines as an Administrator.
- Virtual Machine Contributor: Create and manage virtual machines, including reset root user's password and managed disks. Doesn't grant access to the management virtual network (VNet) or the ability to assign permissions to the resources.
To join a virtual machine to a VNet, you can use the custom permission Microsoft.Network/virtualNetworks/subnets/join/action to make a custom role.
When this custom role is used with Managed Identity and Conditional Access Policy, you can use device state, data classification, anomalies, location, and identity to force multifactor authentication and granularly allow access based on verified trust.
To extend your realm of control beyond the system and allow your Microsoft Entra ID tenant with Microsoft Intelligent Security Graph to support secure access, go to the Management blade of the virtual machine and turn on System Assigned Managed Identity, as shown here.

Note
This feature is only available for Azure Virtual Desktop, Windows Server 2019, Windows 10, and Linux Distros using certificate-based access.
Step 3: Secure virtual machine boot components
Follow these steps:
- When you create the virtual machine, be sure you configure security for the boot components. Enhanced deployment of virtual machines allows you to select security type and use Secure boot and vTPM.
- Securely deploy virtual machines with verified boot loaders, OS kernels, and drivers that are signed by trusted publishers to establish a "root ." If the image isn't signed by a trusted publisher, the virtual machine won't boot.
- Securely protect keys, certificates, and secrets in the virtual machines in a Trusted Platform Module.
- Gain insights and confidence of the entire boot chain's integrity.
- Ensure workloads are trusted and verifiable. The vTPM enables attestation by measuring the entire boot chain of your virtual machine (UEFI, OS, system, and drivers).
Enhanced deployment of virtual machines allows you to select security type and use secure boot and vTPM when you create them, as shown here.

Step 4: Enable customer-managed keys and double encryption
Using customer-managed keys and double encryption ensures that if a disk is exported, it isn't readable or able to function. By ensuring that the keys are privately held and disks are double encrypted, you protect against breaches that attempt to extract disk information.
For information on how to configure a customer-managed encryption key with Azure Key Vault, see Use the Azure portal to enable server-side encryption with customer-managed keys for managed disks. There's an additional cost for using Azure Key Vault.
Enable server-side encryption of Azure Disk Storage for:
- FIPS 140-2 compliant transparent encryption with AES 256 encryption.
- Greater flexibility to manage controls.
- Hardware (HSM) or software-defined encryption.
Enable server-side encryption at the host for end-to-end encryption of your virtual machine data.
After completing these procedures, you use your customer-managed encryption key to encrypt the disks within your virtual machine.
You select the encryption type on the Disks blade for the virtual machine configuration. For Encryption type, select Double encryption with platform-managed and customer-managed keys, as shown here.

Step 5: Control the applications installed on virtual machines
It's important to control the applications that are installed on your virtual machines:
- Browser extensions (APIs) are difficult to secure which can lead to malicious URL delivery.
- Unsanctioned apps can go unpatched as they're shadow IT objects (the IT teams aren't prepared or have no knowledge that these are installed).
You can use the Virtual Machine Applications feature to control the applications that are installed on virtual machines. With this feature, you select which virtual machine applications to install. This feature uses the Azure Compute Gallery to simplify management of applications for virtual machines. When used together with RBAC, you can ensure that only trusted applications are available for users.
You select the virtual machine applications on the Advanced blade for the virtual machine configuration, as show here.

Step 6: Configure secure access
To configure secure access:
- Configure secure communication within the Azure environment between components that are accessing virtual machines directly
- Set up multifactor authentication with conditional access
- Use privileged access workstations (PAWs)

In the diagram:
- multifactor authentication with conditional access is set up within Microsoft Entra ID and related portals.
- Admins use privileged access workstations (PAWs) to access virtual machines directly.
Configure secure communication within the Azure environment for virtual machines
First, be sure that communication between the components in the Azure environment is secure.
In the reference architecture, Azure Bastion provides secure connections to virtual machines. Azure Bastion acts as an RDP/SSH broker and doesn't interact with the RDP protocol of your physical system. This also enables you to reduce the number of public-facing IP addresses.
The following diagram shows the components of secure communications for virtual machines.

Set up multifactor authentication with conditional access
In Step 2. Leverage Role Based Access Control, you configured Microsoft Entra integration and managed identity. This allows you to set up Azure multifactor authentication for Azure Virtual Desktop or for servers running Windows Server 2019 or newer. You can also Log in to a Linux VM with Microsoft Entra credentials. The added benefit of this is the machine that connects to the virtual machine must also be registered to your Microsoft Entra ID tenant to be allowed to connect.
When configuring multifactor authentication with conditional access and related policies, use the recommended policy set for Zero Trust as a guide. This includes Starting point policies that don't require managing devices. Ideally, the devices accessing your virtual machines are managed and you can implement the Enterprise policies, which is recommended for Zero Trust. For more information, see Common Zero Trust identity and device access policies.
The following diagram shows the recommended policies for Zero Trust.

Remember that usernames and passwords can be 100% compromised. Using multifactor authentication, you reduce your risk of compromise by 99.9%. This requires Microsoft Entra ID P1 licenses.
Note
You can use VPNs used to connect to virtual machines in Azure as well. However, you should be sure to use methods to verify explicitly. Creating a tunnel that is "trusted" regardless of how they are used can be riskier than having specific connections that are highly verified.
No amount of security at the Network, Transport, or Application layers matters if you aren't coming from a trusted, verified, and secure source.
Use PAWs
Use Privileged Access Workstations (PAWs) to ensure devices that access virtual machines are healthy. PAWs are configured specifically for privileged access so that admins use a device that has:
- Security controls and policies that restrict local administrative access.
- Productivity tools to minimize the attack surface to only what's absolutely required for performing sensitive administrative tasks.
For more information on deployment options, see Privileged access deployment.
Step 7: Set up secure maintenance of virtual machines
Secure maintenance of virtual machines includes:
- Using anti-malware
- Automating virtual machine updates
Use anti-malware on virtual machines
Anti-malware helps protect your virtual machine from threats such as malicious files and adware, etc. You can use anti-malware software from an option of vendors such as Microsoft, Symantec, Trend Micro, and Kaspersky.
Microsoft Antimalware is a no-cost resource that provides real-time protection capability to assist in detection, quarantining and eradicating malicious software, spyware, and viruses:
- Runs in the background with the need of user interaction
- Provides alerts when unwanted or malicious software is downloaded, installed, or run
- Offers secure-by-default configuration and anti-malware monitoring
- Scheduled scanning
- Signature updates
- Antimalware Engine and Platform updates
- Active Protection
- Samples reporting
- Exclusions
- Antimalware event collection
Automate virtual machine updates
Automating updates to systems ensures they are protected from the latest malware and misconfiguration exploits. There's automatic updating with aid in the trusted platform verification process.
Concentrate on Azure Virtual Machine Maintenance and Updates to ensure your systems are hardened against configuration insecurities:
- Azure Automation Update Management can assist in the management of your update process. With this utility, you can check the update status of your systems, manage, schedule, and reboot servers.
- The Azure Virtual Machine Agent is used to manage your virtual machines and gives you the ability to use extensions for management.
Operating systems supported by Update Management include the following:
- Each Windows virtual machine - Update Management does a scan twice a day for each machine.
- Each Linux virtual machine - Update Management does a scan every hour.
See this additional guidance:
- Plan deployment for updating Windows VMs in Azure
- Use Azure Private Link to securely connect networks to Azure Automation Ensures virtual machines connect in an isolated controlled fashion and not over the internet for updates.
Step 8: Enable advanced threat detection and protection
Threat protection for Azure infrastructure is provided by Microsoft Defender for Cloud. This protection is extended to virtual machines when you provision Microsoft Defender for Servers, as shown in the following diagram.

In the diagram:
- As described in the Apply Zero Trust principles to Azure IaaS overview article, Defender for Cloud is enabled at the level of an Azure subscription or at the level of an Azure management group that includes multiple Azure subscriptions.
- In addition to enabling Defender for Cloud, Defender for Servers is provisioned.
Advanced threat protection verifies the activities occurring on virtual machines based on Microsoft's threat intelligence. It looks for specific configurations and activities that suggest that there could be a breach. It enables the Verify explicitly and Assume breach Zero Trust principles.
Microsoft Defender for Servers includes the following:
- Access to the Microsoft Defender for Endpoint data that is related to vulnerabilities, installed software, and alerts for your endpoints for endpoint detection and response (EDR).
- Defender for Cloud's integrated vulnerability assessment scanner for servers.
- Discover vulnerabilities and misconfigurations in real time with Microsoft Defender for Endpoint, and without the need of other agents or periodic scans.
- Defender for Cloud's integrated Qualys scanner for Azure and hybrid machines allows you to use a leading tool in real-time vulnerability identification without the need of a Qualys license.
- Implement Just-in-time virtual machine access in Defender for Cloud. This creates an explicit deny rule for RDP/SSH and gives you JIT access at the server level when you need it and allows you to limit the period of access.
- File integrity monitoring in Defender for Cloud provides you to change monitoring of files and registries of the operations system, application software, and other changes that allow you to validate the integrity of your file systems.
- Adaptive application controls in Defender for Cloud provides an automated solution for creating and defining allow list for known safe applications and generates security alerts if a new application runs other than those you define as safe for use.
- Adaptive network hardening in Defender for Cloud uses machine learning algorithms that calculate your current traffic, threat intelligence, indicators of compromise, and known trusted configurations to provide recommendations for hardening your Network Security Groups.
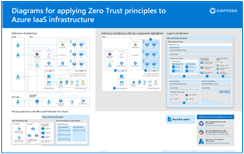
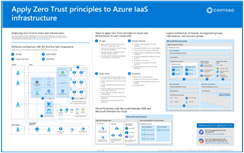
Technical illustrations
These illustrations are replicas of the reference illustrations in these articles. Download and customize these for your own organization and customers. Replace the Contoso logo with your own.
| Item | Description |
|---|---|
 Download Visio
 Updated October 2024 |
Apply Zero Trust principles to Azure IaaS Use these illustrations with these articles: - Overview - Azure storage - Virtual machines - Azure spoke virtual networks - Azure hub virtual networks |
 Download Visio
 Updated October 2024 |
Apply Zero Trust principles to Azure IaaS — One page poster A one-page overview of the process for applying the principles of Zero Trust to Azure IaaS environments. |
For additional technical illustrations, see Zero Trust illustrations for IT architects and implementers.
Recommended training
Secure your Azure virtual machine disks
| Training | Secure your Azure virtual machine disks |
|---|---|

|
Learn how to use Azure Disk Encryption (ADE) to encrypt OS and data disks on existing and new virtual machines. In this module, you learn how to: |
For more training on Azure, see the entire Microsoft catalog:
Browse all - Training | Microsoft Learn
Implement virtual machine host security in Azure
| Training | Implement virtual machine host security in Azure |
|---|---|

|
In this learning path, learn how to protect and harden your virtual machines in Azure. |
For more training on virtual machines in Azure, see these resources in the Microsoft catalog:
Virtual machines in Azure | Microsoft Learn
Next Steps
See these additional articles for applying Zero Trust principles to Azure:
- Azure IaaS overview
- Azure Virtual Desktop
- Azure Virtual WAN
- IaaS applications in Amazon Web Services
- Microsoft Sentinel and Microsoft Defender XDR
References
- Manage Azure resource groups with the Azure portal
- Secure boot
- Overview of vTPM
- Attestation
- Enable server-side encryption of Azure Disk Storage
- AES 256 encryption
- Azure Bastion
- Azure multifactor authentication for Azure Virtual Desktop
- Windows Servers 2019 or newer
- Log in to a Linux VM with Microsoft Entra credentials
- Common Zero Trust identity and device access policies
- Privileged Access Workstations (PAW)
- Privileged access deployment
- Microsoft Anti-malware
- Virtual Machine Agent
- Plan deployment for updating Windows VMs in Azure - Azure Example Scenarios
- Use Azure Private Link to securely connect networks to Azure Automation
- Microsoft Defender for Servers
- Microsoft Defender for Endpoint
- Defender for Cloud's integrated vulnerability assessment