Tests de disponibilité d’Application Insights
Après avoir déployé votre application web ou votre site web, vous pouvez configurer des tests périodiques pour surveiller la disponibilité et la réactivité. Application Insights envoie des requêtes web à votre application à intervalles réguliers à partir de différents points du monde, Il peut vous alerter si votre application ne répond pas ou si elle répond trop lentement. Vous pouvez créer jusqu’à 100 tests de disponibilité par ressource Application Insights.
Les tests de disponibilité ne nécessitent aucune modification du site web que vous testez et utilisez pour n’importe quel point de terminaison HTTP ou HTTPS accessible à partir de l’Internet public. Vous pouvez également tester la disponibilité d’une API REST dont dépend votre service.
Remarque
Les tests de disponibilité sont stockés sous forme chiffrée, conformément aux stratégies de chiffrement des données Azure au repos.
Types de tests de disponibilité
Il existe deux types de tests de disponibilité :
Test Standard : C’est un type de test de disponibilité qui vérifie la disponibilité d’un site web en envoyant une seule demande, similaire au test ping de l’URL déconseillé. Outre la vérification du fait qu’un point de terminaison répond et la mesure des performances, les tests standard portent également sur la validité du certificat TLS/SSL, la vérification proactive de la durée de vie, le verbe de requête HTTP (par exemple
GET,HEADetPOST), les en-têtes personnalisés et les données personnalisées associées à votre requête HTTP.Test personnalisé de suivi de la disponibilité : si vous décidez de créer une application personnalisée pour exécuter des tests de disponibilité, vous pouvez utiliser la méthode TrackAvailability()pour envoyer les résultats à Application Insights.
(Déconseillé) Test Web à plusieurs étapes : Vous pouvez relire cet enregistrement d’une séquence de requêtes Web pour tester des scénarios plus complexes. Les tests Web à plusieurs étapes sont créés dans Visual Studio Enterprise et chargés sur le portail pour y être exécutés.
(Déconseillé) Test de ping d’URL à plusieurs étapes : Vous pouvez créer ce test via le Portail Azure pour vérifier si un point de terminaison répond et mesurer le niveau de performance associé à cette réponse. Vous pouvez également définir des critères de réussite personnalisés à l’aide de fonctionnalités plus avancées, comme analyser des requêtes dépendantes et autoriser de nouvelles tentatives.
Important
Il existe deux mises hors service de tests de disponibilité à venir :
Tests web à plusieurs étapes : Le 31 août 2024, les tests web multi-étapes dans Application Insights seront mis hors service. Nous conseillons aux utilisateurs de ces tests de passer à d’autres tests de disponibilité avant la date de mise hors service. Après cette date, nous retirerons l’infrastructure sous-jacente, ce qui arrêtera les tests multi-étapes restants.
Tests ping d’URL : Le 30 septembre 2026, les tests ping d’URL dans Application Insights seront mis hors service. Les tests ping d’URL existants seront supprimés de vos ressources. Passez en revue la tarification pour les tests standard et la transition pour les utiliser avant le 30 septembre 2026 pour vous assurer que vous pouvez continuer à exécuter des tests de disponibilité en une seule étape dans vos ressources Application Insights.
Création d'un test de disponibilité
Conseil
Si vous utilisez actuellement d’autres tests de disponibilité, comme des tests ping d’URL, vous pouvez y ajouter des tests standard. Si vous voulez utiliser un test standard à la place d’un de vos autres tests, ajoutez-le et supprimez votre ancien test.
Prérequis
Bien démarrer
Accédez à votre ressource Application Insights et sélectionnez le volet Disponibilité.
Sélectionnez Ajouter un test Standard.
Entrez le nom et l’URL de votre test, et d’autres paramètres décrits dans le tableau suivant. Sélectionnez ensuite Create (Créer).
Setting Description URL L’URL peut être n’importe quelle page web que vous voulez tester, mais elle doit être visible depuis l’Internet public. L’URL peut contenir une chaîne de requête. Vous pouvez donc, par exemple, tester un peu votre base de données. Si l’URL correspond à une redirection, nous allons la suivre, jusqu’à 10 redirections. Analyser les demandes dépendantes Le test demande des images, des scripts, des fichiers de style et d’autres fichiers qui font partie de la page web testée. Le temps de réponse enregistré inclut le temps qui a été nécessaire pour obtenir ces fichiers. Le test échoue si l’une de ces ressources ne peut pas être téléchargée dans le délai imparti pour l’ensemble du test. Si l’option n’est pas sélectionnée, le test demande uniquement le fichier à l’URL spécifiée. L’activation de cette option donne lieu à une vérification plus stricte. Le test peut échouer pour certains cas difficiles à détecter en parcourant le site manuellement. Veuillez noter que nous analysons un maximum de 15 requêtes dépendantes. Autoriser les nouvelles tentatives Lorsque le test échoue, une nouvelle tentative est effectuée peu après. L’échec est signalé uniquement après trois tentatives infructueuses. Les tests suivants sont ensuite effectués selon la fréquence de test habituelle. La nouvelle tentative est temporairement suspendue jusqu’à la réussite de la tentative suivante. Cette règle est appliquée indépendamment à chaque emplacement de test. Nous recommandons cette option. En moyenne, environ 80 % des échecs disparaissent lors de la nouvelle tentative. Test de validation du certificat SSL Vous pouvez vérifier le certificat SSL de votre site web pour vous assurer qu'il est correctement installé, valide, fiable, et qu'il ne provoque aucune erreur chez vos utilisateurs. Vérification proactive de la durée de vie Ce paramètre vous permet de définir une durée au terme de laquelle votre certificat SSL expirera. Une fois qu’il a expiré, votre test échoue. Fréquence de test définit la fréquence selon laquelle le test est exécuté à partir de chaque emplacement de test. Avec, par défaut, une fréquence de cinq minutes et cinq emplacements de test, votre site sera testé en moyenne une fois par minute. Emplacements du test Nos serveurs envoient des requêtes web à votre URL à partir de ces emplacements. Nous recommandons d'utiliser au moins cinq emplacements de test pour pouvoir faire la distinction entre les problèmes propres à votre site web et les problèmes de réseau. Vous pouvez sélectionner jusqu’à 16 emplacements. En-têtes personnalisés Paires clé-valeur qui définissent les paramètres de fonctionnement. Verbe de requête HTTP Indiquez l’action à effectuer pour votre requête. Corps de la demande Données personnalisées associées à votre requête HTTP. Vous pouvez charger vos propres fichiers, entrer votre contenu ou désactiver cette fonctionnalité.
Critères de réussite
| Paramètre | Description |
|---|---|
| Délai d’expiration du test | diminuez cette valeur pour être averti des réponses lentes. Le test est compté comme une erreur si des réponses de votre site n’ont pas été reçues pendant cette période. Si vous avez sélectionné Analyser les demandes dépendantes, l’ensemble des images, fichiers de style, scripts et autres ressources dépendantes ont dû être reçus pendant cette période. |
| Réponse HTTP | Le code d’état retourné est comptabilisé comme un succès. Le nombre 200 est le code qui indique qu’une page web normale a été retournée. |
| Correspondance du contenu | Chaîne telle que « Bienvenue ! ». Nous vérifions qu’une correspondance exacte respectant la casse est présente dans chaque réponse. Il doit s'agir d'une chaîne standard sans caractère générique. N’oubliez pas que si votre contenu change, vous devrez peut-être l’actualiser. La correspondance de contenu est prise en charge uniquement pour les caractères anglais. |
Alertes de disponibilité
| Setting | Description |
|---|---|
| Quasi temps réel | Nous vous conseillons d’utiliser les alertes en quasi-temps réel. La configuration de ce type d’alerte s’effectue après avoir créé votre test de disponibilité. |
| Seuil d’emplacement de l’alerte | nous recommandons un minimum de 3 à 5 emplacements. La relation optimale entre le seuil d’emplacement de l’alerte et le nombre d’emplacements de test est seuil d’emplacement de l’alerte = nombre d’emplacements de test - 2, avec un minimum de cinq emplacements de test. |
Étiquettes de remplissage d’emplacement
Vous pouvez utiliser les étiquettes de remplissage suivantes pour l’attribut de géolocalisation quand vous déployez un test ping d’URL de disponibilité en utilisant Azure Resource Manager.
Azure
| Nom d’affichage | Nom du remplissage |
|---|---|
| Australie Est | emea-au-syd-edge |
| Brésil Sud | latam-br-gru-edge |
| USA Centre | us-fl-mia-edge |
| Asie Est | apac-hk-hkn-azr |
| USA Est | us-va-ash-azr |
| France Sud (anciennement France Centre) | emea-ch-zrh-edge |
| France Centre | emea-fr-pra-edge |
| Japon Est | apac-jp-kaw-edge |
| Europe Nord | emea-gb-db3-azr |
| Centre-Nord des États-Unis | us-il-ch1-azr |
| États-Unis - partie centrale méridionale | us-tx-sn1-azr |
| Asie Sud-Est | apac-sg-sin-azr |
| Ouest du Royaume-Uni | emea-se-sto-edge |
| Europe Ouest | emea-nl-ams-azr |
| USA Ouest | us-ca-sjc-azr |
| Sud du Royaume-Uni | emea-ru-msa-edge |
Azure Government
| Nom d’affichage | Nom du remplissage |
|---|---|
| USGov Virginia | usgov-va-azr |
| Gouvernement des États-Unis - Arizona | usgov-phx-azr |
| Gouvernement des États-Unis - Texas | usgov-tx-azr |
| USDoD Est | usgov-ddeast-azr |
| US DoD - Centre | usgov-ddcentral-azr |
Microsoft Azure géré par 21Vianet
| Nom d’affichage | Nom du remplissage |
|---|---|
| Chine orientale | mc-cne-azr |
| Chine orientale 2 | mc-cne2-azr |
| Chine du Nord | mc-cnn-azr |
| Chine Nord 2 | mc-cnn2-azr |
Activer les alertes
Les alertes sont désormais activées automatiquement par défaut, mais afin de configurer complètement une alerte, vous devez tout d’abord créer initialement votre test de disponibilité.
Remarque
Avec les nouvelles alertes unifiées, le niveau de gravité et les préférences de notification des règles d’alerte des groupes d’actionsdoivent être configurés dans l’expérience d’alertes. Sans les étapes suivantes, vous recevrez les notifications dans le portail uniquement.
Une fois le test de disponibilité enregistré, sous l’onglet Détails, cliquez sur les points de suspension à côté du test que vous venez d’effectuer. Sélectionnez la page Ouvrir les règles (alertes).
Définissez le niveau de gravité, la description des règles et le groupe d’actions disposant des préférences de notification que vous souhaitez utiliser pour cette règle d’alerte.
Critères d’alerte
Les alertes de disponibilité activées déclenchent automatiquement un e-mail quand le point de terminaison que vous avez défini n’est pas disponible et quand il est à nouveau disponible. Les alertes de disponibilité créées à l’aide de cette expérience sont basées sur l’état. Lorsque les critères d’alerte sont remplis, une seule alerte est générée quand le site web est détecté comme n’étant pas disponible. Si le site web est toujours indisponible la prochaine fois que le critère d’alerte est évalué, aucune nouvelle alerte ne sera générée.
Par exemple, supposons que votre site web soit en panne pendant une heure et que vous avez configuré une alerte par e-mail avec une fréquence d’évaluation de 15 minutes. Vous recevez uniquement un e-mail lorsque le site web tombe en panne et un autre e-mail après son redémarrage. Vous ne recevez pas d’alertes continues toutes les 15 minutes pour vous rappeler que le site web est toujours indisponible.
Vous ne souhaitez peut-être pas recevoir de notifications lorsque votre site web est en panne pour une courte période de temps, par exemple pendant la maintenance. Vous pouvez modifier la fréquence d’évaluation à une valeur supérieure au temps d’arrêt attendu, jusqu’à 15 minutes. Vous pouvez également augmenter le seuil d’emplacement de l’alerte, de sorte qu’il déclenche uniquement une alerte si le site web est en panne pour un nombre spécifique de régions. Pour des temps d’arrêt planifiés plus longs, désactivez temporairement la règle d’alerte ou de créer une règle personnalisée. Vous disposez ainsi de plus d’options pour le temps d’arrêt.
Modifier les critères d’alerte
Pour apporter des modifications au seuil d’emplacement, à la période d’agrégation et à la fréquence des tests, sélectionnez la condition dans la page de modification de la règle d’alerte pour ouvrir la fenêtre « Configurer la logique du signal ».
Créer une règle d’alerte personnalisée
Si vous avez besoin de fonctionnalités avancées, vous pouvez créer une règle d’alerte personnalisée sous l’onglet Alertes. Sélectionnez Créer>Règle d’alerte. Sélectionnez Métriques pour Type de signal afin d’afficher tous les signaux disponibles, puis Disponibilité.
Une règle d’alerte personnalisée offre des valeurs plus élevées pour la période d’agrégation (jusqu’à 24 heures au lieu de 6 heures) et la fréquence de test (jusqu’à 1 heure au lieu de 15 minutes). Elle propose également d’autres options pour mieux définir la logique en sélectionnant différents opérateurs, types d’agrégation et valeurs de seuil.
Générer une alerte si X emplacements sur Y signalent des échecs La règle d’alerte X emplacements sur Y est activée par défaut dans l’expérience des nouvelles alertes unifiées quand vous créez un test de disponibilité. Vous pouvez refuser en sélectionnant l’option « classique » ou en choisissant de désactiver la règle d’alerte. Configurez les groupes d’actions pour recevoir des notifications lorsque l’alerte se déclenche en suivant les étapes précédentes. Sans cette étape, vous recevrez les notifications dans le portail uniquement lorsque la règle se déclenche.
Générer une alerte sur des métriques de disponibilité : en utilisant les nouvelles alertes unifiées, vous pouvez également générer une alerte sur les métriques de disponibilité d’agrégats segmentés et de durée des tests :
Sélectionnez une ressource Application Insights dans l’expérience Métriques, puis sélectionnez une mesure de Disponibilité.
L’option Configurer les alertes dans le menu vous redirige vers la nouvelle expérience où vous pouvez sélectionner des tests ou des emplacements spécifiques sur lesquels vous configurez les règles d’alerte. Ici, vous pouvez également configurer les groupes d’actions pour cette règle d’alerte.
Générer une alerte sur des requêtes d’analytique personnalisées : en utilisant les nouvelles alertes unifiées, vous pouvez créer des alertes sur des requêtes de journaux personnalisées. Avec des requêtes personnalisées, vous pouvez créer des alertes sur une condition arbitraire qui peut vous aider à obtenir le signal le plus fiable pour des problèmes de disponibilité. Cela s’applique également si vous envoyez les résultats de disponibilité personnalisés en utilisant le Kit de développement logiciel (SDK) TrackAvailability.
Les mesures sur les données de disponibilité incluent tous les résultats de disponibilité personnalisés que vous pouvez soumettre en appelant le Kit de développement logiciel (SDK) TrackAvailability. Vous pouvez utiliser la prise en charge de la création d’alertes sur les mesures pour créer des alertes sur les résultats de disponibilité personnalisés.
Automatiser les alertes
Pour automatiser ce processus à l’aide de modèles Azure Resource Manager, voir Créer une alerte de métrique avec un modèle Azure Resource Manager.
Consulter les résultats des tests de disponibilité
Cet section explique comment passer en revue les résultats du test de disponibilité sur le portail Azure et comment interroger les données à l’aide de Log Analytics. Les résultats des tests de disponibilité peuvent être visualisés avec des vues Courbe et Nuage de points.
Vérifier la disponibilité
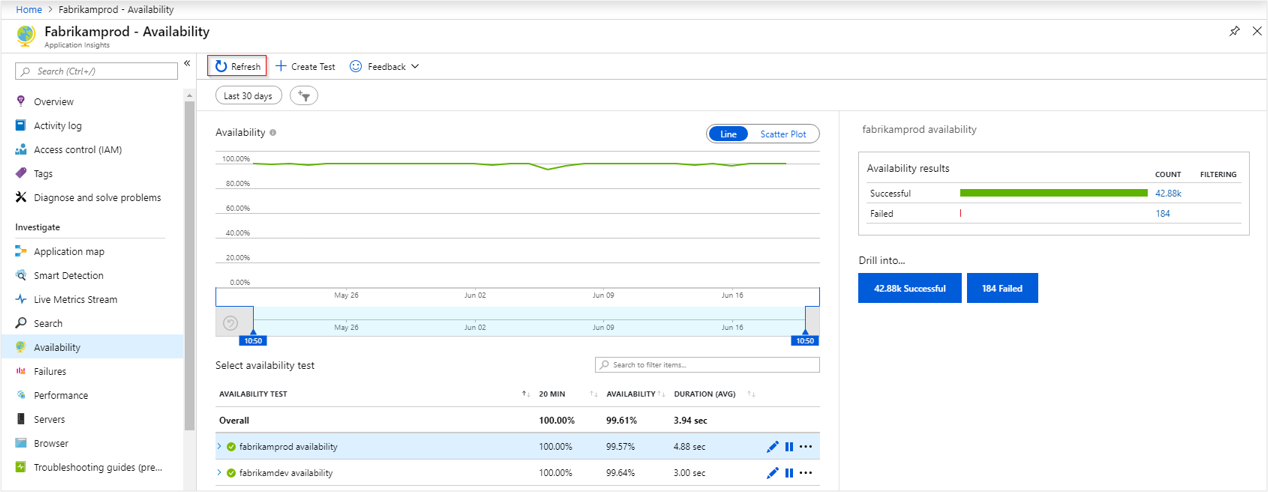
Commencez par consulter le graphique sous l’onglet Disponibilité de votre ressource Application Insights.
La vue Nuage de points montre des exemples de résultats de test contenant des détails de l’étape de test des diagnostics. Le moteur de test stocke les détails de diagnostic pour les tests qui présentent des erreurs. Pour les tests réussis, les détails de diagnostic sont stockés pour un sous-ensemble des exécutions. Pointez sur les points verts/rouges pour voir le test, son nom et son emplacement.
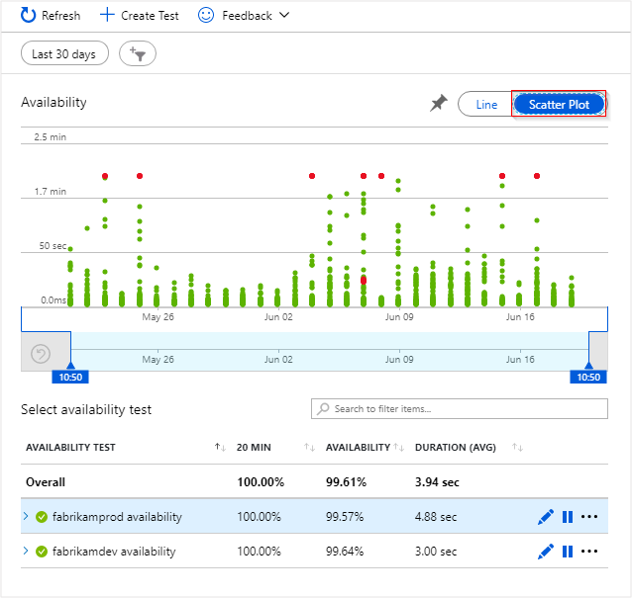
Sélectionnez un test ou un emplacement particulier. Vous pouvez aussi réduire la période de temps pour voir plus de résultats autour de la période qui vous intéresse. Utilisez l’Explorateur de recherche pour voir les résultats de toutes les exécutions. Vous pouvez aussi utiliser des requêtes Log Analytics pour exécuter des rapports personnalisés sur ces données.
Pour voir les détails de la transaction de bout en bout, sous Explorer, sélectionnez Réussite ou Échec. Sélectionner ensuite un exemple. Vous pouvez également accéder aux détails de la transaction de bout en bout en sélectionnant un point de données sur le graphe.

Examiner et modifier des tests
Pour modifier, désactiver temporairement ou supprimer un test, sélectionnez les points de suspension en regard du nom du test. La propagation de changements de configuration vers tous les agents de test peut prendre jusqu’à 20 minutes.

Vous souhaiterez peut-être désactiver les tests de disponibilité ou les règles d’alerte associées lorsque vous effectuez la maintenance de votre service.
Si vous constatez des erreurs
Sélectionnez un point rouge.
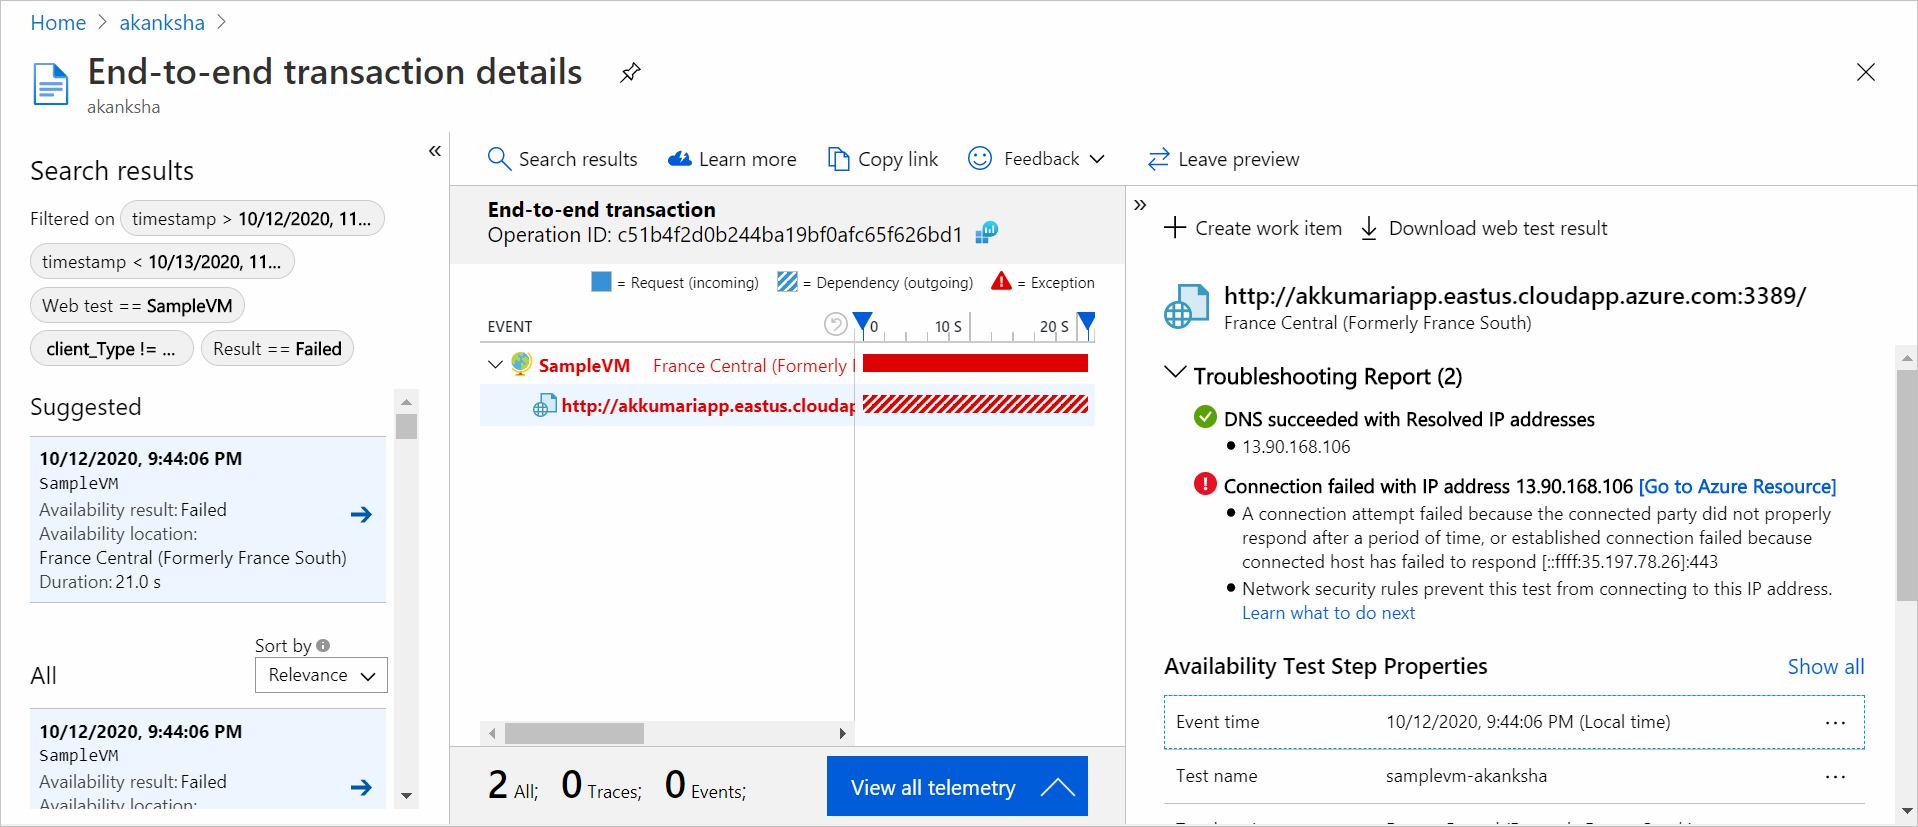
À partir d’un résultat de test de disponibilité, vous pouvez voir les détails de la transaction pour tous les composants. Ici, vous pouvez :
- Passez en revue le rapport de résolution des problèmes pour déterminer ce qui a pu provoquer l’échec de votre test alors que votre application est toujours disponible.
- Vérifier la réponse reçue à partir de votre serveur.
- Diagnostiquer la défaillance à l'aide des données de télémétrie côté serveur corrélées qui ont été collectées pendant le traitement du test de disponibilité en échec.
- Enregistrer un problème ou un élément de travail dans Git ou Azure Boards pour suivre le problème. Le bogue contient un lien vers cet événement.
- Ouvrir le résultat du test web dans Visual Studio.
Pour en savoir plus sur l’expérience des diagnostics des transactions de bout en bout, consultez la documentation relative aux diagnostics des transactions.
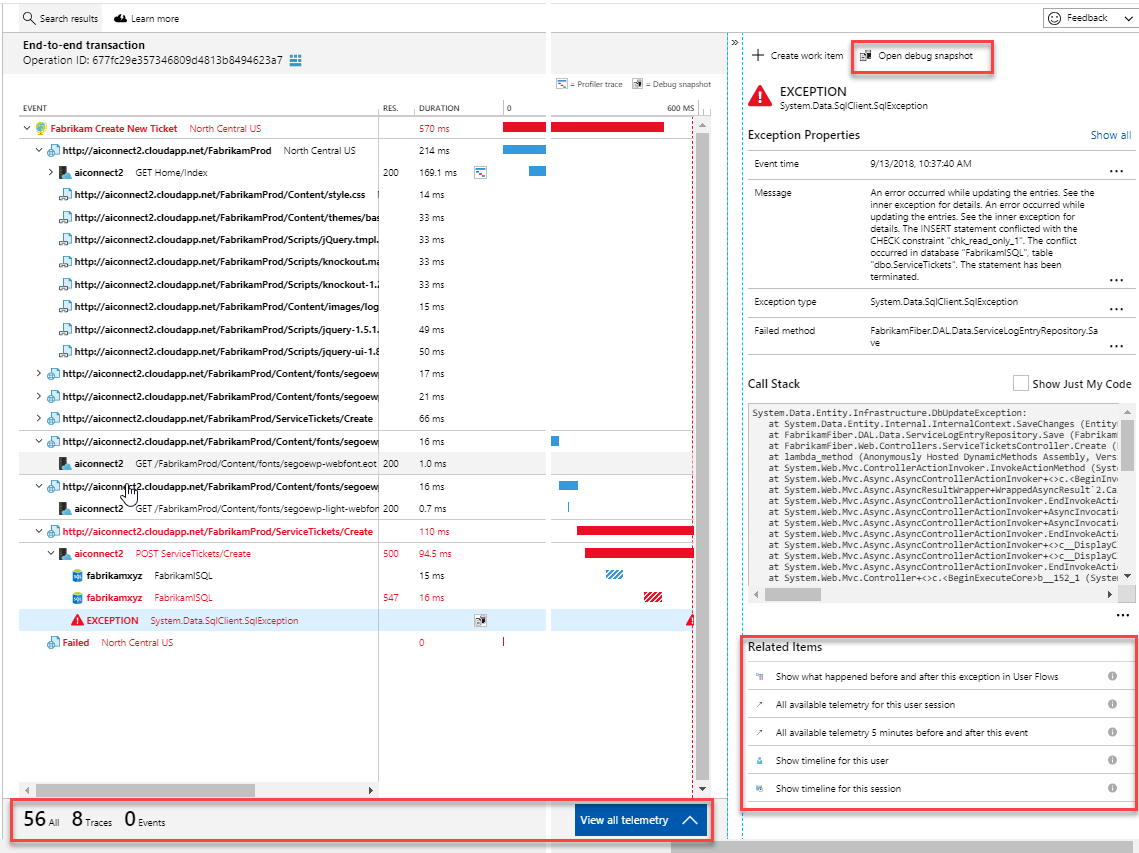
Sélectionnez la ligne d’une exception pour afficher les détails de l’exception côté serveur qui a provoqué l’échec du test de disponibilité synthétique. Vous pouvez également obtenir la capture instantanée de débogage pour des diagnostics de niveau code plus riches.
Outre les résultats bruts, vous pouvez aussi examiner deux métriques de disponibilité essentielles dans Metrics Explorer :
- Disponibilité : pourcentage des tests qui ont réussi, sur toutes les exécutions de test.
- Durée du test : durée moyenne du test sur toutes les exécutions de test.
Requête dans Log Analytics
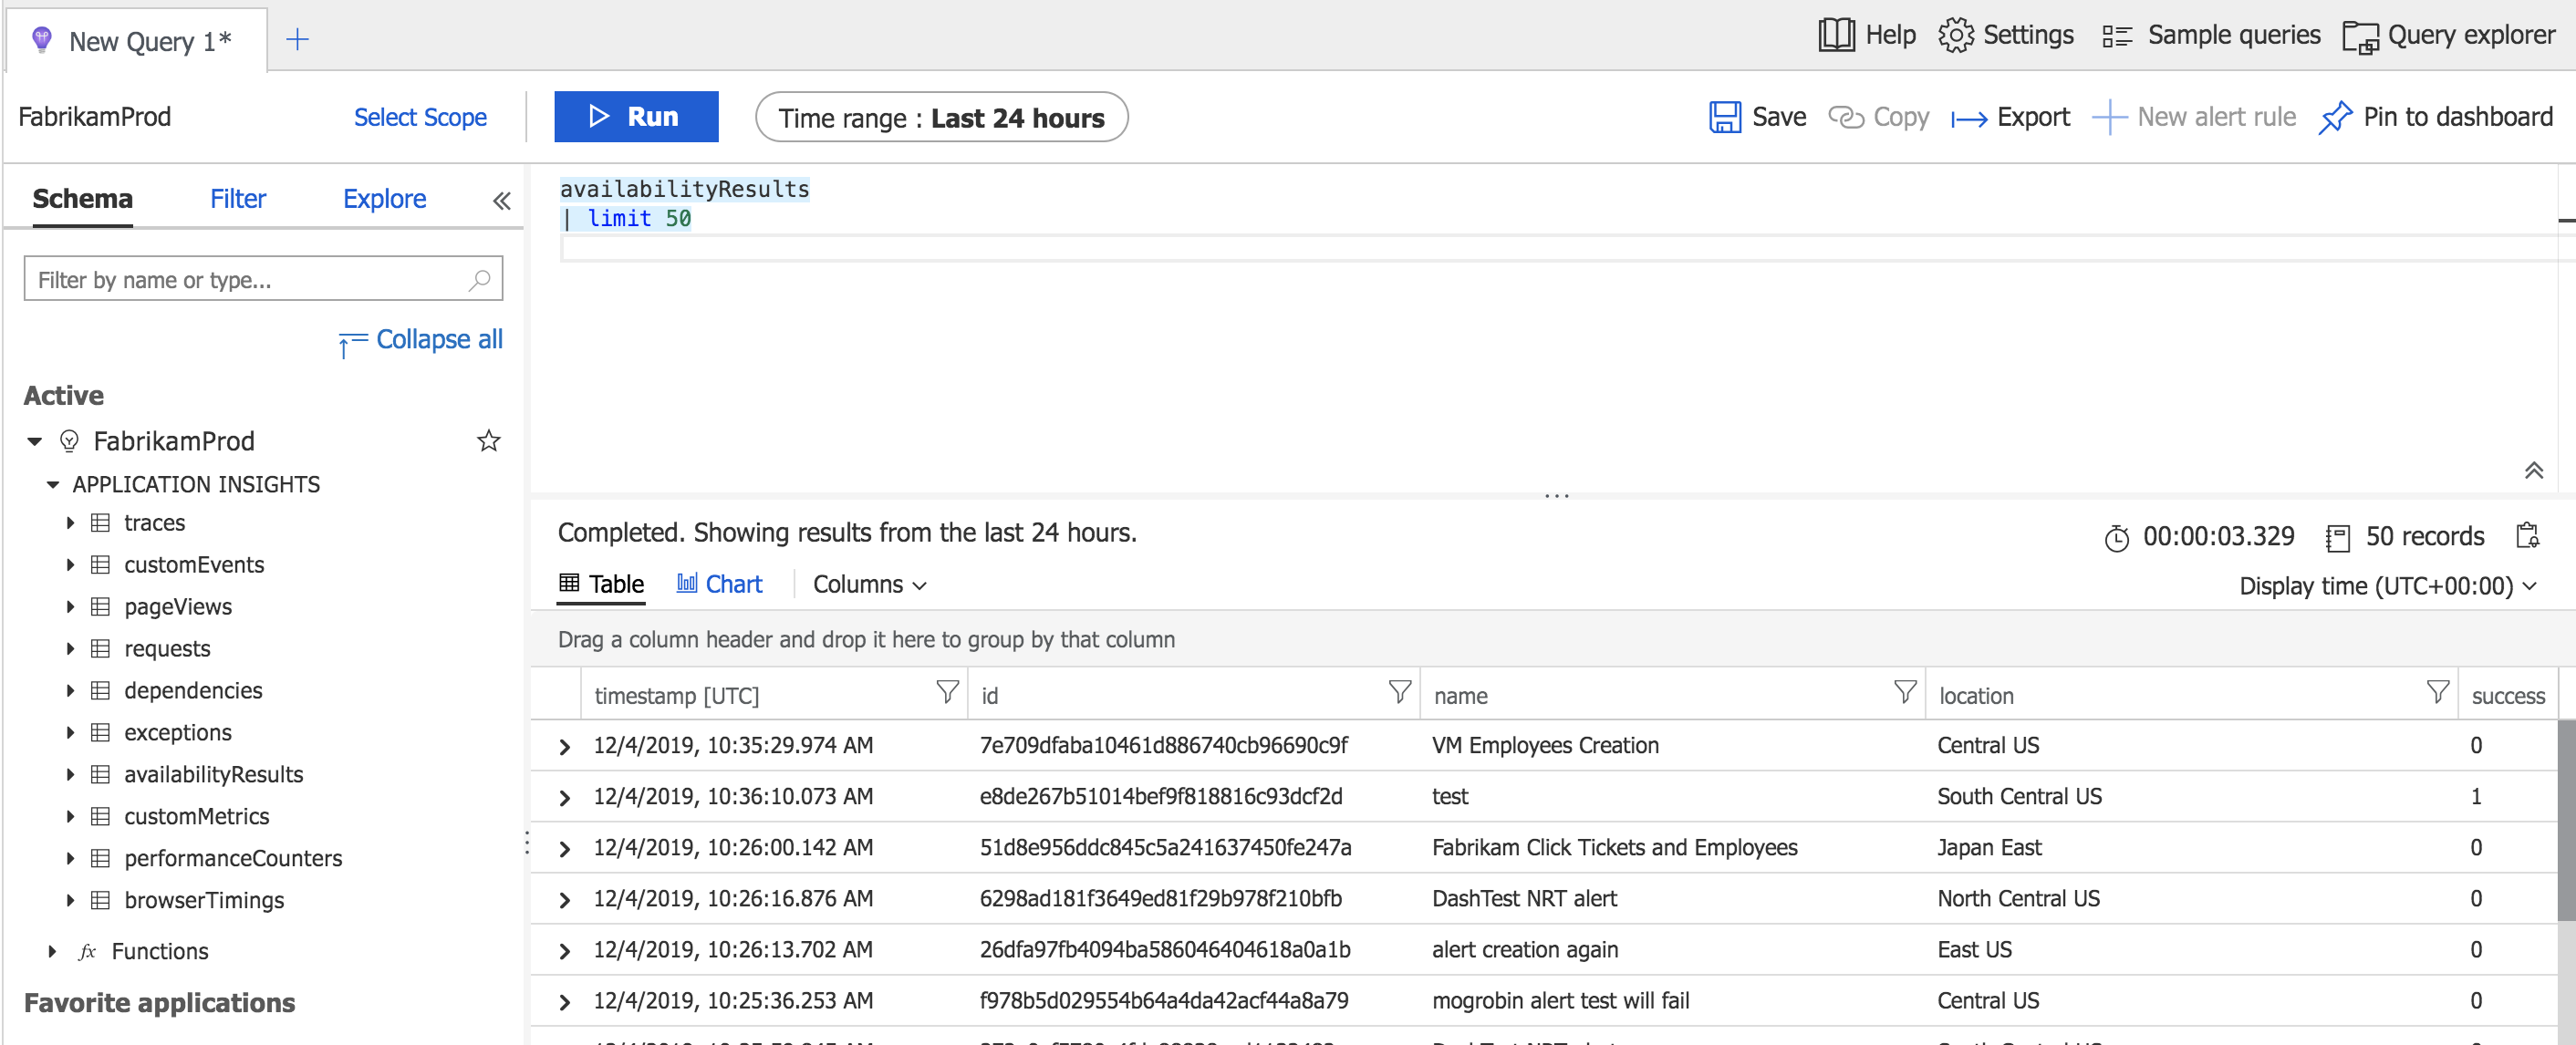
Vous pouvez utiliser Log Analytics pour voir les résultats de la disponibilité, les dépendances, et plus encore. Pour en savoir plus sur Log Analytics, consultez Vue d’ensemble des requêtes de journal.
Migrer des tests de disponibilité
Dans cet article, nous vous guidons tout au long du processus de migration des tests ping d’URL classiques vers les tests standard modernes et efficaces.
Nous simplifions ce processus en fournissant des instructions détaillées et claires pour garantir une transition fluide et équiper vos applications avec les dernières fonctionnalités de supervision.
Migrer des tests ping d’URL classiques vers des tests standard
Les étapes suivantes vous guident tout au long du processus de création de tests standard qui répliquent les fonctionnalités de vos tests ping d’URL. Cela vous permet de commencer plus facilement à utiliser les fonctionnalités avancées des tests standard à l’aide de vos tests ping d’URL existants.
Important
Un coût est associé à l’exécution de tests standard. Une fois que vous avez créé un test standard, vous êtes facturé pour les exécutions de tests. Reportez-vous à la tarification Azure Monitor avant de commencer ce processus.
Prérequis
- Tout test ping d’URL dans Application Insights
- Accès Azure PowerShell
Bien démarrer
Connectez-vous à votre abonnement avec Azure PowerShell (Connect-AzAccount + Set-AzContext).
Répertoriez tous les tests ping d’URL dans l’abonnement en cours :
Get-AzApplicationInsightsWebTest | `
Where-Object { $_.WebTestKind -eq "ping" } | `
Format-Table -Property ResourceGroupName,Name,WebTestKind,Enabled;
Recherchez le test ping d’URL que vous souhaitez migrer et enregistrez son groupe de ressource et son nom.
Les commandes suivantes créent un test standard avec la même logique que le test ping d’URL.
Remarque
Les commandes suivantes fonctionnent à la fois pour les points de terminaison HTTP et HTTPS, utilisés dans vos tests ping d’URL.
$resourceGroup = "pingTestResourceGroup";
$appInsightsComponent = "componentName";
$pingTestName = "pingTestName";
$newStandardTestName = "newStandardTestName";

$componentId = (Get-AzApplicationInsights -ResourceGroupName $resourceGroup -Name $appInsightsComponent).Id;
$pingTest = Get-AzApplicationInsightsWebTest -ResourceGroupName $resourceGroup -Name $pingTestName;
$pingTestRequest = ([xml]$pingTest.ConfigurationWebTest).WebTest.Items.Request;
$pingTestValidationRule = ([xml]$pingTest.ConfigurationWebTest).WebTest.ValidationRules.ValidationRule;

$dynamicParameters = @{};

if ($pingTestRequest.IgnoreHttpStatusCode -eq [bool]::FalseString) {
$dynamicParameters["RuleExpectedHttpStatusCode"] = [convert]::ToInt32($pingTestRequest.ExpectedHttpStatusCode, 10);
}

if ($pingTestValidationRule -and $pingTestValidationRule.DisplayName -eq "Find Text" `
-and $pingTestValidationRule.RuleParameters.RuleParameter[0].Name -eq "FindText" `
-and $pingTestValidationRule.RuleParameters.RuleParameter[0].Value) {
$dynamicParameters["ContentMatch"] = $pingTestValidationRule.RuleParameters.RuleParameter[0].Value;
$dynamicParameters["ContentPassIfTextFound"] = $true;
}

New-AzApplicationInsightsWebTest @dynamicParameters -ResourceGroupName $resourceGroup -Name $newStandardTestName `
-Location $pingTest.Location -Kind 'standard' -Tag @{ "hidden-link:$componentId" = "Resource" } -TestName $newStandardTestName `
-RequestUrl $pingTestRequest.Url -RequestHttpVerb "GET" -GeoLocation $pingTest.PropertiesLocations -Frequency $pingTest.Frequency `
-Timeout $pingTest.Timeout -RetryEnabled:$pingTest.RetryEnabled -Enabled:$pingTest.Enabled `
-RequestParseDependent:($pingTestRequest.ParseDependentRequests -eq [bool]::TrueString);
Le nouveau test standard n’ayant pas de règles d’alerte par défaut, il ne crée pas d’alertes sonores. Aucune modification n’est apportée à votre test ping d’URL afin que vous puissiez continuer à vous y fier pour les alertes.
Une fois que vous avez validé les fonctionnalités du nouveau test standard, mettez à jour vos règles d’alerte qui font référence au test ping d’URL pour qu’elles fassent référence au test standard à la place. Désactivez ou supprimez ensuite le test ping d’URL.
Pour supprimer un test ping d’URL avec Azure PowerShell, utilisez cette commande :
Remove-AzApplicationInsightsWebTest -ResourceGroupName $resourceGroup -Name $pingTestName;
Effectuer des tests derrière un pare-feu
Pour veiller à la disponibilité de points de terminaison derrière des pare-feux, activez des tests de disponibilité publics ou exécutez des tests de disponibilité dans des scénarios d’entrée déconnectés ou non.
Activation du test de disponibilité public
Vérifiez que votre site web interne dispose d’un enregistrement DNS (Domain Name System) public. Les tests de disponibilité échouent si vous ne pouvez pas résoudre le DNS. Pour plus d’informations, consultez Création d’un nom de domaine personnalisé pour une application interne.
Avertissement
Les adresses IP utilisées par le service des tests de disponibilité sont partagées et peuvent exposer les points de terminaison de service protégés par votre pare-feu aux autres tests. Le filtrage d’adresse IP seul ne peut pas sécuriser le trafic de votre service. Il est donc recommandé d’ajouter des en-têtes personnalisés supplémentaires pour vérifier l’origine de la requête web. Pour plus d’informations, consultez Étiquettes de service du réseau virtuel.
Authentifier le trafic
Définissez des en-têtes personnalisés dans des tests de disponibilité standard pour valider le trafic.
Générez un jeton ou un GUID pour identifier le trafic dans vos tests de disponibilité.
Ajoutez l’en-tête personnalisé « X-Customer-InstanceId » avec la valeur
ApplicationInsightsAvailability:<GUID generated in step 1>sous la section « Informations de test standard » lorsque vous créez ou mettez à jour vos tests de disponibilité.Veillez à ce que votre service vérifie si le trafic entrant inclut l’en-tête et la valeur définie lors des étapes précédentes.

Vous pouvez également définir le jeton en tant que paramètre de requête. Par exemple : https://yourtestendpoint/?x-customer-instanceid=applicationinsightsavailability:<your guid>.
Configurer votre pare-feu pour autoriser les requêtes entrantes à partir des tests de disponibilité
Remarque
Cet exemple est spécifique à une utilisation d’étiquette de service de groupe de sécurité réseau. Plusieurs services Azure acceptent les étiquettes de service, chacune nécessitant différentes étapes de configuration.
Pour simplifier l’activation de services Azure sans autoriser des IP individuels ou maintenir une liste des IP à jour, utilisez des Étiquettes de service. Appliquez ces étiquettes dans Pare-feu Azure et des groupes de sécurité réseau, ce qui permet l’accès du service de test de disponibilité à vos points de terminaison. L’étiquette de service applique
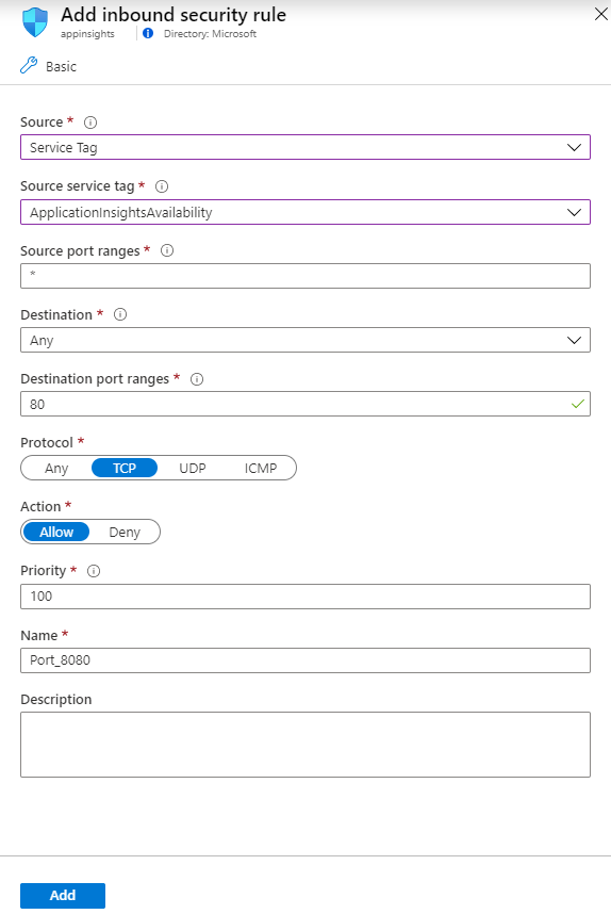
ApplicationInsightsAvailabilityà tous les tests de disponibilité.Si vous utilisez des groupes de sécurité réseau Azure, accédez à votre ressource de type groupe de sécurité réseau et sélectionnez Règles de sécurité du trafic entrant sous Paramètres. Sélectionnez ensuite Ajouter.

Ensuite, sélectionnez Étiquette de service comme source et ApplicationInsightsAvailability comme étiquette de service source. Utilisez les ports ouverts 80 (http) et 443 (https) pour le trafic entrant à partir de l’étiquette de service.
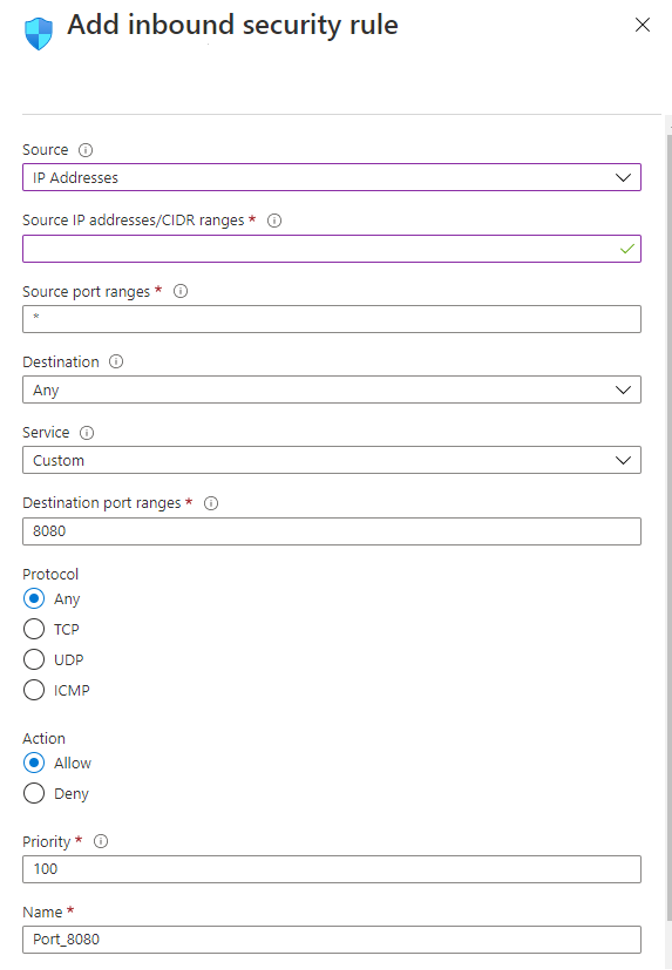
Pour gérer l’accès lorsque vos points de terminaison sont en dehors d’Azure ou lorsque les étiquettes de service ne sont pas une option, établissez une liste d’autorisation des adresses IP de nos agents de test web. Vous pouvez interroger des plages d’adresses IP en utilisant PowerShell, Azure CLI ou un appel REST avec l’API Étiquette de service. Pour obtenir une liste complète des étiquettes de service actuelles et de leur détails sur l’IP, téléchargez le fichier JSON.
Dans votre ressource de type groupe de sécurité réseau, sélectionnez Règles de sécurité du trafic entrant sous Paramètres. Sélectionnez ensuite Ajouter.
Ensuite, sélectionnez Adresses IP comme source. Ajoutez alors vos adresses IP dans une liste séparée par des virgules dans les plages d’adresses IP source/CIDR.
Scénarios déconnectés ou sans entrée
Connectez votre ressource Application Insights à votre point de terminaison de service interne en utilisant Azure Private Link.
Écrivez du code personnalisé pour tester régulièrement votre serveur ou vos points de terminaison internes. Envoyez les résultats à Application Insights en utilisant l’API TrackAvailability() dans le package principal du Kit de développement logiciel (SDK).
Configurations TLS prises en charge
Pour fournir un chiffrement de classe optimale, tous les tests de disponibilité utilisent TLS (Transport Layer Security) 1.2 et 1.3 comme mécanisme de chiffrement privilégié. En outre, les suites de chiffrement et les courbes elliptiques suivantes sont également prises en charge dans chaque version.
Remarque
TLS 1.3 n’est actuellement disponible que dans les régions de test de disponibilité : NorthCentralUS, CentralUS, EastUS, SouthCentralUS et WestUS.
TLS 1.2
Suites de chiffrement
- TLS_ECDHE_ECDSA_WITH_AES_256_GCM_SHA384
- TLS_ECDHE_ECDSA_WITH_AES_128_GCM_SHA256
- TLS_ECDHE_RSA_WITH_AES_256_GCM_SHA384
- TLS_ECDHE_RSA_WITH_AES_128_GCM_SHA256
- TLS_ECDHE_ECDSA_WITH_AES_256_CBC_SHA384
- TLS_ECDHE_ECDSA_WITH_AES_128_CBC_SHA256
- TLS_ECDHE_RSA_WITH_AES_256_CBC_SHA384
- TLS_ECDHE_RSA_WITH_AES_128_CBC_SHA256
Courbes elliptiques
- NistP384
- NistP256
TLS 1.3
Suites de chiffrement
- TLS_AES_256_GCM_SHA384
- TLS_AES_128_GCM_SHA256
Courbes elliptiques :
- NistP384
- NistP256
Dépréciation de configuration TLS
Avertissement
Le 31 octobre 2024, conformément à la dépréciation du TLS hérité à l’échelle de Azure, les versions du protocole TLS 1.0/1.1 et les suites de chiffrement et les courbes elliptiques TLS 1.2/1.3 héritées listés ci-dessous seront supprimées pour les tests de disponibilité Application Insights.
TLS 1.0 et TLS 1.1
Les versions du protocole ne sont plus prises en charge.
TLS 1.2
Suites de chiffrement
- TLS_ECDHE_ECDSA_WITH_AES_256_CBC_SHA
- TLS_ECDHE_ECDSA_WITH_AES_128_CBC_SHA
- TLS_ECDHE_RSA_WITH_AES_256_CBC_SHA
- TLS_ECDHE_RSA_WITH_AES_128_CBC_SHA
- TLS_RSA_WITH_AES_256_GCM_SHA384
- TLS_RSA_WITH_AES_128_GCM_SHA256
- TLS_RSA_WITH_AES_256_CBC_SHA256
- TLS_RSA_WITH_AES_128_CBC_SHA256
- TLS_RSA_WITH_AES_256_CBC_SHA
- TLS_RSA_WITH_AES_128_CBC_SHA
Courbes elliptiques :
- curve25519
TLS 1.3
Courbes elliptiques
- curve25519
Dépannage
Avertissement
Nous avons récemment activé TLS 1.3 dans les tests de disponibilité. Si vous voyez de nouveaux messages d’erreur par conséquent, assurez-vous que les clients s’exécutant sur Windows Server 2022 avec TLS 1.3 activé peuvent se connecter à votre point de terminaison. Si vous ne parvenez pas à le faire, vous pouvez envisager de désactiver temporairement TLS 1.3 sur votre point de terminaison afin que les tests de disponibilité reviennent aux versions TLS antérieures.
Pour plus d’informations, consultez l’article de résolution des problèmes.
Consultez l’article sur la résolution des problèmes dédié.
Classeur avec les temps d’arrêt, les contrats SLA et les interruptions
Cet article présente un moyen simple de calculez et d’indiquer le contrat SLA pour les tests web via un seul et même volet pour vos ressources Application Insights et vos abonnements Azure. Le rapport sur les temps d’arrêt et les interruptions offre de puissantes fonctionnalités et des visualisations de données prédéfinies pour améliorer votre compréhension de la connectivité de votre client, du temps de réponse habituel des applications et des temps d’arrêt.
Le modèle de classeur SLA est accessible à partir de votre ressource Application Insights de deux façons :
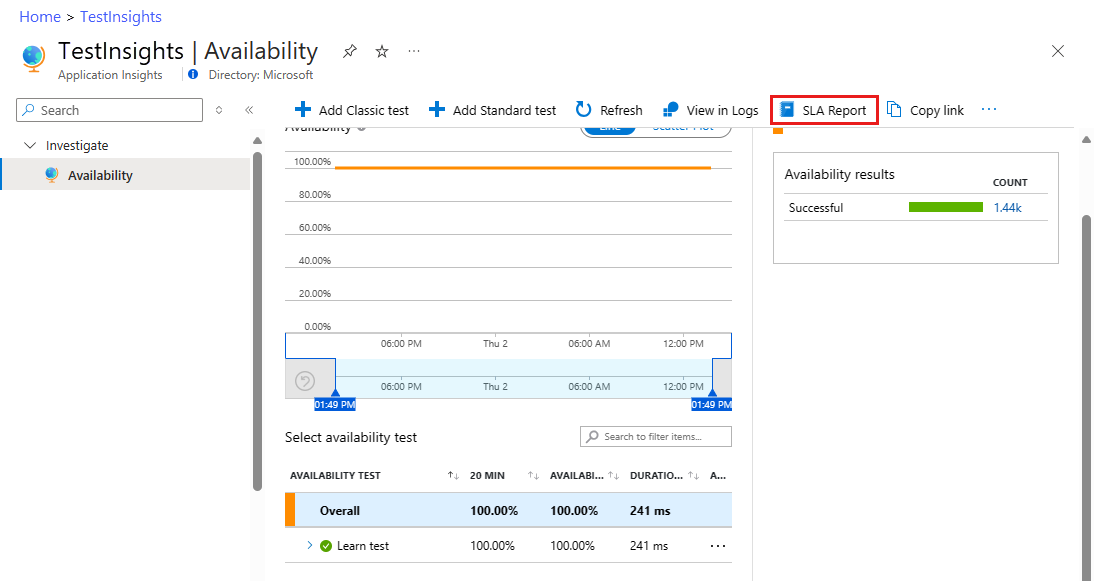
Ouvrez le volet de Disponibilité puis sélectionnez Rapport SLA en haut de l’écran.
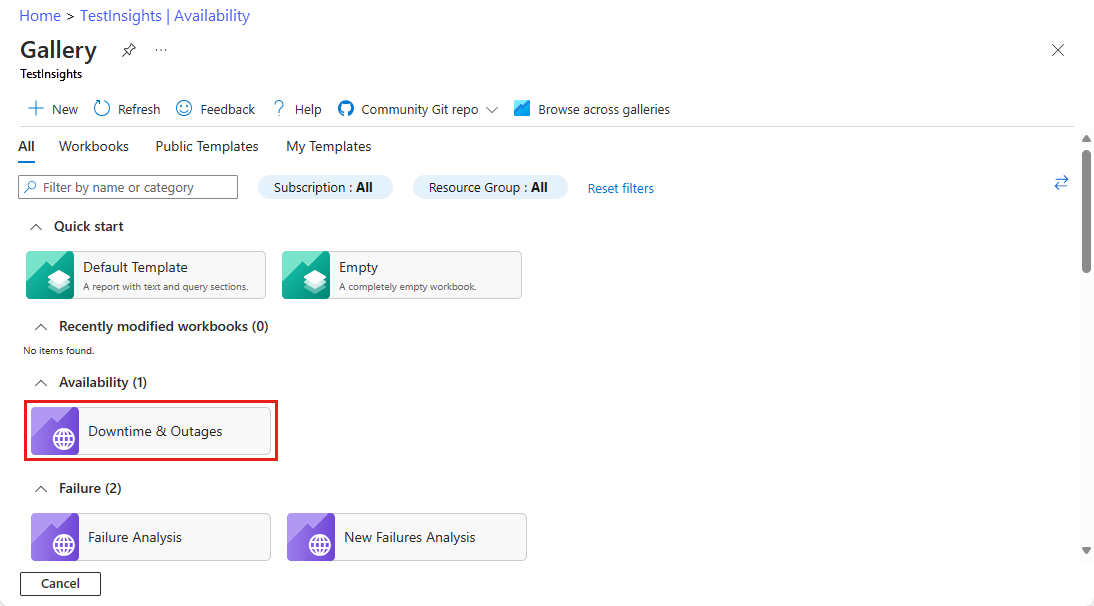
Ouvrez le volet classeurs puis sélectionnez Temps d’arrêt et pannes.
Flexibilité des paramètres
Les paramètres définis dans le classeur influencent le reste de votre rapport.
Subscriptions,App Insights ResourcesetWeb Test: ces paramètres déterminent vos options générales pour les ressources. Ils sont basés sur des requêtes Log Analytics et sont utilisés dans chaque requête des rapports.Failure ThresholdetOutage Window: vous pouvez utiliser ces paramètres pour déterminer vos propres critères pour une panne de service. Par exemple, les critères d’une alerte de disponibilité Application Insights en fonction d’un compteur d’emplacement défaillant sur une période choisie. Le seuil standard est de trois emplacements dans une fenêtre de cinq minutes.Maintenance Period: vous pouvez utiliser ce paramètre pour sélectionner votre fréquence de maintenance classique.Maintenance Windowest un sélecteur de DateHeure pour un exemple de période de maintenance. Toutes les données qui sont générées au cours de la période identifiée seront ignorées dans vos résultats.Availability Target %: ce paramètre spécifie votre objectif cible et prend des valeurs personnalisées.
Page Vue d’ensemble
La page Vue d’ensemble contient des informations générales sur les éléments suivants :
- Contrat SLA total (à l’exclusion des périodes de maintenance, le cas échéant)
- Instances de panne de bout en bout
- Temps d’arrêt de l’application
Les instances d’interruption sont définies comme ceci : le moment où un test commence à échouer jusqu’à ce qu’il réussisse, en fonction de vos paramètres pour les interruptions. Si un test commence à échouer à 8h00 et réussit à nouveau à 10h00, cette période de données tout entière est considérée comme étant la même interruption.
Vous pouvez également examiner l’interruption la plus longue qui s’est produite sur la période couverte par votre rapport.
Certains tests peuvent être reliés à leur ressource Application Insights pour une étude plus approfondie. Mais cela n’est possible que dans la ressource Application Insights basée sur l’espace de travail.
Temps d’arrêt, interruptions et défaillances
L’onglet Interruptions et temps d’arrêt contient des informations sur le nombre total d’instances d’interruption et le nombre total de temps d’arrêt décomposés par test.
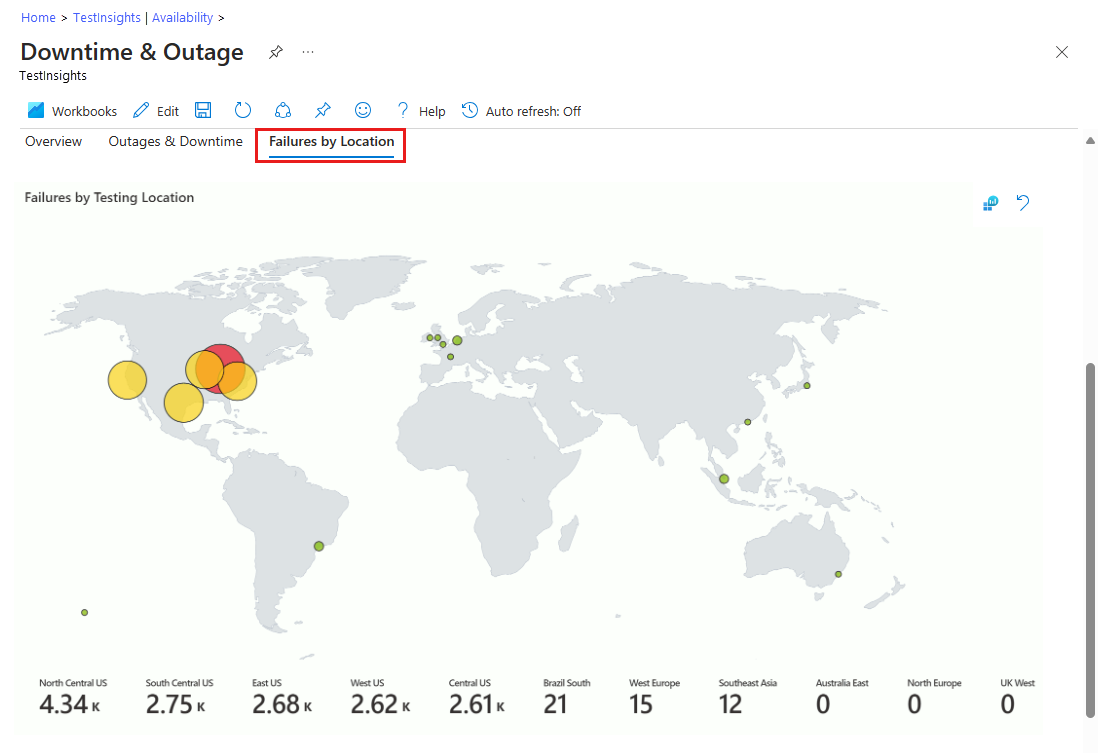
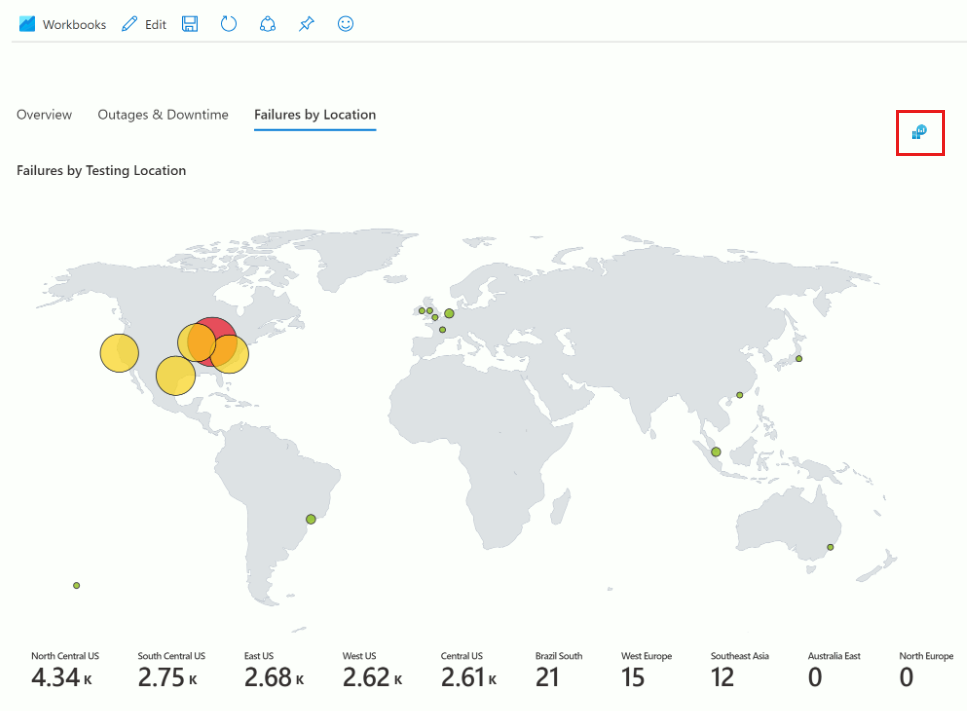
L’onglet Défaillances par emplacement a une carte géographique des emplacements de tests ayant échoué pour aider à identifier les zones de connexion ayant des problèmes potentiels.
Modifier le rapport
Vous pouvez modifier le rapport comme n’importe quel autre classeur Azure Monitor.

Vous pouvez personnaliser les requêtes ou les visualisations en fonction des besoins de votre équipe.
Log Analytics
Les requêtes peuvent toutes être exécutées dans Log Analytics et être utilisées dans d’autres rapports ou tableaux de bord.
Supprimez la restriction du paramètre et réutilisez la requête principale.
Accès et partage
Le rapport peut être partagé avec vos équipes et votre direction, ou épinglées à un tableau de bord pour une utilisation ultérieure. L’utilisateur doit disposer d’une autorisation de lecture ou d’un accès à la ressource Application Insights où le classeur réel est stocké.
Forum aux questions
Cette section fournit des réponses aux questions fréquentes.
Général
Puis-je exécuter des tests de disponibilité sur un serveur intranet ?
Nos tests web s’exécutent sur des points de présence qui sont répartis dans le monde entier. Il existe deux solutions :
- Porte pare-feu : Autorisez les requêtes envoyées à votre serveur à partir de la longue liste modifiable d’agents de test web.
- Code personnalisé : Écrivez votre propre code pour envoyer des requêtes régulières à votre serveur depuis votre intranet. Vous pouvez exécuter des tests web Visual Studio à cet effet. Le testeur peut envoyer les résultats à Application Insights à l’aide de l’API
TrackAvailability().
Quelle est la chaîne de l’agent utilisateur pour les tests de disponibilité ?
La chaîne de l’agent utilisateur est Mozilla/5.0 (compatible; MSIE 9.0; Windows NT 6.1; Trident/5.0; AppInsights)
Prise en charge de TLS
Comment cette dépréciation impacte-t-elle mon comportement de test web ?
Les tests de disponibilité agissent comme un client distribué dans chacun des emplacements de test web pris en charge. Chaque fois qu’un test web est exécuté, le service de test de disponibilité tente d’atteindre le point de terminaison distant défini dans la configuration du test web. Un message Hello du client TLS est envoyé, qui contient toutes les configurations TLS actuellement prises en charge. Si le point de terminaison distant partage une configuration TLS commune avec le client de test de disponibilité, alors l’établissement de la liaison TLS réussit. Sinon, le test web échoue avec un échec d’établissement d'une liaison TLS.
Comment faire pour vérifier que mon test web n’est pas impacté ?
Pour éviter tout impact, chaque point de terminaison distant (y compris les requêtes dépendantes) avec lequel votre test web interagit doit prendre en charge au moins une combinaison de la même version du protocole, de la suite de chiffrement et de la courbe elliptique que le test de disponibilité prend en charge. Si le point de terminaison distant ne prend pas en charge la configuration TLS nécessaire, il doit être mis à jour avec la prise en charge d’une combinaison de la configuration TLS postérieure à la dépréciation mentionnée ci-dessus. Ces points de terminaison peuvent être découverts via l’affichage des Détails de transaction de votre test web (idéalement pour une exécution de test web réussie).
Comment faire pour valider la configuration TLS prise en charge par un point de terminaison distant ?
Il existe plusieurs outils pour définir la configuration TLS prise en charge par un point de terminaison. L’une des méthodes consiste à suivre l’exemple détaillé sur cette page. Si votre point de terminaison distant n’est pas disponible via l’Internet public, vous devez vous assurer de valider la configuration TLS prise en charge sur le point de terminaison distant depuis un ordinateur qui a accès à votre point de terminaison.
Remarque
Pour découvrir les étapes permettant d’activer la configuration TLS nécessaire sur votre serveur web, il est préférable de contacter l’équipe propriétaire de la plateforme d’hébergement sur laquelle votre serveur web s’exécute, si le processus n’est pas connu.
Après le 31 octobre 2024, quel sera le comportement de test web pour les tests impactés ?
Il n’existe aucun type d’exception avec lequel tous les échecs d’établissement d'une liaison TLS affectés par cette dépréciation se présenteraient. Toutefois, l’exception la plus courante qui commencerait à faire échouer votre test web serait The request was aborted: Couldn't create SSL/TLS secure channel. Vous devez également pouvoir voir les échecs liés à TLS dans l’Étape de résolution des problèmes du transport TLS pour le résultat de test web potentiellement impacté.
Puis-je voir quelle configuration TLS est actuellement utilisée par mon test web ?
La configuration TLS négociée pendant une exécution de test web ne peut pas être consultée. Tant que le point de terminaison distant prend en charge la configuration TLS courante avec les tests de disponibilité, aucun impact ne doit être observé après la dépréciation.
Quels composants la dépréciation affecte-t-elle dans le service de test de disponibilité ?
La dépréciation TLS détaillée dans ce document ne doit affecter que le comportement d’exécution des tests web de test de disponibilité après le 31 octobre 2024. Pour plus d’informations sur l’interaction avec le service de test de disponibilité pour les opérations CRUD, consultez Prise en charge TLS d’Azure Resource Manager. Cette ressource fournit plus d’informations sur les chronologies de prise en charge et de dépréciation de TLS.
Où puis-je obtenir des informations sur la prise en charge de TLS ?
Pour toute question générale sur les problème de TLS hérité, consultez Résolution des problèmes TLS.
Étapes suivantes
Commentaires
Bientôt disponible : Tout au long de 2024, nous allons supprimer progressivement GitHub Issues comme mécanisme de commentaires pour le contenu et le remplacer par un nouveau système de commentaires. Pour plus d’informations, consultez https://aka.ms/ContentUserFeedback.
Envoyer et afficher des commentaires pour

