Megjegyzés
Az oldalhoz való hozzáféréshez engedély szükséges. Megpróbálhat bejelentkezni vagy módosítani a címtárat.
Az oldalhoz való hozzáféréshez engedély szükséges. Megpróbálhatja módosítani a címtárat.
Baidu cloud push is a Chinese cloud service that you can use to send push notifications to mobile devices.
As Google Play and FCM (Firebase Cloud Messaging) are not available in China, it is necessary to use different app stores and push services. Baidu is one of them, and the one currently used by Notification Hub.
Előfeltételek
This tutorial requires:
- Android SDK (we assume that you use Android Studio), which you can download from the Android site
- Baidu Push Android SDK
Megjegyzés:
Az oktatóanyag elvégzéséhez egy aktív Azure-fiókra lesz szüksége. Ha nincs fiókja, néhány perc alatt létrehozhat egy ingyenes próbafiókot. További információ: Ingyenes Azure-próbafiók létrehozása.
To get started, do the following:
- Create a Baidu account.
- Create a Baidu cloud push project, and make a note of the API key and secret key.
Configure a new notification hub
Jelentkezzen be a Azure portalra.
Válassza az Összes szolgáltatás lehetőséget a bal oldali menüben.

Írja be a Notification Hubs kifejezést a Szűrőszolgáltatások szövegmezőbe. A szolgáltatás neve melletti csillag ikonnal felveheti a szolgáltatást a kedvencek szakaszba a bal oldali menüben. Válassza a Notification Hubs lehetőséget.
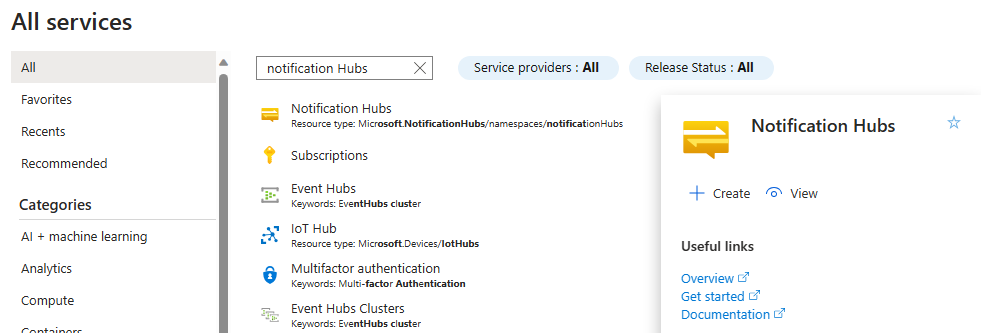
On the Notification Hubs page, select Create on the toolbar.

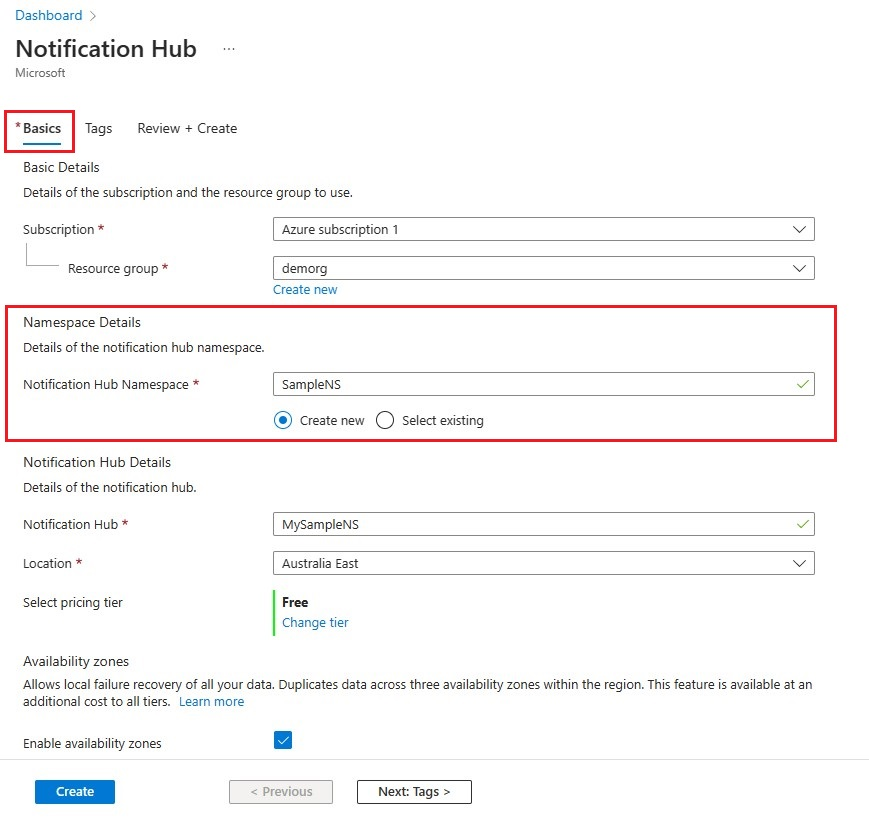
Az Értesítési központ lap Alapismeretek lapján hajtsa végre a következő lépéseket:
Az Előfizetésben válassza ki a használni kívánt Azure-előfizetés nevét, majd válasszon ki egy meglévő erőforráscsoportot, vagy hozzon létre egy újat.
Adja meg az új névtér egyedi nevét a Névtér részletei mezőben.
A névtér egy vagy több értesítési központot tartalmaz, ezért írja be a központ nevét a Notification Hub Részletei szakaszba.
Válasszon egy értéket a Hely legördülő listából. Ez az érték határozza meg azt a helyet, ahol létre szeretné hozni a központot.
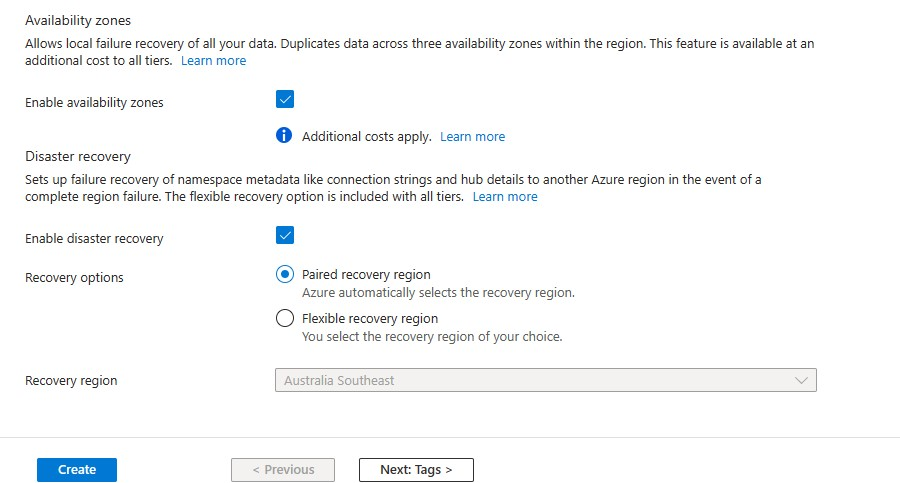
Tekintse át a Rendelkezésre állási zónák lehetőséget. Ha olyan régiót választott, amely rendelkezésre állási zónákkal rendelkezik, a jelölőnégyzet alapértelmezés szerint be van jelölve. A rendelkezésre állási zónák fizetős funkciók, ezért további díjakat adnak hozzá a szinthez.
Válasszon vészhelyreállítási lehetőséget: Nincs, Párosított helyreállítási régió vagy Rugalmas helyreállítási régió. Ha a Párosított helyreállítási régiót választja, megjelenik az átállási régió. Ha a rugalmas helyreállítási régiót választja, a legördülő listából választhat a helyreállítási régiók listájából.
Válassza a Create gombot.
Ha az üzembe helyezés befejeződött, válassza az Erőforrás megnyitása lehetőséget.
6. In your notification hub, select Notification Services and then Baidu (Android China).
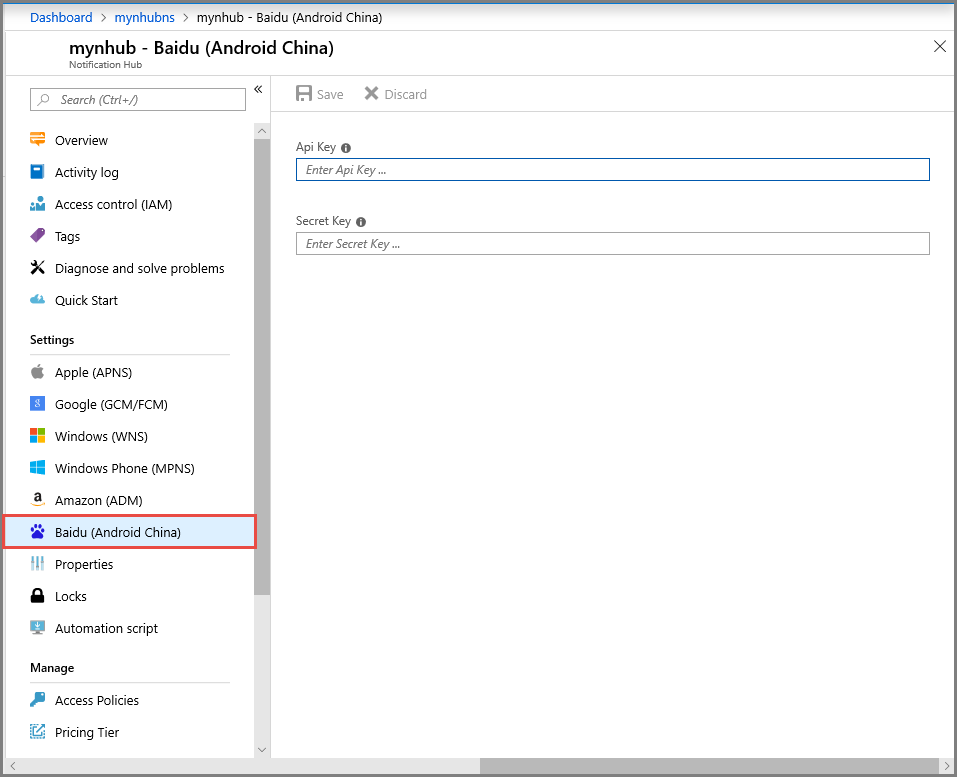
7. Scroll down to the Baidu notification settings section. Enter the API key and secret key that you obtained from the Baidu console, in the Baidu cloud push project. Then click Save.

Your notification hub is now configured to work with Baidu. You also have the connection strings to register your app to both send and receive push notifications.
Make a note of the DefaultListenSharedAccessSignature and DefaultFullSharedAccessSignature from the Access connection information window.
Az alkalmazás csatlakoztatása az értesítési központhoz
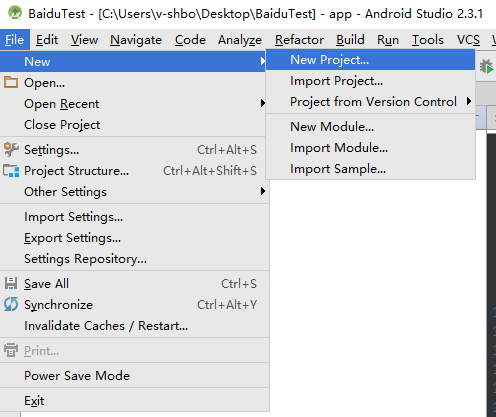
In Android Studio, create a new Android project (File > New > New Project).
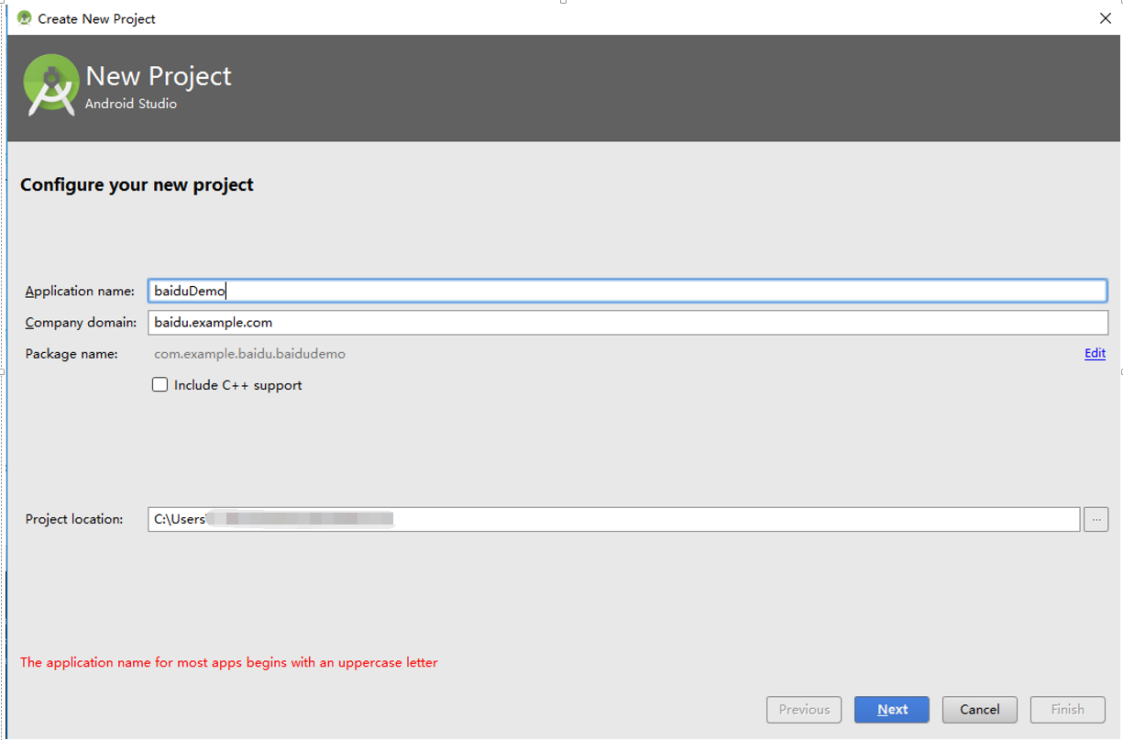
Enter an Application Name and ensure that the Minimum Required SDK version is set to API 16: Android 4.1. Also please make sure your package name (应用包名) is the same as in the Baidu Cloud Push Portal
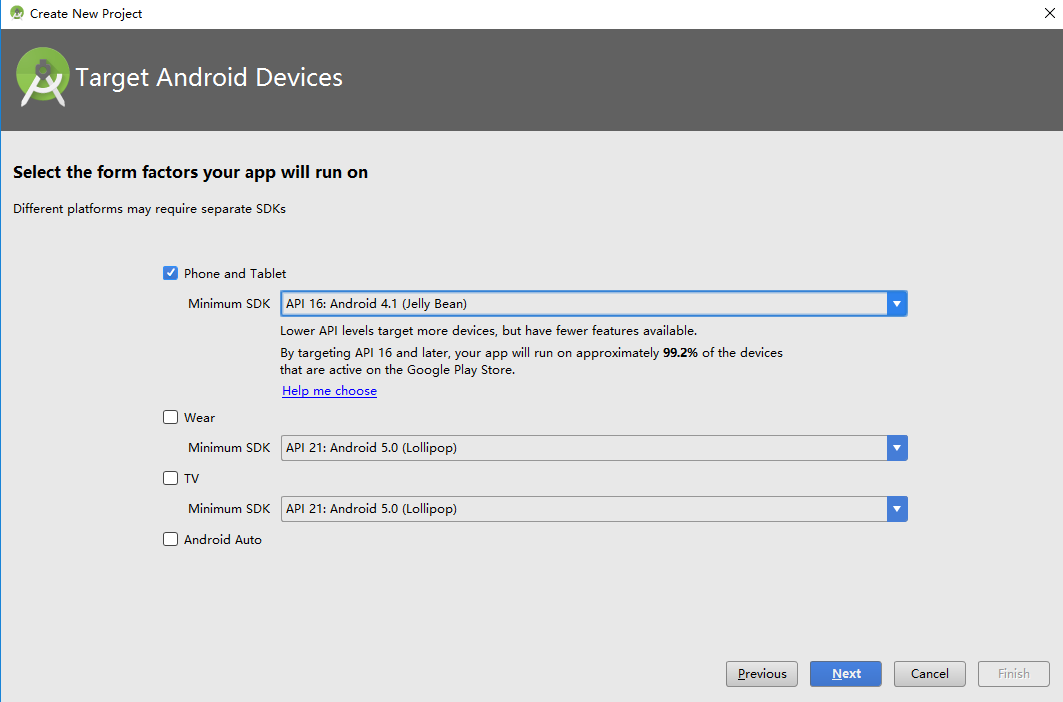
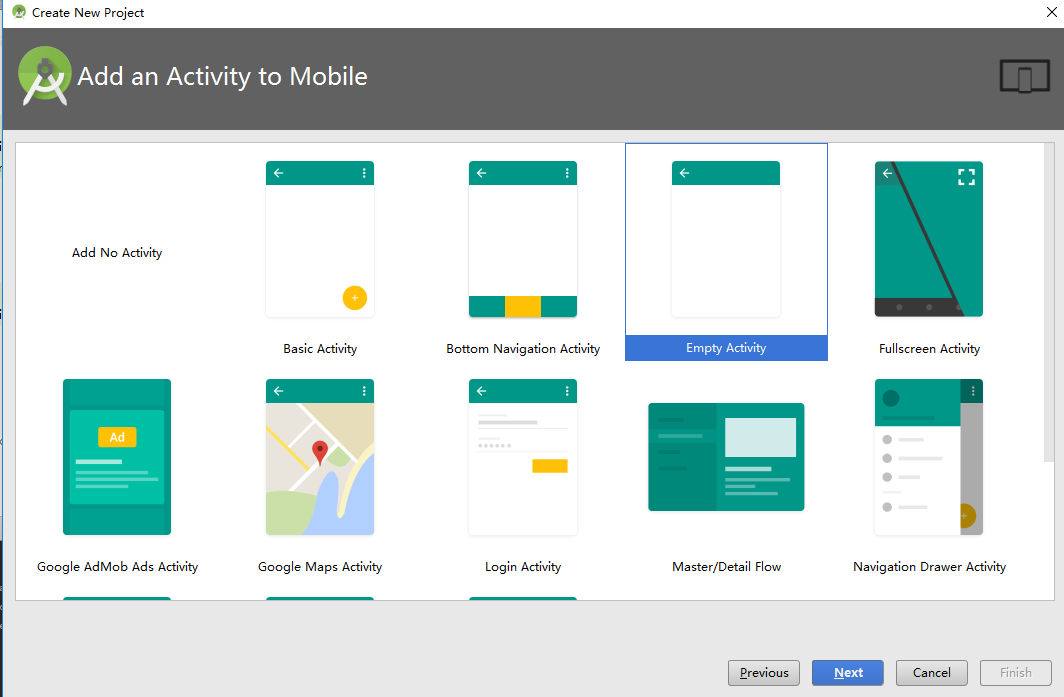
Click Next and continue following the wizard until the Create Activity window appears. Make sure that Empty Activity is selected, and finally select Finish to create a new Android Application.
Make sure that the Project Build Target is set correctly.
Then add Azure Notification Hubs libraries. In the
Build.Gradlefile for the app, add the following lines in the dependencies section.implementation 'com.microsoft.azure:notification-hubs-android-sdk:0.6@aar' implementation 'com.microsoft.azure:azure-notifications-handler:1.0.1@aar'A dependencies (függőségek) szakasz után vegye fel az alábbi tárhelyet.
repositories {
    maven {
        url "https://dl.bintray.com/microsoftazuremobile/SDK"
    }
}
To avoid the List conflict, add the following code in the project's
Manifest.xmlfile:<manifest package="YOUR.PACKAGE.NAME" xmlns:tools="http://schemas.android.com/tools" xmlns:android="http://schemas.android.com/apk/res/android">and in the
<application/>tag:<application tools:replace="android:allowBackup,icon,theme,label">Download and unzip the Baidu Push Android SDK. Copy the
pushservice-x.y.z jarfile in the libs folder. Then copy the.sofiles in thesrc/main/jniLibs(create a new folder) folders of your Android application.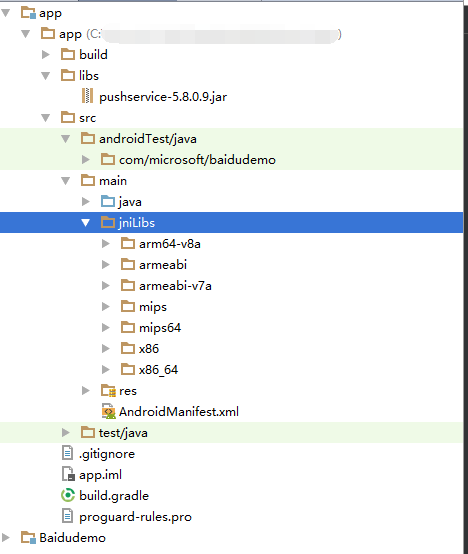
In the project's
libsfolder, right click on thepushervice-x.y.z.jarfile; select Add as Library to including this library in the project.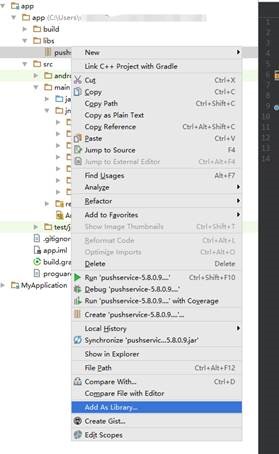
Open the Android project's
AndroidManifest.xmlfile and add the permissions required by the Baidu SDK. ReplaceYOURPACKAGENAMEwith your package name.<uses-permission android:name="android.permission.INTERNET" /> <uses-permission android:name="android.permission.READ_PHONE_STATE" /> <uses-permission android:name="android.permission.ACCESS_NETWORK_STATE" /> <uses-permission android:name="android.permission.RECEIVE_BOOT_COMPLETED" /> <uses-permission android:name="android.permission.WRITE_SETTINGS" /> <uses-permission android:name="android.permission.VIBRATE" /> <uses-permission android:name="android.permission.WRITE_EXTERNAL_STORAGE" /> <uses-permission android:name="android.permission.DISABLE_KEYGUARD" /> <uses-permission android:name="android.permission.ACCESS_COARSE_LOCATION" /> <uses-permission android:name="android.permission.ACCESS_WIFI_STATE" /> <uses-permission android:name="android.permission.ACCESS_DOWNLOAD_MANAGER" /> <uses-permission android:name="android.permission.DOWNLOAD_WITHOUT_NOTIFICATION" /> <uses-permission android:name="android.permission.EXPAND_STATUS_BAR" /> !! <uses-permission android:name="baidu.push.permission.WRITE_PUSHINFOPROVIDER.YOURPACKAGENAME" /> !!<permission android:name="baidu.push.permission.WRITE_PUSHINFOPROVIDER.YOURPACKAGENAME" android:protectionLevel="normal" />Add the following configuration within the application element after the
.MainActivityactivity element, replacing yourprojectname (for example,com.example.BaiduTest):<activity android:name="com.baidu.android.pushservice.richmedia.MediaViewActivity" android:configChanges="orientation|keyboardHidden" android:label="MediaViewActivity" /> <activity android:name="com.baidu.android.pushservice.richmedia.MediaListActivity" android:configChanges="orientation|keyboardHidden" android:label="MediaListActivity" android:launchMode="singleTask" /> <!-- Push application definition message --> <receiver android:name=".MyPushMessageReceiver"> <intent-filter> <!-- receive push message--> <action android:name="com.baidu.android.pushservice.action.MESSAGE" /> <!-- receive bind,unbind,fetch,delete.. message--> <action android:name="com.baidu.android.pushservice.action.RECEIVE" /> <action android:name="com.baidu.android.pushservice.action.notification.CLICK" /> </intent-filter> </receiver> <receiver android:name="com.baidu.android.pushservice.PushServiceReceiver" android:process=":bdservice_v1"> <intent-filter> <action android:name="android.intent.action.BOOT_COMPLETED" /> <action android:name="android.net.conn.CONNECTIVITY_CHANGE" /> <action android:name="com.baidu.android.pushservice.action.notification.SHOW" /> <action android:name="com.baidu.android.pushservice.action.media.CLICK" /> <action android:name="android.intent.action.MEDIA_MOUNTED" /> <action android:name="android.intent.action.USER_PRESENT" /> <action android:name="android.intent.action.ACTION_POWER_CONNECTED" /> <action android:name="android.intent.action.ACTION_POWER_DISCONNECTED" /> </intent-filter> </receiver> <receiver android:name="com.baidu.android.pushservice.RegistrationReceiver" android:process=":bdservice_v1"> <intent-filter> <action android:name="com.baidu.android.pushservice.action.METHOD" /> <action android:name="com.baidu.android.pushservice.action.BIND_SYNC" /> </intent-filter> <intent-filter> <action android:name="android.intent.action.PACKAGE_REMOVED" /> <data android:scheme="package" /> </intent-filter> </receiver> <service android:name="com.baidu.android.pushservice.PushService" android:exported="true" android:process=":bdservice_v1"> <intent-filter> <action android:name="com.baidu.android.pushservice.action.PUSH_SERVICE" /> </intent-filter> </service> <service android:name="com.baidu.android.pushservice.CommandService" android:exported="true" /> <!-- Adapt the ContentProvider declaration required for the Android N system, and the write permissions include the application package name--> <provider android:name="com.baidu.android.pushservice.PushInfoProvider" android:authorities="com.baidu.push.example.bdpush" android:exported="true" android:protectionLevel="signature" android:writePermission="baidu.push.permission.WRITE_PUSHINFOPROVIDER. yourprojectname " /> <!-- API Key of the Baidu application --> <meta-data android:name="api_key" !! android:value="api_key" /> </application>Add a new class called
ConfigurationSettings.javato the project.public class ConfigurationSettings { public static String API_KEY = "..."; public static String NotificationHubName = "..."; public static String NotificationHubConnectionString = "..."; }Set the value of the
API_KEYstring with the API_KEY from the Baidu Cloud Project.Set the value of the
NotificationHubNamestring with your notification hub name from the Azure portal and thenNotificationHubConnectionStringwithDefaultListenSharedAccessSignaturefrom the Azure portal.Open MainActivity.java, and add the following to the onCreate method:
PushManager.startWork(this, PushConstants.LOGIN_TYPE_API_KEY, API_KEY );Add a new class called
MyPushMessageReceiver.java, and add the following code to it. It is the class that handles the push notifications that are received from the Baidu push server.package your.package.name; import android.content.Context; import android.content.Intent; import android.os.AsyncTask; import android.text.TextUtils; import android.util.Log; import com.baidu.android.pushservice.PushMessageReceiver; import com.microsoft.windowsazure.messaging.NotificationHub; import org.json.JSONException; import org.json.JSONObject; import java.util.List; public class MyPushMessageReceiver extends PushMessageReceiver { public static final String TAG = MyPushMessageReceiver.class .getSimpleName(); public static NotificationHub hub = null; public static String mChannelId, mUserId; @Override public void onBind(Context context, int errorCode, String appid, String userId, String channelId, String requestId) { String responseString = "onBind errorCode=" + errorCode + " appid=" + appid + " userId=" + userId + " channelId=" + channelId + " requestId=" + requestId; Log.d(TAG, responseString); if (errorCode == 0) { // Binding successful Log.d(TAG, " Binding successful"); } try { if (hub == null) { hub = new NotificationHub( ConfigurationSettings.NotificationHubName, ConfigurationSettings.NotificationHubConnectionString, context); Log.i(TAG, "Notification hub initialized"); } } catch (Exception e) { Log.e(TAG, e.getMessage()); } mChannelId = channelId; mUserId = userId; registerWithNotificationHubs(); } private void registerWithNotificationHubs() { new AsyncTask<Void, Void, Void>() { @Override protected Void doInBackground(Void... params) { try { hub.registerBaidu(mUserId, mChannelId); Log.i(TAG, "Registered with Notification Hub - '" + ConfigurationSettings.NotificationHubName + "'" + " with UserId - '" + mUserId + "' and Channel Id - '" + mChannelId + "'"); } catch (Exception e) { Log.e(TAG, e.getMessage()); } return null; } }.execute(null, null, null); } @Override public void onMessage(Context context, String message, String customContentString) { String messageString = " onMessage=\"" + message + "\" customContentString=" + customContentString; Log.d(TAG, messageString); if (!TextUtils.isEmpty(customContentString)) { JSONObject customJson = null; try { customJson = new JSONObject(customContentString); String myvalue = null; if (!customJson.isNull("mykey")) { myvalue = customJson.getString("mykey"); } } catch (JSONException e) { e.printStackTrace(); } } } @Override public void onNotificationArrived(Context context, String title, String description, String customContentString) { String notifyString = " Notice Arrives onNotificationArrived title=\"" + title + "\" description=\"" + description + "\" customContent=" + customContentString; Log.d(TAG, notifyString); if (!TextUtils.isEmpty(customContentString)) { JSONObject customJson = null; try { customJson = new JSONObject(customContentString); String myvalue = null; if (!customJson.isNull("mykey")) { myvalue = customJson.getString("mykey"); } } catch (JSONException e) { // TODO Auto-generated catch block e.printStackTrace(); } } } @Override public void onNotificationClicked(Context context, String title, String description, String customContentString) { String notifyString = " onNotificationClicked title=\"" + title + "\" description=\"" + description + "\" customContent=" + customContentString; Log.d(TAG, notifyString); Intent intent = new Intent(context.getApplicationContext(),MainActivity.class); intent.putExtra("title",title); intent.putExtra("description",description); intent.putExtra("isFromNotify",true); intent.addFlags(Intent.FLAG_ACTIVITY_NEW_TASK); context.getApplicationContext().startActivity(intent); } @Override public void onSetTags(Context context, int errorCode, List<String> successTags, List<String> failTags, String requestId) { String responseString = "onSetTags errorCode=" + errorCode + " successTags=" + successTags + " failTags=" + failTags + " requestId=" + requestId; Log.d(TAG, responseString); } @Override public void onDelTags(Context context, int errorCode, List<String> successTags, List<String> failTags, String requestId) { String responseString = "onDelTags errorCode=" + errorCode + " successTags=" + successTags + " failTags=" + failTags + " requestId=" + requestId; Log.d(TAG, responseString); } @Override public void onListTags(Context context, int errorCode, List<String> tags, String requestId) { String responseString = "onListTags errorCode=" + errorCode + " tags=" + tags; Log.d(TAG, responseString); } @Override public void onUnbind(Context context, int errorCode, String requestId) { String responseString = "onUnbind errorCode=" + errorCode + " requestId = " + requestId; Log.d(TAG, responseString); if (errorCode == 0) { // Unbinding is successful Log.d(TAG, " Unbinding is successful "); } } }
Send notifications to your app
You can quickly test receiving notifications from the Azure portal via the Send button in the notification hub configuration screen, as shown in the following screens:
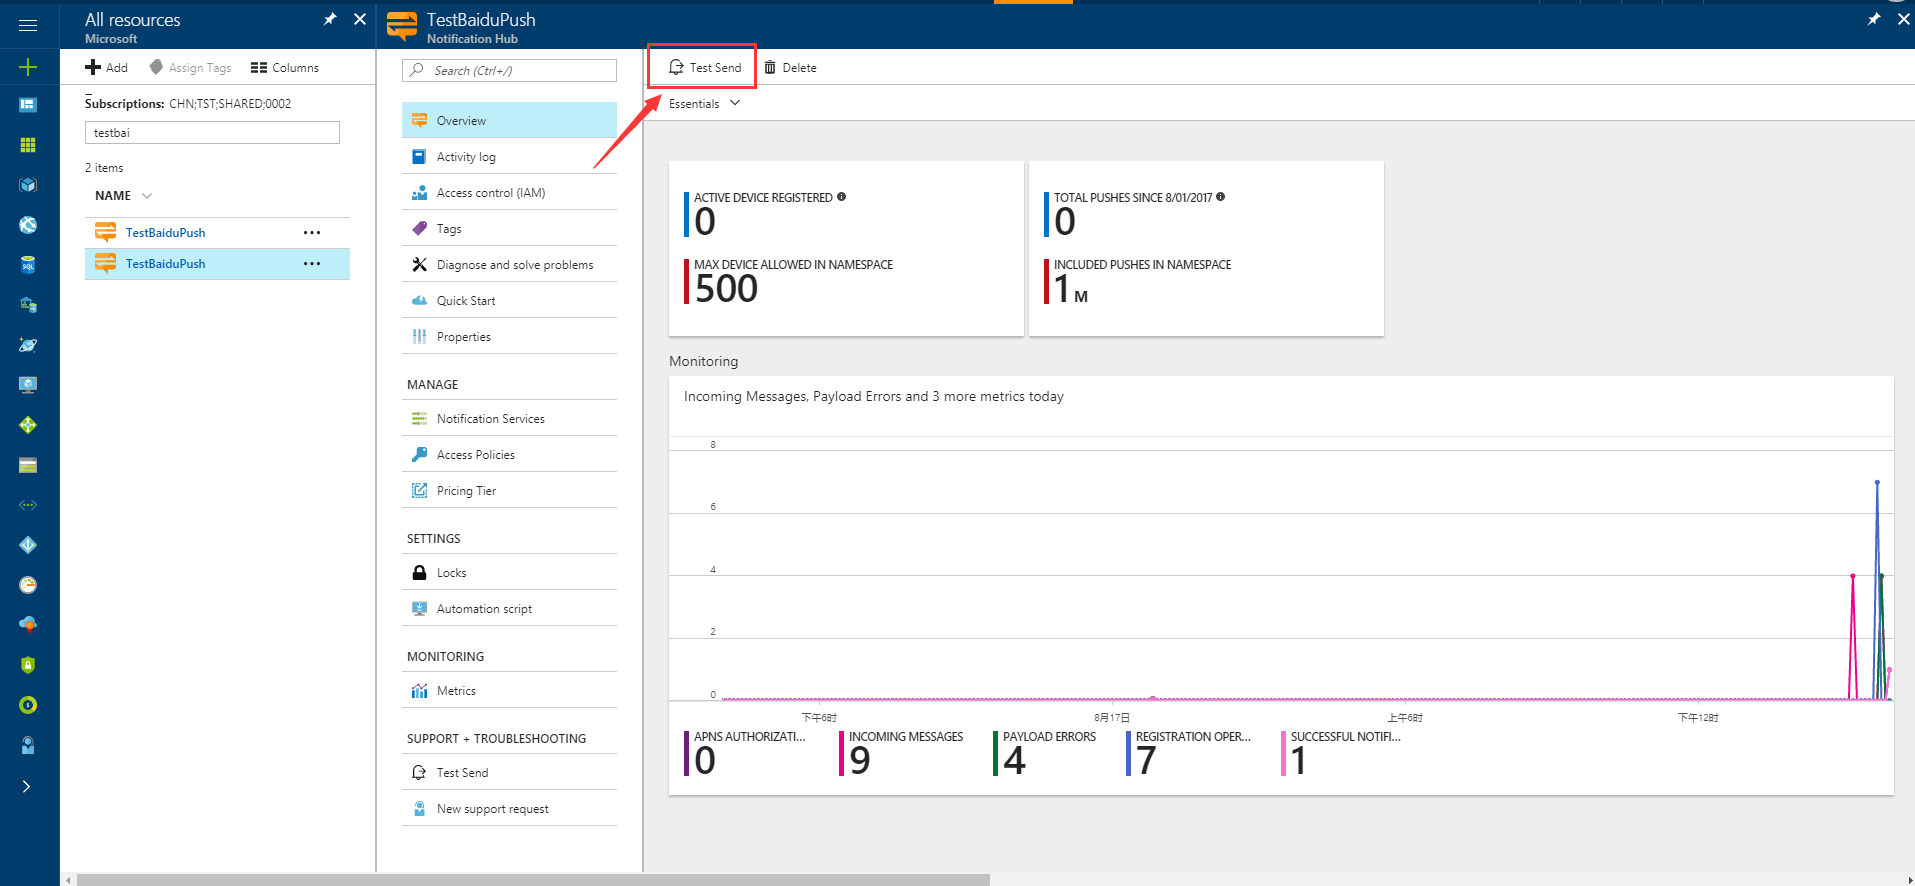
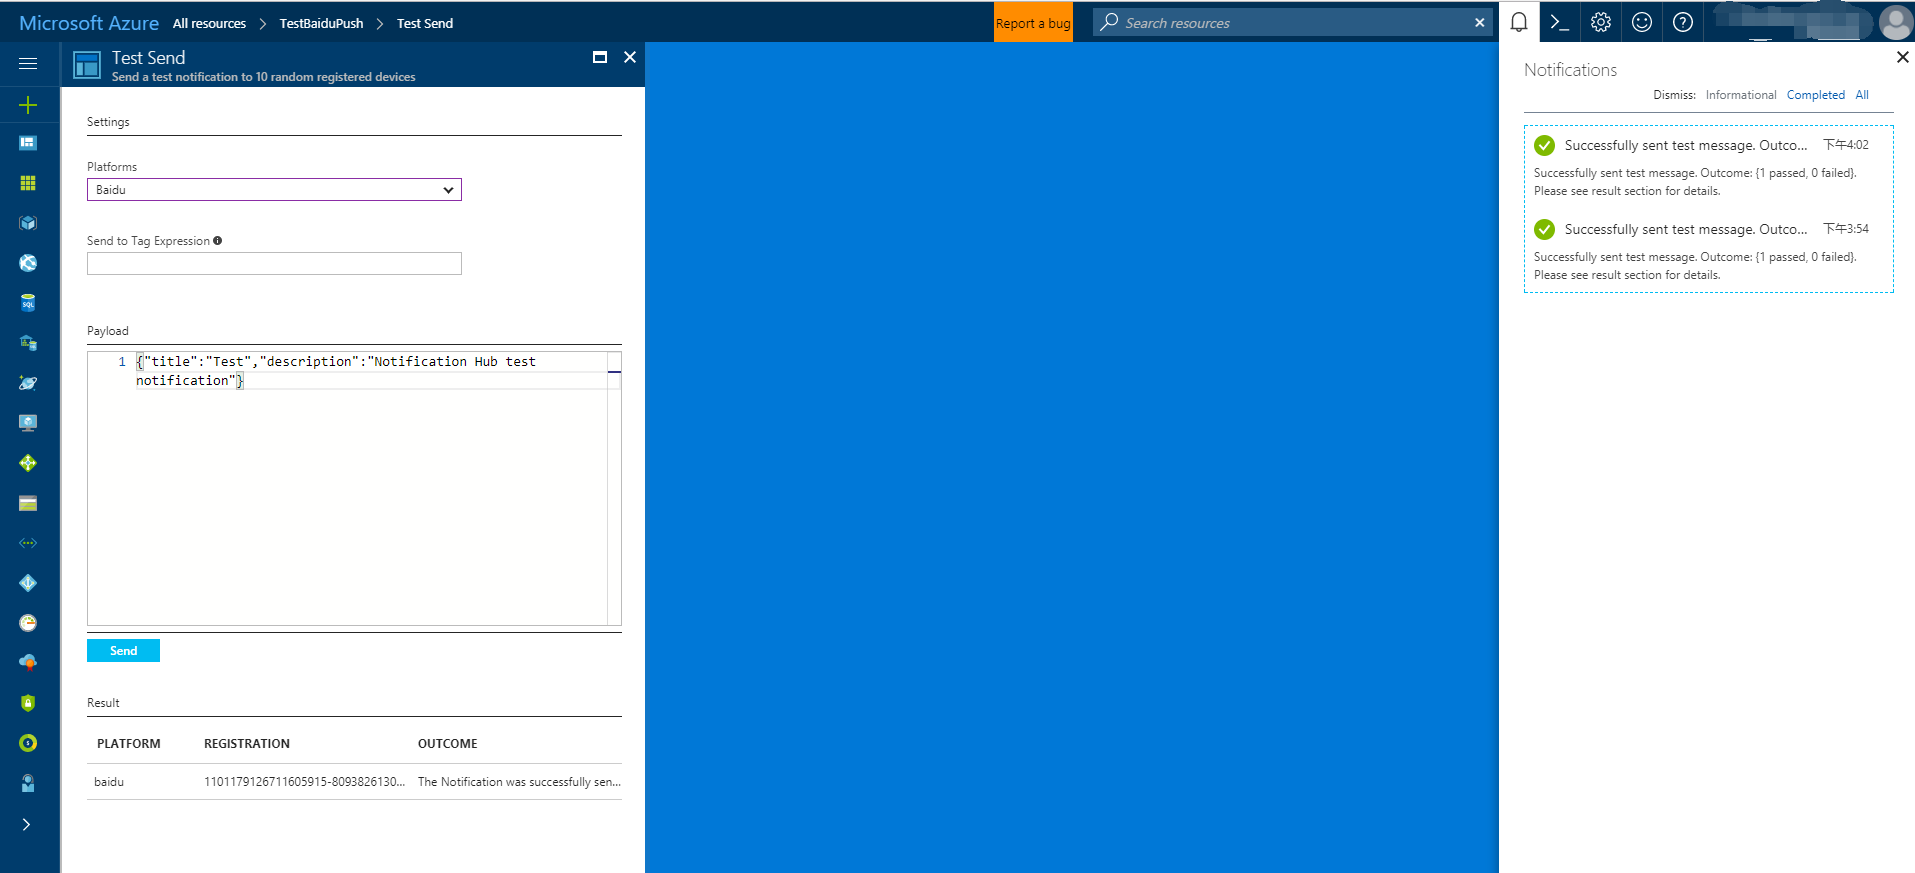
Push notifications are normally sent in a back-end service like Mobile Services or ASP.NET using a compatible library. If a library is not available for your back-end, you can use the REST API directly to send notification messages.
For simplicity, this tutorial uses a console app as a demonstration on how to send a notification with the .NET SDK. However, we recommend the Use Notification Hubs to push notifications to users tutorial as the next step for sending notifications from an ASP.NET backend.
Here are different approaches for sending notifications:
- REST Interface: You can support notification on any backend platform using the REST interface.
- Microsoft Azure Notification Hubs .NET SDK: In the Nuget Package Manager for Visual Studio, run Install-Package Microsoft.Azure.NotificationHubs.
- Node.js: How to use Notification Hubs from Node.js.
- Mobile Apps: For an example of how to send notifications from an Azure App Service Mobile Apps backend that's integrated with Notification Hubs, see Add push notifications to your mobile app.
- Java / PHP: For an example of how to send notifications by using the REST APIs, see "How to use Notification Hubs from Java/PHP" (Java | PHP).
(Optional) Send notifications from a .NET console app.
In this section, we show sending a notification using a .NET console app.
Create a new Visual C# console application:
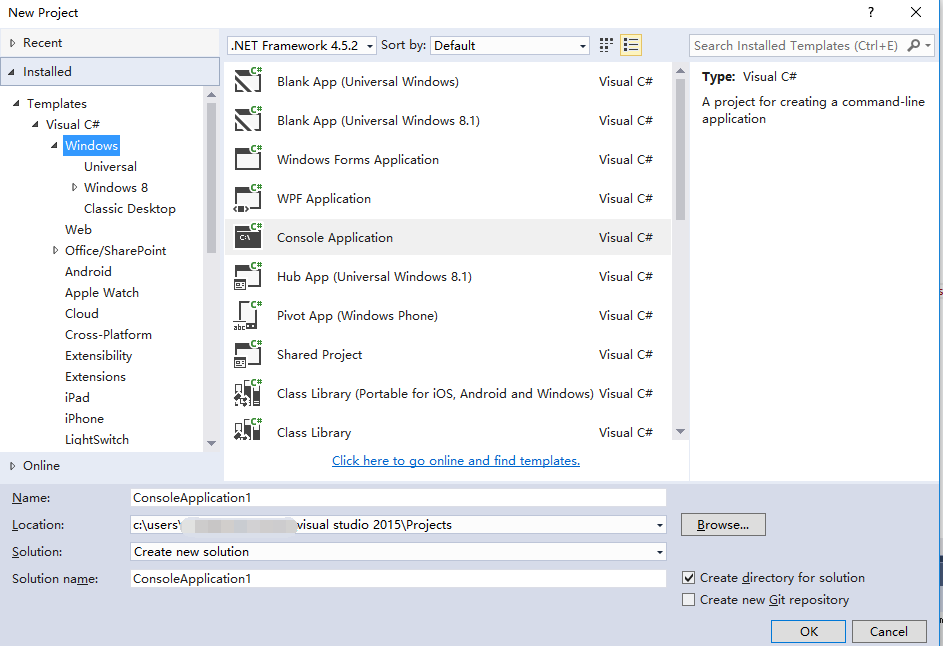
In the Package Manager Console window, set the Default project to your new console application project, and then in the console window, execute the following command:
Install-Package Microsoft.Azure.NotificationHubsThis instruction adds a reference to the Azure Notification Hubs SDK using the Microsoft.Azure.Notification Hubs NuGet package.

Open the file
Program.csand add the following using statement:using Microsoft.Azure.NotificationHubs;In your
Programclass, add the following method and replaceDefaultFullSharedAccessSignatureSASConnectionStringandNotificationHubNamewith the values that you have.private static async void SendNotificationAsync() { NotificationHubClient hub = NotificationHubClient.CreateClientFromConnectionString("DefaultFullSharedAccessSignatureSASConnectionString", "NotificationHubName"); string message = "{\"title\":\"((Notification title))\",\"description\":\"Hello from Azure\"}"; var result = await hub.SendBaiduNativeNotificationAsync(message); }Add the following lines in your
Mainmethod:SendNotificationAsync(); Console.ReadLine();
Az alkalmazás tesztelése
To test this app with an actual phone, just connect the phone to your computer by using a USB cable. This action loads your app onto the attached phone.
To test this app with the emulator, on the Android Studio top toolbar, click Run, and then select your app: it starts the emulator, loads, and runs the app.
The app retrieves the userId and channelId from the Baidu Push notification service and registers with the notification hub.
To send a test notification, you can use the debug tab of the Azure portal. If you built the .NET console application for Visual Studio, just press the F5 key in Visual Studio to run the application. The application sends a notification that appears in the top notification area of your device or emulator.
