Mulai cepat: Pemberitahuan push di SDK Aplikasi Windows
Dalam mulai cepat ini Anda akan membuat aplikasi Windows desktop yang mengirim dan menerima pemberitahuan push menggunakan SDK Aplikasi Windows.
Prasyarat
- Mulai menggunakan WinUI
- Buat proyek baru yang menggunakan SDK Aplikasi Windows ATAU Gunakan SDK Aplikasi Windows dalam proyek yang sudah ada
- Akun Azure diperlukan untuk menggunakan pemberitahuan push SDK Aplikasi Windows.
- Baca Gambaran umum pemberitahuan push
Aplikasi sampel
Mulai cepat ini menjelaskan penambahan dukungan pemberitahuan push ke aplikasi Anda. Lihat contoh kode dari mulai cepat ini dalam konteks di aplikasi sampel yang ditemukan di GitHub.
Referensi API
Untuk dokumentasi referensi API untuk pemberitahuan push, lihat Namespace Microsoft.Windows.PushNotifications.
Mengonfigurasi identitas aplikasi Anda di Azure Active Directory (AAD)
Pemberitahuan push di SDK Aplikasi Windows menggunakan identitas dari Azure Active Directory (AAD). Kredensial Azure diperlukan saat meminta URI Saluran WNS dan saat meminta token akses untuk mengirim pemberitahuan push. Catatan: Kami TIDAK mendukung penggunaan pemberitahuan push SDK Aplikasi Windows dengan Pusat Mitra Microsoft.
Langkah 1: Membuat pendaftaran aplikasi AAD
Masuk ke akun Azure Anda dan buat sumber daya Pendaftaran Aplikasi AAD baru. Pilih Pendaftaran baru.
Langkah 2: Berikan nama dan pilih opsi multi-penyewa
Berikan nama aplikasi.
Pemberitahuan push memerlukan opsi multi-penyewa, jadi pilihlah.
- Untuk informasi selengkapnya tentang penyewa, lihat Siapa yang bisa masuk ke aplikasi Anda?.
Pilih Daftar
Perhatikan ID Aplikasi (klien) Anda, karena ini adalah Azure AppId yang akan Anda gunakan selama pendaftaran aktivasi dan permintaan token akses.
Perhatikan ID Direktori (penyewa) Anda, karena ini adalah Azure TenantId yang akan Anda gunakan saat meminta token akses.
Penting
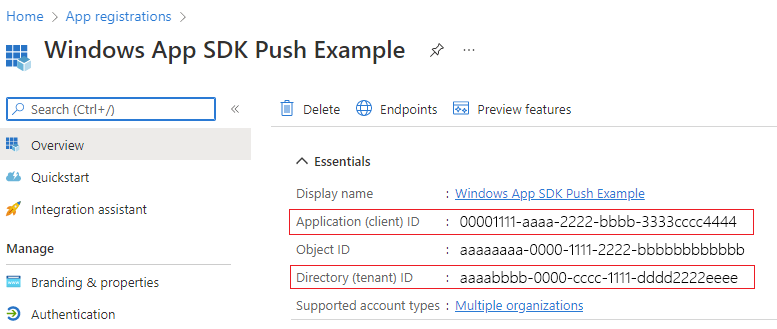 Catat ID Aplikasi (klien) dan ID Direktori (penyewa) Anda.
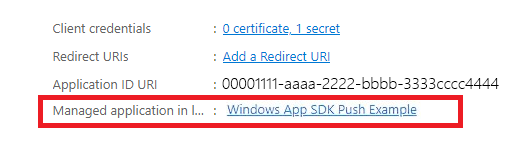
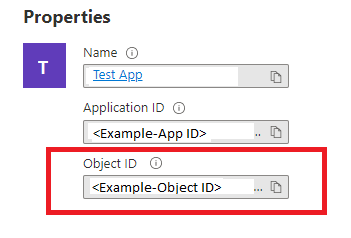
Perhatikan ID Objek Anda, karena ini adalah Azure ObjectId yang akan Anda gunakan saat meminta permintaan saluran. Perhatikan bahwa INI BUKAN ID objek yang tercantum di halaman Esensial . Sebagai gantinya, untuk menemukan ID Objek yang benar, klik nama aplikasi di bidang Aplikasi terkelola di direktori lokal di halaman Esensial:
Catatan
Perwakilan layanan diperlukan untuk mendapatkan ID Objek, jika tidak ada yang terkait dengan aplikasi Anda, ikuti langkah-langkah di salah satu artikel berikut untuk membuatnya di portal Azure atau menggunakan baris perintah:
Menggunakan Azure PowerShell untuk membuat perwakilan layanan dengan sertifikat
Langkah 3: Buat rahasia untuk pendaftaran aplikasi Anda
Rahasia Anda akan digunakan bersama dengan Azure AppId/ClientId Anda saat meminta token akses untuk mengirim pemberitahuan push.

Navigasi ke Sertifikat & rahasia dan pilih Rahasia klien baru.
Penting
Pastikan Anda menyalin rahasia Anda setelah dibuat dan menyimpannya di lokasi yang aman, seperti Azure Key Vault. Ini hanya akan dapat dilihat sekali setelah pembuatan.
Langkah 4: Petakan Nama Keluarga Paket aplikasi Anda ke Azure AppId-nya
Jika aplikasi Anda dikemas (termasuk dikemas dengan lokasi eksternal), Anda dapat menggunakan alur ini untuk memetakan Nama Keluarga Paket (PFN) aplikasi Anda dan Azure AppId-nya.
Jika aplikasi Anda adalah aplikasi Win32 yang dikemas, buat permintaan pemetaan Nama Keluarga Paket (PFN) dengan mengirim email Win_App_SDK_Push@microsoft.com dengan baris subjek "SDK Aplikasi Windows Permintaan Pemetaan Pemberitahuan Push" dan isi "PFN: [PFN Anda]", AppId: [APPId Anda], ObjectId: [ObjectId Anda]. Permintaan pemetaan selesai setiap minggu. Anda akan diberi tahu setelah permintaan pemetaan Anda selesai.
Mengonfigurasi aplikasi Anda untuk menerima pemberitahuan push
Langkah 1: Menambahkan deklarasi namespace layanan
Tambahkan namespace layanan untuk pemberitahuan Microsoft.Windows.PushNotificationspush SDK Aplikasi Windows .
#include <winrt/Microsoft.Windows.PushNotifications.h>

using namespace winrt::Microsoft::Windows::PushNotifications;
Langkah 2: Tambahkan aktivator COM ke manifes aplikasi Anda
Penting
Jika aplikasi Anda tidak dikemas (artinya, aplikasi tidak memiliki identitas paket saat runtime), maka lewati ke Langkah 3: Daftar dan tanggapi pemberitahuan push pada startup aplikasi.
Jika aplikasi Anda dikemas (termasuk dikemas dengan lokasi eksternal): Buka Package.appxmanifest Anda. Tambahkan yang berikut ini di <Application> dalam elemen . IdGanti nilai , Executable, dan DisplayName dengan nilai khusus untuk aplikasi Anda.
<!--Packaged apps only-->
<!--package.appxmanifest-->

<Package
  ...
  xmlns:com="http://schemas.microsoft.com/appx/manifest/com/windows10"
  ...
  <Applications>
    <Application>
      ...
      <Extensions>

        <!--Register COM activator-->
        <com:Extension Category="windows.comServer">
          <com:ComServer>
              <com:ExeServer Executable="SampleApp\SampleApp.exe" DisplayName="SampleApp" Arguments="----WindowsAppRuntimePushServer:">
                <com:Class Id="[Your app's Azure AppId]" DisplayName="Windows App SDK Push" />
            </com:ExeServer>
          </com:ComServer>
        </com:Extension>

      </Extensions>
    </Application>
  </Applications>
 </Package>
Langkah 3: Mendaftar dan merespons pemberitahuan push pada startup aplikasi
Perbarui metode aplikasi main() Anda untuk menambahkan hal berikut:
- Daftarkan aplikasi Anda untuk menerima pemberitahuan push dengan memanggil PushNotificationManager::D efault(). Daftar().
- Periksa sumber permintaan aktivasi dengan memanggil AppInstance::GetCurrent(). GetActivatedEventArgs(). Jika aktivasi dipicu dari pemberitahuan push, tanggapi berdasarkan payload pemberitahuan.
Penting
Anda harus memanggil PushNotificationManager::D efault(). Daftar sebelum memanggil AppInstance.GetCurrent.GetActivatedEventArgs.
Sampel berikut berasal dari contoh aplikasi kemasan yang ditemukan di GitHub.
// cpp-console.cpp
#include "pch.h"
#include <iostream>
#include <winrt/Microsoft.Windows.PushNotifications.h>
#include <winrt/Microsoft.Windows.AppLifecycle.h>
#include <winrt/Windows.Foundation.h>
#include <wil/result.h>
#include <wil/cppwinrt.h>


using namespace winrt;
using namespace Windows::Foundation;

using namespace winrt::Microsoft::Windows::PushNotifications;
using namespace winrt::Microsoft::Windows::AppLifecycle;

winrt::guid remoteId{ "7edfab6c-25ae-4678-b406-d1848f97919a" }; // Replace this with your own Azure ObjectId


void SubscribeForegroundEventHandler()
{
    winrt::event_token token{ PushNotificationManager::Default().PushReceived([](auto const&, PushNotificationReceivedEventArgs const& args)
    {
        auto payload{ args.Payload() };

        std::string payloadString(payload.begin(), payload.end());
        std::cout << "\nPush notification content received in the FOREGROUND: " << payloadString << std::endl;
    }) };
}

int main()
{
    // Setup an event handler, so we can receive notifications in the foreground while the app is running.
    SubscribeForegroundEventHandler();

    PushNotificationManager::Default().Register();

    auto args{ AppInstance::GetCurrent().GetActivatedEventArgs() };
    switch (args.Kind())
    {
        // When it is launched normally (by the users, or from the debugger), the sample requests a WNS Channel URI and
        // displays it, then waits for notifications. This user can take a copy of the WNS Channel URI and use it to send
        // notifications to the sample
        case ExtendedActivationKind::Launch:
        {
            // Checks to see if push notifications are supported. Certain self-contained apps may not support push notifications by design
            if (PushNotificationManager::IsSupported())
            {
                // Request a WNS Channel URI which can be passed off to an external app to send notifications to.
                // The WNS Channel URI uniquely identifies this app for this user and device.
                PushNotificationChannel channel{ RequestChannel() };
                if (!channel)
                {
                    std::cout << "\nThere was an error obtaining the WNS Channel URI" << std::endl;

                    if (remoteId == winrt::guid { "00000000-0000-0000-0000-000000000000" })
                    {
                        std::cout << "\nThe ObjectID has not been set. Refer to the readme file accompanying this sample\nfor the instructions on how to obtain and setup an ObjectID" << std::endl;
                    }
                }

                std::cout << "\nPress 'Enter' at any time to exit App." << std::endl;
                std::cin.ignore();
            }
            else
            {
                // App implements its own custom socket here to receive messages from the cloud since Push APIs are unsupported.
            }
        }
        break;

        // When it is activated from a push notification, the sample only displays the notification.
        // It doesn’t register for foreground activation of perform any other actions
        // because background activation is meant to let app perform only small tasks in order to preserve battery life.
        case ExtendedActivationKind::Push:
        {
            PushNotificationReceivedEventArgs pushArgs{ args.Data().as<PushNotificationReceivedEventArgs>() };

            // Call GetDeferral to ensure that code runs in low power
            auto deferral{ pushArgs.GetDeferral() };

            auto payload{ pushArgs.Payload() } ;

            // Do stuff to process the raw notification payload
            std::string payloadString(payload.begin(), payload.end());
            std::cout << "\nPush notification content received in the BACKGROUND: " << payloadString.c_str() << std::endl;
            std::cout << "\nPress 'Enter' to exit the App." << std::endl;

            // Call Complete on the deferral when finished processing the payload.
            // This removes the override that kept the app running even when the system was in a low power mode.
            deferral.Complete();
            std::cin.ignore();
        }
        break;

        default:
            std::cout << "\nUnexpected activation type" << std::endl;
            std::cout << "\nPress 'Enter' to exit the App." << std::endl;
            std::cin.ignore();
            break;
    }

    // We do not call PushNotificationManager::UnregisterActivator
    // because then we wouldn't be able to receive background activations, once the app has closed.
    // Call UnregisterActivator once you don't want to receive push notifications anymore.
}
Langkah 4: Minta URI Saluran WNS dan daftarkan dengan server WNS
URI Saluran WNS adalah titik akhir HTTP untuk mengirim pemberitahuan push. Setiap klien harus meminta URI Saluran dan mendaftarkannya ke server WNS untuk menerima pemberitahuan push.
Catatan
URI Saluran WNS kedaluwarsa setelah 30 hari.
auto channelOperation{ PushNotificationManager::Default().CreateChannelAsync(winrt::guid("[Your app's Azure ObjectID]")) };
PushNotificationManager akan mencoba membuat URI Saluran, mencoba kembali secara otomatis selama tidak lebih dari 15 menit. Buat penanganan aktivitas untuk menunggu panggilan selesai. Setelah panggilan selesai, jika berhasil, daftarkan URI dengan server WNS.
// cpp-console.cpp

winrt::Windows::Foundation::IAsyncOperation<PushNotificationChannel> RequestChannelAsync()
{
    // To obtain an AAD RemoteIdentifier for your app,
    // follow the instructions on https://learn.microsoft.com/azure/active-directory/develop/quickstart-register-app
    auto channelOperation = PushNotificationManager::Default().CreateChannelAsync(remoteId);

    // Setup the inprogress event handler
    channelOperation.Progress(
        [](auto&& sender, auto&& args)
        {
            if (args.status == PushNotificationChannelStatus::InProgress)
            {
                // This is basically a noop since it isn't really an error state
                std::cout << "Channel request is in progress." << std::endl << std::endl;
            }
            else if (args.status == PushNotificationChannelStatus::InProgressRetry)
            {
                LOG_HR_MSG(
                    args.extendedError,
                    "The channel request is in back-off retry mode because of a retryable error! Expect delays in acquiring it. RetryCount = %d",
                    args.retryCount);
            }
        });

    auto result = co_await channelOperation;

    if (result.Status() == PushNotificationChannelStatus::CompletedSuccess)
    {
        auto channelUri = result.Channel().Uri();

        std::cout << "channelUri: " << winrt::to_string(channelUri.ToString()) << std::endl << std::endl;

        auto channelExpiry = result.Channel().ExpirationTime();

        // Caller's responsibility to keep the channel alive
        co_return result.Channel();
    }
    else if (result.Status() == PushNotificationChannelStatus::CompletedFailure)
    {
        LOG_HR_MSG(result.ExtendedError(), "We hit a critical non-retryable error with channel request!");
        co_return nullptr;
    }
    else
    {
        LOG_HR_MSG(result.ExtendedError(), "Some other failure occurred.");
        co_return nullptr;
    }

};

PushNotificationChannel RequestChannel()
{
    auto task = RequestChannelAsync();
    if (task.wait_for(std::chrono::seconds(300)) != AsyncStatus::Completed)
    {
        task.Cancel();
        return nullptr;
    }

    auto result = task.GetResults();
    return result;
}
Langkah 5: Membangun dan menginstal aplikasi Anda
Gunakan Visual Studio untuk membuat dan menginstal aplikasi Anda. Klik kanan pada file solusi di Penjelajah Solusi dan pilih Sebarkan. Visual Studio akan membangun aplikasi Anda dan menginstalnya di komputer Anda. Anda dapat menjalankan aplikasi dengan meluncurkannya melalui Menu Mulai atau debugger Visual Studio.
Mengirim pemberitahuan push ke aplikasi Anda
Pada titik ini, semua konfigurasi selesai dan server WNS dapat mengirim pemberitahuan push ke aplikasi klien. Dalam langkah-langkah berikut, lihat permintaan server pemberitahuan push dan header respons untuk detail selengkapnya.
Langkah 1: Meminta token akses
Untuk mengirim pemberitahuan push, server WNS terlebih dahulu perlu meminta token akses. Kirim permintaan HTTP POST dengan Azure TenantId, Azure AppId, dan rahasia Anda. Untuk informasi tentang mengambil Azure TenantId dan Azure AppId, lihat Mendapatkan nilai PENYEwa dan ID aplikasi untuk masuk.
Permintaan Sampel HTTP:
POST /{tenantID}/oauth2/v2.0/token Http/1.1
Host: login.microsoftonline.com
Content-Type: application/x-www-form-urlencoded
Content-Length: 160

grant_type=client_credentials&client_id=<Azure_App_Registration_AppId_Here>&client_secret=<Azure_App_Registration_Secret_Here>&scope=https://wns.windows.com/.default/
Permintaan Sampel C#:
//Sample C# Access token request
var client = new RestClient("https://login.microsoftonline.com/{tenantID}/oauth2/v2.0");
var request = new RestRequest("/token", Method.Post);
request.AddHeader("Content-Type", "application/x-www-form-urlencoded");
request.AddParameter("grant_type", "client_credentials");
request.AddParameter("client_id", "[Your app's Azure AppId]");
request.AddParameter("client_secret", "[Your app's secret]");
request.AddParameter("scope", "https://wns.windows.com/.default");
RestResponse response = await client.ExecutePostAsync(request);
Console.WriteLine(response.Content);
Jika permintaan Anda berhasil, Anda akan menerima respons yang berisi token Anda di bidang access_token .
{
    "token_type":"Bearer",
    "expires_in":"86399",
    "ext_expires_in":"86399",
    "expires_on":"1653771789",
    "not_before":"1653685089",
    "access_token":"[your access token]"
}
Langkah 2. Mengirim pemberitahuan mentah
Buat permintaan HTTP POST yang berisi token akses yang Anda peroleh di langkah sebelumnya dan konten pemberitahuan push yang ingin Anda kirim. Konten pemberitahuan push akan dikirimkan ke aplikasi.
POST /?token=[The token query string parameter from your channel URL. E.g. AwYAAABa5cJ3...] HTTP/1.1
Host: dm3p.notify.windows.com
Content-Type: application/octet-stream
X-WNS-Type: wns/raw
Authorization: Bearer [your access token]
Content-Length: 46

{ Sync: "Hello from the Contoso App Service" }
var client = new RestClient("[Your channel URL. E.g. https://wns2-by3p.notify.windows.com/?token=AwYAAABa5cJ3...]");
var request = new RestRequest();
request.Method = Method.Post;
request.AddHeader("Content-Type", "application/octet-stream");
request.AddHeader("X-WNS-Type", "wns/raw");
request.AddHeader("Authorization", "Bearer [your access token]");
request.AddBody("Notification body");
RestResponse response = await client.ExecutePostAsync(request);");
Langkah 3: Mengirim pemberitahuan aplikasi bersumber cloud
Jika Anda hanya tertarik untuk mengirim pemberitahuan mentah, awasi langkah ini. Untuk mengirim pemberitahuan aplikasi bersumber cloud, juga diketahui pemberitahuan toast push, pertama-tama ikuti Mulai Cepat: Pemberitahuan aplikasi di SDK Aplikasi Windows. Pemberitahuan aplikasi dapat berupa push (dikirim dari cloud) atau dikirim secara lokal. Mengirim pemberitahuan aplikasi bersumber cloud mirip dengan mengirim pemberitahuan mentah di Langkah 2, kecuali header X-WNS-Type adalah toast, Content-Type adalah text/xml, dan konten berisi payload XML pemberitahuan aplikasi. Lihat Skema XML Pemberitahuan untuk informasi selengkapnya tentang cara membuat payload XML Anda.
Buat permintaan HTTP POST yang berisi token akses Anda dan konten pemberitahuan aplikasi bersumber cloud yang ingin Anda kirim. Konten pemberitahuan push akan dikirimkan ke aplikasi.
POST /?token=AwYAAAB%2fQAhYEiAESPobjHzQcwGCTjHu%2f%2fP3CCNDcyfyvgbK5xD3kztniW%2bjba1b3aSSun58SA326GMxuzZooJYwtpgzL9AusPDES2alyQ8CHvW94cO5VuxxLDVzrSzdO1ZVgm%2bNSB9BAzOASvHqkMHQhsDy HTTP/1.1
Host: dm3p.notify.windows.com
Content-Type: text/xml
X-WNS-Type: wns/toast
Authorization: Bearer [your access token]
Content-Length: 180

<toast><visual><binding template="ToastGeneric"><text>Example cloud toast notification</text><text>This is an example cloud notification using XML</text></binding></visual></toast>
var client = new RestClient("https://dm3p.notify.windows.com/?token=AwYAAAB%2fQAhYEiAESPobjHzQcwGCTjHu%2f%2fP3CCNDcyfyvgbK5xD3kztniW%2bjba1b3aSSun58SA326GMxuzZooJYwtpgzL9AusPDES2alyQ8CHvW94cO5VuxxLDVzrSzdO1ZVgm%2bNSB9BAzOASvHqkMHQhsDy");
client.Timeout = -1;

var request = new RestRequest(Method.POST);
request.AddHeader("Content-Type", "text/xml");
request.AddHeader("X-WNS-Type", "wns/toast");
request.AddHeader("Authorization", "Bearer <AccessToken>");
request.AddParameter("text/xml", "<toast><visual><binding template=\"ToastGeneric\"><text>Example cloud toast notification</text><text>This is an example cloud notification using XML</text></binding></visual></toast>",  ParameterType.RequestBody);
Console.WriteLine(response.Content);
Sumber

Windows developer
Saran dan Komentar
Segera hadir: Sepanjang tahun 2024 kami akan menghentikan penggunaan GitHub Issues sebagai mekanisme umpan balik untuk konten dan menggantinya dengan sistem umpan balik baru. Untuk mengetahui informasi selengkapnya, lihat: https://aka.ms/ContentUserFeedback.
Kirim dan lihat umpan balik untuk