Nata
Norint pasiekti šį puslapį, reikalingas leidimas. Galite pabandyti prisijungti arba pakeisti katalogus.
Norint pasiekti šį puslapį, reikalingas leidimas. Galite pabandyti pakeisti katalogus.
You can invoke Fabric user data functions from external applications by sending HTTP requests to the function's public endpoint. This enables you to integrate your Fabric business logic into web apps, automation scripts, microservices, or any system outside the Fabric environment.
In this tutorial, you:
- Register a Microsoft Entra application for authentication
- Get the function's public URL and enable public access
- Create a Python console application that calls the function
- Understand the response schema and HTTP status codes
Prerequisites
- Visual Studio Code installed on your local machine.
- Python 3.11 installed on your local machine.
- A Microsoft Fabric account. You can sign up for a free trial.
- A Fabric workspace.
- A published user data functions item. For instructions, see Create user data functions in Visual Studio Code or Create user data functions in the portal.
Create a Microsoft Entra app
To call user data functions from an external application, you need to register an application in Microsoft Entra ID. This app registration provides the credentials your Python application uses to authenticate.
Go to the Microsoft Entra admin center and register an application using the steps described in Quickstart: Register an application with the Microsoft identity platform.
The Microsoft Entra app Application (client) ID and Directory (tenant) ID values appear in the Summary box. Record these values because they're required later.
Under the Manage list, select API permissions, then Add permission.
Add the PowerBI Service, select Delegated permissions, and select UserDataFunction.Execute.All or item.Execute.All permissions. Confirm that admin consent isn't required.
Go back to the Manage setting and select Authentication > Add a platform > Single-page application.
For local development purposes, add
http://localhost:3000under Redirect URIs and confirm that the application is enabled for the authorization code flow with Proof Key for Code Exchange (PKCE). Select the Configure button to save your changes. If the application encounters an error related to cross-origin requests, add the Mobile and desktop applications platform in the previous step with the same redirect URI.Back to Authentication, scroll down to Advanced Settings and, under Allow public client flows, select Yes for Enable the following mobile and desktop flows.
Create a console application
Now that you have an app registration, create a Python console application that authenticates and calls your user data function.
Get the function URL to invoke
Each user data function has a unique public URL that serves as its REST API endpoint. Before you can call the function from an external application, you need to enable public access and get the URL.
To get the function URL:
In the Fabric portal, open your user data functions item.
Make sure you're in Run only mode, not Develop mode.
In the Functions explorer, hover over the name of the function and select the ellipsis (...).
Select Properties.
In the Properties pane, make sure Public access is enabled. If not, select the toggle to enable it.
Copy the Public URL for use in your Python application.
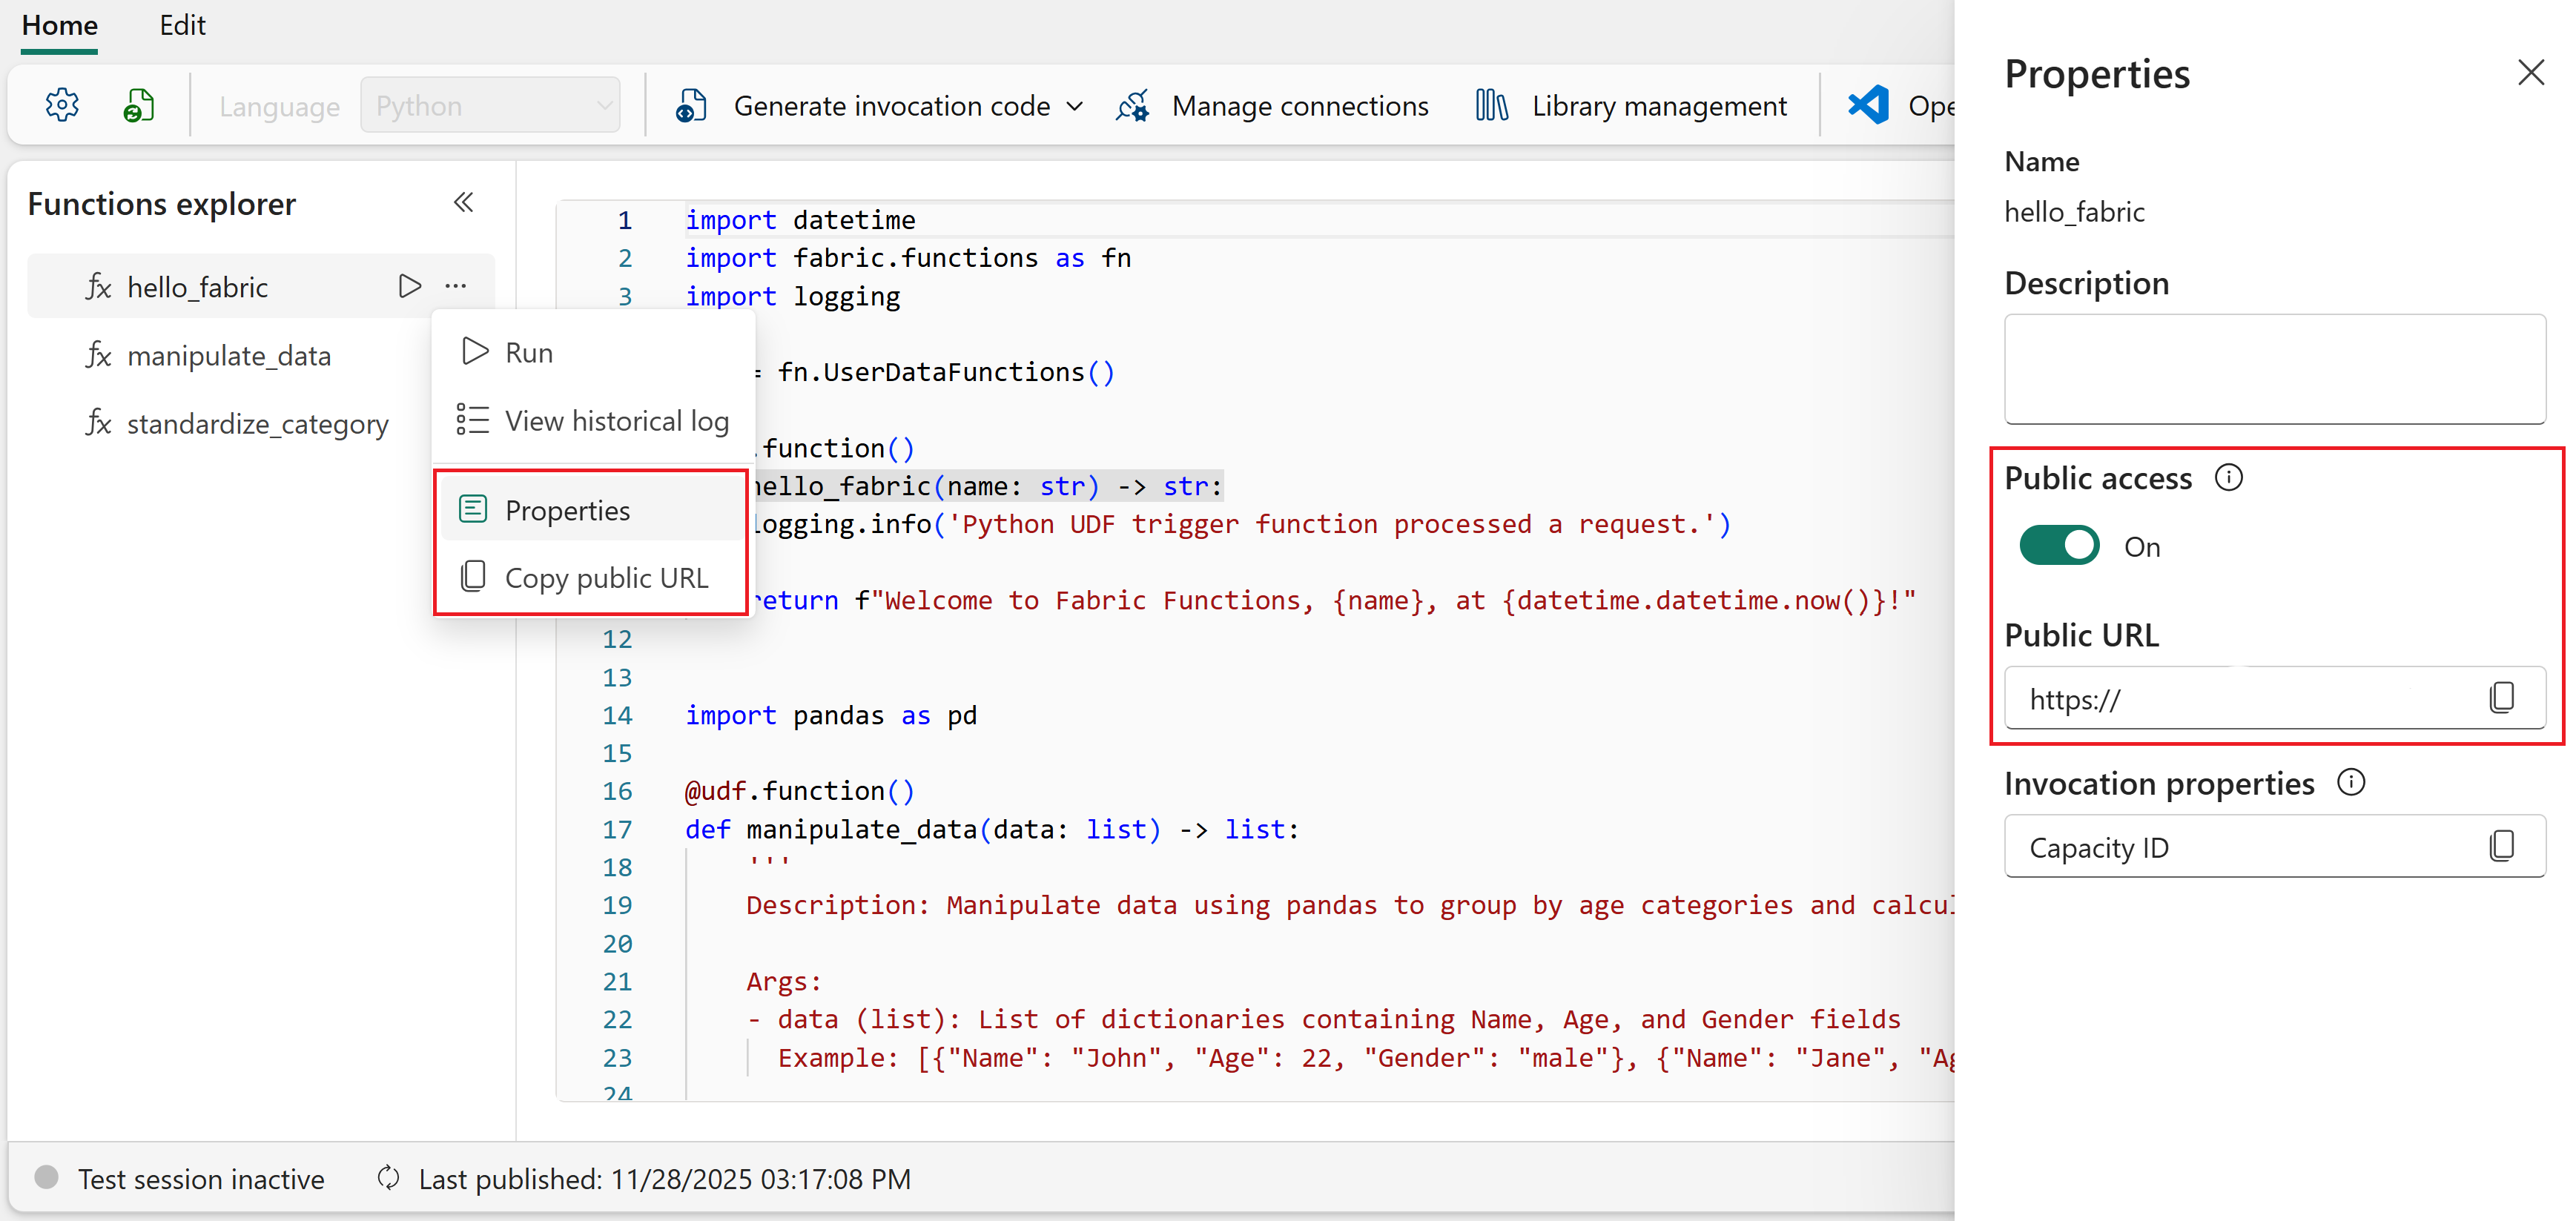
Tip
If public access is already enabled, you can skip the Properties pane. In the Functions explorer, select the ellipsis (...) next to the function name and select Copy Function URL. This copies the same URL as the Public URL in the Properties pane.
In your application code, replace the
FUNCTION_URLplaceholder with the URL you copied.

Set up your Python project
Create a Python project with a virtual environment and install the required dependencies.
Create a new folder for your Python app, for example
my-data-app.Open the folder in Visual Studio Code.
Open the Command Palette (Ctrl+Shift+P) and search for Python: Create Environment.
Select venv as the environment type.
Select Python 3.11 as the interpreter version.
Open a new terminal in Visual Studio Code (Ctrl+`).
Activate the Python virtual environment:
Windows:
.venv\Scripts\activatemacOS/Linux:
source .venv/bin/activateInstall the required Python libraries:
pip install azure-identity requests
Add the application code
Add the Python code that authenticates with Microsoft Entra ID and calls your user data function.
Create a file named
app.pyin your project folder.Add the following code. Replace
<REPLACE WITH USER DATA FUNCTION URL>with the public URL you copied earlier.from azure.identity import InteractiveBrowserCredential import requests import json # Acquire a token using interactive browser authentication # This opens a browser window for the user to sign in with their Microsoft account credential = InteractiveBrowserCredential() scope = "https://analysis.windows.net/powerbi/api/user_impersonation" token = credential.get_token(scope) if not token.token: print("Error: Could not get access token") exit(1) # Prepare headers with the access token headers = { "Authorization": f"Bearer {token.token}", "Content-Type": "application/json" } FUNCTION_URL = "<REPLACE WITH USER DATA FUNCTION URL>" # Prepare the request data (modify to match your function's expected input) data = {"name": "John"} try: # Call the user data function public URL response = requests.post(FUNCTION_URL, json=data, headers=headers) response.raise_for_status() print(json.dumps(response.json(), indent=2)) except Exception as e: print(f"Error: {e}")Note
This example uses
InteractiveBrowserCredentialfor simplicity, which opens a browser for interactive sign-in. For production applications, pass theclient_idandtenant_idfrom your registered Microsoft Entra application toInteractiveBrowserCredential, or use a different credential type such asClientSecretCredentialfor service-to-service authentication. For more information, see Azure Identity client library for Python.
Run the application
To run the application, use the following command in the terminal:
python app.py
A browser window opens for you to sign in with your Microsoft account. After authentication, the application calls your user data function and prints the response.
To debug the application in Visual Studio Code, set breakpoints by clicking in the gutter next to the line numbers, then press F5 to start debugging. For more information, see Python debugging in Visual Studio Code.
Output schema
When you invoke a user data function from an external application, the response body follows this JSON schema:
{
  "functionName": "hello_fabric",
  "invocationId": "1234567890",
  "status": "Succeeded",
  "output": "Hello, John!",
  "errors": []
}
The response includes these properties:
- functionName: The name of the function that was executed.
- invocationId: A unique identifier for this specific function execution. Useful for troubleshooting and correlating logs.
- status: The outcome of the function's execution. Possible values are
Succeeded,BadRequest,Failed,Timeout, andResponseTooLarge. - output: The return value of your function. The data type and structure depend on what your function returns. For example, if your function returns a string,
outputis a string. If your function returns a dictionary,outputis a JSON object. - errors: A list of errors captured during execution. Each error includes a
name,message, and optionalpropertiesobject containing key-value pairs with more details. Empty when the function succeeds.
Response codes
The function returns the following HTTP codes as a result of the execution.
| Response code | Message | Description |
|---|---|---|
| 200 | Success | The request was successful. |
| 400 | Bad Request | The request wasn't valid. This response could be due to missing or incorrect input parameter values, data types, or names. This response could also be caused by public access being turned off for a function. |
| 403 | Forbidden | The response was too large and the invocation failed. |
| 408 | Request Timeout | The request failed due to the execution taking longer than the maximum allowed time. |
| 409 | Conflict | The request couldn't be completed due to a conflicting state. This error could be caused by an unhandled exception or an error with user credentials. |
| 422 | Bad Request | The request failed due to a UserThrownError raised in the function. |
| 500 | Internal Server Error | The request failed due to an internal error in the service. |