Configure dataflow storage to use Azure Data Lake Gen 2
Data used with Power BI is stored in internal storage provided by Power BI by default. With the integration of dataflows and Azure Data Lake Storage Gen 2 (ADLS Gen2), you can store your dataflows in your organization's Azure Data Lake Storage Gen2 account. This feature essentially allows you to "bring your own storage" to Power BI dataflows, and establish a connection at the tenant or workspace level.
Reasons to use the ADLS Gen 2 workspace or tenant connection
After you attach your dataflow, Power BI configures and saves a reference so that you can now read and write data to your own ADLS Gen 2. Power BI stores the data in the common data model (CDM) format, which captures metadata about your data in addition to the actual data generated by the dataflow itself. This feature unlocks many powerful capabilities and enables your data and the associated metadata in CDM format to now serve extensibility, automation, monitoring, and backup scenarios. When you make this data available and widely accessible in your own environment, it enables you to democratize the insights and data created within your organization. It also unlocks the ability for you to create further solutions with a wide range of complexity. Your solutions can be CDM aware custom applications and solutions in Power Platform, Azure, and those available through partner and independent software vendor (ISV) ecosystems. Or you can create an application to read a CSV. Your data engineers, data scientists, and analysts can now work with, use, and reuse a common set of data that is curated in ADLS Gen 2.
There are two ways to configure which ADLS Gen 2 store to use: you can use a tenant-assigned ADLS Gen 2 account, or you can bring your own ADLS Gen 2 store at a workspace level.
Prerequisites
To bring your own ADLS Gen 2 account, you must have Owner permission at the storage account layer. Permissions at the resource group or subscription level won't work. If you're an administrator, you still must assign yourself the Owner permission. Currently not supporting ADLS Gen2 Storage Accounts behind a firewall.
The storage account must be created with the Hierarchical Namespace (HNS) enabled.
The storage account must be created in the same Microsoft Entra tenant as the Power BI tenant.
The user must have Storage Blob Data Owner role, Storage Blob Data Reader role, and an Owner role at the storage account level (scope should be this resource and not inherited). Any applied role changes might take a few minutes to sync, and must sync before the following steps can be completed in the Power BI service.
The Power BI workspace tenant region should be the same as the storage account region.
TLS (Transport Layer Security) version 1.2 (or higher) is required to secure your endpoints. Web browsers and other client applications that use TLS versions earlier than TLS 1.2 won't be able to connect.
Attaching a dataflow with ADLS Gen 2 behind multifactor authentication (MFA) isn't supported.
Finally, you can connect to any ADLS Gen 2 from the Admin portal, but if you connect directly to a workspace, you must first ensure there are no dataflows in the workspace before connecting.
Note
Bring your own storage (Azure Data Lake Gen 2) is not available in the Power BI service for U.S. Government GCC customers. For more information about which features are available, and which are not, see Power BI feature availability for U.S. Government customers.
The following table describes the permissions for ADLS and for Power BI required for ADLS Gen 2 and Power BI:
| Action | ADLS permissions | Minimum Power BI permissions |
|---|---|---|
| Connect ADLS Gen 2 to Power BI tenant | Owner | Power BI administrator |
| Connect ADLS Gen 2 to Workspace | Owner | Workspace admin |
| Create Power BI dataflows writing back to connected ADLS account | Not applicable | Workspace contributor |
| Consume Power BI dataflow | Not applicable | Workspace viewer |
Connect to an Azure Data Lake Gen 2 at a workspace level
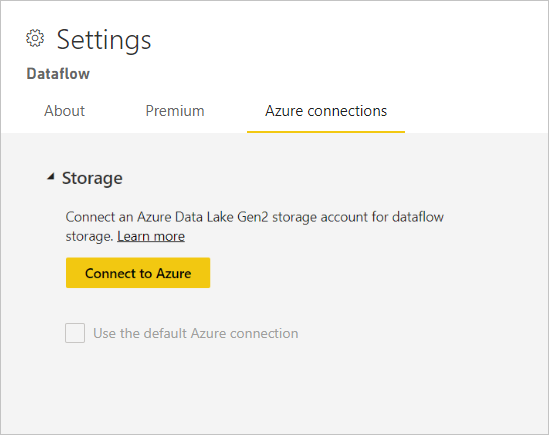
Navigate to a workspace that has no dataflows. Select Workspace settings. Choose the Azure Connections tab and then select the Storage section.

The Use default Azure connection option is visible if admin has already configured a tenant-assigned ADLS Gen 2 account. You have two options:
- Use the tenant configured ADLS Gen 2 account by selecting the box called Use the default Azure connection, or
- Select Connect to Azure to point to a new Azure Storage account.
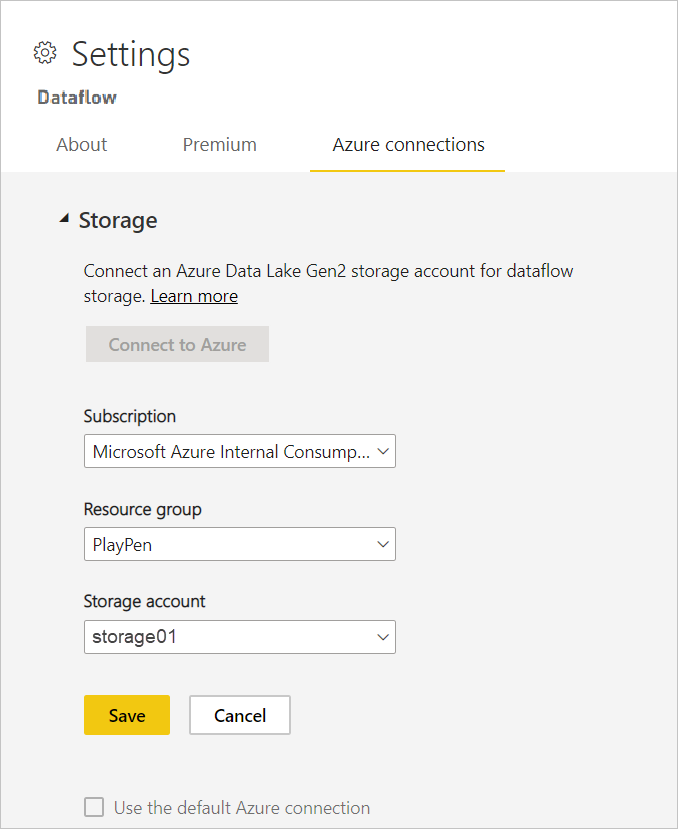
When you select Connect to Azure, Power BI retrieves a list of Azure subscriptions to which you have access. Fill in the dropdowns. Then choose a valid Azure subscription, resource group, and storage account that has the hierarchical namespace option enabled, which is the ADLS Gen2 flag. The personal account used to connect to Azure is only used once, to set the initial connection and grant the Power BI service account rights to read and write data, after which the original user account is no longer needed to keep the connection active.

After you choose your selected, select Save and you now have successfully connected the workspace to your own ADLS Gen2 account. Power BI automatically configures the storage account with the required permissions, and sets up the Power BI filesystem where the data will be written. At this point, every dataflow’s data inside this workspace will write directly to this filesystem, which can be used with other Azure services. You now have a single source for all of your organizational or departmental data.
Azure connections configuration
Configuring Azure connections is an optional setting with more properties that can optionally be set:
- Tenant Level storage, which lets you set a default, and/or
- Workspace-level storage, which lets you specify the connection per workspace
You can optionally configure tenant-level storage if you want to use a centralized data lake only, or want this storage to be the default option. We don’t automatically start by using the default to allow flexibility in your configuration, so you have flexibility to configure the workspaces that use this connection as you see fit. If you configure a tenant-assigned ADLS Gen 2 account, you still have to configure each workspace to use this default option.
You can optionally, or additionally, configure workspace-level storage permissions as a separate option, which provides complete flexibility to set a specific ADLS Gen 2 account on a workspace by workspace basis.
To summarize, if tenant-level storage and workspace-level storage permissions are allowed, then workspace admins can optionally use the default ADLS connection, or opt to configure another storage account separate from the default. If tenant storage isn't set, then workspace admins can optionally configure ADLS accounts on a workspace by workspace basis. Finally, if tenant-level storage is selected and workspace-level storage isn't allowed, then workspace admins can optionally configure their dataflows to use this connection.
Structure and format for ADLS Gen 2 workspace connections
In the ADLS Gen 2 storage account, all dataflows are stored in the powerbi container of the filesystem.
The structure of the powerbi container looks like this:
<workspace name>/<dataflow name>/model.json, <workspace name>/<dataflow name>/model.json.snapshots/<all snapshots> and <workspace name>/<dataflow name>/<table name>/<tablesnapshots>
The location where dataflows store data in the folder hierarchy for ADLS Gen 2 is the same whether the workspace is located in shared capacity or Premium capacity.
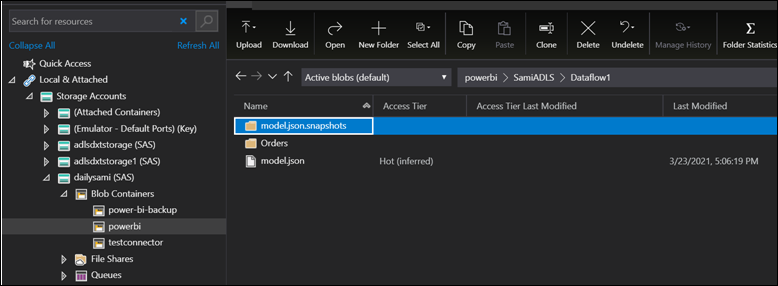
The following example uses the Orders table of the Northwind Odata sample.

In the preceding image:
- The model.json is the most recent version of the dataflow.
- The model.json.snapshots are all previous versions of the dataflow. This history is useful if you need a previous version of mashup, or incremental settings.
- The tablename is the folder containing resulting data after a dataflow refresh has completed.
We only write to this storage account and don't currently delete data. So even after detach, we don’t delete from the ADLS account, so all of the files mentioned in the preceding list are still stored.
Note
Dataflows allow linking or referencing tableds in other dataflows. In such dataflows, the model.json file can refer to another model.json of another dataflow in the same or other workspace.
Moving files between/within ADLS Gen 2 storage accounts
When you move a dataflow from one ADLS Gen2 storage account to another, you need to make sure that the paths in the model.json file are updated to reflect the new location. This is because the model.json file contains the path to the dataflow and the path to the data. If you don't update the paths, the dataflow will not be able to find the data and causes permission errors. To update the paths, you can use the following steps:
- Open the model.json file in a text editor.
- Find the storage account URL and replace it with the new storage account URL.
- Save the file.
- Overwrite the existing model.json file in the ADLS Gen2 storage account.
Extensibility for ADLS Gen 2 workspace connections
If you're connecting ADLS Gen 2 to Power BI, you can do this action at the workspace or tenant level. Make sure you have the right access level. Learn more in Prerequisites.
The storage structure adheres to the Common Data Model format. Learn more about the storage structure and CDM by visiting What is the storage structure for analytical dataflows and Use the Common Data Model to optimize Azure Data Lake Storage Gen2.
After it's properly configured, the data and metadata is in your control. Many applications are aware of the CDM and the data can be extended by using Azure, PowerApps, and PowerAutomate. You can also use third-party ecosystems either by conforming to the format or by reading the raw data.
Detach Azure Data Lake Gen 2 from a workspace or tenant
To remove a connection at a workspace level, you must first ensure all dataflows in the workspace are deleted. After all the dataflows have been removed, select Disconnect in the workspace settings. The same applies for a tenant, but you must first ensure all workspaces have also been disconnected from the tenant storage account before you're able to disconnect at a tenant level.
Disable Azure Data Lake Gen 2
In the Admin portal, under dataflows, you can disable access for users to either use this feature, and can disallow workspace admins to bring their own Azure Storage.
Revert from Azure Data Lake Gen 2
After the dataflow storage has been configured to use Azure Data Lake Gen 2, there's no way to automatically revert. The process to return to Power BI-managed storage is manual.
To revert the migration that you made to Gen 2, you need to delete your dataflows and recreate them in the same workspace. Then, because we don’t delete data from ADLS Gen 2, go to the resource itself and clean up data. This action would involve the following steps.
Export a copy of the dataflow from Power BI. Or, copy the model.json file. The model.json file is stored in ADLS.
Delete the dataflows.
Detach ADLS.
Recreate the dataflows by using import. Incremental refresh data (if applicable) will need to be deleted prior to import. This action can be done by deleting the relevant partitions in the model.json file.
Configure refresh/recreate incremental refresh policies.
Connect to the data by using the ADLS Gen 2 connector
The scope of this document describes ADLS Gen 2 dataflows connections and not the Power BI ADLS Gen 2 connector. Working with the ADLS Gen 2 connector is a separate, possibly additive, scenario. The ADLS connector simply uses ADLS as a datasource. So using Power Query Online to query against that data doesn’t have to be in CDM format, it can be whatever data format the customer wants. For more information, see Azure Data Lake Storage Gen2.
Related content
The following articles provide more information about dataflows and Power BI: