你当前正在访问 Microsoft Azure Global Edition 技术文档网站。 如果需要访问由世纪互联运营的 Microsoft Azure 中国技术文档网站,请访问 https://docs.azure.cn。
本文展示了如何发出路线请求并在地图上显示路线。
可通过两种方法来执行此操作。 第一种方法是使用 TypeScript REST SDK @azure-rest/maps-route 查询 Get Route Directions API。 第二种方法是使用 Fetch API 对 Get Route Directions API 发起搜索请求。 两种方法在本文中均有介绍。
通过 REST SDK 查询路线
import * as atlas from "azure-maps-control";
import MapsRoute, { toColonDelimitedLatLonString } from "@azure-rest/maps-route";
import "azure-maps-control/dist/atlas.min.css";

const onload = () => {
  // Initialize a map instance.
  const map = new atlas.Map("map", {
    view: "Auto",
    // Add authentication details for connecting to Azure Maps.
    authOptions: {
      // Use Azure Active Directory authentication.
      authType: "aad",
      clientId: "<Your Azure Maps Client ID>",
      aadAppId: "<Your Azure Active Directory Client ID>",
      aadTenant: "<Your Azure Active Directory Tenant ID>"
    }
  });

  map.events.add("load", async () => {
    // Use the access token from the map and create an object that implements the TokenCredential interface.
    const credential = {
      getToken: () => {
        return {
          token: map.authentication.getToken()
        };
      }
    };

    // Create a Route client.
    const client = MapsRoute(credential, "<Your Azure Maps Client ID>");

    // Create a data source and add it to the map.
    const dataSource = new atlas.source.DataSource();
    map.sources.add(dataSource);

    // Create the GeoJSON objects which represent the start and end points of the route.
    const startPoint = new atlas.data.Feature(new atlas.data.Point([-122.130137, 47.644702]), {
      title: "Redmond",
      icon: "pin-blue"
    });

    const endPoint = new atlas.data.Feature(new atlas.data.Point([-122.3352, 47.61397]), {
      title: "Seattle",
      icon: "pin-round-blue"
    });

    // Add the data to the data source.
    dataSource.add([startPoint, endPoint]);

    // Create a layer for rendering the route line under the road labels.
    map.layers.add(
      new atlas.layer.LineLayer(dataSource, null, {
        strokeColor: "#2272B9",
        strokeWidth: 5,
        lineJoin: "round",
        lineCap: "round"
      }),
      "labels"
    );

    // Create a layer for rendering the start and end points of the route as symbols.
    map.layers.add(
      new atlas.layer.SymbolLayer(dataSource, null, {
        iconOptions: {
          image: ["get", "icon"],
          allowOverlap: true,
          ignorePlacement: true
        },
        textOptions: {
          textField: ["get", "title"],
          offset: [0, 1.2]
        },
        filter: ["any", ["==", ["geometry-type"], "Point"], ["==", ["geometry-type"], "MultiPoint"]] //Only render Point or MultiPoints in this layer.
      })
    );

    // Get the coordinates of the start and end points.
    const coordinates = [
      [startPoint.geometry.coordinates[1], startPoint.geometry.coordinates[0]],
      [endPoint.geometry.coordinates[1], endPoint.geometry.coordinates[0]]
    ];

    // Get the route directions between the start and end points.
    const response = await client.path("/route/directions/{format}", "json").get({
      queryParameters: {
        query: toColonDelimitedLatLonString(coordinates)
      }
    });

    // Get the GeoJSON feature collection of the route.
    const data = getFeatures(response.body.routes);

    // Add the route data to the data source.
    dataSource.add(data);

    // Update the map view to center over the route.
    map.setCamera({
      bounds: data.bbox,
      padding: 40
    });
  });
};

/**
 * Helper function to convert a route response into a GeoJSON FeatureCollection.
 */
const getFeatures = (routes) => {
  const bounds = [];
  const features = routes.map((route, index) => {
    const multiLineCoords = route.legs.map((leg) => {
      return leg.points.map((coord) => {
        const position = [coord.longitude, coord.latitude];
        bounds.push(position);
        return position;
      });
    });

    // Include all properties on the route object except legs.
    // Legs is used to create the MultiLineString, so we only need the summaries.
    // The legSummaries property replaces the legs property with just summary data.
    const props = {
      ...route,
      legSummaries: route.legs.map((leg) => leg.summary),
      resultIndex: index
    };
    delete props.legs;

    return {
      type: "Feature",
      geometry: {
        type: "MultiLineString",
        coordinates: multiLineCoords
      },
      properties: props
    };
  });

  return {
    type: "FeatureCollection",
    features: features,
    bbox: new atlas.data.BoundingBox.fromLatLngs(bounds)
  };
};

document.body.onload = onload;
在上面的代码示例中,第一个代码块构造了一个地图对象,并设置身份验证机制来使用 Microsoft Entra ID。 有关说明,可以参阅创建地图。
第二个代码块创建了对象,该对象实现 TokenCredential 接口,通过访问令牌验证对 Azure Maps 的 HTTP 请求。 然后,它将凭据对象传递给 MapsSearch 并创建客户端的实例。
第二个代码块创建 DataSource 对象并将其添加到地图。
第四个代码块创建起点和终点对象,并将其添加到 dataSource 对象。
线条是 LineString 的一个特征。 LineLayer 呈现 DataSource 中包装的线条对象(作为地图中的线条)。 第四个代码块创建线条层并将其添加到地图。 请参阅 LinestringLayerOptions 中介绍的线条层属性。
某个符号层使用文本或图标来呈现在 DataSource 中包装的基于点的数据。 文本或图标在地图上渲染为符号。 第五个代码块创建符号层并将其添加到地图。
第六个代码块会查询 Azure Maps 路线服务(MapsRoute 客户端的一部分)。 Get 请求用于获取起点和终点之间的路线。 然后,系统会使用 getFeatures() 帮助程序函数从响应中提取 GeoJSON 特性集合,并将其添加到数据源。 然后,它将响应呈现为地图上的路线。 有关向地图添加线路的详细信息,请参阅在地图上添加线路。
最后一个代码块使用地图的 setCamera 属性设置地图的边界。
路线查询、数据源、符号、线层和摄影机边界是在事件侦听器中创建的。 此代码结构可确保仅在地图完全加载后显示结果。
通过 Fetch API 查询路线
import * as atlas from "azure-maps-control";
import "azure-maps-control/dist/atlas.min.css";

const onload = () => {
  // Initialize a map instance.
  const map = new atlas.Map("map", {
    view: "Auto",
    // Add authentication details for connecting to Azure Maps.
    authOptions: {
      // Use Azure Active Directory authentication.
      authType: "aad",
      clientId: "<Your Azure Maps Client ID>",
      aadAppId: "<Your Azure Active Directory Client ID>",
      aadTenant: "<Your Azure Active Directory Tenant ID>"
    }
  });

  map.events.add("load", async () => {
    // Create a data source and add it to the map.
    const dataSource = new atlas.source.DataSource();
    map.sources.add(dataSource);

    // Create the GeoJSON objects which represent the start and end points of the route.
    const startPoint = new atlas.data.Feature(new atlas.data.Point([-122.130137, 47.644702]), {
      title: "Redmond",
      icon: "pin-blue"
    });

    const endPoint = new atlas.data.Feature(new atlas.data.Point([-122.3352, 47.61397]), {
      title: "Seattle",
      icon: "pin-round-blue"
    });

    // Add the data to the data source.
    dataSource.add([startPoint, endPoint]);

    // Create a layer for rendering the route line under the road labels.
    map.layers.add(
      new atlas.layer.LineLayer(dataSource, null, {
        strokeColor: "#2272B9",
        strokeWidth: 5,
        lineJoin: "round",
        lineCap: "round"
      }),
      "labels"
    );

    // Create a layer for rendering the start and end points of the route as symbols.
    map.layers.add(
      new atlas.layer.SymbolLayer(dataSource, null, {
        iconOptions: {
          image: ["get", "icon"],
          allowOverlap: true,
          ignorePlacement: true
        },
        textOptions: {
          textField: ["get", "title"],
          offset: [0, 1.2]
        },
        filter: ["any", ["==", ["geometry-type"], "Point"], ["==", ["geometry-type"], "MultiPoint"]] //Only render Point or MultiPoints in this layer.
      })
    );

    // Send a request to the route API
    let url = "https://atlas.microsoft.com/route/directions/json?";
    url += "&api-version=1.0";
    url +=
      "&query=" +
      startPoint.geometry.coordinates[1] +
      "," +
      startPoint.geometry.coordinates[0] +
      ":" +
      endPoint.geometry.coordinates[1] +
      "," +
      endPoint.geometry.coordinates[0];

    // Process request
    fetch(url, {
      headers: {
        Authorization: "Bearer " + map.authentication.getToken(),
        "x-ms-client-id": "<Your Azure Maps Client ID>"
      }
    })
      .then((response) => response.json())
      .then((response) => {
        const bounds = [];
        const route = response.routes[0];

        // Create an array to store the coordinates of each turn
        let routeCoordinates = [];
        route.legs.forEach((leg) => {
          const legCoordinates = leg.points.map((point) => {
            const position = [point.longitude, point.latitude];
            bounds.push(position);
            return position;
          });
          // Add each turn coordinate to the array
          routeCoordinates = routeCoordinates.concat(legCoordinates);
        });

        // Add route line to the dataSource
        dataSource.add(new atlas.data.Feature(new atlas.data.LineString(routeCoordinates)));

        // Update the map view to center over the route.
        map.setCamera({
          bounds: new atlas.data.BoundingBox.fromLatLngs(bounds),
          padding: 40
        });
      });
  });
};

document.body.onload = onload;
在上面的代码示例中,第一个块构造了一个地图对象,并设置身份验证机制来使用 Microsoft Entra ID。 有关说明,可以参阅创建地图。
第二个代码块创建 DataSource 对象并将其添加到地图。
第三个代码块创建路线的起点和终点。 然后,将其添加到数据源。 有关详细信息,请参阅在地图上添加图钉。
LineLayer 呈现 DataSource 中包装的线条对象(作为地图中的线条)。 第四个代码块创建线条层并将其添加到地图。 请参阅 LineLayerOptions 中介绍的线条层属性。
某个符号层使用文本或图标来呈现作为符号包装在地图上 DataSource 中的基于点的数据。 第五个代码块创建符号层并将其添加到地图。 请在 SymbolLayerOptions 中参阅符号层的属性。
下一个代码块将使用 Fetch API 对 Get Route Directions 发起搜索请求。 然后分析响应。 如果响应成功,则将使用纬度和经度信息创建一条直线(通过连接这些点)。 然后,将行数据添加到数据源,以在地图上呈现路线。 有关详细信息,请参阅在地图上添加线路。
最后一个代码块使用地图的 setCamera 属性设置地图的边界。
路线查询、数据源、符号、线层和摄影机边界是在事件侦听器中创建的。 重申一下,我们想要确保结果在地图完全加载后显示。
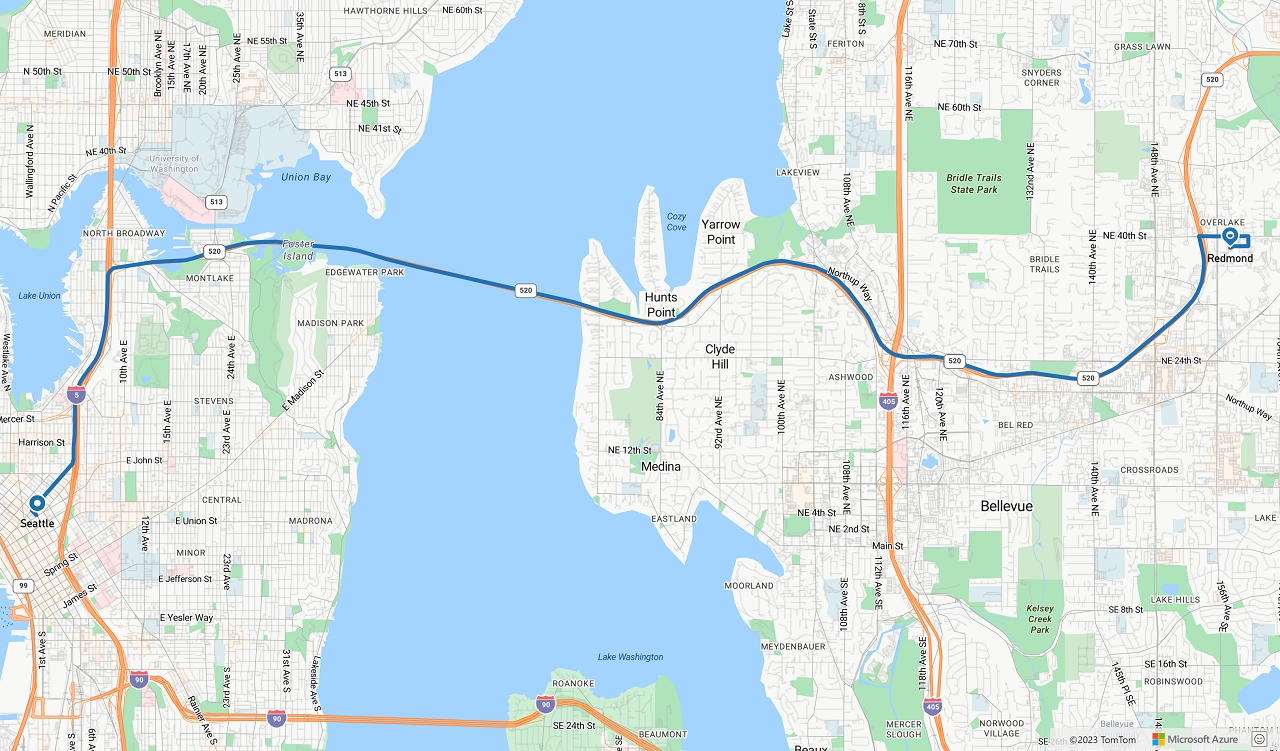
下图是一个屏幕截图,显示了两个代码示例的结果。
后续步骤
详细了解本文中使用的类和方法:
有关完整代码示例,请参阅以下文章: