建立資料來源 (Android SDK)
Azure 地圖服務 Android SDK 會將數據儲存在數據源中。 使用資料來源可將查詢和轉譯的資料作業最佳化。 目前,資料來源有兩種不同的類型:
- GeoJSON 來源:在本機管理 GeoJSON 格式的原始位置資料。 適用於小型到中型資料集 (數十萬個圖形)。
- 向量圖格來源:根據地圖底圖系統,為目前的地圖檢視載入格式化為向量圖格的資料。 適合用於大型資料集 (數百萬或數十億個圖形)。
注意
Azure 地圖服務 Android SDK 淘汰
適用於 Android 的 Azure 地圖服務 原生 SDK 現在已被取代,將於 3/31/25 淘汰。 若要避免服務中斷,請透過 3/31/25 移轉至 Azure 地圖服務 Web SDK。 如需詳細資訊,請參閱 Azure 地圖服務 Android SDK 移轉指南。
GeoJSON 資料來源
Azure 地圖服務使用 GeoJSON 作為其主要資料模型之一。 GeoJSON 是以 JSON 格式表示地理空間資料的開放式地理空間標準方法。 Azure 地圖服務 Android SDK 中提供的 GeoJSON 類別,可讓您輕鬆建立及串行化 GeoJSON 數據。 在 DataSource 類別中載入及儲存 GeoJSON 資料,並使用圖層加以轉譯。 下列程式碼說明如何在 Azure 地圖服務中建立 GeoJSON 物件。
/*
    Raw GeoJSON feature

    {
         "type": "Feature",
         "geometry": {
             "type": "Point",
             "coordinates": [-100, 45]
         },
         "properties": {
             "custom-property": "value"
         }
    }

*/

//Create a point feature.
Feature feature = Feature.fromGeometry(Point.fromLngLat(-100, 45));

//Add a property to the feature.
feature.addStringProperty("custom-property", "value");

//Add the feature to the data source.
source.add(feature);
/*
    Raw GeoJSON feature

    {
         "type": "Feature",
         "geometry": {
             "type": "Point",
             "coordinates": [-100, 45]
         },
         "properties": {
             "custom-property": "value"
         }
    }

*/

//Create a point feature.
val feature = Feature.fromGeometry(Point.fromLngLat(-100, 45))

//Add a property to the feature.
feature.addStringProperty("custom-property", "value")

//Add the feature to the data source.
source.add(feature)
提示
GeoJSON 資料可以使用下列三種方法之一新增至 DataSource 實例: add、 importDataFromUrl和 setShapes。 setShapes方法提供有效率的方式來覆寫數據源中的所有數據。 如果您呼叫 clear then add 方法來取代數據源中的所有數據,則會對對應進行兩個轉譯呼叫。 方法 setShape 會清除數據,並將數據新增至數據源,並透過單一轉譯呼叫對應。
或者,屬性可以先載入 JsonObject,然後在建立時傳遞至功能,如下列範例程式代碼所示。
//Create a JsonObject to store properties for the feature.
JsonObject properties = new JsonObject();
properties.addProperty("custom-property", "value");

Feature feature = Feature.fromGeometry(Point.fromLngLat(-100, 45), properties);
//Create a JsonObject to store properties for the feature.
val properties = JsonObject()
properties.addProperty("custom-property", "value")

val feature = Feature.fromGeometry(Point.fromLngLat(-100, 45), properties)
建立 GeoJSON 特徵後,即可透過地圖的 sources 屬性將資料來源新增至地圖。 下列程式碼說明如何建立 DataSource、將其新增至地圖,並將特徵新增至資料來源。
//Create a data source and add it to the map.
DataSource source = new DataSource();
map.sources.add(source);

//Add GeoJSON feature to the data source.
source.add(feature);
下列程式代碼顯示數種方式來建立 GeoJSON 功能、FeatureCollection 和 geometries。
//GeoJSON Point Geometry
Point point = Point.fromLngLat(LONGITUDE, LATITUDE);

//GeoJSON Point Geometry
LineString linestring = LineString.fromLngLats(PointList);

//GeoJSON Polygon Geometry
Polygon polygon = Polygon.fromLngLats(listOfPointList);

Polygon polygonFromOuterInner = Polygon.fromOuterInner(outerLineStringObject,innerLineStringObject);

//GeoJSON MultiPoint Geometry
MultiPoint multiPoint = MultiPoint.fromLngLats(PointList);

//GeoJSON MultiLineString Geometry
MultiLineString multiLineStringFromLngLat = MultiLineString.fromLngLats(listOfPointList);

MultiLineString multiLineString = MultiLineString.fromLineString(singleLineString);

//GeoJSON MultiPolygon Geometry
MultiPolygon multiPolygon = MultiPolygon.fromLngLats(listOflistOfPointList);

MultiPolygon multiPolygonFromPolygon = MultiPolygon.fromPolygon(polygon);

MultiPolygon multiPolygonFromPolygons = MultiPolygon.fromPolygons(PolygonList);

//GeoJSON Feature
Feature pointFeature = Feature.fromGeometry(Point.fromLngLat(LONGITUDE, LATITUDE));

//GeoJSON FeatureCollection
FeatureCollection featureCollectionFromSingleFeature = FeatureCollection.fromFeature(pointFeature);

FeatureCollection featureCollection = FeatureCollection.fromFeatures(listOfFeatures);
//GeoJSON Point Geometry
val point = Point.fromLngLat(LONGITUDE, LATITUDE)

//GeoJSON Point Geometry
val linestring = LineString.fromLngLats(PointList)

//GeoJSON Polygon Geometry
val polygon = Polygon.fromLngLats(listOfPointList)

val polygonFromOuterInner = Polygon.fromOuterInner(outerLineStringObject, innerLineStringObject)

//GeoJSON MultiPoint Geometry
val multiPoint = MultiPoint.fromLngLats(PointList)

//GeoJSON MultiLineString Geometry
val multiLineStringFromLngLat = MultiLineString.fromLngLats(listOfPointList)

val multiLineString = MultiLineString.fromLineString(singleLineString)

//GeoJSON MultiPolygon Geometry
val multiPolygon = MultiPolygon.fromLngLats(listOflistOfPointList)

val multiPolygonFromPolygon = MultiPolygon.fromPolygon(polygon)

val multiPolygonFromPolygons = MultiPolygon.fromPolygons(PolygonList)

//GeoJSON Feature
val pointFeature = Feature.fromGeometry(Point.fromLngLat(LONGITUDE, LATITUDE))

//GeoJSON FeatureCollection
val featureCollectionFromSingleFeature = FeatureCollection.fromFeature(pointFeature)

val featureCollection = FeatureCollection.fromFeatures(listOfFeatures)
序列化和還原序列化 GeoJSON
特徵集合、特徵和幾何類別全都有 fromJson() 和 toJson() 靜態方法,有助於序列化。 透過 fromJson() 方法傳遞的格式化有效 JSON 字串,會建立幾何物件。 此方法 fromJson() 也表示您可以使用 Gson 或其他串行化/還原串行化策略。 下列程式代碼示範如何取得字串化的 GeoJSON 功能,並將其還原串行化為 Feature 類別,然後將它串行化回 GeoJSON 字串。
//Take a stringified GeoJSON object.
String GeoJSON_STRING = "{"
    + "      \"type\": \"Feature\","
    + "      \"geometry\": {"
    + "            \"type\": \"Point\""
    + "            \"coordinates\": [-100, 45]"
    + "      },"
    + "      \"properties\": {"
    + "            \"custom-property\": \"value\""
    + "      },"
    + "}";

//Deserialize the JSON string into a feature.
Feature feature = Feature.fromJson(GeoJSON_STRING);

//Serialize a feature collection to a string.
String featureString = feature.toJson();
//Take a stringified GeoJSON object.
val GeoJSON_STRING = ("{"
        + "      \"type\": \"Feature\","
        + "      \"geometry\": {"
        + "            \"type\": \"Point\""
        + "            \"coordinates\": [-100, 45]"
        + "      },"
        + "      \"properties\": {"
        + "            \"custom-property\": \"value\""
        + "      },"
        + "}")

//Deserialize the JSON string into a feature.
val feature = Feature.fromJson(GeoJSON_STRING)

//Serialize a feature collection to a string.
val featureString = feature.toJson()
從 Web 或資產資料夾匯入 GeoJSON 資料
大部分的 GeoJSON 檔案都包含 FeatureCollection。 將 GeoJSON 檔案讀取為字串,並使用 FeatureCollection.fromJson 方法來還原串行化它。
類別 DataSource 具有稱為 importDataFromUrl 的內建方法,可使用 Web 或資產資料夾中檔案的 URL,在 GeoJSON 檔案中載入。 在數據源新增至對應之前,必須先呼叫這個方法。
zone_pivot_groups:azure-maps-android
//Create a data source and add it to the map.
DataSource source = new DataSource();

//Import the geojson data and add it to the data source.
source.importDataFromUrl("URL_or_FilePath_to_GeoJSON_data");

//Examples:
//source.importDataFromUrl("asset://sample_file.json");
//source.importDataFromUrl("https://example.com/sample_file.json");

//Add data source to the map.
map.sources.add(source);
//Create a data source and add it to the map.
var source = new DataSource()

//Import the geojson data and add it to the data source.
source.importDataFromUrl("URL_or_FilePath_to_GeoJSON_data")

//Examples:
//source.importDataFromUrl("asset://sample_file.json")
//source.importDataFromUrl("https://example.com/sample_file.json")

//Add data source to the map.
map.sources.add(source)
方法 importDataFromUrl 提供將 GeoJSON 摘要載入數據源的簡單方法,但提供載入數據方式和載入後所發生狀況的有限控制。 下列程式碼是可重複使用的類別,可從 Web 或資產資料夾匯入資料,並透過回呼函式將其傳回至 UI 執行緒。 接下來,在回呼中新增更多載入邏輯來處理數據、將其新增至地圖、計算周框方塊,以及更新地圖相機。
import android.content.Context;
import android.os.Handler;
import android.os.Looper;
import android.webkit.URLUtil;

import java.io.BufferedReader;
import java.io.IOException;
import java.io.InputStream;
import java.io.InputStreamReader;
import java.net.URL;
import java.util.concurrent.ExecutorService;
import java.util.concurrent.Executors;

import javax.net.ssl.HttpsURLConnection;

public class Utils {

    interface SimpleCallback {
        void notify(String result);
    }

    /**
     * Imports data from a web url or asset file name and returns it to a callback.
     * @param urlOrFileName A web url or asset file name that points to data to load.
     * @param context The context of the app.
     * @param callback The callback function to return the data to.
     */
    public static void importData(String urlOrFileName, Context context, SimpleCallback callback){
        importData(urlOrFileName, context, callback, null);
    }

    /**
     * Imports data from a web url or asset file name and returns it to a callback.
     * @param urlOrFileName A web url or asset file name that points to data to load.
     * @param context The context of the app.
     * @param callback The callback function to return the data to.
     * @param error A callback function to return errors to.
     */
    public static void importData(String urlOrFileName, Context context, SimpleCallback callback, SimpleCallback error){
        if(urlOrFileName != null && callback != null) {
            ExecutorService executor = Executors.newSingleThreadExecutor();
            Handler handler = new Handler(Looper.getMainLooper());

            executor.execute(() -> {
                String data = null;

                try {

                    if(URLUtil.isNetworkUrl(urlOrFileName)){
                        data = importFromWeb(urlOrFileName);
                    } else {
                        //Assume file is in assets folder.
                        data = importFromAssets(context, urlOrFileName);
                    }

                    final String result = data;

                    handler.post(() -> {
                        //Ensure the resulting data string is not null or empty.
                        if (result != null && !result.isEmpty()) {
                            callback.notify(result);
                        } else {
                            error.notify("No data imported.");
                        }
                    });
                } catch(Exception e) {
                    if(error != null){
                        error.notify(e.getMessage());
                    }
                }
            });
        }
    }

    /**
     * Imports data from an assets file as a string.
     * @param context The context of the app.
     * @param fileName The asset file name.
     * @return
     * @throws IOException
     */
    private static String importFromAssets(Context context, String fileName) throws IOException {
        InputStream stream = null;

        try {
            stream = context.getAssets().open(fileName);

            if(stream != null) {
                return readStreamAsString(stream);
            }
        } catch (Exception e) {
            e.printStackTrace();
        } finally {
            // Close Stream and disconnect HTTPS connection.
            if (stream != null) {
                stream.close();
            }
        }

        return null;
    }

    /**
     * Imports data from the web as a string.
     * @param url URL to the data.
     * @return
     * @throws IOException
     */
    private static String importFromWeb(String url) throws IOException {
        InputStream stream = null;
        HttpsURLConnection connection = null;
        String result = null;

        try {
            connection = (HttpsURLConnection) new URL(url).openConnection();

            //For this use case, set HTTP method to GET.
            connection.setRequestMethod("GET");

            //Open communications link (network traffic occurs here).
            connection.connect();

            int responseCode = connection.getResponseCode();
            if (responseCode != HttpsURLConnection.HTTP_OK) {
                throw new IOException("HTTP error code: " + responseCode);
            }

            //Retrieve the response body as an InputStream.
            stream = connection.getInputStream();

            if (stream != null) {
                return readStreamAsString(stream);
            }
        } catch (Exception e) {
            e.printStackTrace();
        } finally {
            // Close Stream and disconnect HTTPS connection.
            if (stream != null) {
                stream.close();
            }
            if (connection != null) {
                connection.disconnect();
            }
        }

        return result;
    }

    /**
     * Reads an input stream as a string.
     * @param stream Stream to convert.
     * @return
     * @throws IOException
     */
    private static String readStreamAsString(InputStream stream) throws IOException {
        //Convert the contents of an InputStream to a String.
        BufferedReader in = new BufferedReader(new InputStreamReader(stream, "UTF-8"));

        String inputLine;
        StringBuffer response = new StringBuffer();

        while ((inputLine = in.readLine()) != null) {
            response.append(inputLine);
        }

        in.close();

        return response.toString();
    }
}
import android.content.Context
import android.os.Handler
import android.os.Looper
import android.webkit.URLUtil
import java.net.URL
import java.util.concurrent.ExecutorService
import java.util.concurrent.Executors

class Utils {
    companion object {

        /**
            * Imports data from a web url or asset file name and returns it to a callback.
            * @param urlOrFileName A web url or asset file name that points to data to load.
            * @param context The context of the app.
            * @param callback The callback function to return the data to.
            */
        fun importData(urlOrFileName: String?, context: Context, callback: (String?) -> Unit) {
            importData(urlOrFileName, context, callback, null)
        }

        /**
            * Imports data from a web url or asset file name and returns it to a callback.
            * @param urlOrFileName A web url or asset file name that points to data to load.
            * @param context The context of the app.
            * @param callback The callback function to return the data to.
            * @param error A callback function to return errors to.
            */
        public fun importData(urlOrFileName: String?, context: Context, callback: (String?) -> Unit, error: ((String?) -> Unit)?) {
            if (urlOrFileName != null && callback != null) {
                val executor: ExecutorService = Executors.newSingleThreadExecutor()
                val handler = Handler(Looper.getMainLooper())
                executor.execute {
                    var data: String? = null

                    try {
                        data = if (URLUtil.isNetworkUrl(urlOrFileName)) {
                            URL(urlOrFileName).readText()
                        } else { //Assume file is in assets folder.
                            context.assets.open(urlOrFileName).bufferedReader().use{
                                it.readText()
                            }
                        }

                        handler.post {
                            //Ensure the resulting data string is not null or empty.
                            if (data != null && !data.isEmpty()) {
                                callback(data)
                            } else {
                                error!!("No data imported.")
                            }
                        }
                    } catch (e: Exception) {
                        error!!(e.message)
                    }
                }
            }
        }
    }
}
下列程式代碼示範如何使用這個公用程式將 GeoJSON 數據匯入為字串,並透過回呼將它傳回 UI 線程。 在回呼中,字串資料可序列化為 GeoJSON 特徵集合,並新增至資料來源。 您可以選擇性地更新地圖相機,以將焦點放在資料上。
//Create a data source and add it to the map.
DataSource source = new DataSource();
map.sources.add(source);

//Import the geojson data and add it to the data source.
Utils.importData("URL_or_FilePath_to_GeoJSON_data",
    this,
    (String result) -> {
        //Parse the data as a GeoJSON Feature Collection.
        FeatureCollection fc = FeatureCollection.fromJson(result);

        //Add the feature collection to the data source.
        source.add(fc);

        //Optionally, update the maps camera to focus in on the data.

        //Calculate the bounding box of all the data in the Feature Collection.
        BoundingBox bbox = MapMath.fromData(fc);

        //Update the maps camera so it is focused on the data.
        map.setCamera(
            bounds(bbox),
            padding(20));
    });
//Create a data source and add it to the map.
DataSource source = new DataSource();
map.sources.add(source);

//Import the GeoJSON data and add it to the data source.
Utils.importData("SamplePoiDataSet.json", this) {
    result: String? ->
        //Parse the data as a GeoJSON Feature Collection.
            val fc = FeatureCollection.fromJson(result!!)

        //Add the feature collection to the data source.
        source.add(fc)

        //Optionally, update the maps camera to focus in on the data.

        //Calculate the bounding box of all the data in the Feature Collection.
        val bbox = MapMath.fromData(fc);

        //Update the maps camera so it is focused on the data.
        map.setCamera(
            bounds(bbox),

            //Padding added to account for pixel size of rendered points.
            padding(20)
        )
    }
更新特徵
類別 DataSource 可讓您輕鬆新增及移除特徵。 更新特徵的幾何或屬性時,需要取代資料來源中的特徵。 有兩種方法可用來更新特徵:
- 使用所需的更新建立新特徵,並使用
setShapes方法來取代資料來源中的所有特徵。 如果您想要更新資料來源中的所有特徵,此方法將可發揮效用。
DataSource source;

private void onReady(AzureMap map) {
    //Create a data source and add it to the map.
    source = new DataSource();
    map.sources.add(source);

    //Create a feature and add it to the data source.
    Feature myFeature = Feature.fromGeometry(Point.fromLngLat(0,0));
    myFeature.addStringProperty("Name", "Original value");

    source.add(myFeature);
}

private void updateFeature(){
    //Create a new replacement feature with an updated geometry and property value.
    Feature myNewFeature = Feature.fromGeometry(Point.fromLngLat(-10, 10));
    myNewFeature.addStringProperty("Name", "New value");

    //Replace all features to the data source with the new one.
    source.setShapes(myNewFeature);
}
var source: DataSource? = null

private fun onReady(map: AzureMap) {
    //Create a data source and add it to the map.
    source = DataSource()
    map.sources.add(source)

    //Create a feature and add it to the data source.
    val myFeature = Feature.fromGeometry(Point.fromLngLat(0.0, 0.0))
    myFeature.addStringProperty("Name", "Original value")
    source!!.add(myFeature)
}

private fun updateFeature() {
    //Create a new replacement feature with an updated geometry and property value.
    val myNewFeature = Feature.fromGeometry(Point.fromLngLat(-10.0, 10.0))
    myNewFeature.addStringProperty("Name", "New value")

    //Replace all features to the data source with the new one.
    source!!.setShapes(myNewFeature)
}
- 追蹤變數中的特徵執行個體,並將其傳入資料來源
remove方法中,而加以移除。 使用所需的更新建立新特徵、更新變數參考,並使用add方法將其新增至資料來源。
DataSource source;
Feature myFeature;

private void onReady(AzureMap map) {
    //Create a data source and add it to the map.
    source = new DataSource();
    map.sources.add(source);

    //Create a feature and add it to the data source.
    myFeature = Feature.fromGeometry(Point.fromLngLat(0,0));
    myFeature.addStringProperty("Name", "Original value");

    source.add(myFeature);
}

private void updateFeature(){
    //Remove the feature instance from the data source.
    source.remove(myFeature);

    //Get properties from original feature.
    JsonObject props = myFeature.properties();

    //Update a property.
    props.addProperty("Name", "New value");

    //Create a new replacement feature with an updated geometry.
    myFeature = Feature.fromGeometry(Point.fromLngLat(-10, 10), props);

    //Re-add the feature to the data source.
    source.add(myFeature);
}
var source: DataSource? = null
var myFeature: Feature? = null

private fun onReady(map: AzureMap) {
    //Create a data source and add it to the map.
    source = DataSource()
    map.sources.add(source)

    //Create a feature and add it to the data source.
    myFeature = Feature.fromGeometry(Point.fromLngLat(0.0, 0.0))
    myFeature.addStringProperty("Name", "Original value")
    source!!.add(myFeature)
}

private fun updateFeature() {
    //Remove the feature instance from the data source.
    source!!.remove(myFeature)

    //Get properties from original feature.
    val props = myFeature!!.properties()

    //Update a property.
    props!!.addProperty("Name", "New value")

    //Create a new replacement feature with an updated geometry.
    myFeature = Feature.fromGeometry(Point.fromLngLat(-10.0, 10.0), props)

    //Re-add the feature to the data source.
    source!!.add(myFeature)
}
提示
如果您有一些會定期更新的資料,還有一些很少變更的資料,最好將這些資料分割到個別的資料來源執行個體。 資料來源發生更新時,會強制地圖重新繪製資料來源中的所有特徵。 藉由分割此資料,在該資料來源發生更新時,將只會重新繪製要定期更新的特徵,其他資料來源中的特徵將無需重新繪製。 這有助於提升效能。
向量圖格來源
向量圖格來源說明如何存取向量圖格圖層。 使用 VectorTileSource 類別將向量圖格來源具現化。 向量圖格圖層類似於圖格圖層,但兩者並不相同。 圖格圖層是點陣影像。 向量圖格圖層是 PBF 格式的壓縮檔案。 這個壓縮的檔案包含向量地圖資料,以及一或多個圖層。 此檔案可根據每個圖層的樣式,在用戶端上轉譯及設定樣式。 向量圖格中的資料包含點、線條和多邊形形式的地理特徵。 使用向量圖格圖層 (而非點陣圖格圖層) 有數個優點:
- 向量圖格的檔案大小通常比對等的點陣圖格小很多。 因此,會使用較少頻寬。 這意味著延遲較低、地圖效能更快,使用者體驗更加理想。
- 向量圖格會在用戶端上轉譯,因此會根據其顯示所在裝置的解析度進行調整。 因此,轉譯的地圖會顯得更加清晰,可清楚看到標籤。
- 變更向量地圖中的資料樣式時不需要再次下載資料,因為新的樣式可套用在用戶端上。 相對地,變更點陣圖格圖層的樣式時通常需要從伺服器載入圖格,然後再套用新樣式。
- 由於資料是以向量形式傳遞的,準備資料時所需的伺服器端處理會比較少。 因此,較新的資料可更快成為可用資料。
Azure 地圖服務遵循 Mapbox 向量圖格規格,這是一個開放式標準。 Azure 地圖服務提供下列向量圖格服務作為平台的一部分:
- 道路圖格
- 交通事故
- 交通流量
- Azure 地圖服務 Creator 也允許透過轉譯 -取得地圖底圖 API 來建立和存取自訂向量圖格
提示
使用來自 Azure 地圖服務 轉譯服務的向量或點陣影像磚搭配 Web SDK 時,您可以使用 佔位元 azmapsdomain.invalid取代 atlas.microsoft.com 。 此預留位置將會取代為地圖所使用的相同網域,並且會自動附加相同的驗證詳細資料。 這可大幅簡化使用 Microsoft Entra 驗證時對轉譯服務進行驗證的程序。
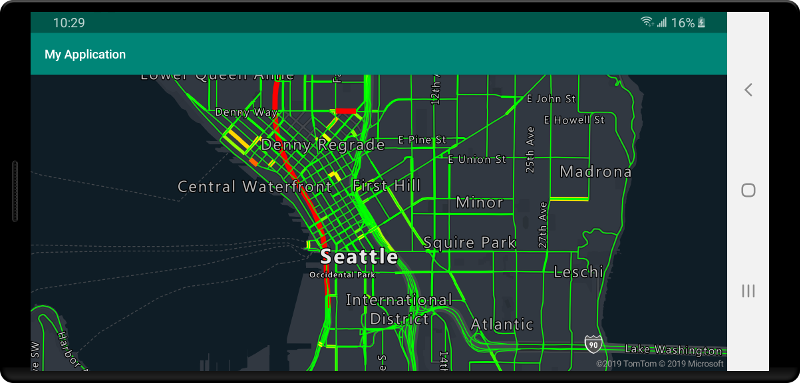
若要在地圖上顯示向量圖格來源的資料,請將來源連線至其中一個資料轉譯圖層。 所有使用向量來源的圖層,都必須在選項中指定 sourceLayer 值。 下列程式碼會將 Azure 地圖服務的交通流量向量圖格服務載入為向量圖格來源,然後使用線條圖層將其顯示在地圖上。 此向量圖格來源在來源圖層中有單一資料集,名為「交通流量」。 此資料集中的線條資料具有名為 traffic_level 的屬性,可在此程式碼中用來選取色彩和調整線條的大小。
//Formatted URL to the traffic flow vector tiles, with the maps subscription key appended to it.
String trafficFlowUrl = "https://azmapsdomain.invalid/traffic/flow/tile/pbf?api-version=1.0&style=relative&zoom={z}&x={x}&y={y}";

//Create a vector tile source and add it to the map.
VectorTileSource source = new VectorTileSource(
    tiles(new String[] { trafficFlowUrl }),
    maxSourceZoom(22)
);
map.sources.add(source);

//Create a layer for traffic flow lines.
LineLayer layer = new LineLayer(source,
    //The name of the data layer within the data source to pass into this rendering layer.
    sourceLayer("Traffic flow"),

    //Color the roads based on the traffic_level property.
    strokeColor(
        interpolate(
            linear(),
            get("traffic_level"),
            stop(0, color(Color.RED)),
            stop(0.33, color(Color.YELLOW)),
            stop(0.66, color(Color.GREEN))
        )
    ),

    //Scale the width of roads based on the traffic_level property.
    strokeWidth(
        interpolate(
            linear(),
            get("traffic_level"),
            stop(0, 6),
            stop(1,1)
        )
    )
);

//Add the traffic flow layer below the labels to make the map clearer.
map.layers.add(layer, "labels");
//Formatted URL to the traffic flow vector tiles, with the maps subscription key appended to it.
val trafficFlowUrl = "https://azmapsdomain.invalid/traffic/flow/tile/pbf?api-version=1.0&style=relative&zoom={z}&x={x}&y={y}"

//Create a vector tile source and add it to the map.
val source = VectorTileSource(
    tiles(arrayOf(trafficFlowUrl)),
    maxSourceZoom(22)
)
map.sources.add(source)

//Create a layer for traffic flow lines.
val layer = LineLayer(
    source,  //The name of the data layer within the data source to pass into this rendering layer.
    sourceLayer("Traffic flow"),  //Color the roads based on the traffic_level property.
    strokeColor(
        interpolate(
            linear(),
            get("traffic_level"),
            stop(0, color(Color.RED)),
            stop(0.33, color(Color.YELLOW)),
            stop(0.66, color(Color.GREEN))
        )
    ),  //Scale the width of roads based on the traffic_level property.
    strokeWidth(
        interpolate(
            linear(),
            get("traffic_level"),
            stop(0, 6),
            stop(1, 1)
        )
    )
)

//Add the traffic flow layer below the labels to make the map clearer.
map.layers.add(layer, "labels")
將數據源 連線 至圖層
資料會使用轉譯圖層在地圖上轉譯。 一或多個轉譯圖層可參考單一資料來源。 下列轉譯圖層需要資料來源:
- 泡泡圖層 - 將點資料轉譯為地圖上的縮放圓圈。
- 符號圖層 - 將點資料轉譯為圖示或文字。
- 熱度圖圖層 - 將點資料轉譯為密度熱度圖。
- 線條圖層 - 轉譯線條,或轉譯多邊形的外框。
- 多邊形圖層 - 以單色或影像圖樣填滿多邊形的區域。
下列程式代碼示範如何建立數據源、將數據源新增至地圖,並將它連接到泡泡圖層。 然後,將 GeoJSON 點數據從遠端位置匯入數據源。
//Create a data source and add it to the map.
DataSource source = new DataSource();

//Import the geojson data and add it to the data source.
source.importDataFromUrl("URL_or_FilePath_to_GeoJSON_data");

//Add data source to the map.
map.sources.add(source);

//Create a layer that defines how to render points in the data source and add it to the map.
BubbleLayer layer = new BubbleLayer(source);
map.layers.add(layer);
//Create a data source and add it to the map.
val source = DataSource()

//Import the geojson data and add it to the data source.
source.importDataFromUrl("URL_or_FilePath_to_GeoJSON_data")

//Add data source to the map.
map.sources.add(source)
有較多的轉譯層不會連線到這些數據源,但會直接載入數據以進行轉譯。
- 圖格圖層 - 將點陣圖格圖層疊加地圖之上。
一個具有多個圖層的資料來源
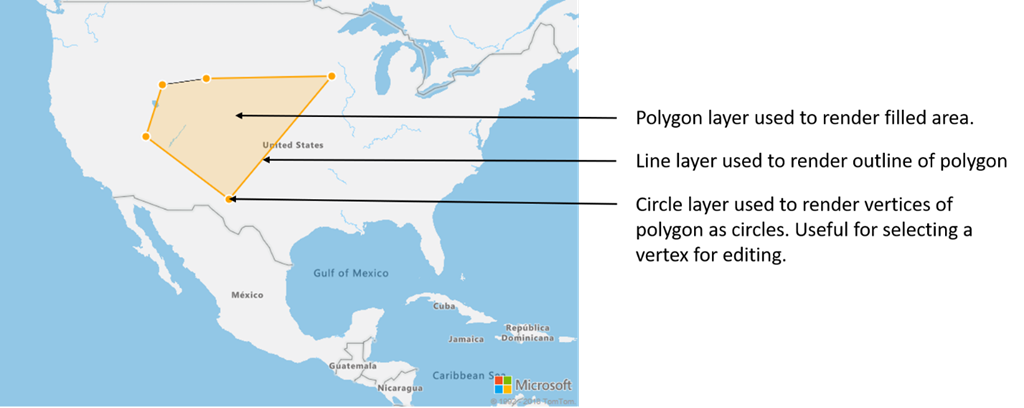
多個圖層可連線至單一資料來源。 在許多不同的情況下,此選項都有其效益。 例如,請考量使用者繪製了多邊形的案例。 當使用者將點新增至地圖時,我們應轉譯並填滿多邊形區域。 對多邊形的外框新增樣式線條,使用者在繪製時就更能清楚看到多邊形的邊緣。 為了方便編輯多邊形中的個別位置,我們可以在每個位置上方新增一個控點,例如圖釘或標記。
在大部分的地圖平台中,您都需要多邊形物件、線條物件,以及多邊形中各個位置的圖釘。 當多邊形經過修改時,您必須手動更新線條和圖釘,這很快就會變得複雜起來。
透過 Azure 地圖服務,您只需在資料來源中有一個多邊形即可,如下列程式碼所示。
//Create a data source and add it to the map.
DataSource source = new DataSource();
map.sources.add(source);

//Create a polygon and add it to the data source.
source.add(Polygon.fromLngLats(/* List of points */));

//Create a polygon layer to render the filled in area of the polygon.
PolygonLayer polygonLayer = new PolygonLayer(source,
    fillColor("rgba(255,165,0,0.2)")
);

//Create a line layer for greater control of rendering the outline of the polygon.
LineLayer lineLayer = new LineLayer(source,
    strokeColor("orange"),
    strokeWidth(2f)
);

//Create a bubble layer to render the vertices of the polygon as scaled circles.
BubbleLayer bubbleLayer = new BubbleLayer(source,
    bubbleColor("orange"),
    bubbleRadius(5f),
    bubbleStrokeColor("white"),
    bubbleStrokeWidth(2f)
);

//Add all layers to the map.
map.layers.add(new Layer[] { polygonLayer, lineLayer, bubbleLayer });
//Create a data source and add it to the map.
val source = DataSource()
map.sources.add(source)

//Create a polygon and add it to the data source.
source.add(Polygon.fromLngLats())

//Create a polygon layer to render the filled in area of the polygon.
val polygonLayer = PolygonLayer(
    source,
    fillColor("rgba(255,165,0,0.2)")
)

//Create a line layer for greater control of rendering the outline of the polygon.
val lineLayer = LineLayer(
    source,
    strokeColor("orange"),
    strokeWidth(2f)
)

//Create a bubble layer to render the vertices of the polygon as scaled circles.
val bubbleLayer = BubbleLayer(
    source,
    bubbleColor("orange"),
    bubbleRadius(5f),
    bubbleStrokeColor("white"),
    bubbleStrokeWidth(2f)
)

//Add all layers to the map.
map.layers.add(arrayOf<Layer>(polygonLayer, lineLayer, bubbleLayer))
提示
使用 map.layers.add 方法將圖層新增至地圖時,可以將現有圖層的標識碼或實例當做第二個參數傳入。 這會指示地圖插入在現有圖層底下新增的新圖層。 除了傳入圖層識別碼以外,此方法也支援下列值。
"labels"- 在地圖標籤圖層底下插入新圖層。"transit"- 在地圖道路和交通圖層底下插入新圖層。
下一步
請參閱下列文章,以取得更多可新增至地圖的程式碼範例: