教學課程:將 GeoJSON 資料載入 Azure 地圖服務 Android SDK
本教學課程會引導您完成將位置資料的 GeoJSON 檔案匯入 Azure 地圖服務 Android SDK 的流程。 在本教學課程中,您會了解如何:
- 將 Azure 地圖服務新增至 Android 應用程式。
- 建立資料來源,並從本機檔案或 Web 載入 GeoJSON 檔案。
- 在地圖上顯示資料。
- 與地圖上的資料互動,以檢視其詳細資料。
注意
Azure 地圖服務 Android SDK 淘汰
適用於 Android 的 Azure 地圖服務 原生 SDK 現在已被取代,將於 3/31/25 淘汰。 若要避免服務中斷,請透過 3/31/25 移轉至 Azure 地圖服務 Web SDK。 如需詳細資訊,請參閱 Azure 地圖服務 Android SDK 移轉指南。
必要條件
- 完成建立 Android 應用程式。 本教學課程持續納入該快速入門中所使用的程式碼。
- 下載 GeoJSON 檔案的景點範例。
從 Web 或資產資料夾匯入 GeoJSON 資料
大部分的 GeoJSON 檔案會將所有資料包裝在 FeatureCollection 中。 基於此案例,如果 GeoJSON 檔案是以字串的形式載入至應用程式,您就可以將該檔案傳遞至功能集合的靜態 fromJson 方法,將字串還原序列化成可以加入地圖的 GeoJSON FeatureCollection 物件。
下列步驟示範如何將 GeoJSON 檔案匯入應用程式,並還原序列化為 GeoJSON FeatureCollection 物件。
- 完成快速入門:建立 Android 應用程式,下列步驟會建立在此應用程式的最上層。
- 在 Android Studio 的專案面板中,以滑鼠右鍵按一下 [應用程式] 資料夾,然後移至
New > Folder > Assets Folder。 - 將景點範例 GeoJSON 檔案拖放到資產資料夾中。
- 移至 MainActivity.java 檔案,並在
mapControl.onReady事件的回撥內新增下列程式碼,於onCreate方法內。 此程式碼會使用importDataFromUrl方法,將 SamplePoiDataSet.json 檔案從資產資料夾載入資料來源,然後將它新增至對應。
//Create a data source and add it to the map.
DataSource source = new DataSource();

//Import the geojson data and add it to the data source.
source.importDataFromUrl("asset://SamplePoiDataSet.json");

//Add data source to the map.
map.sources.add(source);
- 移至 MainActivity.kt 檔案,並在
mapControl.onReady事件的回撥內新增下列程式碼,於onCreate方法內。 此程式碼會使用importDataFromUrl方法,將 SamplePoiDataSet.json 檔案從資產資料夾載入資料來源,然後將它新增至對應。
//Create a data source and add it to the map.
DataSource source = new DataSource();

//Import the geojson data and add it to the data source.
source.importDataFromUrl("asset://SamplePoiDataSet.json");

//Add data source to the map.
map.sources.add(source);
- 使用程式碼將 GeoJSON 資料載入資料來源,我們現在必須指定應該在地圖上顯示該資料的方式。 地點資料有數個不同的轉譯層;例如泡泡層、符號層和熱度圖層是最常使用的圖層。 新增下列程式碼,以在匯入資料的程式碼之後,在
mapControl.onReady事件回撥的泡泡層中轉譯資料。
//Create a layer and add it to the map.
BubbleLayer layer = new BubbleLayer(source);
map.layers.add(layer);
//Create a layer and add it to the map.
val layer = new BubbleLayer(source)
map.layers.add(layer)
- 在 Android Studio 的專案面板中,以滑鼠右鍵按一下路徑
app > res > layout下的 layout 資料夾,然後移至New > File。 建立名為 popup_text.xml 的新檔案。 - 開啟 popup_text.xml 檔案。 如果檔案在設計工具檢視中開啟,請以滑鼠右鍵按一下畫面,然後選取 [移至 XML]。 複製下列 XML 並將貼上到此檔案。 此 XML 會建立簡單的版面配置,可與快顯視窗搭配使用,並包含文字檢視。
<?xml version="1.0" encoding="utf-8"?>
<RelativeLayout xmlns:android="http://schemas.android.com/apk/res/android"
    android:layout_width="match_parent"
    android:orientation="vertical"
    android:background="#ffffff"
    android:layout_margin="8dp"
    android:padding="10dp"

    android:layout_height="match_parent">

    <TextView
        android:id="@+id/message"
        android:layout_width="wrap_content"
        android:text=""
        android:textSize="18dp"
        android:textColor="#222"
        android:layout_height="wrap_content"
        android:width="200dp"/>

</RelativeLayout>
- 回到 MainActivity.java 檔案,並在泡泡圖層的程式碼之後,新增下列程式碼以建立可重複使用的快顯。
//Create a popup and add it to the map.
Popup popup = new Popup();
map.popups.add(popup);

//Close it initially.
popup.close();
- 回到 MainActivity.kt 檔案,並在泡泡圖層的程式碼之後,新增下列程式碼以建立可重複使用的快顯。
//Create a popup and add it to the map.
val popup = Popup()
map.popups.add(popup)

//Close it initially.
popup.close()
- 新增下列程式碼,以將
click事件附加至泡泡圖層。 點選泡泡層中的泡泡時,會引發事件並從所選功能的屬性擷取詳細資料、使用 popup_text.xml 版面配置檔案建立檢視、將它當做內容傳入快顯視窗,然後在功能位置顯示快顯視窗。
//Add a click event to the layer.
map.events.add((OnFeatureClick)(feature) -> {
    //Get the first feature and it's properties.
    Feature f = feature.get(0);
    JsonObject props = f.properties();

    //Retrieve the custom layout for the popup.
    View customView = LayoutInflater.from(this).inflate(R.layout.popup_text, null);

    //Display the name and entity type information of the feature into the text view of the popup layout.
    TextView tv = customView.findViewById(R.id.message);
    tv.setText("%s\n%s",
        f.getStringProperty("Name"),
        f.getStringProperty("EntityType")
    );

    //Get the position of the clicked feature.
    Position pos = MapMath.getPosition((Point)f.geometry());

    //Set the options on the popup.
    popup.setOptions(
            //Set the popups position.
            position(pos),

            //Set the anchor point of the popup content.
            anchor(AnchorType.BOTTOM),

            //Set the content of the popup.
            content(customView)
    );

    //Open the popup.
    popup.open();

    //Return a boolean indicating if event should be consumed or continue to bubble up.
    return false;
}, layer);
//Add a click event to the layer.
map.events.add(OnFeatureClick { feature: List<Feature> ->
    //Get the first feature and it's properties.
    val f = feature[0]
    val props = f.properties()

    //Retrieve the custom layout for the popup.
    val customView: View = LayoutInflater.from(this).inflate(R.layout.popup_text, null)

    //Display the name and entity type information of the feature into the text view of the popup layout.
    val tv = customView.findViewById<TextView>(R.id.message)
    tv.text = String.format(
        "%s\n%s",
        f.getStringProperty("Name"),
        f.getStringProperty("EntityType")
    )

    //Get the position of the clicked feature.
    val pos = MapMath.getPosition(f.geometry() as Point?)

    //Set the options on the popup.
    popup.setOptions( //Set the popups position.
        position(pos),  //Set the anchor point of the popup content.
        anchor(AnchorType.BOTTOM),  //Set the content of the popup.
        content(customView)
    )

    //Open the popup.
    popup.open()

    //Return a boolean indicating if event should be consumed or continue to bubble up.
    false
} as OnFeatureClick, layer)
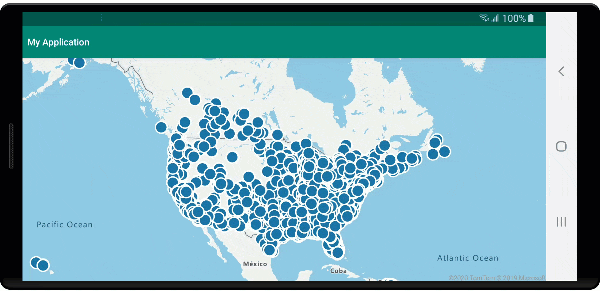
執行應用程式。 地圖會顯示,並在 GeoJSON 檔案中的每個位置上以泡泡覆疊。 點選任何泡泡顯示具有所接觸功能的名稱和實體類型的快顯視窗。
清除資源
採取下列步驟來清除本教學課程的資源:
- 關閉 Android Studio,並刪除您建立的應用程式。
- 如果您已在外部裝置上測試應用程式,請將該裝置上的應用程式解除安裝。
下一步
若要查看更多程式碼範例和互動式編碼體驗: