設定 Azure 虛擬機器 (VM) 上的受控識別
Azure 資源受控識別是 Microsoft Entra ID 的一項功能。 每個支援適用於 Azure 資源的受控識別 Azure 服務均受限於其本身的時間表。 在開始之前,請務必先檢閱資源的受控識別可用性狀態和已知問題。
資源的受控身分識別會在 Microsoft Entra ID 中為 Azure 服務提供自動受控身分識別。 您可以使用此身分識別來向任何支援 Microsoft Entra 驗證的服務進行驗證,不需要任何您程式碼中的認證。
如需 Azure 原則定義和詳細資料的相關資訊,請參閱使用 Azure 原則指派受控識別 (預覽)。
在本文中,您會了解如何使用 Azure 入口網站,為 Azure 虛擬機器 (VM) 啟用和停用系統與使用者指派的受控識別。
必要條件
系統指派的受控識別
在本節中,您會了解如何使用 Azure 入口網站,為虛擬機器啟用和停用系統指派的受控識別。
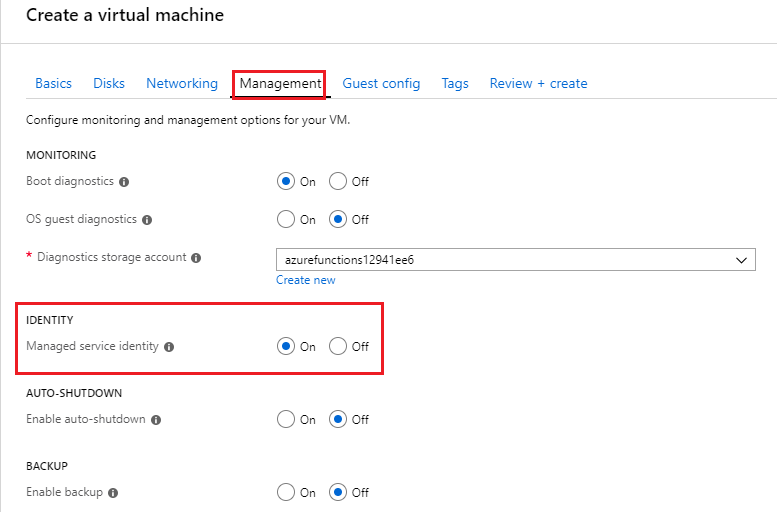
在建立虛擬機器時啟用系統指派的受身分控識別
若要於 VM 建立期間在 VM 上啟用系統指派的受控識別,您的帳戶需要虛擬機器參與者角色指派。 不需要其他的 Microsoft Entra 目錄角色指派。
- 請在 [身分識別] 區段的 [管理] 索引標籤之下,將 [受控服務識別] 切換至 [開啟]。
請參閱下列快速入門來建立 VM:
在現有虛擬機器上啟用系統指派的受身分控識別
提示
本文中的步驟可能略有不同,具體取決於您從哪個入口網站展開作業。
若要在原先佈建的 VM 上啟用系統指派的受控識別,您的帳戶需要虛擬機器參與者角色指派。 不需要其他的 Microsoft Entra 目錄角色指派。
使用與包含虛擬機器的 Azure 訂用帳戶相關聯的帳戶,登入 Azure 入口網站。
瀏覽至所需的虛擬機器,然後選取 [身分識別]。
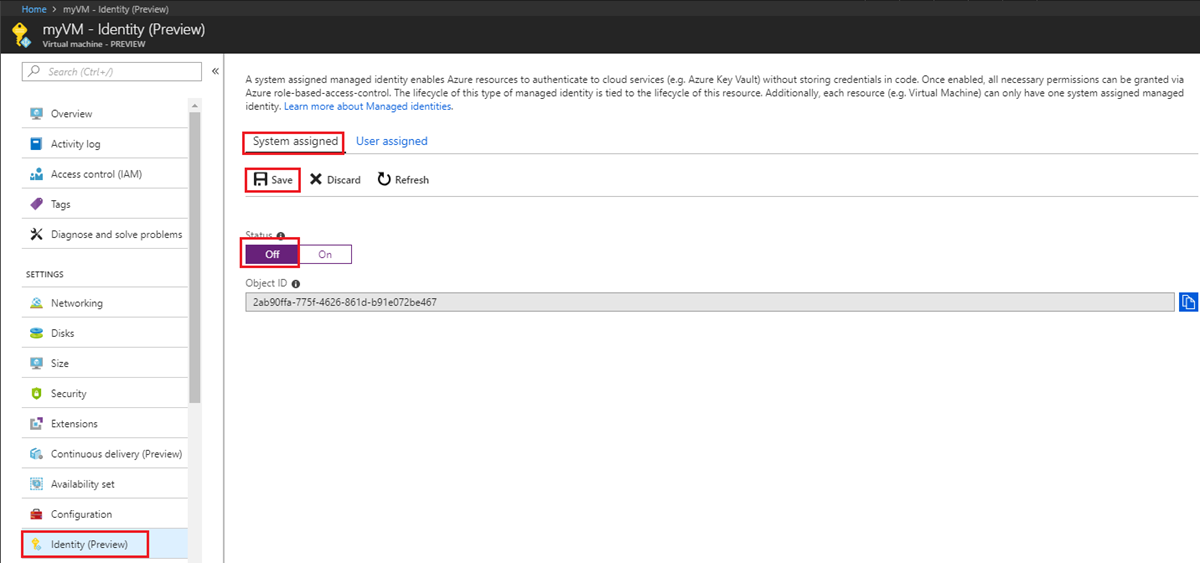
在 [系統指派]、[狀態] 底下,選取 [開啟],然後按一下 [儲存]:
![此螢幕擷取畫面顯示 [系統指派] 狀態設定為 [開啟] 的 [身分識別 (預覽)] 頁面。](media/msi-qs-configure-portal-windows-vm/create-windows-vm-portal-configuration-blade.png)
從虛擬機器移除系統指派的受控識別
若要從 VM 中移除系統指派的受控識別,您的帳戶需要虛擬機器參與者角色指派。 不需要其他的 Microsoft Entra 目錄角色指派。
如果您的虛擬機器不再需要系統指派的受控識別:
使用與包含虛擬機器的 Azure 訂用帳戶相關聯的帳戶,登入 Azure 入口網站。
瀏覽至所需的虛擬機器,然後選取 [身分識別]。
在 [系統指派]、[狀態] 底下,選取 [關閉],然後按一下 [儲存]:
使用者指派的受控識別
在本節中,您會了解如何使用 Azure 入口網站在虛擬機器中新增和移除使用者指派的受控識別。
在建立虛擬機器時指派使用者指派的身分識別
若要將使用者指派的身分識別指派給 VM,您的帳戶需要虛擬機器參與者和受控識別操作者角色指派。 不需要其他的 Microsoft Entra 目錄角色指派。
目前,Azure 入口網站不支援在建立虛擬機器時指派使用者指派的受控識別。 相反地,請參閱下列其中一篇虛擬機器建立快速入門文章來先建立虛擬機器,然後繼續進行下一節,以了解如何對虛擬機器指派使用者指派的受控識別:
將使用者指派的受控識別指派至現有虛擬機器
若要將使用者指派的身分識別指派給 VM,您的帳戶需要虛擬機器參與者和受控識別操作者角色指派。 不需要其他的 Microsoft Entra 目錄角色指派。
使用與包含虛擬機器的 Azure 訂用帳戶相關聯的帳戶,登入 Azure 入口網站。
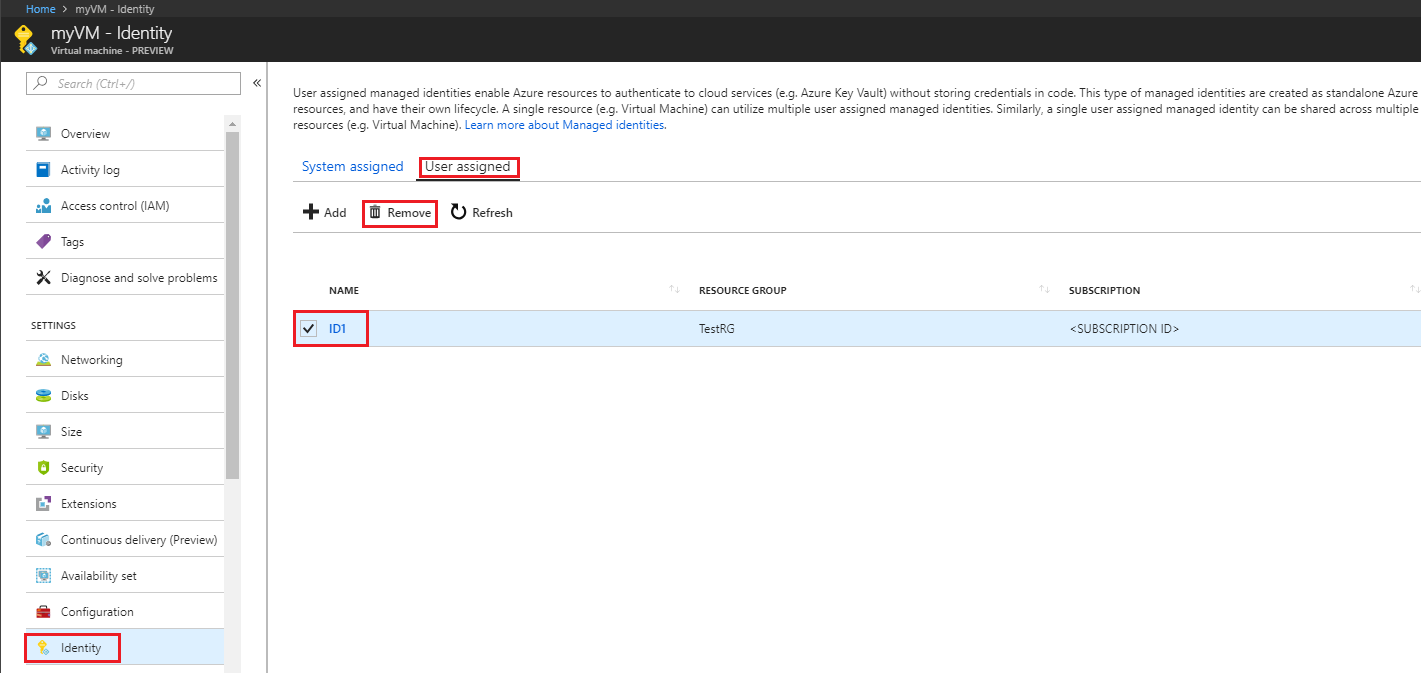
瀏覽至所需 VM,然後依序按一下 [身分識別]、[使用者指派] 和 [+新增]。
![此螢幕擷取畫面顯示已選取 [使用者指派] 並反白顯示 [新增] 按鈕的 [身分識別] 頁面。](media/msi-qs-configure-portal-windows-vm/add-user-assigned-identity-vm-screenshot1.png)
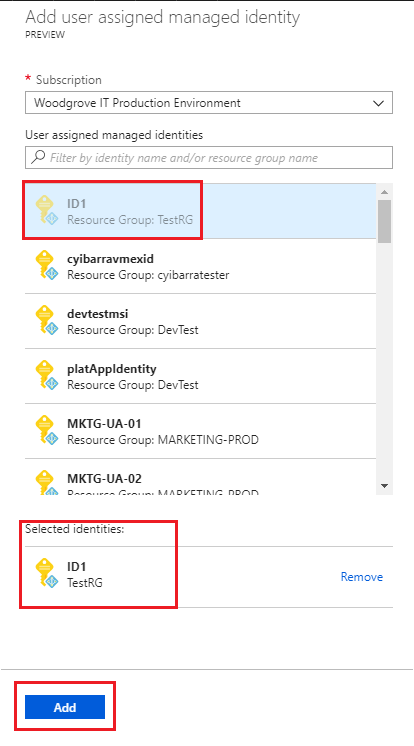
按一下想要新增到虛擬機器的使用者指派身分識別,然後按一下 [新增]。
從虛擬機器移除使用者指派的受控識別
若要從 VM 中移除使用者指派的身分識別,您的帳戶需要虛擬機器參與者角色指派。 不需要其他的 Microsoft Entra 目錄角色指派。
使用與包含虛擬機器的 Azure 訂用帳戶相關聯的帳戶,登入 Azure 入口網站。
瀏覽至所需 VM,選取 [身分識別]、[使用者指派] 以及要刪除的使用者指派受控識別名稱,然後按一下 [移除] (按一下 [確認] 窗格中的 [是])。
下一步
- 使用 Azure 入口網站,提供 Azure VM 的受控識別存取權給另一個 Azure 資源。
在本文中,藉由使用 Azure CLI,您將了解如何在 Azure VM 上執行 Azure 資源作業的下列受控識別:
- 在 Azure VM 上啟用和停用系統指派受控識別
- 在 Azure VM 上新增和移除使用者指派受控識別
如果您還沒有 Azure 帳戶,請先註冊免費帳戶,再繼續進行。
必要條件
- 如果不熟悉 Azure 資源的受控識別,請參閱 什麼是 Azure 資源受控識別?。 若要了解系統指派和使用者指派的受控識別類型,請參閱 受控識別類型。
在 Azure Cloud Shell 中使用 Bash 環境。 如需詳細資訊,請參閱 Azure Cloud Shell 中的 Bash 快速入門。

若要在本地執行 CLI 參考命令,請安裝 Azure CLI。 若您在 Windows 或 macOS 上執行,請考慮在 Docker 容器中執行 Azure CLI。 如需詳細資訊,請參閱〈如何在 Docker 容器中執行 Azure CLI〉。
如果您使用的是本機安裝,請使用 az login 命令,透過 Azure CLI 來登入。 請遵循您終端機上顯示的步驟,完成驗證程序。 如需其他登入選項,請參閱使用 Azure CLI 登入。
出現提示時,請在第一次使用時安裝 Azure CLI 延伸模組。 如需擴充功能詳細資訊,請參閱使用 Azure CLI 擴充功能。
執行 az version 以尋找已安裝的版本和相依程式庫。 若要升級至最新版本,請執行 az upgrade。
系統指派的受控識別
在本節中,您將了解如何使用 Azure CLI 在 Azure VM 上啟用和停用系統指派的受控識別。
在建立 Azure VM 時,啟用系統指派的受控識別
若要建立已啟用系統指派受控識別的 Azure VM,您的帳戶需要虛擬機器參與者角色指派。 不需要其他的 Microsoft Entra 目錄角色指派。
使用 az group create,為您的 VM 和其相關資源建立資源群組。 如果您已經有想要使用的資源群組,您可以略過此步驟:
az group create --name myResourceGroup --location westus使用 az vm create 建立 VM。 下列範例會根據
--assign-identity參數的要求 (具有指定的--role和--scope),建立具有系統指派受控識別且名為 myVM 的虛擬機器。--admin-username和--admin-password參數會指定虛擬機器登入的系統管理使用者名稱和密碼帳戶。 根據您的環境更新這些值:az vm create --resource-group myResourceGroup --name myVM --image win2016datacenter --generate-ssh-keys --assign-identity --role contributor --scope mySubscription --admin-username azureuser --admin-password myPassword12
在現有 Azure VM 上啟用系統指派的受控識別
若要在 VM 上啟用系統指派的受控識別,您的帳戶需要虛擬機器參與者角色指派。 不需要其他的 Microsoft Entra 目錄角色指派。
如果您要在本機主控台中使用 Azure CLI,請先使用 az login 登入 Azure。 使用與包含虛擬機器的 Azure 訂用帳戶相關聯的帳戶。
az login使用 az vm identity assign 與
identity assign命令在現有的虛擬機器上啟用系統指派的身分識別:az vm identity assign -g myResourceGroup -n myVm
停用來自 Azure VM 的系統指派身分識別
若要在 VM 上停用系統指派的受控識別,您的帳戶需要虛擬機器參與者角色指派。 不需要其他的 Microsoft Entra 目錄角色指派。
如果您的虛擬機器不再需要系統指派的身分識別,但仍需要使用者指派的身分識別,請使用下列命令:
az vm update -n myVM -g myResourceGroup --set identity.type='UserAssigned'
如果您的虛擬機器不再需要系統指派的身分識別,而且沒有使用者指派的身分識別,請使用下列命令:
注意
值 none 會區分大小寫。 它必須是小寫字母。
az vm update -n myVM -g myResourceGroup --set identity.type="none"
使用者指派的受控識別
在本節中,您將了解如何使用 Azure CLI 在 Azure VM 中新增和移除使用者指派的受控識別。 如果您在與您的 VM 不同的 RG 中建立使用者指派的受控識別。 您必須使用受控識別的 URL 將它指派給您的 VM。 例如:
--identities "/subscriptions/<SUBID>/resourcegroups/<RESROURCEGROUP>/providers/Microsoft.ManagedIdentity/userAssignedIdentities/<USER_ASSIGNED_ID_NAME>"
在建立 Azure VM 時,指派使用者指派的受控識別
若要在 VM 建立期間將使用者指派的身分識別指派給 VM,您的帳戶需要虛擬機器參與者和受控識別操作者角色指派。 不需要其他的 Microsoft Entra 目錄角色指派。
如果您已經有想要使用的資源群組,可以略過此步驟。 使用 az group create 建立資源群組,以便控制及部署使用者指派的受控識別。 請務必以您自己的值取代
<RESOURCE GROUP>和<LOCATION>參數的值。 :az group create --name <RESOURCE GROUP> --location <LOCATION>使用 az identity create,建立使用者指派的受控識別。
-g參數會指定建立使用者指派受控識別的資源群組,而-n參數會指定其名稱。重要
建立使用者指派的受控識別時,名稱必須以字母或數字開頭,並且包含英數字元、連字號 (-) 和底線 (_) 的組合。 若要讓虛擬機器或虛擬機器擴展集的指派正常運作,名稱長度上限為 24 個字元。 如需詳細資訊,請參閱常見問題集和已知問題。
az identity create -g myResourceGroup -n myUserAssignedIdentity回應會包含所建立使用者指派受控識別的詳細資料,與下列內容類似。 指派給使用者指派受控識別的資源識別碼值會使用於下列步驟。
{
    "clientId": "00001111-aaaa-2222-bbbb-3333cccc4444",
    "clientSecretUrl": "https://control-westcentralus.identity.azure.net/subscriptions/<SUBSCRIPTON ID>/resourcegroups/<RESOURCE GROUP>/providers/Microsoft.ManagedIdentity/userAssignedIdentities/<myUserAssignedIdentity>/credentials?tid=5678&oid=9012&aid=00001111-aaaa-2222-bbbb-3333cccc4444",
    "id": "/subscriptions/<SUBSCRIPTON ID>/resourcegroups/<RESOURCE GROUP>/providers/Microsoft.ManagedIdentity/userAssignedIdentities/<USER ASSIGNED IDENTITY NAME>",
    "location": "westcentralus",
    "name": "<USER ASSIGNED IDENTITY NAME>",
    "principalId": "aaaaaaaa-bbbb-cccc-1111-222222222222",
    "resourceGroup": "<RESOURCE GROUP>",
    "tags": {},
    "tenantId": "aaaabbbb-0000-cccc-1111-dddd2222eeee",
    "type": "Microsoft.ManagedIdentity/userAssignedIdentities"
}
使用 az vm create 建立 VM。 下列範例會依
--assign-identity參數的指定內容 (具有指定的--role和--scope),建立與新使用者指派身分識別相關聯的虛擬機器。 別忘了以您自己的值取代<RESOURCE GROUP>、<VM NAME>、<USER NAME>、<PASSWORD>、<USER ASSIGNED IDENTITY NAME>、<ROLE>和<SUBSCRIPTION>參數的值。az vm create --resource-group <RESOURCE GROUP> --name <VM NAME> --image <SKU linux image> --admin-username <USER NAME> --admin-password <PASSWORD> --assign-identity <USER ASSIGNED IDENTITY NAME> --role <ROLE> --scope <SUBSCRIPTION>
將使用者指派的受控識別指派至現有 Azure VM
若要將使用者指派的身分識別指派給 VM,您的帳戶需要虛擬機器參與者和受控識別操作者角色指派。 不需要其他的 Microsoft Entra 目錄角色指派。
使用 az identity create,建立使用者指派的身分識別。
-g參數會指定要在其中建立使用者指派身分識別的資源群組,而-n參數會指定其名稱。 請務必以您自己的值取代<RESOURCE GROUP>和<USER ASSIGNED IDENTITY NAME>參數的值:重要
目前不支援在建立使用者指派的受控識別名稱中使用特殊字元 (如底線)。 請使用英數字元。 因此請定期回來查看是否有更新。 如需詳細資訊,請參閱常見問題集和已知問題
az identity create -g <RESOURCE GROUP> -n <USER ASSIGNED IDENTITY NAME>回應會包含所建立使用者指派受控識別的詳細資料,與下列內容類似。
{
  "clientId": "00001111-aaaa-2222-bbbb-3333cccc4444",
  "clientSecretUrl": "https://control-westcentralus.identity.azure.net/subscriptions/<SUBSCRIPTON ID>/resourcegroups/<RESOURCE GROUP>/providers/Microsoft.ManagedIdentity/userAssignedIdentities/<USER ASSIGNED IDENTITY NAME>/credentials?tid=5678&oid=9012&aid=00001111-aaaa-2222-bbbb-3333cccc4444",
  "id": "/subscriptions/<SUBSCRIPTON ID>/resourcegroups/<RESOURCE GROUP>/providers/Microsoft.ManagedIdentity/userAssignedIdentities/<USER ASSIGNED IDENTITY NAME>",
  "location": "westcentralus",
  "name": "<USER ASSIGNED IDENTITY NAME>",
  "principalId": "aaaaaaaa-bbbb-cccc-1111-222222222222",
  "resourceGroup": "<RESOURCE GROUP>",
  "tags": {},
  "tenantId": "aaaabbbb-0000-cccc-1111-dddd2222eeee",
  "type": "Microsoft.ManagedIdentity/userAssignedIdentities"
}
使用 az vm identity assign,將使用者指派的身分識別指派給您的虛擬機器。 請務必以您自己的值取代
<RESOURCE GROUP>和<VM NAME>參數的值。<USER ASSIGNED IDENTITY NAME>是使用者指派之受控識別的資源name屬性 (在上一個步驟中建立)。 如果您在與您的 VM 不同的 RG 中建立使用者指派的受控識別。 您必須使用受控識別的 URL。az vm identity assign -g <RESOURCE GROUP> -n <VM NAME> --identities <USER ASSIGNED IDENTITY>
從 Azure VM 移除使用者指派的受控識別
若要將使用者指派的身分識別移除至 VM,您的帳戶需要虛擬機器參與者角色指派。
如果這是指派給虛擬機器的唯一使用者指派受控識別,將會從身分識別類型值中移除 UserAssigned。 請務必以您自己的值取代 <RESOURCE GROUP> 和 <VM NAME> 參數的值。 <USER ASSIGNED IDENTITY> 將會是使用者所指派身分識別的 name 屬性,您可以使用 az vm identity show,在虛擬機器的身分識別區段中找到此項:
az vm identity remove -g <RESOURCE GROUP> -n <VM NAME> --identities <USER ASSIGNED IDENTITY>
如果您的虛擬機器沒有系統指派的受控識別,而且您想要從其中移除所有使用者指派的身分識別,請使用下列命令:
注意
值 none 會區分大小寫。 它必須是小寫字母。
az vm update -n myVM -g myResourceGroup --set identity.type="none" identity.userAssignedIdentities=null
如果您的虛擬機器同時具有系統指派和使用者指派的身分識別,您可以藉由切換為僅使用系統指派的身分識別,來移除所有使用者指派的身分識別。 使用下列命令:
az vm update -n myVM -g myResourceGroup --set identity.type='SystemAssigned' identity.userAssignedIdentities=null
下一步
- Azure 資源受控識別概觀
- 如需完整的 Azure VM 建立快速入門,請參閱:
在本文中,藉由使用 PowerShell,您將了解如何在 Azure VM 上執行下列 Azure 資源受控識別作業。
注意
建議您使用 Azure Az PowerShell 模組來與 Azure 互動。 請參閱安裝 Azure PowerShell 以開始使用。 若要了解如何移轉至 Az PowerShell 模組,請參閱將 Azure PowerShell 從 AzureRM 移轉至 Az。
必要條件
- 如果您不熟悉 Azure 資源的受控識別,請參閱概觀一節。 請務必檢閱系統指派和使用者指派受控識別之間的差異。
- 如果您還沒有 Azure 帳戶,請先註冊免費帳戶,再繼續進行。
- 若要執行範例指令碼,您有兩個選項:
- 使用 Azure Cloud Shell,您可以使用程式碼區塊右上角的 [試用] 按鈕來開啟此服務。
- 藉由安裝最新版本的 Azure PowerShell,在本機執行指令碼,然後使用
Connect-AzAccount來登入 Azure。
系統指派的受控識別
在本節中,我們會探討如何使用 Azure PowerShell 啟用和停用系統指派的受控識別。
在建立 Azure VM 時,啟用系統指派的受控識別
若要建立已啟用系統指派受控識別的 Azure VM,您的帳戶需要虛擬機器參與者角色指派。 不需要其他的 Microsoft Entra 目錄角色指派。
請參閱下列 Azure VM 快速入門,完成必要的章節 (「登入 Azure」、「建立資源群組」、「建立網路群組」、「建立VM」)。
當您參閱「建立VM」一節時,請稍微修改一下 New-AzVMConfig Cmdlet 語法。 請務必新增
-IdentityType SystemAssigned參數,以佈建已啟用系統所指派身分識別的 VM,例如:$vmConfig = New-AzVMConfig -VMName myVM -IdentityType SystemAssigned ...
在現有 Azure VM 上啟用系統指派的受控識別
若要在原先佈建的 VM 上啟用系統指派的受控識別,您的帳戶需要虛擬機器參與者角色指派。 不需要其他的 Microsoft Entra 目錄角色指派。
使用
Get-AzVMCmdlet 擷取 VM 屬性。 然後在 Update-AzVM Cmdlet 上使用-IdentityType參數來啟用系統指派的受控識別:$vm = Get-AzVM -ResourceGroupName myResourceGroup -Name myVM Update-AzVM -ResourceGroupName myResourceGroup -VM $vm -IdentityType SystemAssigned
將 VM 系統指派的身分識別新增至群組
您在 VM 上啟用系統指派的身分識別後,就可以將它新增至群組。 下列程序會將 VM 其系統指派的身分識別新增至群組。
擷取並記下 VM 其服務主體的
ObjectID(如所傳回值的Id欄位中指定):Get-AzADServicePrincipal -displayname "myVM"擷取並記下群組的
ObjectID(如所傳回值的Id欄位中指定):Get-AzADGroup -searchstring "myGroup"將 VM 的服務主體新增至群組:
New-MgGroupMember -GroupId "<Id of group>" -DirectoryObjectId "<Id of VM service principal>"
停用來自 Azure VM 的系統指派受控識別
若要在 VM 上停用系統指派的受控識別,您的帳戶需要虛擬機器參與者角色指派。 不需要其他的 Microsoft Entra 目錄角色指派。
如果您的虛擬機器已不再需要系統指派的受控識別,但仍需要使用者指派的受控識別,請使用下列 Cmdlet:
使用
Get-AzVMCmdlet 來擷取 VM 屬性,並將-IdentityType參數設定為UserAssigned:$vm = Get-AzVM -ResourceGroupName myResourceGroup -Name myVM Update-AzVm -ResourceGroupName myResourceGroup -VM $vm -IdentityType "UserAssigned" -IdentityID "/subscriptions/<SUBSCRIPTION ID>/resourcegroups/<RESROURCE GROUP>/providers/Microsoft.ManagedIdentity/userAssignedIdentities/<USER ASSIGNED IDENTITY NAME>..."
如果您的虛擬機器不再需要系統指派的受控識別,而且沒有使用者指派的受控識別,請使用下列命令:
$vm = Get-AzVM -ResourceGroupName myResourceGroup -Name myVM
Update-AzVm -ResourceGroupName myResourceGroup -VM $vm -IdentityType None
使用者指派的受控識別
本節中,您將了解如何使用 Azure PowerShell 在 VM 中新增和移除使用者指派的受控識別。
在 VM 建立期間,將使用者指派的受控識別指派給 VM
若要將使用者指派的身分識別指派給 VM,您的帳戶需要虛擬機器參與者和受控識別操作者角色指派。 不需要其他的 Microsoft Entra 目錄角色指派。
請參閱下列 Azure VM 快速入門,完成必要的章節 (「登入 Azure」、「建立資源群組」、「建立網路群組」、「建立VM」)。
當您參閱「建立 VM」一節時,請稍微修改一下
New-AzVMConfigCmdlet 語法。 新增-IdentityType UserAssigned和-IdentityID參數,以佈建具有使用者所指派身分識別的 VM。 以您自己的值取代<VM NAME>、<SUBSCRIPTION ID>、<RESROURCE GROUP>和<USER ASSIGNED IDENTITY NAME>。 例如:$vmConfig = New-AzVMConfig -VMName <VM NAME> -IdentityType UserAssigned -IdentityID "/subscriptions/<SUBSCRIPTION ID>/resourcegroups/<RESROURCE GROUP>/providers/Microsoft.ManagedIdentity/userAssignedIdentities/<USER ASSIGNED IDENTITY NAME>..."
將使用者指派的受控識別指派至現有 Azure VM
若要將使用者指派的身分識別指派給 VM,您的帳戶需要虛擬機器參與者和受控識別操作者角色指派。 不需要其他的 Microsoft Entra 目錄角色指派。
請使用 New-AzUserAssignedIdentity Cmdlet 來建立使用者指派的受控識別。 請記下輸出中的
Id,因為您在下一個步驟中需要此資訊。重要
建立使用者指派的受控識別時,僅支援使用英數字元、底線和連字號 (0-9 或 a-z 或 A-Z、_ 或 -) 字元。 此外,指派至 VM/VMSS 的名稱應該限制為 3 到 128 個字元長度,才能正常運作。 如需詳細資訊,請參閱常見問題集和已知問題
New-AzUserAssignedIdentity -ResourceGroupName <RESOURCEGROUP> -Name <USER ASSIGNED IDENTITY NAME>使用
Get-AzVMCmdlet 擷取 VM 屬性。 然後使用 Update-AzVM Cmdlet 上的-IdentityType和-IdentityID參數,將使用者指派的受控識別新增至 Azure VM。-IdentityId參數的值是您在上一個步驟中記下的Id。 以您自己的值取代<VM NAME>、<SUBSCRIPTION ID>、<RESROURCE GROUP>和<USER ASSIGNED IDENTITY NAME>。警告
若要保留任何使用者先前指派給 VM 的受控識別,請查詢
IdentityVM 物件的屬性 (例如$vm.Identity)。 如果已傳回任何使用者指派的受控識別,請在下列命令中包含這些受控識別,以及您想要指派給 VM 的使用者所指派受控識別。$vm = Get-AzVM -ResourceGroupName <RESOURCE GROUP> -Name <VM NAME> # Get the list of existing identity IDs and then append to it $identityIds = $vm.Identity.UserAssignedIdentities.Keys $uid = "/subscriptions/<SUBSCRIPTION ID>/resourcegroups/<RESROURCE GROUP>/providers/Microsoft.ManagedIdentity/userAssignedIdentities/<USER ASSIGNED IDENTITY NAME>" $identityIds = $identityIds + $uid # Update the VM with added identity IDs Update-AzVM -ResourceGroupName <RESOURCE GROUP> -VM $vm -IdentityType UserAssigned -IdentityID $uid
從 Azure VM 移除使用者指派的受控識別
若要將使用者指派的身分識別移除至 VM,您的帳戶需要虛擬機器參與者角色指派。
如果您的 VM 具有多個使用者指派的受控識別,則您可以使用下列命令移除所有身分識別,但請留下最後一個。 請務必以您自己的值取代 <RESOURCE GROUP> 和 <VM NAME> 參數的值。 <USER ASSIGNED IDENTITY NAME> 是使用者指派受控識別的名稱屬性,它應該保留在 VM 上。 使用查詢搜尋 VM 物件的 Identity 屬性,即可找到此資訊。 例如,$vm.Identity:
$vm = Get-AzVm -ResourceGroupName myResourceGroup -Name myVm
Update-AzVm -ResourceGroupName myResourceGroup -VirtualMachine $vm -IdentityType UserAssigned -IdentityID <USER ASSIGNED IDENTITY NAME>
如果您的虛擬機器沒有系統指派的受控識別,而且您想要從其中移除所有使用者指派的受控識別,請使用下列命令:
$vm = Get-AzVm -ResourceGroupName myResourceGroup -Name myVm
Update-AzVm -ResourceGroupName myResourceGroup -VM $vm -IdentityType None
如果您的虛擬機器同時具有系統指派和使用者指派的受控識別,您可以藉由切換為僅使用系統指派的受控識別,來移除所有使用者指派的受控識別。
$vm = Get-AzVm -ResourceGroupName myResourceGroup -Name myVm
Update-AzVm -ResourceGroupName myResourceGroup -VirtualMachine $vm -IdentityType "SystemAssigned"
下一步
如需完整的 Azure VM 建立快速入門,請參閱:
在本文中,藉由使用 Azure Resource Manager 部署範本,您將了解如何在 Azure VM 上執行 Azure 資源作業的下列受控識別:
必要條件
- 如果您不熟悉如何使用 Azure Resource Manager 部署範本,請參閱概觀一節。 請務必檢閱系統指派和使用者指派受控識別之間的差異。
- 如果您還沒有 Azure 帳戶,請先註冊免費帳戶,再繼續進行。
Azure 資源管理員範本
如同 Azure 入口網站和指令碼,Azure Resource Manager 範本可讓您部署由 Azure 資源群組所定義的全新或已修改資源。 範本編輯和部署有幾個選項可用 (在本機和入口網站),包括:
- 使用 Azure Marketplace 所提供的自訂範本,可讓您從頭開始建立範本,或根據現有的常用範本或快速入門範本來建立範本。
- 衍生自現有的資源群組,方法是從原始部署,或從部署的目前狀態匯出範本。
- 使用本機 JSON 編輯器 (例如 VS Code),然後使用 PowerShell 或 CLI 上傳和部署。
- 使用 Visual Studio 的 Azure 資源群組專案來建立和部署範本。
不論您選擇的選項,在初始部署和重新部署期間,範本的語法都相同。 在新的或現有虛擬機器上啟用系統或使用者指派的受控識別,是以相同的方式來進行。 此外,根據預設,Azure Resource Manager 會對部署採取累加式更新。
系統指派的受控識別
在本節中,您將使用 Azure Resource Manager 範本以啟用和停用系統指派的受控識別。
在建立 Azure VM 時,或在現有虛擬機器上啟用系統指派的受控識別
若要在 VM 上啟用系統指派的受控識別,您的帳戶需要虛擬機器參與者角色指派。 不需要其他的 Microsoft Entra 目錄角色指派。
無論您是在本機登入 Azure 或透過 Azure 入口網站登入,都請使用與包含虛擬機器的 Azure 訂用帳戶相關聯的帳戶。
若要啟用系統指派的受控識別,請將範本載入到編輯器、在
resources區段中找出感興趣的Microsoft.Compute/virtualMachines資源,然後在與"type": "Microsoft.Compute/virtualMachines"屬性相同的層級上新增"identity"屬性。 使用下列語法:"identity": { "type": "SystemAssigned" },當您完成時,應該將下列區段新增至範本的
resource區段,而且應該類似下列內容:"resources": [ { //other resource provider properties... "apiVersion": "2018-06-01", "type": "Microsoft.Compute/virtualMachines", "name": "[variables('vmName')]", "location": "[resourceGroup().location]", "identity": { "type": "SystemAssigned", } } ]
指派角色給虛擬機器的系統指派受控識別
在虛擬機器上啟用系統指派的受控識別後,建議您授與其這類角色:在角色建立所在資源群組的讀者存取權。 您可以在使用 Azure Resource Manager 範本指派 Azure 角色一文中找到詳細的資訊,以協助您進行此步驟。
停用來自 Azure VM 的系統指派受控識別
若要從 VM 中移除系統指派的受控識別,您的帳戶需要虛擬機器參與者角色指派。 不需要其他的 Microsoft Entra 目錄角色指派。
無論您是在本機登入 Azure 或透過 Azure 入口網站登入,都請使用與包含虛擬機器的 Azure 訂用帳戶相關聯的帳戶。
在編輯器中載入範本,然後在
resources區段找出想要的Microsoft.Compute/virtualMachines資源。 若您的虛擬機器只有系統指派的受控識別,您可以將識別類型變更為None予以停用。Microsoft.Compute/virtualMachines API 版本 2018-06-01
如果虛擬機器同時具有系統與使用者指派的身分識別,請從受控識別類型中移除
SystemAssigned,並保留UserAssigned以及userAssignedIdentities字典值。Microsoft.Compute/virtualMachines API 版本 2018-06-01
若
apiVersion為2017-12-01且虛擬機器同時具有系統與使用者指派的受控識別,請從身分識別類型中移除SystemAssigned,並保留UserAssigned以及使用者指派受控識別的identityIds陣列。
下列範例示範如何從沒有使用者指派受控識別的虛擬機器中移除系統指派的受控識別:
{
    "apiVersion": "2018-06-01",
    "type": "Microsoft.Compute/virtualMachines",
    "name": "[parameters('vmName')]",
    "location": "[resourceGroup().location]",
    "identity": {
        "type": "None"
    }
}
使用者指派的受控識別
在本節中,您會使用 Azure Resource Manager 範本,將使用者指派的受控識別指派至 Azure VM。
注意
若要使用 Azure Resource Manager 範本建立使用者指派的受控識別,請參閱建立使用者指派的受控識別。
將使用者指派的受控識別指派給 Azure VM
若要將使用者指派的身分識別指派給 VM,您的帳戶需要受控識別運算子角色指派。 不需要其他的 Microsoft Entra 目錄角色指派。
在
resources元素之下,新增下列項目,以將使用者指派的受控識別指派至您的虛擬機器。 請務必將<USERASSIGNEDIDENTITY>取代為您建立的使用者指派受控識別名稱。Microsoft.Compute/virtualMachines API 版本 2018-06-01
如果
apiVersion為2018-06-01,則使用者指派的受控識別會以userAssignedIdentities字典格式儲存,而<USERASSIGNEDIDENTITYNAME>值必須儲存在您範本variables區段內所定義的變數中。{ "apiVersion": "2018-06-01", "type": "Microsoft.Compute/virtualMachines", "name": "[variables('vmName')]", "location": "[resourceGroup().location]", "identity": { "type": "userAssigned", "userAssignedIdentities": { "[resourceID('Microsoft.ManagedIdentity/userAssignedIdentities/',variables('<USERASSIGNEDIDENTITYNAME>'))]": {} } } }Microsoft.Compute/virtualMachines API 版本 2017-12-01
如果
apiVersion為2017-12-01,則使用者指派的受控識別會儲存在identityIds陣列中,而<USERASSIGNEDIDENTITYNAME>值必須儲存在您範本variables區段內所定義的變數中。{ "apiVersion": "2017-12-01", "type": "Microsoft.Compute/virtualMachines", "name": "[variables('vmName')]", "location": "[resourceGroup().location]", "identity": { "type": "userAssigned", "identityIds": [ "[resourceID('Microsoft.ManagedIdentity/userAssignedIdentities/',variables('<USERASSIGNEDIDENTITYNAME>'))]" ] } }當您完成時,應該將下列區段新增至範本的
resource區段,而且應該類似下列內容:Microsoft.Compute/virtualMachines API 版本 2018-06-01
  "resources": [
     {
         //other resource provider properties...
         "apiVersion": "2018-06-01",
         "type": "Microsoft.Compute/virtualMachines",
         "name": "[variables('vmName')]",
         "location": "[resourceGroup().location]",
         "identity": {
             "type": "userAssigned",
             "userAssignedIdentities": {
                "[resourceID('Microsoft.ManagedIdentity/userAssignedIdentities/',variables('<USERASSIGNEDIDENTITYNAME>'))]": {}
             }
         }
     }
 ]
Microsoft.Compute/virtualMachines API 版本 2017-12-01
"resources": [
     {
         //other resource provider properties...
         "apiVersion": "2017-12-01",
         "type": "Microsoft.Compute/virtualMachines",
         "name": "[variables('vmName')]",
         "location": "[resourceGroup().location]",
         "identity": {
             "type": "userAssigned",
             "identityIds": [
                "[resourceID('Microsoft.ManagedIdentity/userAssignedIdentities/',variables('<USERASSIGNEDIDENTITYNAME>'))]"
             ]
         }
     }
]
從 Azure VM 移除使用者指派的受控識別
若要從 VM 中移除使用者指派的身分識別,您的帳戶需要虛擬機器參與者角色指派。 不需要其他的 Microsoft Entra 目錄角色指派。
無論您是在本機登入 Azure 或透過 Azure 入口網站登入,都請使用與包含虛擬機器的 Azure 訂用帳戶相關聯的帳戶。
在編輯器中載入範本,然後在
resources區段找出想要的Microsoft.Compute/virtualMachines資源。 若您的虛擬機器只有使用者指派的受控識別,您可以將身分識別類型變更為None予以停用。下列範例示範如何從沒有系統指派受控識別的虛擬機器中移除所有使用者指派的受控識別:
 {
   "apiVersion": "2018-06-01",
   "type": "Microsoft.Compute/virtualMachines",
   "name": "[parameters('vmName')]",
   "location": "[resourceGroup().location]",
   "identity": {
       "type": "None"
       },
 }
Microsoft.Compute/virtualMachines API 版本 2018-06-01
若要從虛擬機器中移除單一使用者指派的受控識別,請從
useraAssignedIdentities字典中移除它。如果您有系統指派的受控識別,則將其保存在
identity值下方的type值中。Microsoft.Compute/virtualMachines API 版本 2017-12-01
若要從虛擬機器中移除單一使用者指派的受控識別,請從
identityIds陣列中移除它。如果您有系統指派的受控識別,則將其保存在
identity值下方的type值中。
下一步
在本文中,使用 CURL 來呼叫 Azure Resource Manager REST 端點,即可了解如何在 Azure VM 上執行下列 Azure 資源受控識別作業:
- 在 Azure VM 上啟用和停用系統指派受控識別
- 在 Azure VM 上新增和移除使用者指派受控識別
如果您還沒有 Azure 帳戶,請先註冊免費帳戶,再繼續進行。
必要條件
- 如果不熟悉 Azure 資源的受控識別,請參閱 什麼是 Azure 資源受控識別?。 若要了解系統指派和使用者指派的受控識別類型,請參閱 受控識別類型。
在 Azure Cloud Shell 中使用 Bash 環境。 如需詳細資訊,請參閱 Azure Cloud Shell 中的 Bash 快速入門。
若要在本地執行 CLI 參考命令,請安裝 Azure CLI。 若您在 Windows 或 macOS 上執行,請考慮在 Docker 容器中執行 Azure CLI。 如需詳細資訊,請參閱〈如何在 Docker 容器中執行 Azure CLI〉。
如果您使用的是本機安裝,請使用 az login 命令,透過 Azure CLI 來登入。 請遵循您終端機上顯示的步驟,完成驗證程序。 如需其他登入選項,請參閱使用 Azure CLI 登入。
出現提示時,請在第一次使用時安裝 Azure CLI 延伸模組。 如需擴充功能詳細資訊,請參閱使用 Azure CLI 擴充功能。
執行 az version 以尋找已安裝的版本和相依程式庫。 若要升級至最新版本,請執行 az upgrade。
系統指派的受控識別
在本節中,您將了解如何使用 CURL 呼叫 Azure Resource Manager REST 端點,在 Azure VM 上啟用和停用系統指派的受控識別。
在建立 Azure VM 時,啟用系統指派的受控識別
若要建立已啟用系統指派受控識別的 Azure VM,您的帳戶需要虛擬機器參與者角色指派。 不需要其他的 Microsoft Entra 目錄角色指派。
使用 az group create,為您的 VM 和其相關資源建立資源群組。 如果您已經有想要使用的資源群組,您可以略過此步驟:
az group create --name myResourceGroup --location westus建立虛擬機器的網路介面:
az network nic create -g myResourceGroup --vnet-name myVnet --subnet mySubnet -n myNic擷取持有人存取權杖,在下一個步驟中,會使用此權杖搭配搭配系統指派的受控識別,在授權標頭中建立虛擬機器。
az account get-access-token使用 Azure Cloud Shell,並使用 CURL 呼叫 Azure Resource Manager REST 端點來建立虛擬機器。 下列範例會建立具有系統指派的受控識別 (如同在要求本文中由
"identity":{"type":"SystemAssigned"}值所識別) 且名為 myVM 的虛擬機器。 將上一個步驟中要求持有人存取權杖時所收到的值用以取代<ACCESS TOKEN>值,<SUBSCRIPTION ID>的值則為適用於您的環境的值。curl 'https://management.azure.com/subscriptions/<SUBSCRIPTION ID>/resourceGroups/myResourceGroup/providers/Microsoft.Compute/virtualMachines/myVM?api-version=2018-06-01' -X PUT -d '{"location":"westus","name":"myVM","identity":{"type":"SystemAssigned"},"properties":{"hardwareProfile":{"vmSize":"Standard_D2_v2"},"storageProfile":{"imageReference":{"sku":"2016-Datacenter","publisher":"MicrosoftWindowsServer","version":"latest","offer":"WindowsServer"},"osDisk":{"caching":"ReadWrite","managedDisk":{"storageAccountType":"StandardSSD_LRS"},"name":"myVM3osdisk","createOption":"FromImage"},"dataDisks":[{"diskSizeGB":1023,"createOption":"Empty","lun":0},{"diskSizeGB":1023,"createOption":"Empty","lun":1}]},"osProfile":{"adminUsername":"azureuser","computerName":"myVM","adminPassword":"<SECURE PASSWORD STRING>"},"networkProfile":{"networkInterfaces":[{"id":"/subscriptions/<SUBSCRIPTION ID>/resourceGroups/myResourceGroup/providers/Microsoft.Network/networkInterfaces/myNic","properties":{"primary":true}}]}}}' -H "Content-Type: application/json" -H "Authorization: Bearer <ACCESS TOKEN>"PUT https://management.azure.com/subscriptions/<SUBSCRIPTION ID>/resourceGroups/myResourceGroup/providers/Microsoft.Compute/virtualMachines/myVM?api-version=2018-06-01 HTTP/1.1要求標頭
要求標頭 描述 Content-Type 必要。 設定為 application/json。授權 必要。 設定為有效的 Bearer存取權杖。要求本文
  {
    "location":"westus",
    "name":"myVM",
    "identity":{
       "type":"SystemAssigned"
    },
    "properties":{
       "hardwareProfile":{
          "vmSize":"Standard_D2_v2"
       },
       "storageProfile":{
          "imageReference":{
             "sku":"2016-Datacenter",
             "publisher":"MicrosoftWindowsServer",
             "version":"latest",
             "offer":"WindowsServer"
          },
          "osDisk":{
             "caching":"ReadWrite",
             "managedDisk":{
                "storageAccountType":"StandardSSD_LRS"
             },
             "name":"myVM3osdisk",
             "createOption":"FromImage"
          },
          "dataDisks":[
             {
                "diskSizeGB":1023,
                "createOption":"Empty",
                "lun":0
             },
             {
                "diskSizeGB":1023,
                "createOption":"Empty",
                "lun":1
             }
          ]
       },
       "osProfile":{
          "adminUsername":"azureuser",
          "computerName":"myVM",
          "adminPassword":"myPassword12"
       },
       "networkProfile":{
          "networkInterfaces":[
             {
                "id":"/subscriptions/<SUBSCRIPTION ID>/resourceGroups/myResourceGroup/providers/Microsoft.Network/networkInterfaces/myNic",
                "properties":{
                   "primary":true
                }
             }
          ]
       }
    }
 }
在現有 Azure VM 上啟用系統指派的身分識別
若要在原先佈建的 VM 上啟用系統指派的受控識別,您的帳戶需要虛擬機器參與者角色指派。 不需要其他的 Microsoft Entra 目錄角色指派。
擷取持有人存取權杖,在下一個步驟中,會使用此權杖搭配搭配系統指派的受控識別,在授權標頭中建立虛擬機器。
az account get-access-token使用下列 CURL 命令呼叫 Azure Resource Manager REST 端點,以便在您的虛擬機器上啟用系統指派的受控識別 (如同在要求本文中由 myVMSS 虛擬機器的
{"identity":{"type":"SystemAssigned"}值所識別)。 將上一個步驟中要求持有人存取權杖時所收到的值用以取代<ACCESS TOKEN>值,<SUBSCRIPTION ID>的值則為適用於您的環境的值。重要
若要確保您不會刪除虛擬機器指派的任何現有使用者指派識別,需要使用下列 CURL 命令來列出使用者指派的受控識別:
curl 'https://management.azure.com/subscriptions/<SUBSCRIPTION ID>/resourceGroups/<RESOURCE GROUP>/providers/Microsoft.Compute/virtualMachines/<VM NAME>?api-version=2018-06-01' -H "Authorization: Bearer <ACCESS TOKEN>"。 如有任何使用者指派的受控識別是指派給回應中identity值識別的虛擬機器,請跳至步驟 3,此步驟將說明如何保留使用者指派的受控識別,同時在虛擬機器上啟用系統指派的受控識別。curl 'https://management.azure.com/subscriptions/<SUBSCRIPTION ID>/resourceGroups/myResourceGroup/providers/Microsoft.Compute/virtualMachines/myVM?api-version=2018-06-01' -X PATCH -d '{"identity":{"type":"SystemAssigned"}}' -H "Content-Type: application/json" -H "Authorization:Bearer <ACCESS TOKEN>"PATCH https://management.azure.com/subscriptions/<SUBSCRIPTION ID>/resourceGroups/myResourceGroup/providers/Microsoft.Compute/virtualMachines/myVM?api-version=2018-06-01 HTTP/1.1要求標頭
要求標頭 描述 Content-Type 必要。 設定為 application/json。授權 必要。 設定為有效的 Bearer存取權杖。要求本文
 {
    "identity":{
       "type":"SystemAssigned"
    }
 }
若要在有現有使用者指派受控識別的虛擬機器上啟用系統指派的受控識別,您需要將
SystemAssigned新增至type值。舉例而言,若您的虛擬機器有使用者指派的受控識別
ID1和ID2,而且您想要將系統指派的受控識別新增至虛擬機器,請使用下列 CURL 呼叫。 以適用於您的環境的值取代<ACCESS TOKEN>和<SUBSCRIPTION ID>。API 版本
2018-06-01會將使用者指派的受控身分識別儲存在userAssignedIdentities值內 (採用字典格式),而不是儲存在identityIds值內 (採用 API 版本2017-12-01中所使用的陣列格式)。API 版本 2018-06-01
curl 'https://management.azure.com/subscriptions/<SUBSCRIPTION ID>/resourceGroups/myResourceGroup/providers/Microsoft.Compute/virtualMachines/myVM?api-version=2018-06-01' -X PATCH -d '{"identity":{"type":"SystemAssigned, UserAssigned", "userAssignedIdentities":{"/subscriptions/<<SUBSCRIPTION ID>>/resourcegroups/myResourceGroup/providers/Microsoft.ManagedIdentity/userAssignedIdentities/ID1":{},"/subscriptions/<SUBSCRIPTION ID>/resourcegroups/myResourceGroup/providers/Microsoft.ManagedIdentity/userAssignedIdentities/ID2":{}}}}' -H "Content-Type: application/json" -H "Authorization:Bearer <ACCESS TOKEN>"PATCH https://management.azure.com/subscriptions/<SUBSCRIPTION ID>/resourceGroups/myResourceGroup/providers/Microsoft.Compute/virtualMachines/myVM?api-version=2018-06-01 HTTP/1.1要求標頭
要求標頭 描述 Content-Type 必要。 設定為 application/json。授權 必要。 設定為有效的 Bearer存取權杖。要求本文
 {
    "identity":{
       "type":"SystemAssigned, UserAssigned",
       "userAssignedIdentities":{
          "/subscriptions/<<SUBSCRIPTION ID>>/resourcegroups/myResourceGroup/providers/Microsoft.ManagedIdentity/userAssignedIdentities/ID1":{

          },
          "/subscriptions/<SUBSCRIPTION ID>/resourcegroups/myResourceGroup/providers/Microsoft.ManagedIdentity/userAssignedIdentities/ID2":{

          }
       }
    }
 }
API 版本 2017-12-01
curl 'https://management.azure.com/subscriptions/<SUBSCRIPTION ID>/resourceGroups/myResourceGroup/providers/Microsoft.Compute/virtualMachines/myVM?api-version=2017-12-01' -X PATCH -d '{"identity":{"type":"SystemAssigned, UserAssigned", "identityIds":["/subscriptions/<<SUBSCRIPTION ID>>/resourcegroups/myResourceGroup/providers/Microsoft.ManagedIdentity/userAssignedIdentities/ID1","/subscriptions/<SUBSCRIPTION ID>/resourcegroups/myResourceGroup/providers/Microsoft.ManagedIdentity/userAssignedIdentities/ID2"]}}' -H "Content-Type: application/json" -H "Authorization:Bearer <ACCESS TOKEN>"PATCH https://management.azure.com/subscriptions/<SUBSCRIPTION ID>/resourceGroups/myResourceGroup/providers/Microsoft.Compute/virtualMachines/myVM?api-version=2017-12-01 HTTP/1.1要求標頭
要求標頭 描述 Content-Type 必要。 設定為 application/json。授權 必要。 設定為有效的 Bearer存取權杖。要求本文
 {
    "identity":{
       "type":"SystemAssigned, UserAssigned",
       "identityIds":[
          "/subscriptions/<<SUBSCRIPTION ID>>/resourcegroups/myResourceGroup/providers/Microsoft.ManagedIdentity/userAssignedIdentities/ID1",
          "/subscriptions/<SUBSCRIPTION ID>/resourcegroups/myResourceGroup/providers/Microsoft.ManagedIdentity/userAssignedIdentities/ID2"
       ]
    }
 }
停用來自 Azure VM 的系統指派受控識別
若要在 VM 上停用系統指派的受控識別,您的帳戶需要虛擬機器參與者角色指派。 不需要其他的 Microsoft Entra 目錄角色指派。
擷取持有人存取權杖,在下一個步驟中,會使用此權杖搭配搭配系統指派的受控識別,在授權標頭中建立虛擬機器。
az account get-access-token使用 CURL 呼叫 Azure Resource Manager REST 端點來停用系統指派的受控識別,以便更新虛擬機器。 下列範例會停用系統指派受控識別 (如同在要求本文中由 myVM 虛擬機器中的
{"identity":{"type":"None"}}值所識別)。 將上一個步驟中要求持有人存取權杖時所收到的值用以取代<ACCESS TOKEN>值,<SUBSCRIPTION ID>的值則為適用於您的環境的值。重要
若要確保您不會刪除虛擬機器指派的任何現有使用者指派識別,需要使用下列 CURL 命令來列出使用者指派的受控識別:
curl 'https://management.azure.com/subscriptions/<SUBSCRIPTION ID>/resourceGroups/<RESOURCE GROUP>/providers/Microsoft.Compute/virtualMachines/<VM NAME>?api-version=2018-06-01' -H "Authorization: Bearer <ACCESS TOKEN>"。 如有任何使用者指派的受控識別是指派給回應中identity值識別的虛擬機器,請跳至步驟 3,此步驟將說明如何保留使用者指派的受控識別,同時在虛擬機器上停用系統指派的受控識別。curl 'https://management.azure.com/subscriptions/<SUBSCRIPTION ID>/resourceGroups/myResourceGroup/providers/Microsoft.Compute/virtualMachines/myVM?api-version=2018-06-01' -X PATCH -d '{"identity":{"type":"None"}}' -H "Content-Type: application/json" -H "Authorization:Bearer <ACCESS TOKEN>"PATCH https://management.azure.com/subscriptions/<SUBSCRIPTION ID>/resourceGroups/myResourceGroup/providers/Microsoft.Compute/virtualMachines/myVM?api-version=2018-06-01 HTTP/1.1要求標頭
要求標頭 描述 Content-Type 必要。 設定為 application/json。授權 必要。 設定為有效的 Bearer存取權杖。要求本文
 {
    "identity":{
       "type":"None"
    }
 }
若要從具有使用者指派受控識別的虛擬機器移除系統指派的受控識別,請從
{"identity":{"type:" "}}值移除SystemAssigned,但同時保留UserAssigned值和userAssignedIdentities字典值 (如果您使用 API 版本 2018-06-01)。 如果您使用 API 版本 2017-12-01 或先前版本,則請保留identityIds陣列。
使用者指派的受控識別
在本節中,您將了解如何使用 CURL 呼叫 Azure Resource Manager REST 端點,在 Azure VM 上新增和移除使用者指派的受控識別。
在建立 Azure VM 時,指派使用者指派的受控識別
若要將使用者指派的身分識別指派給 VM,您的帳戶需要虛擬機器參與者和受控識別操作者角色指派。 不需要其他的 Microsoft Entra 目錄角色指派。
擷取持有人存取權杖,在下一個步驟中,會使用此權杖搭配搭配系統指派的受控識別,在授權標頭中建立虛擬機器。
az account get-access-token建立虛擬機器的網路介面:
az network nic create -g myResourceGroup --vnet-name myVnet --subnet mySubnet -n myNic擷取持有人存取權杖,在下一個步驟中,會使用此權杖搭配搭配系統指派的受控識別,在授權標頭中建立虛擬機器。
az account get-access-token使用以下找到的指示建立使用者指派的受控識別:建立使用者指派的受控識別。
使用 CURL 呼叫 Azure Resource Manager REST 端點來建立虛擬機器。 下列範例會使用使用者指派的受控識別
ID1(如同在要求本文中由"identity":{"type":"UserAssigned"}值所識別),在資源群組 myResourceGroup 中建立名為 myVM 的虛擬機器。 將上一個步驟中要求持有人存取權杖時所收到的值用以取代<ACCESS TOKEN>值,<SUBSCRIPTION ID>的值則為適用於您的環境的值。API 版本 2018-06-01
curl 'https://management.azure.com/subscriptions/<SUBSCRIPTION ID>/resourceGroups/myResourceGroup/providers/Microsoft.Compute/virtualMachines/myVM?api-version=2018-06-01' -X PUT -d '{"location":"westus","name":"myVM","identity":{"type":"UserAssigned","identityIds":["/subscriptions/<SUBSCRIPTION ID>/resourcegroups/myResourceGroup/providers/Microsoft.ManagedIdentity/userAssignedIdentities/ID1"]},"properties":{"hardwareProfile":{"vmSize":"Standard_D2_v2"},"storageProfile":{"imageReference":{"sku":"2016-Datacenter","publisher":"MicrosoftWindowsServer","version":"latest","offer":"WindowsServer"},"osDisk":{"caching":"ReadWrite","managedDisk":{"storageAccountType":"StandardSSD_LRS"},"name":"myVM3osdisk","createOption":"FromImage"},"dataDisks":[{"diskSizeGB":1023,"createOption":"Empty","lun":0},{"diskSizeGB":1023,"createOption":"Empty","lun":1}]},"osProfile":{"adminUsername":"azureuser","computerName":"myVM","adminPassword":"myPassword12"},"networkProfile":{"networkInterfaces":[{"id":"/subscriptions/<SUBSCRIPTION ID>/resourceGroups/myResourceGroup/providers/Microsoft.Network/networkInterfaces/myNic","properties":{"primary":true}}]}}}' -H "Content-Type: application/json" -H "Authorization: Bearer <ACCESS TOKEN>"PUT https://management.azure.com/subscriptions/<SUBSCRIPTION ID>/resourceGroups/myResourceGroup/providers/Microsoft.Compute/virtualMachines/myVM?api-version=2018-06-01 HTTP/1.1要求標頭
要求標頭 描述 Content-Type 必要。 設定為 application/json。授權 必要。 設定為有效的 Bearer存取權杖。要求本文
 {
    "location":"westus",
    "name":"myVM",
    "identity":{
       "type":"UserAssigned",
       "identityIds":[
          "/subscriptions/<SUBSCRIPTION ID>/resourcegroups/myResourceGroup/providers/Microsoft.ManagedIdentity/userAssignedIdentities/ID1"
       ]
    },
    "properties":{
       "hardwareProfile":{
          "vmSize":"Standard_D2_v2"
       },
       "storageProfile":{
          "imageReference":{
             "sku":"2016-Datacenter",
             "publisher":"MicrosoftWindowsServer",
             "version":"latest",
             "offer":"WindowsServer"
          },
          "osDisk":{
             "caching":"ReadWrite",
             "managedDisk":{
                "storageAccountType":"StandardSSD_LRS"
             },
             "name":"myVM3osdisk",
             "createOption":"FromImage"
          },
          "dataDisks":[
             {
                "diskSizeGB":1023,
                "createOption":"Empty",
                "lun":0
             },
             {
                "diskSizeGB":1023,
                "createOption":"Empty",
                "lun":1
             }
          ]
       },
       "osProfile":{
          "adminUsername":"azureuser",
          "computerName":"myVM",
          "adminPassword":"myPassword12"
       },
       "networkProfile":{
          "networkInterfaces":[
             {
                "id":"/subscriptions/<SUBSCRIPTION ID>/resourceGroups/myResourceGroup/providers/Microsoft.Network/networkInterfaces/myNic",
                "properties":{
                   "primary":true
                }
             }
          ]
       }
    }
 }
API 版本 2017-12-01
curl 'https://management.azure.com/subscriptions/<SUBSCRIPTION ID>/resourceGroups/myResourceGroup/providers/Microsoft.Compute/virtualMachines/myVM?api-version=2017-12-01' -X PUT -d '{"location":"westus","name":"myVM","identity":{"type":"UserAssigned","identityIds":["/subscriptions/<SUBSCRIPTION ID>/resourcegroups/myResourceGroup/providers/Microsoft.ManagedIdentity/userAssignedIdentities/ID1"]},"properties":{"hardwareProfile":{"vmSize":"Standard_D2_v2"},"storageProfile":{"imageReference":{"sku":"2016-Datacenter","publisher":"MicrosoftWindowsServer","version":"latest","offer":"WindowsServer"},"osDisk":{"caching":"ReadWrite","managedDisk":{"storageAccountType":"StandardSSD_LRS"},"name":"myVM3osdisk","createOption":"FromImage"},"dataDisks":[{"diskSizeGB":1023,"createOption":"Empty","lun":0},{"diskSizeGB":1023,"createOption":"Empty","lun":1}]},"osProfile":{"adminUsername":"azureuser","computerName":"myVM","adminPassword":"myPassword12"},"networkProfile":{"networkInterfaces":[{"id":"/subscriptions/<SUBSCRIPTION ID>/resourceGroups/myResourceGroup/providers/Microsoft.Network/networkInterfaces/myNic","properties":{"primary":true}}]}}}' -H "Content-Type: application/json" -H "Authorization: Bearer <ACCESS TOKEN>"PUT https://management.azure.com/subscriptions/<SUBSCRIPTION ID>/resourceGroups/myResourceGroup/providers/Microsoft.Compute/virtualMachines/myVM?api-version=2017-12-01 HTTP/1.1要求標頭
要求標頭 描述 Content-Type 必要。 設定為 application/json。授權 必要。 設定為有效的 Bearer存取權杖。要求本文
 {
    "location":"westus",
    "name":"myVM",
    "identity":{
       "type":"UserAssigned",
       "identityIds":[
          "/subscriptions/<SUBSCRIPTION ID>/resourcegroups/myResourceGroup/providers/Microsoft.ManagedIdentity/userAssignedIdentities/ID1"
       ]
    },
    "properties":{
       "hardwareProfile":{
          "vmSize":"Standard_D2_v2"
       },
       "storageProfile":{
          "imageReference":{
             "sku":"2016-Datacenter",
             "publisher":"MicrosoftWindowsServer",
             "version":"latest",
             "offer":"WindowsServer"
          },
          "osDisk":{
             "caching":"ReadWrite",
             "managedDisk":{
                "storageAccountType":"StandardSSD_LRS"
             },
             "name":"myVM3osdisk",
             "createOption":"FromImage"
          },
          "dataDisks":[
             {
                "diskSizeGB":1023,
                "createOption":"Empty",
                "lun":0
             },
             {
                "diskSizeGB":1023,
                "createOption":"Empty",
                "lun":1
             }
          ]
       },
       "osProfile":{
          "adminUsername":"azureuser",
          "computerName":"myVM",
          "adminPassword":"myPassword12"
       },
       "networkProfile":{
          "networkInterfaces":[
             {
                "id":"/subscriptions/<SUBSCRIPTION ID>/resourceGroups/myResourceGroup/providers/Microsoft.Network/networkInterfaces/myNic",
                "properties":{
                   "primary":true
                }
             }
          ]
       }
    }
 }
將使用者指派的受控識別指派至現有 Azure VM
若要將使用者指派的身分識別指派給 VM,您的帳戶需要虛擬機器參與者和受控識別操作者角色指派。 不需要其他的 Microsoft Entra 目錄角色指派。
擷取持有人存取權杖,在下一個步驟中,會使用此權杖搭配搭配系統指派的受控識別,在授權標頭中建立虛擬機器。
az account get-access-token使用以下找到的指示建立使用者指派的受控識別:建立使用者指派的受控識別。
若要確保您不會刪除指派給虛擬機器的任何現有使用者或系統指派識別,需要使用下列 CURL 命令來列出指派給虛擬機器的識別類型。 若有指派給虛擬機器擴展集的受控識別,則會列在
identity值之下。curl 'https://management.azure.com/subscriptions/<SUBSCRIPTION ID>/resourceGroups/<RESOURCE GROUP>/providers/Microsoft.Compute/virtualMachines/<VM NAME>?api-version=2018-06-01' -H "Authorization: Bearer <ACCESS TOKEN>"GET https://management.azure.com/subscriptions/<SUBSCRIPTION ID>/resourceGroups/<RESOURCE GROUP>/providers/Microsoft.Compute/virtualMachines/<VM NAME>?api-version=2018-06-01 HTTP/1.1要求標頭
要求標頭 描述 授權 必要。 設定為有效的 Bearer存取權杖。如有任何使用者或系統指派的受控識別是指派給回應中
identity值識別的虛擬機器,請跳至步驟 5,此步驟將說明如何在 VM 上新增使用者指派的受控識別時,同時保留系統指派的受控識別。若沒有任何使用者指派的受控識別指派給您的虛擬機器,請使用下列 CURL 命令呼叫 Azure Resource Manager REST 端點,將第一個使用者指派的受控識別指派給虛擬機器。
下列範例會將使用者指派的受控識別
ID1指派給資源群組myResourceGroup 中名為 myVM 的虛擬機器。 將上一個步驟中要求持有人存取權杖時所收到的值用以取代<ACCESS TOKEN>值,<SUBSCRIPTION ID>的值則為適用於您的環境的值。API 版本 2018-06-01
curl 'https://management.azure.com/subscriptions/<SUBSCRIPTION ID>/resourceGroups/myResourceGroup/providers/Microsoft.Compute/virtualMachines/myVM?api-version=2018-06-01' -X PATCH -d '{"identity":{"type":"UserAssigned", "userAssignedIdentities":{"/subscriptions/<SUBSCRIPTION ID>/resourcegroups/myResourceGroup/providers/Microsoft.ManagedIdentity/userAssignedIdentities/ID1":{}}}}' -H "Content-Type: application/json" -H "Authorization:Bearer <ACCESS TOKEN>"PATCH https://management.azure.com/subscriptions/<SUBSCRIPTION ID>/resourceGroups/myResourceGroup/providers/Microsoft.Compute/virtualMachines/myVM?api-version=2018-06-01 HTTP/1.1要求標頭
要求標頭 描述 Content-Type 必要。 設定為 application/json。授權 必要。 設定為有效的 Bearer存取權杖。要求本文
 {
    "identity":{
       "type":"UserAssigned",
       "userAssignedIdentities":{
          "/subscriptions/<SUBSCRIPTION ID>/resourcegroups/myResourceGroup/providers/Microsoft.ManagedIdentity/userAssignedIdentities/ID1":{

          }
       }
    }
 }
API 版本 2017-12-01
curl 'https://management.azure.com/subscriptions/<SUBSCRIPTION ID>/resourceGroups/myResourceGroup/providers/Microsoft.Compute/virtualMachines/myVM?api-version=2017-12-01' -X PATCH -d '{"identity":{"type":"userAssigned", "identityIds":["/subscriptions/<SUBSCRIPTION ID>/resourcegroups/myResourceGroup/providers/Microsoft.ManagedIdentity/userAssignedIdentities/ID1"]}}' -H "Content-Type: application/json" -H "Authorization:Bearer <ACCESS TOKEN>"PATCH https://management.azure.com/subscriptions/<SUBSCRIPTION ID>/resourceGroups/myResourceGroup/providers/Microsoft.Compute/virtualMachines/myVM?api-version=2017-12-01 HTTP/1.1要求標頭
要求標頭 描述 Content-Type 必要。 設定為 application/json。授權 必要。 設定為有效的 Bearer存取權杖。要求本文
 {
    "identity":{
       "type":"userAssigned",
       "identityIds":[
          "/subscriptions/<SUBSCRIPTION ID>/resourcegroups/myResourceGroup/providers/Microsoft.ManagedIdentity/userAssignedIdentities/ID1"
       ]
    }
 }
如果您將現有的使用者指派或系統指派受控識別指派給 VM:
API 版本 2018-06-01
將使用者指派的受控識別新增至
userAssignedIdentities字典值。例如,如果您目前將系統指派的受控識別和使用者指派的受控識別
ID1指派給 VM,而且想要在其中新增使用者指派的受控識別ID2:curl 'https://management.azure.com/subscriptions/<SUBSCRIPTION ID>/resourceGroups/myResourceGroup/providers/Microsoft.Compute/virtualMachines/myVM?api-version=2018-06-01' -X PATCH -d '{"identity":{"type":"SystemAssigned, UserAssigned", "userAssignedIdentities":{"/subscriptions/<SUBSCRIPTION ID>/resourcegroups/myResourceGroup/providers/Microsoft.ManagedIdentity/userAssignedIdentities/ID1":{},"/subscriptions/<SUBSCRIPTION ID>/resourcegroups/myResourceGroup/providers/Microsoft.ManagedIdentity/userAssignedIdentities/ID2":{}}}}' -H "Content-Type: application/json" -H "Authorization:Bearer <ACCESS TOKEN>"PATCH https://management.azure.com/subscriptions/<SUBSCRIPTION ID>/resourceGroups/myResourceGroup/providers/Microsoft.Compute/virtualMachines/myVM?api-version=2018-06-01 HTTP/1.1要求標頭
要求標頭 描述 Content-Type 必要。 設定為 application/json。授權 必要。 設定為有效的 Bearer存取權杖。要求本文
 {
    "identity":{
       "type":"SystemAssigned, UserAssigned",
       "userAssignedIdentities":{
          "/subscriptions/<SUBSCRIPTION ID>/resourcegroups/myResourceGroup/providers/Microsoft.ManagedIdentity/userAssignedIdentities/ID1":{

          },
          "/subscriptions/<SUBSCRIPTION ID>/resourcegroups/myResourceGroup/providers/Microsoft.ManagedIdentity/userAssignedIdentities/ID2":{

          }
       }
    }
 }
API 版本 2017-12-01
保留您想要留在
identityIds陣列值內的使用者指派受控識別,同時新增使用者指派的受控識別。例如,如果您目前將系統指派的受控識別和使用者指派的受控識別
ID1指派給 VM,而且想要在其中新增使用者指派的受控識別ID2:curl 'https://management.azure.com/subscriptions/<SUBSCRIPTION ID>/resourceGroups/myResourceGroup/providers/Microsoft.Compute/virtualMachines/myVM?api-version=2017-12-01' -X PATCH -d '{"identity":{"type":"SystemAssigned,UserAssigned", "identityIds":["/subscriptions/<SUBSCRIPTION ID>/resourcegroups/myResourceGroup/providers/Microsoft.ManagedIdentity/userAssignedIdentities/ID1","/subscriptions/<SUBSCRIPTION ID>/resourcegroups/myResourceGroup/providers/Microsoft.ManagedIdentity/userAssignedIdentities/ID2"]}}' -H "Content-Type: application/json" -H "Authorization:Bearer <ACCESS TOKEN>"PATCH https://management.azure.com/subscriptions/<SUBSCRIPTION ID>/resourceGroups/myResourceGroup/providers/Microsoft.Compute/virtualMachines/myVM?api-version=2017-12-01 HTTP/1.1要求標頭
要求標頭 描述 Content-Type 必要。 設定為 application/json。授權 必要。 設定為有效的 Bearer存取權杖。要求本文
 {
    "identity":{
       "type":"SystemAssigned,UserAssigned",
       "identityIds":[
          "/subscriptions/<SUBSCRIPTION ID>/resourcegroups/myResourceGroup/providers/Microsoft.ManagedIdentity/userAssignedIdentities/ID1",
          "/subscriptions/<SUBSCRIPTION ID>/resourcegroups/myResourceGroup/providers/Microsoft.ManagedIdentity/userAssignedIdentities/ID2"
       ]
    }
 }
從 Azure VM 移除使用者指派的受控識別
若要將使用者指派的身分識別移除至 VM,您的帳戶需要虛擬機器參與者角色指派。
擷取持有人存取權杖,在下一個步驟中,會使用此權杖搭配搭配系統指派的受控識別,在授權標頭中建立虛擬機器。
az account get-access-token若要確保您不會刪除您要維持指派給虛擬機器的任何現有使用者指派受控識別,或者要移除系統指派的受控識別,需要使用下列 CURL 命令來列出受控識別:
curl 'https://management.azure.com/subscriptions/<SUBSCRIPTION ID>/resourceGroups/<RESOURCE GROUP>/providers/Microsoft.Compute/virtualMachines/<VM NAME>?api-version=2018-06-01' -H "Authorization: Bearer <ACCESS TOKEN>"GET https://management.azure.com/subscriptions/<SUBSCRIPTION ID>/resourceGroups/<RESOURCE GROUP>/providers/Microsoft.Compute/virtualMachines/<VM NAME>?api-version=2018-06-01 HTTP/1.1要求標頭
要求標頭 描述 Content-Type 必要。 設定為 application/json。授權 必要。 設定為有效的 Bearer存取權杖。若您有指派給虛擬機器的受控識別,則會在
identity值的回應中列出。例如,如果您將使用者指派的受控識別
ID1和ID2指派給 VM,而且只想要繼續指派ID1,並保留系統指派的身分識別:API 版本 2018-06-01
將
null新增至您想要移除的使用者指派受控識別:curl 'https://management.azure.com/subscriptions/<SUBSCRIPTION ID>/resourceGroups/myResourceGroup/providers/Microsoft.Compute/virtualMachines/myVM?api-version=2018-06-01' -X PATCH -d '{"identity":{"type":"SystemAssigned, UserAssigned", "userAssignedIdentities":{"/subscriptions/<SUBSCRIPTION ID>/resourcegroups/myResourceGroup/providers/Microsoft.ManagedIdentity/userAssignedIdentities/ID2":null}}}' -H "Content-Type: application/json" -H "Authorization:Bearer <ACCESS TOKEN>"PATCH https://management.azure.com/subscriptions/<SUBSCRIPTION ID>/resourceGroups/myResourceGroup/providers/Microsoft.Compute/virtualMachines/myVM?api-version=2018-06-01 HTTP/1.1要求標頭
要求標頭 描述 Content-Type 必要。 設定為 application/json。授權 必要。 設定為有效的 Bearer存取權杖。要求本文
 {
    "identity":{
       "type":"SystemAssigned, UserAssigned",
       "userAssignedIdentities":{
          "/subscriptions/<SUBSCRIPTION ID>/resourcegroups/myResourceGroup/providers/Microsoft.ManagedIdentity/userAssignedIdentities/ID2":null
       }
    }
 }
API 版本 2017-12-01
只保留您想要留在
identityIds陣列中的使用者指派受控識別:curl 'https://management.azure.com/subscriptions/<SUBSCRIPTION ID>/resourceGroups/myResourceGroup/providers/Microsoft.Compute/virtualMachines/myVM?api-version=2017-12-01' -X PATCH -d '{"identity":{"type":"SystemAssigned, UserAssigned", "identityIds":["/subscriptions/<SUBSCRIPTION ID>/resourcegroups/myResourceGroup/providers/Microsoft.ManagedIdentity/userAssignedIdentities/ID1"]}}' -H "Content-Type: application/json" -H "Authorization:Bearer <ACCESS TOKEN>"PATCH https://management.azure.com/subscriptions/<SUBSCRIPTION ID>/resourceGroups/myResourceGroup/providers/Microsoft.Compute/virtualMachines/myVM?api-version=2017-12-01 HTTP/1.1要求標頭
要求標頭 描述 Content-Type 必要。 設定為 application/json。授權 必要。 設定為有效的 Bearer存取權杖。要求本文
 {
    "identity":{
       "type":"SystemAssigned, UserAssigned",
       "identityIds":[
          "/subscriptions/<SUBSCRIPTION ID>/resourcegroups/myResourceGroup/providers/Microsoft.ManagedIdentity/userAssignedIdentities/ID1"
       ]
    }
 }
如果您的虛擬機器同時具有系統指派和使用者指派的受控識別,您可藉由切換為僅使用系統指派的受控識別,移除所有使用者指派的受控識別:
curl 'https://management.azure.com/subscriptions/<SUBSCRIPTION ID>/resourceGroups/myResourceGroup/providers/Microsoft.Compute/virtualMachines/myVM?api-version=2018-06-01' -X PATCH -d '{"identity":{"type":"SystemAssigned"}}' -H "Content-Type: application/json" -H "Authorization:Bearer <ACCESS TOKEN>"
PATCH https://management.azure.com/subscriptions/<SUBSCRIPTION ID>/resourceGroups/myResourceGroup/providers/Microsoft.Compute/virtualMachines/myVM?api-version=2018-06-01 HTTP/1.1
要求標頭
| 要求標頭 | 描述 |
|---|---|
| Content-Type | 必要。 設定為 application/json。 |
| 授權 | 必要。 設定為有效的 Bearer 存取權杖。 |
要求本文
{
   "identity":{
      "type":"SystemAssigned"
   }
}
如果您的虛擬機器只有使用者指派的受控識別,而且您想要全部移除,請使用下列命令:
curl 'https://management.azure.com/subscriptions/<SUBSCRIPTION ID>/resourceGroups/myResourceGroup/providers/Microsoft.Compute/virtualMachines/myVM?api-version=2018-06-01' -X PATCH -d '{"identity":{"type":"None"}}' -H "Content-Type: application/json" -H Authorization:"Bearer <ACCESS TOKEN>"
PATCH https://management.azure.com/subscriptions/<SUBSCRIPTION ID>/resourceGroups/myResourceGroup/providers/Microsoft.Compute/virtualMachines/myVM?api-version=2018-06-01 HTTP/1.1
要求標頭
| 要求標頭 | 描述 |
|---|---|
| Content-Type | 必要。 設定為 application/json。 |
| 授權 | 必要。 設定為有效的 Bearer 存取權杖。 |
要求本文
{
   "identity":{
      "type":"None"
   }
}
下一步
如需如何使用 REST 建立、列出或刪除使用者指派的受控識別相關資訊,請參閱:
在本文中,您將了解如何使用 Azure SDK 來啟用和移除 Azure VM 的 Azure 資源受控識別。
必要條件
Azure 資源受控識別支援的 Azure SDK
Azure 透過一系列 Azure SDK 支援多個程式設計平台。 其中許多都已更新來支援 Azure 資源的受控識別,還提供對應的範例來示範用法。 這份清單會隨著新增額外的支援而更新:
| SDK | 範例 |
|---|---|
| .NET | 從 Azure 資源的受控識別啟用的虛擬機器管理資源 |
| Java | 從 Azure 資源的受控識別啟用的虛擬機器管理儲存體 |
| Node.js | 建立已啟用系統指派受控識別的虛擬機器 |
| Python | 建立已啟用系統指派受控識別的虛擬機器 |
| Ruby | 建立已啟用系統指派身分識別的 Azure VM |
下一步
- 若要了解您還可以如何使用 Azure 入口網站、PowerShell、CLI 和資源範本,請參閱設定 Azure VM 身分識別底下的相關文章。