Poznámka:
Přístup k této stránce vyžaduje autorizaci. Můžete se zkusit přihlásit nebo změnit adresáře.
Přístup k této stránce vyžaduje autorizaci. Můžete zkusit změnit adresáře.
Přehled
V tomto kurzu přidáte nabízená oznámení do projektu rychlého startu pro iOS , aby se nabízené oznámení odeslalo do zařízení při každém vložení záznamu.
Pokud zapnutý projekt rychlého startu serveru nepoužíváte, budete potřebovat balíček rozšíření pro push oznámení. Další informace najdete v tématu Práce se sadou SDK back-endového serveru .NET pro Azure Mobile Apps .
Simulátor iOS nepodporuje nabízená oznámení. Potřebujete fyzické zařízení s iOSem a členství v programu Apple Developer Program.
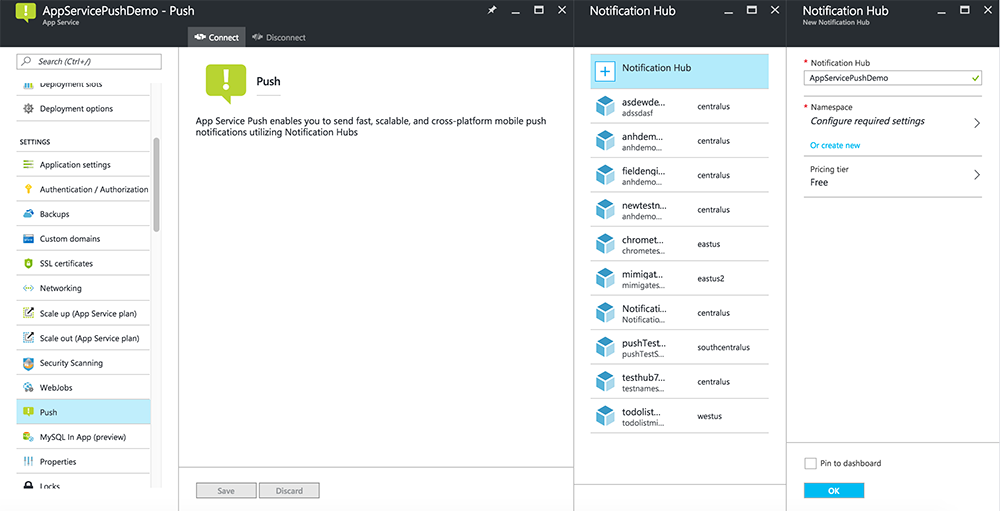
Konfigurace centra oznámení
Funkce Mobile Apps služby Azure App Service používá Azure Notification Hubs k odesílání nabízených oznámení, takže pro mobilní aplikaci nakonfigurujete centrum oznámení.
Na webu Azure Portalpřejděte na App Services a pak vyberte back-end vaší aplikace. V části Nastavenívyberte Push.
Chcete-li do aplikace přidat centrum oznámení, vyberte Připojit. Můžete buď vytvořit centrum, nebo se připojit k existujícímu.
 centra
Teď jste připojili centrum oznámení k back-endovém projektu Mobile Apps. Později toto centrum oznámení nakonfigurujete tak, aby se připojilo k systému oznámení platformy (PNS) pro nabízení do zařízení.
Registrace aplikace pro push oznámení
- Zaregistrujte ID aplikace pro vaši aplikaci. Vytvořte výslovné ID aplikace (ne ID aplikace se zástupnými znaky) a pro identifikátor balíčku použijte přesný identifikátor balíčku, který je v projektu rychlého startu v Xcode. Je také důležité vybrat možnost Nabízená oznámení .
- Dále se připravte na konfiguraci nabízených oznámení a vytvořte certifikát SSL pro vývoj nebo distribuci.
Konfigurace Azure pro odesílání nabízených oznámení
- Na macu spusťte Keychain Access. Na levém navigačním panelu v části Kategorie otevřete Moje certifikáty. Vyhledejte certifikát SSL, který jste stáhli v předchozí části, a pak zpřístupňte jeho obsah. Vyberte pouze certifikát (nevybírejte privátní klíč). Pak ho vyexportujte.
- V portálu Azure vyberte Procházet všechny>App Services. Pak vyberte zázemí pro mobilní aplikace.
- V části Nastavení vyberte App Service Push. Pak vyberte název centra oznámení.
- Přejděte na Apple Push Notification Services>Nahrání certifikátu. Nahrajte soubor .p12 a vyberte správný režim (v závislosti na tom, jestli je certifikát SSL klienta z dřívější verze produkční nebo sandbox). Uložte všechny změny.
Vaše služba je teď nakonfigurovaná tak, aby fungovala s nabízenými oznámeními v iOSu.
Aktualizace back-endu pro odesílání nabízených oznámení
.NET backend (C#):
V sadě Visual Studio klikněte pravým tlačítkem myši na projekt serveru a klikněte na Spravovat balíčky NuGet, vyhledejte
Microsoft.Azure.NotificationHubsa potom klikněte na Nainstalovat. Tím se nainstaluje knihovna Notification Hubs pro odesílání oznámení z back-endu.V projektu ve Visual Studiu na back-endu otevřete Controllers>TodoItemController.cs. V horní části souboru přidejte následující
usingpříkaz:using Microsoft.Azure.Mobile.Server.Config; using Microsoft.Azure.NotificationHubs;Nahraďte metodu
PostTodoItemnásledujícím kódem:public async Task<IHttpActionResult> PostTodoItem(TodoItem item) { TodoItem current = await InsertAsync(item); // Get the settings for the server project. HttpConfiguration config = this.Configuration; MobileAppSettingsDictionary settings = this.Configuration.GetMobileAppSettingsProvider().GetMobileAppSettings(); // Get the Notification Hubs credentials for the Mobile App. string notificationHubName = settings.NotificationHubName; string notificationHubConnection = settings .Connections[MobileAppSettingsKeys.NotificationHubConnectionString].ConnectionString; // Create a new Notification Hub client. NotificationHubClient hub = NotificationHubClient .CreateClientFromConnectionString(notificationHubConnection, notificationHubName); // iOS payload var appleNotificationPayload = "{\"aps\":{\"alert\":\"" + item.Text + "\"}}"; try { // Send the push notification and log the results. var result = await hub.SendAppleNativeNotificationAsync(appleNotificationPayload); // Write the success result to the logs. config.Services.GetTraceWriter().Info(result.State.ToString()); } catch (System.Exception ex) { // Write the failure result to the logs. config.Services.GetTraceWriter() .Error(ex.Message, null, "Push.SendAsync Error"); } return CreatedAtRoute("Tables", new { id = current.Id }, current); }Znovu publikujte projekt serveru.
Node.js backend:
Nastavte back-endový projekt.
Nahraďte skript tabulky todoitem.js následujícím kódem:
var azureMobileApps = require('azure-mobile-apps'),
    promises = require('azure-mobile-apps/src/utilities/promises'),
    logger = require('azure-mobile-apps/src/logger');

var table = azureMobileApps.table();

// When adding record, send a push notification via APNS
table.insert(function (context) {
    // For details of the Notification Hubs JavaScript SDK,
    // see https://aka.ms/nodejshubs
    logger.info('Running TodoItem.insert');

    // Create a payload that contains the new item Text.
    var payload = "{\"aps\":{\"alert\":\"" + context.item.text + "\"}}";

    // Execute the insert; Push as a post-execute action when results are returned as a Promise.
    return context.execute()
        .then(function (results) {
            // Only do the push if configured
            if (context.push) {
                context.push.apns.send(null, payload, function (error) {
                    if (error) {
                        logger.error('Error while sending push notification: ', error);
                    } else {
                        logger.info('Push notification sent successfully!');
                    }
                });
            }
            return results;
        })
        .catch(function (error) {
            logger.error('Error while running context.execute: ', error);
        });
});

module.exports = table;
Při úpravě souboru na místním počítači znovu publikujte projekt serveru.
Přidejte push oznámení do aplikace
Objective-C:
V QSAppDelegate.m naimportujte sadu SDK pro iOS a QSTodoService.h:
#import <MicrosoftAzureMobile/MicrosoftAzureMobile.h>
#import "QSTodoService.h"
V
didFinishLaunchingWithOptionsQSAppDelegate.m vložte následující řádky přímo předreturn YES;:UIUserNotificationSettings* notificationSettings = [UIUserNotificationSettings settingsForTypes:UIUserNotificationTypeAlert | UIUserNotificationTypeBadge | UIUserNotificationTypeSound categories:nil]; [[UIApplication sharedApplication] registerUserNotificationSettings:notificationSettings]; [[UIApplication sharedApplication] registerForRemoteNotifications];V QSAppDelegate.m přidejte následující obslužné metody. Vaše aplikace je teď aktualizovaná tak, aby podporovala nabízená oznámení.
// Registration with APNs is successful
- (void)application:(UIApplication *)application
didRegisterForRemoteNotificationsWithDeviceToken:(NSData *)deviceToken {

    QSTodoService *todoService = [QSTodoService defaultService];
    MSClient *client = todoService.client;

    [client.push registerDeviceToken:deviceToken completion:^(NSError *error) {
        if (error != nil) {
            NSLog(@"Error registering for notifications: %@", error);
        }
    }];
}

// Handle any failure to register
- (void)application:(UIApplication *)application didFailToRegisterForRemoteNotificationsWithError:
(NSError *)error {
    NSLog(@"Failed to register for remote notifications: %@", error);
}

// Use userInfo in the payload to display an alert.
- (void)application:(UIApplication *)application
        didReceiveRemoteNotification:(NSDictionary *)userInfo {
    NSLog(@"%@", userInfo);

    NSDictionary *apsPayload = userInfo[@"aps"];
    NSString *alertString = apsPayload[@"alert"];

    // Create alert with notification content.
    UIAlertController *alertController = [UIAlertController
                                    alertControllerWithTitle:@"Notification"
                                    message:alertString
                                    preferredStyle:UIAlertControllerStyleAlert];

    UIAlertAction *cancelAction = [UIAlertAction
                                    actionWithTitle:NSLocalizedString(@"Cancel", @"Cancel")
                                    style:UIAlertActionStyleCancel
                                    handler:^(UIAlertAction *action)
                                    {
                                        NSLog(@"Cancel");
                                    }];

    UIAlertAction *okAction = [UIAlertAction
                                actionWithTitle:NSLocalizedString(@"OK", @"OK")
                                style:UIAlertActionStyleDefault
                                handler:^(UIAlertAction *action)
                                {
                                    NSLog(@"OK");
                                }];

    [alertController addAction:cancelAction];
    [alertController addAction:okAction];

    // Get current view controller.
    UIViewController *currentViewController = [[[[UIApplication sharedApplication] delegate] window] rootViewController];
    while (currentViewController.presentedViewController)
    {
        currentViewController = currentViewController.presentedViewController;
    }

    // Display alert.
    [currentViewController presentViewController:alertController animated:YES completion:nil];

}
Swift:
Přidejte soubor ClientManager.swift s následujícím obsahem. Nahraďte %AppUrl% adresou URL back-endu mobilní aplikace Azure.
class ClientManager {
    static let sharedClient = MSClient(applicationURLString: "%AppUrl%")
}
V ToDoTableViewController.swift nahraďte řádek inicializující
let clienttímto řádkem:let client = ClientManager.sharedClientV souboru AppDelegate.swift nahraďte text
func applicationnásledujícím způsobem:func application(application: UIApplication, didFinishLaunchingWithOptions launchOptions: [NSObject: AnyObject]?) -> Bool { application.registerUserNotificationSettings( UIUserNotificationSettings(forTypes: [.Alert, .Badge, .Sound], categories: nil)) application.registerForRemoteNotifications() return true }V AppDelegate.swift přidejte následující obslužné metody. Vaše aplikace je teď aktualizovaná tak, aby podporovala nabízená oznámení.
func application(application: UIApplication,
    didRegisterForRemoteNotificationsWithDeviceToken deviceToken: NSData) {
    ClientManager.sharedClient.push?.registerDeviceToken(deviceToken) { error in
        print("Error registering for notifications: ", error?.description)
    }
}

func application(application: UIApplication,
    didFailToRegisterForRemoteNotificationsWithError error: NSError) {
    print("Failed to register for remote notifications: ", error.description)
}

func application(application: UIApplication,
    didReceiveRemoteNotification userInfo: [NSObject: AnyObject]) {

    print(userInfo)

    let apsNotification = userInfo["aps"] as? NSDictionary
    let apsString       = apsNotification?["alert"] as? String

    let alert = UIAlertController(title: "Alert", message: apsString, preferredStyle: .Alert)
    let okAction = UIAlertAction(title: "OK", style: .Default) { _ in
        print("OK")
    }
    let cancelAction = UIAlertAction(title: "Cancel", style: .Default) { _ in
        print("Cancel")
    }

    alert.addAction(okAction)
    alert.addAction(cancelAction)

    var currentViewController = self.window?.rootViewController
    while currentViewController?.presentedViewController != nil {
        currentViewController = currentViewController?.presentedViewController
    }

    currentViewController?.presentViewController(alert, animated: true) {}

}
Test push oznámení
- V Xcode stiskněte Spustit a spusťte aplikaci na zařízení s iOSem (pozor, push notifikace nebudou fungovat na simulátorech). Chcete-li přijímat nabízená oznámení, klikněte na tlačítko OK . k tomuto požadavku dochází při prvním spuštění aplikace.
- V aplikaci přidejte novou položku a klikněte na +.
- Ověřte, že se oznámení přijalo, a kliknutím na tlačítko OK oznámení zavřete. Nyní jste úspěšně dokončili tento kurz.
Více
- Šablony poskytují flexibilitu při odesílání push oznámení mezi více platformami a lokalizovaných push oznámení. Jak používat klientskou knihovnu pro iOS pro Azure Mobile Apps ukazuje, jak zaregistrovat šablony.