Organize your backlog and map child work items to parents in Azure Boards
Azure DevOps Services | Azure DevOps Server 2022 - Azure DevOps Server 2019
After you've added features or epics to your portfolio backlog, organize your backlog by mapping backlog items. You can quickly add and group items into a hierarchy. And also drill up or down within the hierarchy, reorder and reparent items, and filter hierarchical views.
In this article you'll learn how to:
- Open your product backlog or portfolio backlog
- View the tree hierarchy
- Group backlog items using the Mapping pane
- Reparent items through dragging or the Change parent option
Note
For more information, see Backlogs, boards, and plans. In case you don't see the desired work items on your backlog or board, see Set up your backlogs and boards.
Prerequisites
| Category | Requirements |
|---|---|
| Project access | Project member. |
| Permissions | - Member of the Contributors or Project Administrators security group. - To view or modify work items: View work items in this node and Edit work items in this node permissions set to Allow. By default, the Contributors group has this permission set to Allow. For more information, see Set work tracking permissions. |
| Access levels | To add or modify work items: At least Basic access. Users with Stakeholder access for public projects have full access to backlog and board features, like users with Basic access. For more information, see Stakeholder access quick reference. |
| Defined iterations | To use the Planning pane: Ensure your team administrator defined iteration (sprint) paths and configure team iterations. |
| Category | Requirements |
|---|---|
| Project access | Project member. |
| Permissions | - Member of the Contributors or Project Administrators security group. - To view or modify work items: View work items in this node and Edit work items in this node permissions set to Allow. By default, the Contributors group has this permission set to Allow. For more information, see Set work tracking permissions. |
| Access levels | To add or modify work items: At least Basic access. |
| Defined iterations | To use the Planning pane: Ensure your team administrator defined iteration (sprint) paths and configure team iterations. |
Note
Stakeholder access users for a private project can't drag items to map or reparent them or to assign their sprint.
Note
Stakeholder access users can't drag items to map or reparent them or to assign their sprint.
Open your backlog from the web portal
From your web browser, open your product backlog.
(1) Check that you've selected the right project, (2) choose Boards>Backlogs, and then (3) select the correct team from the team selector menu.
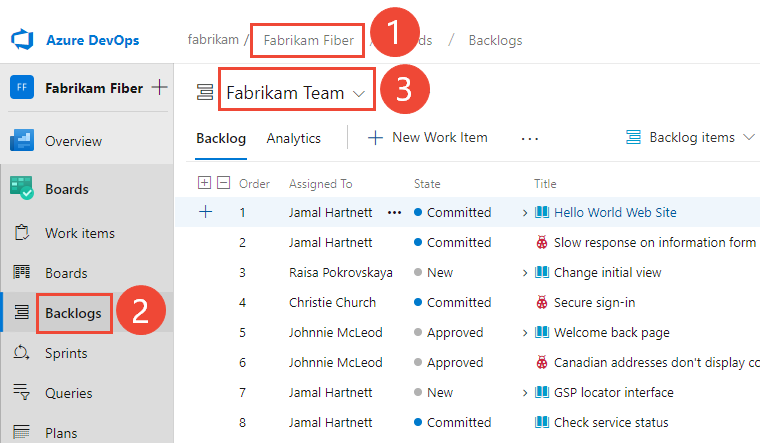
To select another backlog, open the selector and then choose a different team or select the View Backlog directory option. Or, enter a keyword in the search box to filter the list of team backlogs for the project.

Tip
Choose the
 star icon to favorite a team backlog. Favorited artifacts (
 favorited icon) appear at the top of the team selector list.
Check that you have selected Stories (for Agile), Issues (for Basic), Backlog items (for Scrum), or Requirements (for CMMI) as the backlog level.

(Optional) To choose which columns should display and in what order, choose the
 actions icon and select Column options. For more information, see Change column options.
(1) Check that you've selected the right project, (2) choose Boards>Backlogs, and then (3) select the correct team from the team selector menu.

To choose another team, open the selector and select a different team or choose the
 Browse all backlogs option. Or, you can enter a keyword in the search box to filter the list of team backlogs for the project.
Tip
Choose the
star icon to favorite a team backlog. Favorited artifacts (
favorited icon) appear at the top of the team selector list.Check that you have selected Backlog items (for Scrum), Stories (for Agile), or Requirements (for CMMI) as the backlog level.

(Optional) To choose which columns should display and in what order, choose the
actions icon and select Column options. For more information, see Change column options.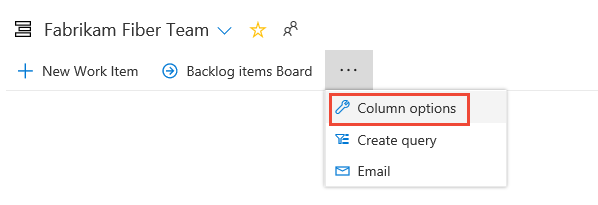
Note
The images you see from your web portal might differ from the images you see in this article. These differences result from updates made to your web app, options that you or your administrator enabled, and which process was chosen when creating your project: Agile, Basic, Scrum, or CMMI. The Basic process is available with Azure DevOps Server 2019 Update 1 and later versions.
Show parent tasks and expand the tree hierarchy
You can set various options to view backlog work items using the View options menu. To learn which options to set based on the tasks you want to accomplish, see Configure your backlog view.
To view Parents or a tree hierarchy, choose the
 view options icon and slide Parents to On.
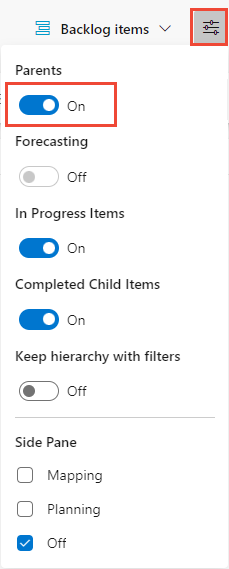
The hierarchical view displays. From this view, you can reparent items by dragging a child item to a new parent.

Use the
 Expand and
  Collapse icons to expand or collapse one level of the hierarchy.
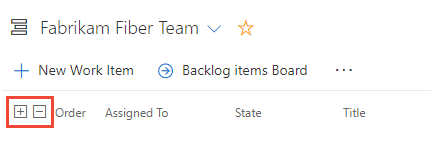
You can set various options to view backlog work items using the View options menu. To learn which options to set based on the tasks you want to accomplish, see Configure your backlog view.
To view Parents or a tree hierarchy, choose
View options and slide Parents to On.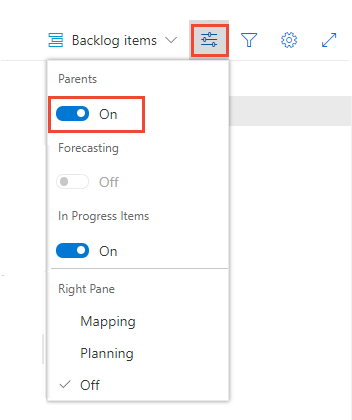
The hierarchical view displays. From this view, you can reparent items by dragging a child item to a new parent.
Use the
Expand and
Collapse icons to expand or collapse one level of the hierarchy.
Map items to group them under a feature or epic
If you've already created your backlog, and now you want to organize it, you can do that most easily by mapping child items to parents.
Choose
View options and select Mapping.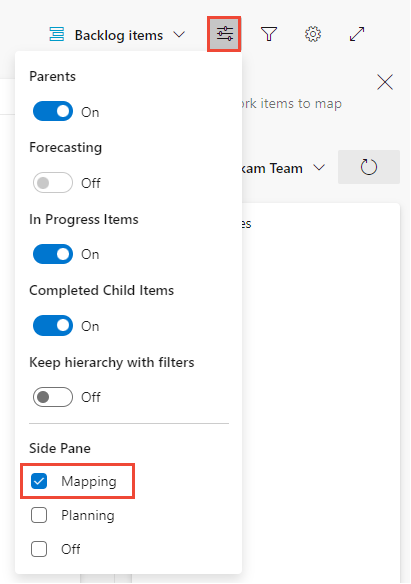
The Mapping pane displays immediately.
Find Unparented backlog items that may appear at the end of the parented set of backlog items. Parents must be turned on in view options.
To map features to epics, select the Features backlog from the backlog selector. The Epics Mapping pane automatically displays.
Choose
View options and select Mapping.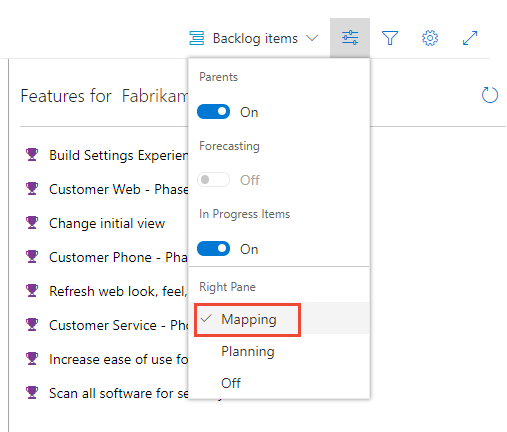
The Mapping pane displays immediately.
Find Unparented backlog items that may appear at the end of the parented set of backlog items. Parents must be turned on in view options.
To map features to epics, select the Features backlog from the backlog selector. The Epics Mapping pane automatically displays.
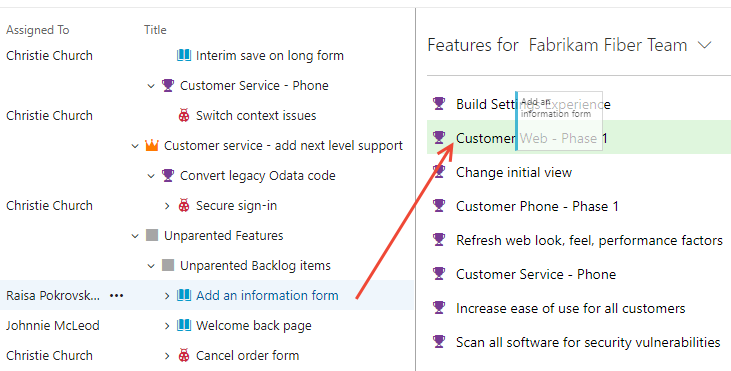
You can multi-select backlog and sprint backlog items in the same way as you multi-select items from query results.
It's the same process to map features to epics. From the Features backlog, drag features to an epic listed under the mapping pane.
Change the parent task and reorder items
When you need to change the order or grouping, drag the item to its new location.
You can reparent an item using the mapping pane, or drag it within the hierarchy to change its parent.
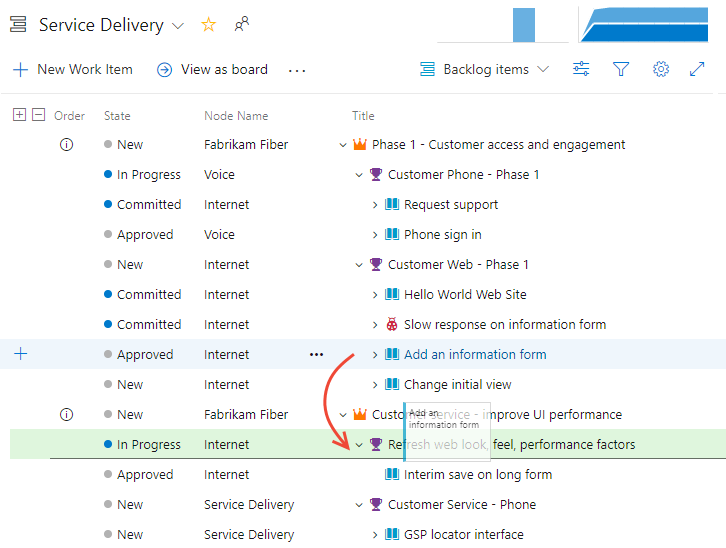
You can only reparent backlog items under other features, and features under other epics.
Also, to change an item's priority within a group, drag the item up or down within its hierarchical group. Reordering from a portfolio backlog works the same as when you moved items into priority order on your product backlog.
Limitations on reordering backlog items owned by other teams
If you find you can't reorder a backlog item, check whether the ![]() info icon appears in the first column as shown in the following image.
info icon appears in the first column as shown in the following image.
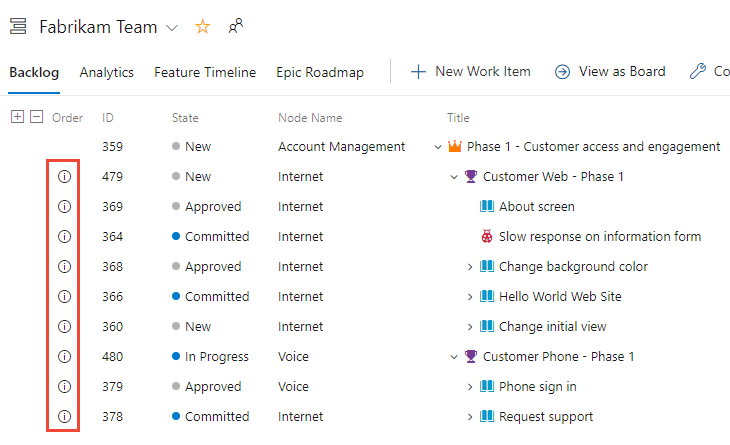
You can reparent items owned by other teams, but you can't reorder items owned by other teams. For more information, see Backlogs, portfolios, and Agile project management, Work with multi-team ownership of backlog items.
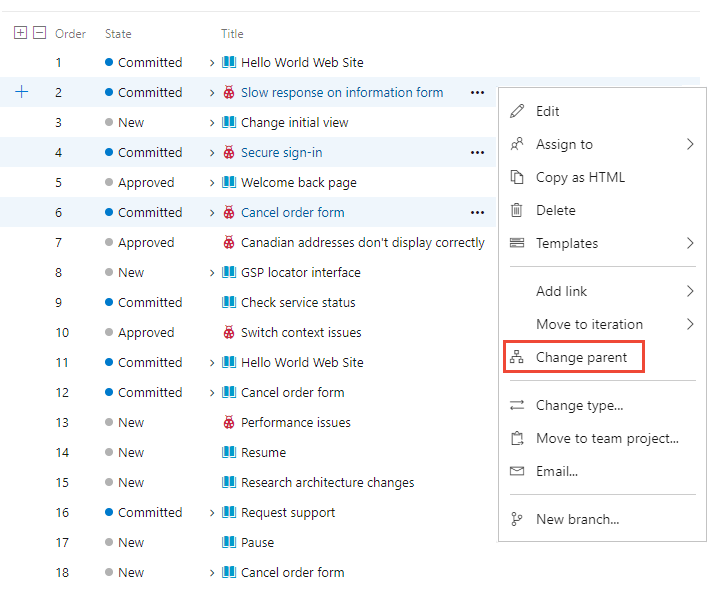
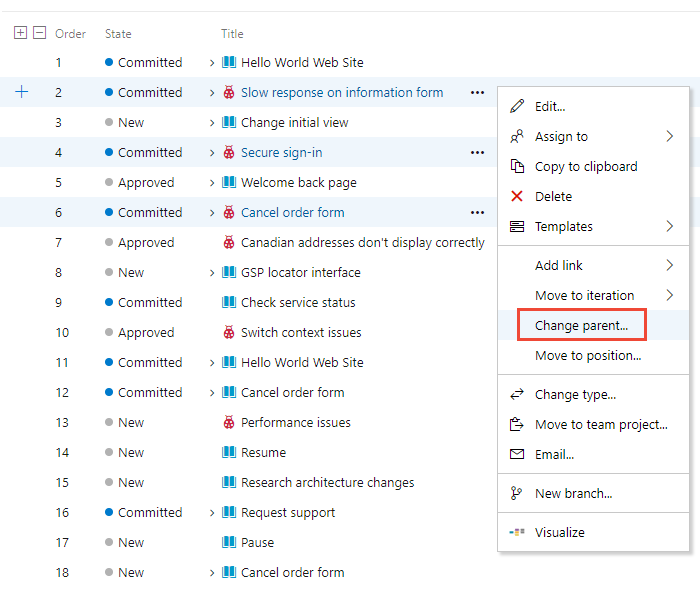
Change a parent of multiple backlog items
From a product or portfolio backlog, you can multi-select several work items and choose Change parent… to link the items to a parent work item.
Add portfolio backlogs and boards
To add a portfolio backlog or board, customize your process, add new work item types, and then configuring your backlogs and boards. You can also add or modify the fields defined for a work item type (WIT) or add a custom WIT. For more information, see Customize an inheritance process and Customize your backlogs or boards (Inheritance process).
To add a portfolio backlog or board, either customize your inherited process or modify your XML definition files. You can also add or modify the fields defined for a work item type (WIT) or add a custom WIT. For more information, see the following articles based on the process model used to update your project:
Inheritance process model:
On-premises XML process model:
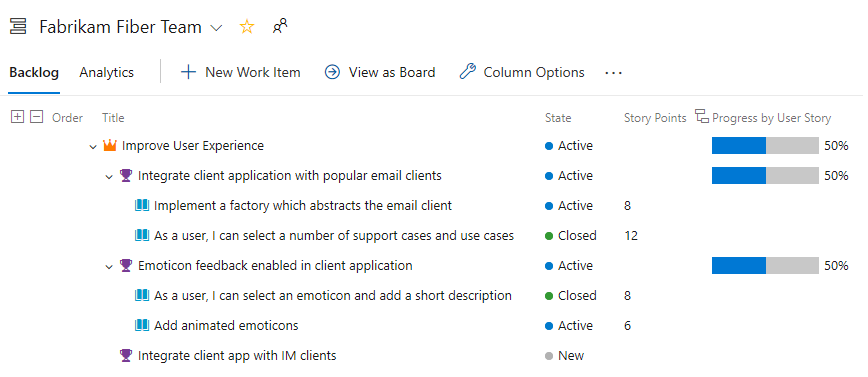
Display rollup progress counts, or totals
Product and portfolio backlogs support rollup columns. You can add one or more rollup columns to display progress bars, counts of descendant work items, or totals of select numeric fields. Your settings persist for each page that you customize and are only valid for your views.
- Progress bars indicate the percentage of descendant items within a hierarchy that are closed or completed.
- Counts display the total number of descendant items.
- Totals provide a sum of numeric fields, such as Effort, Story Points, Completed Work, or Remaining Work of descendant items.
The following example shows progress bars for a portfolio backlog.