Note
Access to this page requires authorization. You can try signing in or changing directories.
Access to this page requires authorization. You can try changing directories.
Azure DevOps Services | Azure DevOps Server 2022 - Azure DevOps Server 2019
Use work items to track features, requirements, code defects, bugs, and project issues or risks. Each work item is based on a work item type that determines the fields available for tracking information. The work item types available depend on the process used when your project was created: Agile, Basic, Scrum, or CMMI.
Each work item represents an object stored in the work item data store and is assigned a unique identifier within an organization or project collection.
If you're just getting started, read this article. To start tracking work on a board, see Plan and track work. For a quick reference to various work item tasks and key concepts, see Work item quick reference.
Track work with different work item types
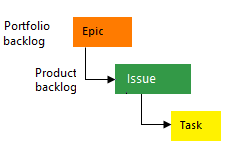
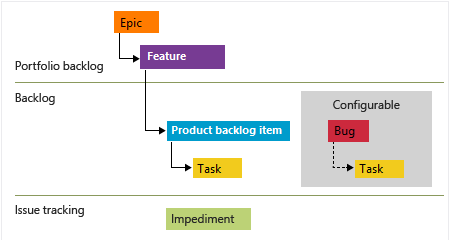
To track different types of work, choose a specific work item type. The following images show the default work item types available for the four default processes. Items in your backlog might be called User Stories (Agile), Issues (Basic), Product Backlog Items (Scrum), or Requirements (CMMI). All four types are similar; they describe the customer value of the work and provide fields to track information about that work.
The following image shows the hierarchy for the Agile process backlog work item:
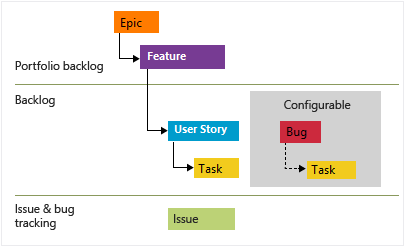
- User Stories and tasks are used to track work.
- Bugs track code defects.
- Epics and features are used to group work under larger scenarios.
Each team can configure how they manage Bug work items at the same level as User Story or Task work items. Use the Working with bugs setting. For more information about using these work item types, see Agile process.

Each work item type belongs to a category. Categories are used to group work item types and determine which types appear on backlogs and boards.
| Category | Work item type | Controls backlogs/boards |
|---|---|---|
| Epic | Epic | Epic portfolio backlogs and boards |
| Feature | Feature | Feature portfolio backlogs and boards |
| Requirement | User Story (Agile) Issue (Basic) Product Backlog Item (Scrum) Requirement (CMMI) |
Product backlogs and boards and Sprints backlog |
| Task | Task | Sprint backlogs and Taskboards |
| Bug | Bug | Dependent on team configuration for tracking bugs |
The Issue (Agile and CMMI) and Impediment (Scrum) work item types are used to track nonwork project elements that can affect work getting done. By default, they don't appear on any backlog or board.
For a list of other work item types, see Work item types to track testing, reviews, and feedback later in this article.
Track bugs as requirements or tasks
Your team can choose how to track bugs. They can track them along with requirements, showing them on the product backlog and board. Alternatively, they can track bugs similar to tasks, typically linking them to a user story or product backlog item. A third option is to not track them as requirements or tasks.
To configure the team bug tracking option, see Show bugs on backlogs and boards. For an overview of all team settings, see Manage teams and configure team tools.
Customize a work item type
You can include or revise fields within a work item type, introduce a personalized work item type, or adjust the display of work item types on backlogs and boards. The approach and extent of customization available depend on the process model assigned to your project. For more information, see the following articles:
Work item form and Details tab
The work item form displays the fields used to track information for each individual work item. Define and update a work item through its respective form, as well as through methods like bulk import, export, update, and modification.
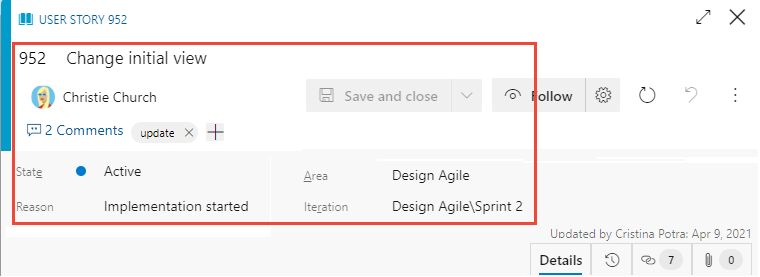
Each work item form contains several tabs. The Details tab includes common fields, other fields defined for the work item type, and the Discussion control. Common fields for all work item types appear at the top of the form. These fields include Title, Assigned To, State, Reason, Area, and Iteration. You can update these fields at any time.
Work item form controls
| Control | Function |
|---|---|
| Copy URL of work item to clipboard (appears on hover over work item title) | |
| Go to Discussions section | |
| Open Actions menu for other work item tasks | |
| Refresh work item with latest changes | |
| Revert changes to work item | |
| Open History tab | |
| Open Links tab | |
| Open Attachments tab | |
| Enter or exit full display mode of a section within the form | |
| Collapse or expand a section within the form | |
| Add new work item and link to existing work item (might appear under |
|
| Change work item type (Appears under |
|
| Move work item to a different project (Appears under |
|
| Copy work item and optionally change work item type (Appears under |
|
| Send email with work item (Appears under |
|
| Recycle work item (Appears under |
|
| Storyboard with PowerPoint (Appears under |
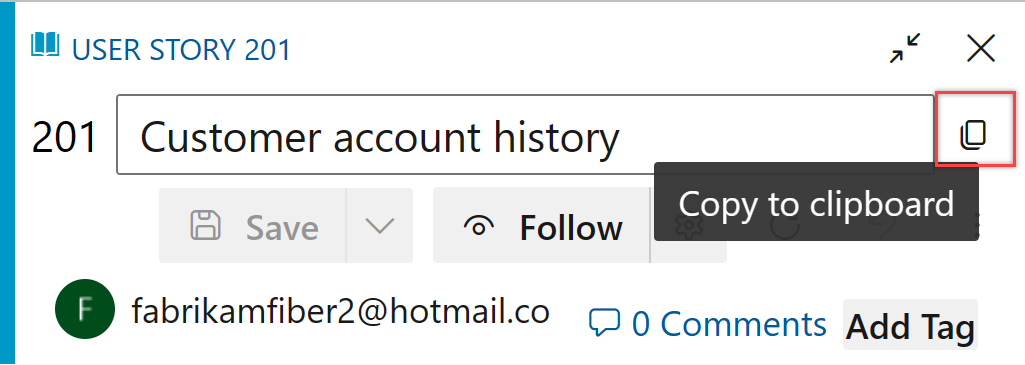
Copy the URL
From the web portal, copy the URL from the web browser address or hover over the title and then select the ![]() copy icon. For other copy options, see Copy or clone work items.
copy icon. For other copy options, see Copy or clone work items.
Common work tracking fields
The following common fields appear in most work items in the header area of the form. The only required field for all work item types is Title. When the work item is saved, the system assigns it a unique ID. The form highlights required fields in yellow. For descriptions of other fields, see Work item field index.
Note
Additional fields may be required depending on customizations made to your process and project.
| Field | Usage |
|---|---|
| Title | Enter a description of 255 characters or less. You can always modify the title later. |
| Assigned To | Assign the work item to the team member responsible for performing the work. Depending on the context, the drop-down menu lists only team members or contributors to the project. |
| State | When the work item is created, the State defaults to the first state in the workflow. As work progresses, you update it to reflect the current state. |
| Reason | Automatically updates when the State is changed. Each State is associated with a default reason. |
| Area | Choose the area path associated with the product or team, or leave blank until assigned during a planning meeting. To change the dropdown list of areas, see Define area paths and assign to a team. |
| Iteration | Choose the sprint or iteration in which the work is to be completed, or leave it blank and assign it later, during a planning meeting. To change the drop-down list of iterations, see Define iteration paths (sprints) and configure team iterations. |
Track active, open, resolved, or closed work items
Workflow states define how a work item progresses from creation to closure. They also determine whether a work item appears on a backlog or board, as described in How workflow category states are used in Azure Boards backlogs and boards.
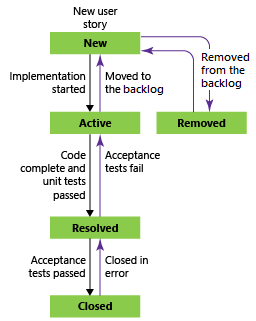
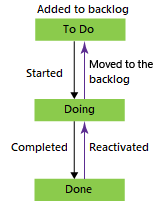
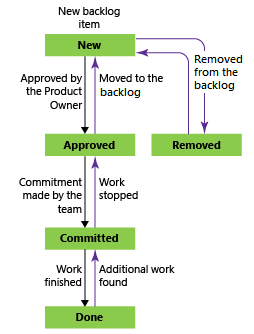
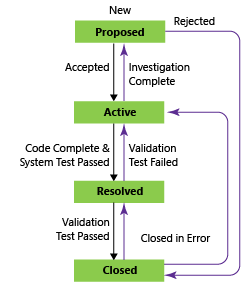
The User Story (Agile process) has four main states that describe its progression: New, Active, Resolved, Closed, and Removed. The following images illustrate the natural progressions and regressions for User Stories (Agile), Issues (Basic), Product Backlog Items (Scrum), and Requirements (CMMI). Similar progressions and regressions are defined for other work item types in each process.
Workflow states: User Story, Agile process
Note
- A work item can exist in only one state at a time.
- When all work is complete, set the work item State to Closed.
- The board and Sprint Taskboard support viewing and updating the workflow state of requirements or tasks using drag and drop. For more information, see Start using your board and Update and monitor your Taskboard.
- Depending on the
 View Options you select, work items in a Closed or Completed state won't appear on the backlog.
 - The Removed state removes a work item from appearing on the backlog. For more information, see Move, change, or delete work items.
- You can query work items by State and other fields to list work in progress, resolved, or completed. For more information, see Query by assignment or workflow changes.
Assign work
You can assign a work item to only one person at a time. The Assigned To field is an identity field designed to hold a user identity added to the project. In the work item form, select the Assigned To field to choose a project member, or start typing the name of a project member to quickly narrow your search.

Note
- You can assign a work item only to users who have been added to a project or team.
- You can assign a work item to only one user at a time. If work is split across multiple users, create separate work items for each user responsible for the work.
- The drop-down menu of identity fields displays the names you have most recently selected over time.
- You can assign several work items at once from the backlog or query results. See Bulk modify work items for details.
- For more information about identity fields, see Query by assignment or workflow changes.
When configured with Microsoft Entra ID or Active Directory, Azure DevOps synchronizes identity fields such as Activated By, Assigned To, Closed By, Created By, and Resolved By.
Grant access to a project by adding security groups created in Microsoft Entra ID or Active Directory. Add accounts to existing or custom groups defined in the collection setting Security pages. For more information, see Add or delete users using Microsoft Entra ID or Set up groups for use in Azure DevOps Server deployments.
Use work item templates to quickly complete forms
With work item templates, you can quickly create work items with prepopulated values for commonly used fields. For example, create a task template that sets the area path, iteration path, and discipline or activity whenever you use it to create a task. For more information, see Use templates to add and update work items.
Follow, Refresh, Revert, and Actions menu
The Follow, Refresh, Revert changes, and Actions menu controls appear on all work item forms.
- Choose Follow to get updates when changes are made to the work item. For more information, see Follow changes made to a user story, bug, or other work item or pull request.
- Choose
 Refresh to update the work item form with the latest changes that someone else made while you had the work item open.
 - Choose
 Revert changes to undo any changes you made to the work item form.
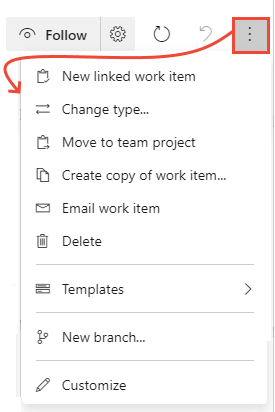
 - To exercise a task available from the Actions menu, see the following articles:
- New linked work item
- Change type
- Move to team project
- Create copy of work item...
- Send email with work item
- Delete
- Templates
- New branch...
- Customize
Note
Some menu options might not appear based on your permission assignments. Additional options might appear due to Marketplace extensions added to your organization or other customizations made to the work item type.
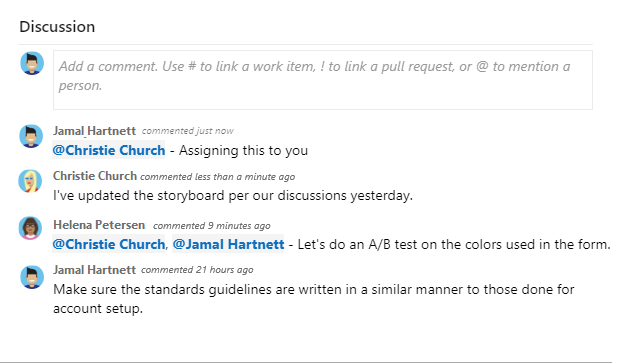
Discussion control
With the Discussion control, project members can add and review comments made about the work being performed. The rich text editor tool bar displays below the text entry area when you select your cursor within each text box. Each comment added is recorded in the History field. For more information, see View and add work items. To query the Discussion or History, see Query work item history and discussion fields.
Deployment, Development, and Related Work controls
The Deployment, Development and Related Work controls are special controls available in most work tracking forms.
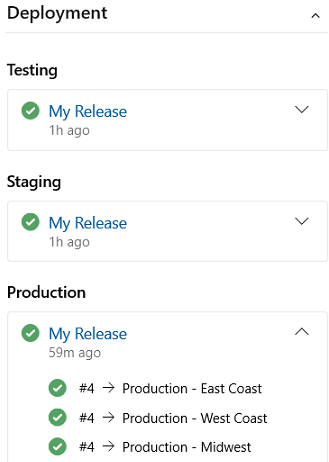
The Deployment control provides a quick view of whether a feature or user story is deployed and to what stage. You gain visual insight into the status of a work item as it is deployed to different release environments and quick navigation to each release stage and run. For more information, see Link work items to deployments.
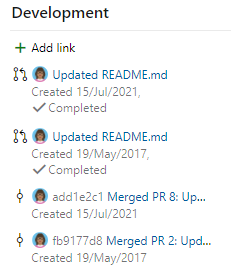
The Development control records all Git development processes that support completion of the work item. It also supports traceability, providing visibility into all the branches, commits, pull requests, and builds related to the work item. For more information, see Drive Git development from a work item .
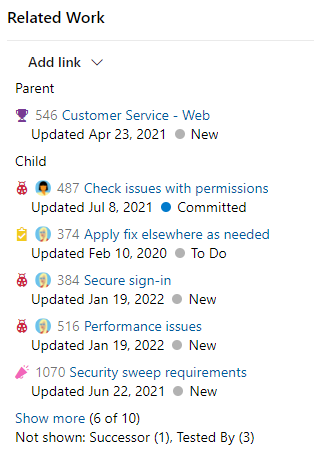
The Related Work control provides a quick view of linked work items, and supports adding a link to a parent work item. Also, you can quickly add and remove linked work items. For more information, see Link user stories, issues, bugs, and other work items.
History, Links, and Attachment tabs
The ![]() History,
History, ![]() Links, and
Links, and ![]() Attachments tabs support auditing, traceability, and sharing information. These three tabs provide a history of changes, controls to add and remove links to work items, and controls to attach and remove files.
Attachments tabs support auditing, traceability, and sharing information. These three tabs provide a history of changes, controls to add and remove links to work items, and controls to attach and remove files.
History: Review changes made to the work item
The ![]() History tab maintains a record of changes made to a work item over time. A record is made when changes are made to any of the common fields, description or other rich-text fields, Discussion control entries, or addition or removal of links or attachments.
History tab maintains a record of changes made to a work item over time. A record is made when changes are made to any of the common fields, description or other rich-text fields, Discussion control entries, or addition or removal of links or attachments.
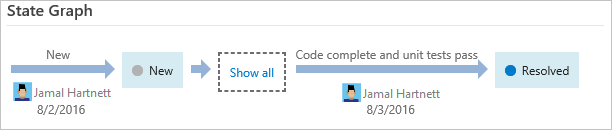
The state change history diagram appears first. To see the entire history of state changes, choose Show all.
Choose an entry in the left pane to view the details of changes made. For more information, see Query work item history and discussion fields.

Links: Link work items to other work items or objects
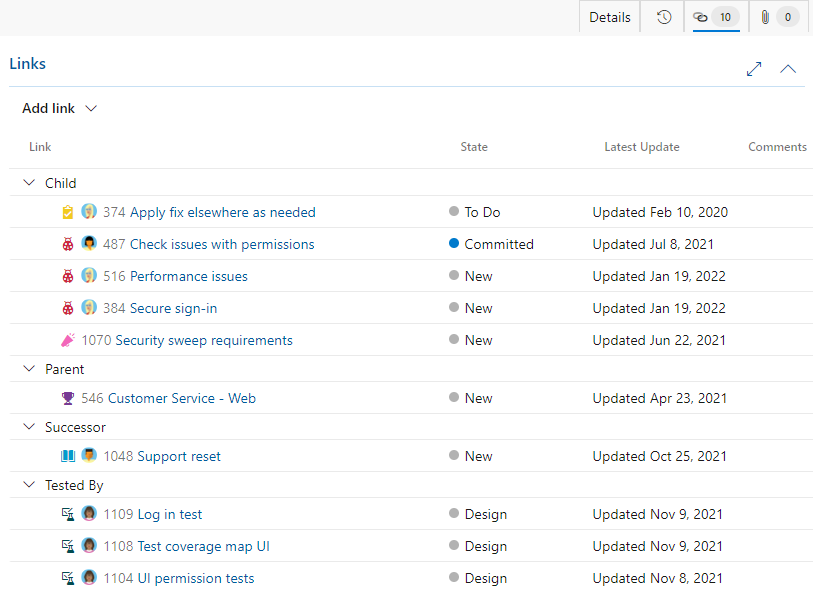
From the ![]() Links tab, you can add, remove, or view work items or other objects linked to the work item. Different link types are used to link to different objects, or to link to other work items.
Links tab, you can add, remove, or view work items or other objects linked to the work item. Different link types are used to link to different objects, or to link to other work items.
For more information, see the following articles, see Link work items to other objects and Link type reference.
Attachments: Attach files to a work item
From the ![]() Attachments tab, you can add, remove, or view files or images added to the work item. You can add up to 100 attachments to a work item. Attachments are limited to 60 MB. For more information, see Share information within work items and social tools.
Attachments tab, you can add, remove, or view files or images added to the work item. You can add up to 100 attachments to a work item. Attachments are limited to 60 MB. For more information, see Share information within work items and social tools.
Track work in the web portal
You can add and update work items from the web portal. For an overview of all clients that connect to your project, see Tools and clients that connect to Azure DevOps. Use the web portal to accomplish the following tasks.
- Work items: Use to quickly find work items assigned to you or filter work items based on other criteria, such as work items that you follow, that you're mentioned in, or that you viewed or updated.
- Boards: Use to implement Kanban practices, update the State, and visualize the flow of work for a team.
- Backlogs: Use to plan, prioritize, and organize the work for a team to do within a product or portfolio backlogs.
- Sprints: Use to plan work for a team to perform during a sprint.
- Queries: Use to define a set of filter criteria to list work items for the purposes of sharing with others, performing bulk updates, or import/export operations.
- Delivery Plans: Use to review the schedule of stories or features your teams plan to deliver. Plans show scheduled work items defined that are assigned to sprints (iteration path) of selected teams against a calendar view.
- Work items: Use to quickly find work items assigned to you or filter work items based on other criteria, such as work items that you follow, that you're mentioned in, or that you viewed or updated.
- Boards: Use to implement Kanban practices, update the State, and visualize the flow of work for a team.
- Backlogs: Use to plan, prioritize, and organize the work for a team to do within a product or portfolio backlogs.
- Sprints: Use to plan work for a team to perform during a sprint.
- Queries: Use to define a set of filter criteria to list work items for the purposes of sharing with others, performing bulk updates, or import/export operations.
Work item types to track testing, reviews, and feedback
Along with the work items types that appear on backlogs and boards, there are work item types that track testing, reviews, and feedback. These types, listed in the following table by category, are available for most all processes.
| Category and Work item type | Used to track specified types of work |
|---|---|
| Code Review Request | Tracks a code review request against code maintained in a Team Foundation version control (TFVC) repository. For more information, see Day in the life of a Developer: Suspend work, fix a bug, and conduct a code review. |
| Code Review Response | A code review response is created for each person who requested to provide review comments. |
| Feedback Request | Feedback requests track requests for feedback generated through the feedback request form. See Get feedback. |
| Feedback Response | A feedback response is created for each person and for each item for which feedback is provided through the Microsoft Feedback Client. See Get feedback. |
| Shared Step | Shared steps are used to repeat tests with different data. |
| Shared Parameter | Shared Parameters specify different data and parameters for running manual test cases. See Repeat a test with different data. |
| Test Case | Each test case defines a manual test. |
| Test Plan | Test plan group test suites and individual test cases together. Test plans include static test suites, requirement-based suites, and query-based suites.For more information, see Create test plans and test suites. |
| Test Suite | Test suites group test cases into separate testing scenarios within a single test plan. Grouping test cases makes it easier to see which scenarios are complete. See Create test plans and test suites. |
Required permissions and access
Members of the Contributors group can use most features under the Boards hub. To add users to a project, see Add users to a project or team.
The following table summarizes the permissions that affect a project member's ability to view and edit work items.
| Level | Permission |
|---|---|
| Area path | View work items in this node |
| Area path | Edit work items in this node |
| Project | Create tag definition |
| Project | Change work item type |
| Project | Move work items out of this project |
| Project | Delete and restore work items |
| Project | Permanently delete work items |
Users with Basic access have full access to all features. Users with Stakeholder access have limited access to certain features. For more information, see Set permissions and access for work tracking and Stakeholder access quick reference.