Note
Access to this page requires authorization. You can try signing in or changing directories.
Access to this page requires authorization. You can try changing directories.
Dynamics 365 Field Service provides an Outlook add-in for frontline managers to create, view, and edit work orders directly from their email. Without leaving Outlook, you can respond to requests for service or questions about existing requests. The Outlook add-in supports shared mailboxes. The Outlook add-in uses the Microsoft account credentials of the individual that was signed in for the shared mailbox.
With Copilot, you can quickly create a work order with information from the email, respond with proposed schedules, or confirm a schedule.
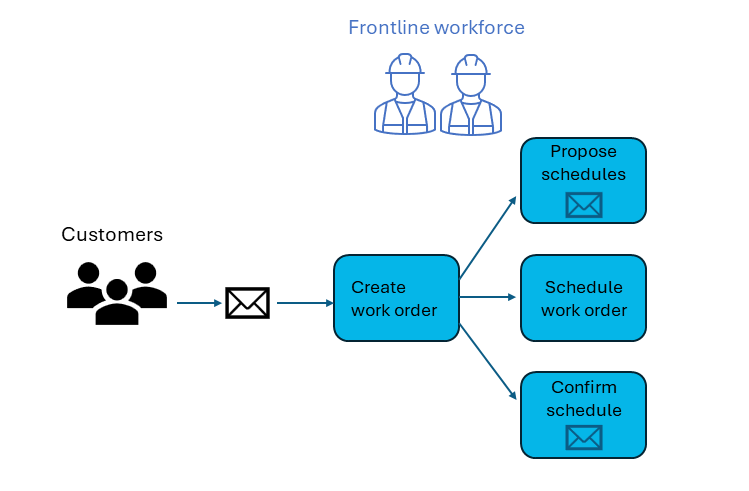
You can also create a work order manually and use the Field Service schedule board for scheduling.
Prerequisites
- Complete Get started with Field Service in Outlook.
- Your administrator enables the Copilot in Microsoft Outlook and the Generate email response settings.
- You have a paid Field Service environment. Copilot isn't available in trial environments.
- Your environment is updated to the latest 2023 wave 2 build.
Create a work order with Copilot
Copilot in Dynamics 365 Field Service adheres to responsible AI guidelines. If you don't see the Copilot icon, your admin might have disabled the Copilot setting.
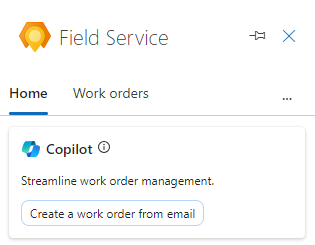
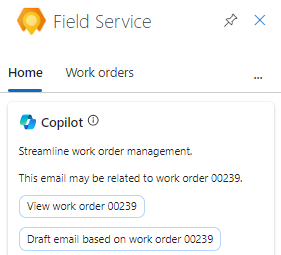
While you're viewing an email, open the Field Service add-in.
If the email was previously used to create a work order using Copilot, a message displays with a link to the work order, unless the email was moved. If the email was moved to another folder, for example from Inbox to Archive, a message or link doesn't display.
On the Home tab, select Create a work order from email.
If the email doesn't meet Microsoft Responsible AI guidelines, Copilot displays an error. Create the work order manually.
Review the work order to ensure all AI-generated content is accurate. Fill in any required information that wasn't included in the email. For example:
If a value doesn't appear in the list, select + New item type to create it in the Field Service app. Save and close the Field Service app. Type the new value or select Refresh to make it appear in the list.
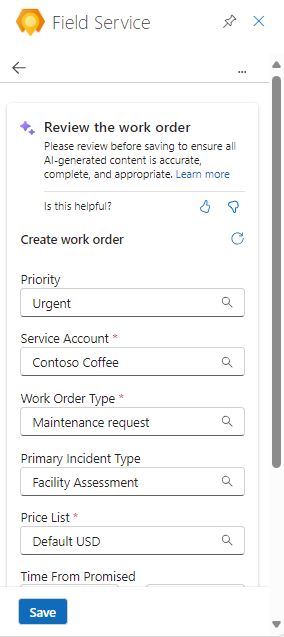
We encourage you to use the like/dislike buttons to leave feedback. Your feedback helps us to continually improve Copilot's responses.
Select Save.
The work order number displays at the top of the Field Service pane and the email is saved in the Field Service timeline.
Tip
If you want to open the work order in the Dynamics 365 Field Service app, select the open web app
 icon.
icon.Choose from one of the Suggested actions or select the back arrow to return to the Home tab.
Create a work order manually
While you're viewing an email, open the Field Service add-in, and then select the Work orders tab.
Select the Create work order (+) button.
Fill in the required information from the email. For example:
If a value doesn't appear in the list, select + New item type to create it in the Field Service app. Save and close the Field Service app. Type the new value or select Refresh to make it appear in the list.

Tip
Copy relevant information from the email into the Summary field, up to 8,000 characters. For general information about work orders, see Work order architecture.
Select Save.
The work order number displays at the top of the Field Service pane and the email is saved in the Field Service timeline.
Tip
If you want to open the work order in the Dynamics 365 Field Service app, select the open web app icon
.
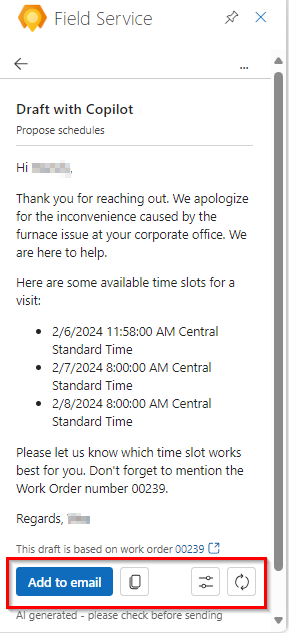
Draft an email response with Copilot
Use Copilot to share proposed schedules for unscheduled work orders or provide schedule confirmations for scheduled work orders.
Copilot in Dynamics 365 Field Service adheres to responsible AI guidelines. If you don't see the Copilot icon, your admin might have disabled this feature.
While you're viewing an email, open the Field Service add-in.
From an open work order, select Draft email with scheduling suggestions or Draft email to confirm schedule.
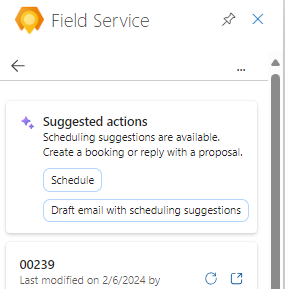
Or on the Home tab, select Draft email based on work order, and then select Proposed schedules or Confirm schedule. If you don't see these options, select the original email.
After reviewing the generated email, select one of the following.
Add to email: The generated response appears as a reply. Make any changes and select Send.
Copy to clipboard: Select the Copy icon to copy the response and paste it where needed.
Make adjustments: Select the Adjust icon to change the length or the tone of the email, and then select Update.
Regenerate: Select the Regenerate icon to generate a different email response.
After adding and sending the email, choose from one of the Suggested actions or select the back arrow to return to the Home tab or the work order list.
View a work order
While you're viewing an email, open the Field Service add-in, and then select the Work orders tab.
The list shows up to 50 work orders, with the most recent one listed first.
To view more work orders in the Field Service app, select See more at the bottom of the list.
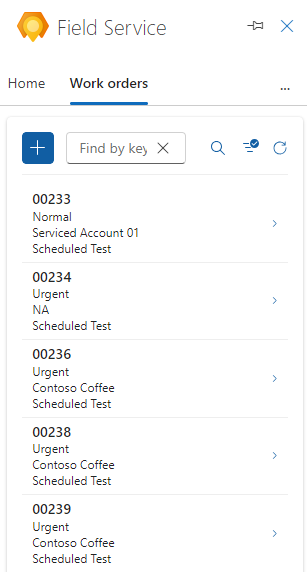
Find the work order you want to view:
Type the work order ID in the Find by ID box and select Search.
To filter the list by status or priority, select Filter, make your choice, and then select Apply.
To remove a filter, select Filter, clear each selection, and then select Apply.
Select the work order to view or edit it.

While you're viewing a work order, depending on the System Status, you can also:
Draft an email with Copilot to propose or confirm schedules.
Open a map to locate the service address. Select the Open in Bing Maps
 icon.
icon.Open the work order in Dynamics 365 Field Service. Select the open web app
icon.
Schedule or reschedule a work order
The Field Service add-in helps you schedule work orders in Outlook. Scheduling suggestions are based on technicians' availability and skills, proximity to the customer's location, promised time windows, and the business unit.
View the work order you need to schedule or reschedule.
To schedule, select Schedule. To reschedule, select View schedule, and then Reschedule.
The system searches for available technicians based on the work order requirements and then displays suggestions. To view more suggestions, select Show more at the bottom of the list.
Review the list of suggestions. You can search for a technician by name, filter by dates, or sort the list by start time or travel time.
If the Estimated Duration isn't set up in the resource requirements, 30 minutes is used as a default.
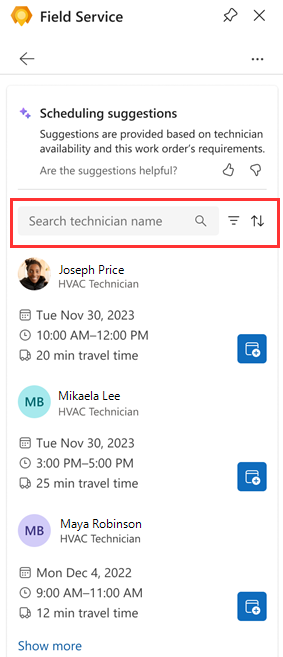
To assign the work order to a technician, select the Book resource icon.
The technician is booked and the status is changed to Scheduled. A confirmation displays at the top of the Field Service pane.
Select the back arrow to return to the Home tab or the work order list.
Move a booking
If you don't need to change the assigned technician, just the date or time of the service appointment, you can move the booking. If needed, you can also assign the work order to a different resource.
View the work order and select View schedule.
Select Move booking.
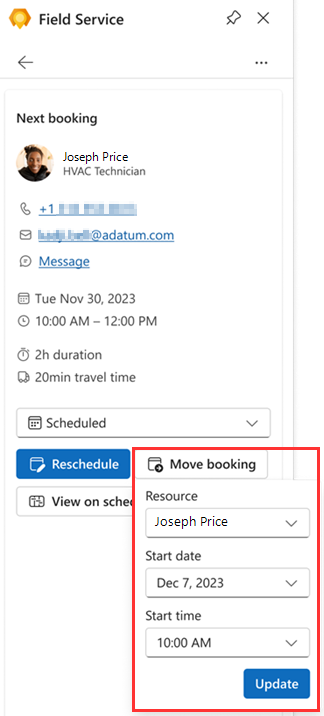
Select the new date and time and, if needed, a different resource.
Select Update.
The technician is booked. A confirmation displays at the top of the Field Service pane.
Edit a work order
View the work order you want to edit.
Make the necessary changes and select Save.