Note
Access to this page requires authorization. You can try signing in or changing directories.
Access to this page requires authorization. You can try changing directories.
In Microsoft Fabric (Fabric), continuous integration and continuous deployment (CI/CD) refers to the development and release practices you use to version Fabric workspace items, move changes through environments, and keep deployed Fabric solutions consistent across workspaces. Because a Fabric solution can include many item types, data sources, and environment-specific settings, a CI/CD plan helps you and your team collaborate without overwriting each other's work or relying on manual reconfiguration during deployment.
This article explains the Fabric CI/CD concepts and best practices that help you plan Git integration, branched workspaces, variable libraries, deployment pipelines, automation tools, and the fabric-cicd library. Not every recommendation applies to every project; use the guidance to choose practices that match your solution's scale, governance requirements, and release process.
What CI/CD concepts should you know for Fabric?
Before learning about Fabric's built-in CI/CD capabilities, you should understand several background topics. This section reviews the core concepts and terminology of traditional CI/CD, and explains the difference between a Fabric solution and a Fabric CI/CD project.
Traditional CI/CD fundamentals
CI/CD represents a set of core principles and best practices that the software industry widely adopts. Its goal is to coordinate and automate the software development lifecycle. CI/CD focuses on two aspects of managing the application lifecycle: continuous integration (CI) and continuous deployment (CD).
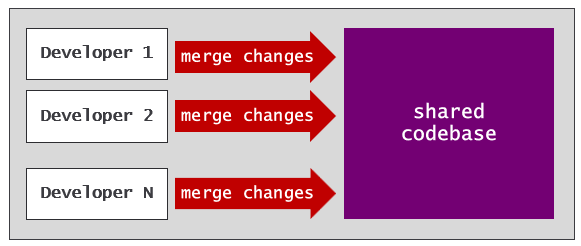
Continuous integration (CI) is the practice of merging code changes into a shared repository regularly. Each merge can trigger automated workflows that validate the complete application by running tests. CI detects bugs early, which keeps the codebase in a working state and ready to deploy to production. It also lets you and your team work on the same application simultaneously by structuring how each person merges work into the shared codebase.
Continuous deployment (CD) is the practice of automating the deployment of code. A manual-approval process often precedes deployment, and one or more approvers must approve a release. Once approvers approve a release, a continuous-deployment process automatically deploys those changes to a target environment.
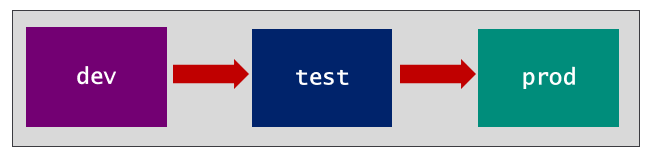
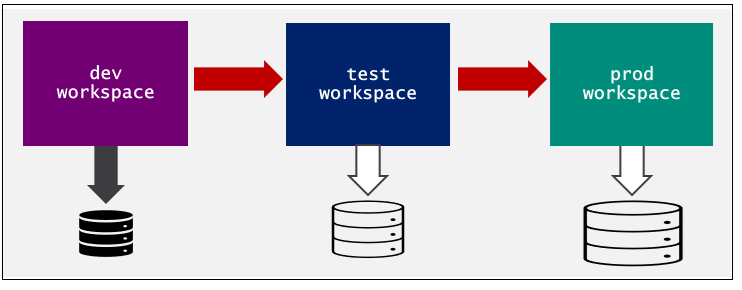
With continuous deployment, you can build automated processes that route the lifecycle of application code through a sequence of environments. Promoting code changes through environments enables enhanced testing and manual-approval gates so only high-quality code reaches production. The release process in a CI/CD lifecycle often promotes changes through a standard set of environments, such as dev, test, and prod.
Fabric solutions
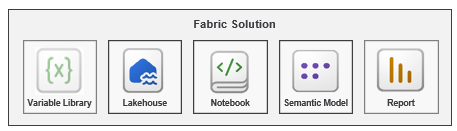
You deliver value to users on the Fabric platform by building Fabric solutions. A Fabric solution is a composition of workspace items, such as variable libraries, lakehouses, notebooks, pipelines, semantic models, and reports. The Fabric platform currently offers more than 35 distinct workspace item types, and that number continues to grow.
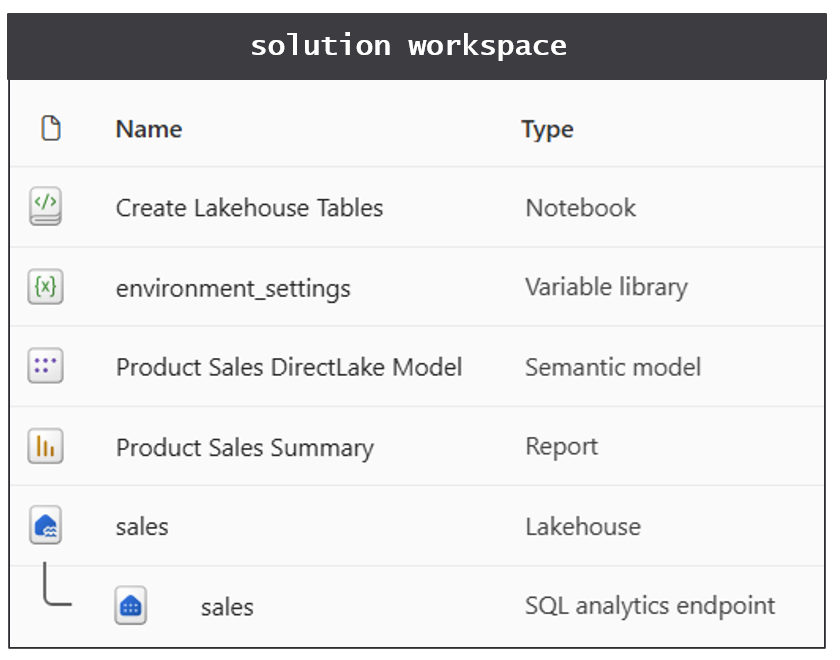
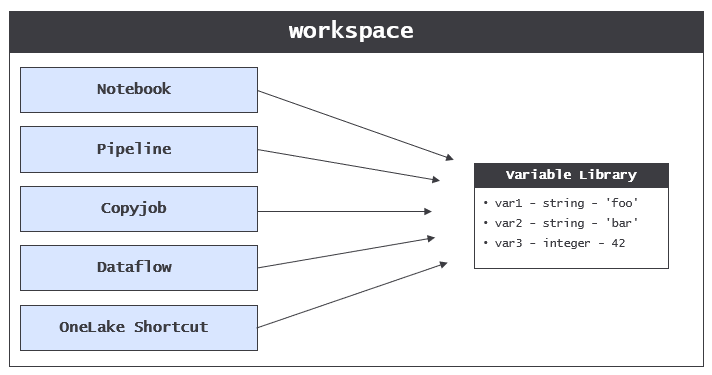
One important decision you must make when designing a Fabric solution is how many workspaces it requires to run. In many scenarios, you can design a Fabric solution to run inside a single workspace. The following screenshot shows a simple example of a Fabric solution with five workspace items that run within a single workspace.
When building a Fabric solution with many items, you can partition items by using workspace folders. Workspace folders help organize items by role or by type. They also help declutter the top-level folder, which is the default view for business users.
There are scenarios where it's either impractical or impossible to deploy all the items for a Fabric solution to a single workspace. For example, Fabric imposes a limit of 1,000 items per workspace. If you build a solution with more than 1,000 items, you must design it to span two or more workspaces. There can also be design factors related to security, least privilege, and item ownership that lead you to a multi-workspace design.
Consider a Fabric solution that uses a medallion architecture with a security requirement preventing business users from accessing staging data in the bronze and silver lakehouses. You can't use workspace folders inside a single workspace to configure security. When you add a workspace role assignment, that assignment grants access to everything inside the workspace. The best way to enforce the security requirement is to split the solution into a staging workspace and a presentation workspace.
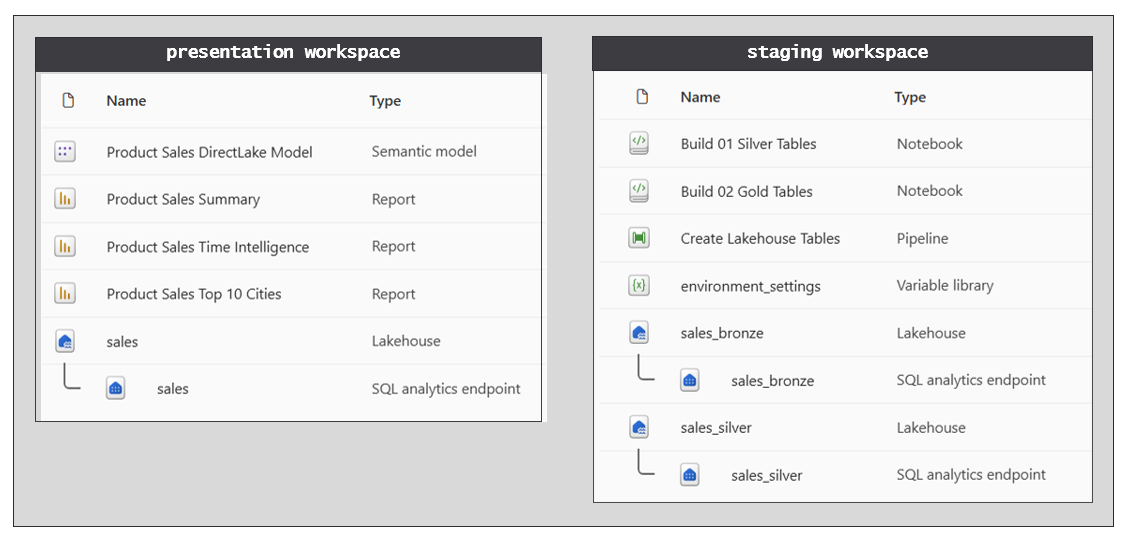
The staging workspace contains the items that run ETL jobs and store staging data. The presentation workspace contains items for business users. After deploying this solution, you configure access to each workspace independently. Business users who need access to reports, the semantic model, and the gold lakehouse get a role assignment on the presentation workspace, with no access to the staging workspace.
Fabric CI/CD projects
Imagine you've prototyped a Fabric solution by using the platform's analytics and AI capabilities, shared it with several peers for review, and received positive feedback. You then present it to the leadership team, who decide to prepare the solution for production so the team can release it to a large audience. That moment is when a Fabric CI/CD project begins.
A Fabric CI/CD project applies CI/CD concepts to a Fabric solution. While the industry widely uses the term application lifecycle management (ALM), it can be helpful to consider Fabric CI/CD as solution lifecycle management (SLM). You create multiple environments and run an instance of the Fabric solution in each one. You also build the CI/CD processes that propagate solution updates from one environment to the next.
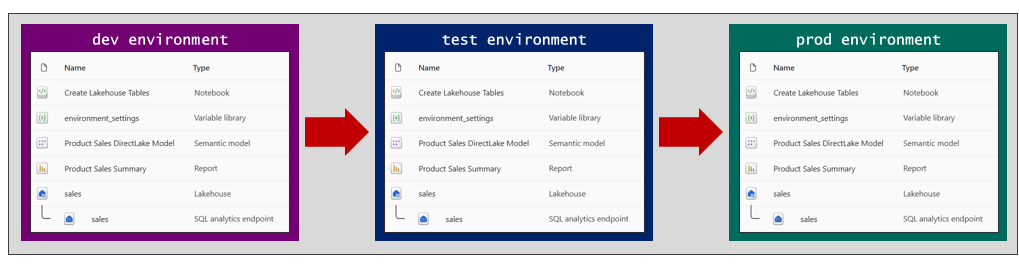
One essential aspect of planning a Fabric CI/CD project is defining the requirements for each environment. An environment is a set of resources that gives you a place to deploy and run the Fabric solution. At a minimum, an environment for a Fabric solution requires a workspace that you assign to a Fabric capacity. If the solution requires two workspaces, then each environment needs two workspaces.
Another important consideration is whether each environment requires its own separate capacity. While you can assign workspaces from all environments to a single shared capacity, the recommended practice is to isolate environments by creating a separate Fabric capacity for each one. The Fabric CI/CD project examples in this guidance use three environments named dev, test, and prod. Your project can use other common names, such as qa, uat, or ppe.

When planning environments, you might decide to include other types of Azure resources. For example, a Fabric solution might access data files from an Azure Storage account. In that case, plan to create a separate Storage account for each environment. A primary motivation for environments is the ability to run a Fabric solution against different data sources for development, testing, and production. During environment planning, map out all URLs and paths that items use to connect to external data sources so you can build a parameterization strategy that lets items in each environment connect to their environment-specific data sources.
What Fabric capabilities support CI/CD?
The Fabric platform provides the following capabilities to support CI/CD processes:
| Capability | What it supports in Fabric CI/CD |
|---|---|
| Git integration | Versions Fabric workspace item definitions in Azure DevOps, GitHub, or GitHub Enterprise. |
| Branched workspaces | Creates and manages feature branches and feature workspaces from the Fabric UI. |
| Variable libraries | Stores environment-specific configuration values outside item definitions. |
| Workspace item types | Determines which Fabric items support Git, deployment pipelines, REST APIs, variables, and auto-binding. |
| Item definitions | Stores the source files and metadata that represent Fabric workspace items in Git. |
| Deployment pipelines | Promotes item changes through staged workspaces for testing and production release. |
The rest of this section examines each of these capabilities, along with several closely related topics. The goal is to build your understanding of how these components work together before you move on to Fabric automation and workflow development.
Git synchronization
The Fabric CI/CD infrastructure starts with its support for Git integration. Imagine you're on a team building a data analytics solution in a Fabric workspace that includes a lakehouse, notebook, semantic model, and report. Fabric lets you maintain the source code for all four workspace items as a single source of truth in a Git repository. Fabric can version, track, and compare workspace item updates.
Fabric's supported Git providers include Azure DevOps, GitHub, and GitHub Enterprise. For the most current information about Git provider support and limitations, see Introduction to Git integration. For the typical first-time setup, see Get started with Git integration.
You enable Fabric's Git integration at workspace scope by connecting a workspace to a branch in a Git repository:
- Create a Fabric connection to the target Git repository.
- Configure the workspace-level Git setting that connects the Fabric workspace to a specific branch.
Fabric provides the Azure DevOps - Source control connector for connecting to Azure DevOps repositories. When you create a connection by using this connector, you configure credentials by using a Microsoft Entra identity, which can be either a user principal or a service principal. For GitHub and GitHub Enterprise, Fabric provides the GitHub - Source control connector, which uses a personal access token (PAT) for credentials.
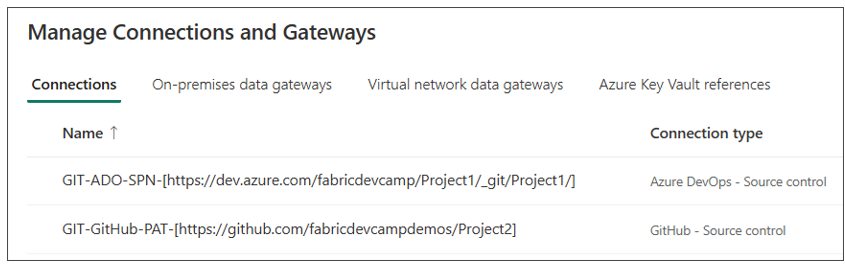
An essential aspect of Fabric Git integration is its ability to dynamically generate item definitions from workspace items. When you connect a workspace to a branch, Fabric runs a Commit to Git operation that generates an item definition for each item and persists it to the target branch as a folder containing item definition files.
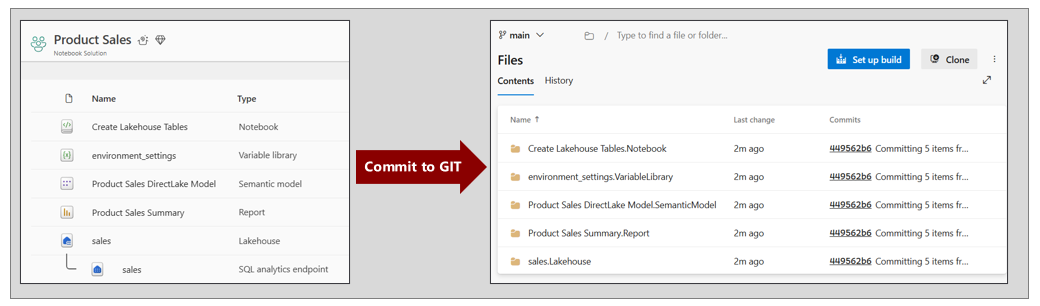
Fabric uses a naming convention for item definition folders that combines the item display name, a period, and the item type in the format of [Item Display Name].[Item Type]. For example, you'll see folder names, such as sales.Lakehouse and Product Sales Summary.Report.
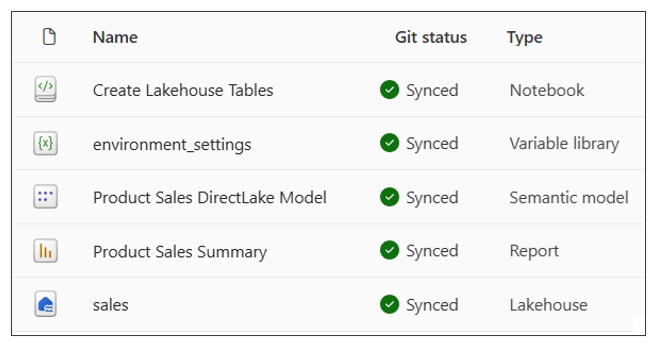
After you connect and synchronize a workspace with a Git branch, the workspace List view displays a Git status column that shows Synced to indicate all items are in sync with the underlying item definitions in Git.
Fabric Git integration also supports synchronization in the other direction. Consider a scenario where Git synchronization has synchronized all items in a workspace with a Git branch. A peer's pull request later merges new changes into that branch from another branch. You can run an Update from Git operation to synchronize those changes from the item definitions in Git back to the items in the workspace.
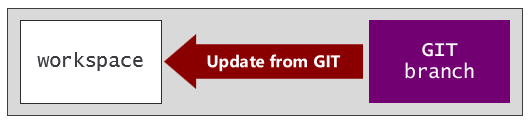
When you run Update from Git, Fabric checks whether a target workspace item already exists for each item definition by matching display name and item type. If Fabric finds a matching item, it updates the existing item to keep it in sync. If Fabric can't find a matching item, it creates a new item from the definition.
Consider what happens when you connect a Git branch containing item definitions to an empty workspace and run Update from Git. Fabric creates a new item from each definition in Git. This leads to an important observation: if you have a Git branch that contains the item definitions for a Fabric solution, you can use that branch to deploy the solution to a target workspace. This is the foundation of Git-based deployment patterns this article discusses later.
Git folder settings
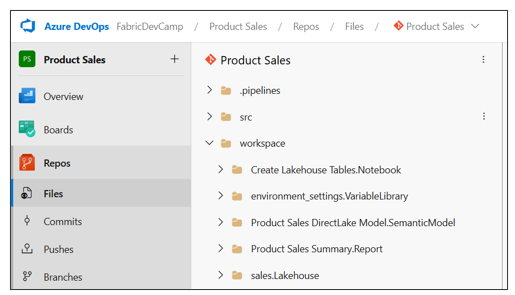
When you use the Fabric UI to configure a connection between a workspace and a Git branch, you can specify an optional Git folder setting. If you leave Git folder at its blank default, Git synchronization creates the item definition folders in the root folder of the target branch. By specifying a value for the Git folder setting, you direct Git synchronization to write its output to a child folder in the Git branch instead.
There are two important scenarios for configuring a Git folder setting.
Scenario 1: a Fabric CI/CD project that mixes workspace items with other project files. If your Git repository also needs to hold workflow files, such as YAML or Python scripts, configuring a Git folder setting (for example, /workspace) keeps the item definitions for workspace items separate from those other project files and avoids confusion. The Git - Connect REST API provides the directoryName parameter for the same purpose.
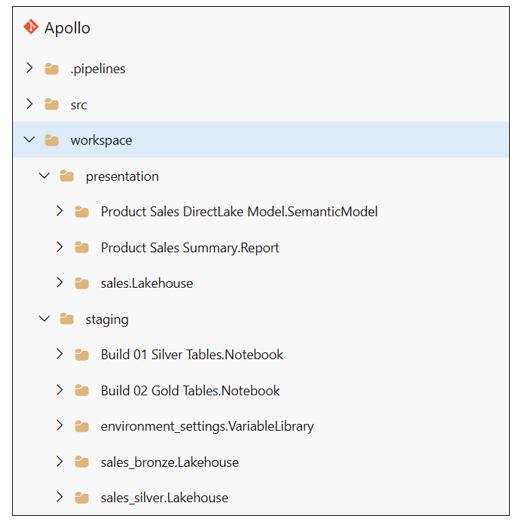
Scenario 2: a Fabric solution distributed across multiple workspaces. Revisit the medallion-architecture solution from earlier—a staging workspace with notebooks and lakehouses for bronze and silver data, and a presentation workspace with the gold lakehouse, a semantic model, and a report. While you could connect each workspace to its own Git repository, avoid that pattern: you need a single Git source of truth for the complete solution, even when the solution spans multiple workspaces.
The recommended practice is to synchronize both workspaces to the same Git branch in the same repository, with a different Git folder setting for each workspace. For example, connect the staging workspace with a Git folder setting of /workspace/staging and the presentation workspace with a Git folder setting of /workspace/presentation. This design is essential for multi-workspace solutions because it effectively creates a single Git source of truth for the entire solution.
Feature workspaces
Development teams widely adopt feature branches in modern software development. A development process based on feature branches lets you work and commit changes in isolation. You can configure feature branches with workflows that automatically run linters, validation checks, and security scans whenever you commit changes, improving the quality of code that reaches production.
After you commit changes to a feature branch, you typically create a pull request to merge those changes into the shared branch. Git providers, such as Azure DevOps and GitHub, let you configure pull requests with manual-approval processes that are as simple or as complex as your scenario requires. When the approval process completes, the Git provider automatically merges the changes into the integration branch—the shared branch where you and your team merge changes together. The integration branch is the single source of truth that's always ready for deployment to test and production environments. Remember that the integration branch is a concept, not a name. It typically has a name like main or dev.
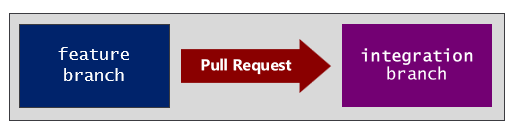
If you're migrating to Fabric with experience in traditional CI/CD, some aspects of Fabric CI/CD will be familiar while other aspects won't. For example, you may already be familiar with creating feature branches and pull requests. However, Fabric CI/CD differs because you must match and connect each feature branch to a feature workspace.
At a high level, a development process for a Fabric CI/CD project that uses feature workspaces starts with a single source of truth in Git. This requires a Git repository and a decision about which branch will serve as the integration branch. You can then create the single source of truth by creating a set of item definitions in the integration branch.
While there are several approaches you can use to create the initial set of item definitions in the integration branch, a common approach involves creating an operational version of the Fabric solution in a dev workspace. This makes it possible to connect the dev workspace to the integration branch and run a Commit to Git operation. The Commit to Git operation creates an item definition in the integration branch for each item in the dev workspace.
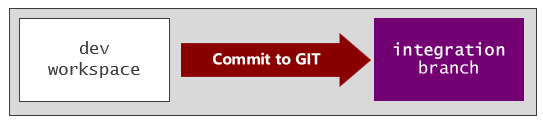
Treat the Commit to Git operation that creates item definitions in the integration branch as a one-time operation. After you create the item definitions that represent the single source of truth, don't directly update items or run Commit to Git operations in the dev workspace. Instead, merge future changes from feature branches into the integration branch. You can enforce this discipline by configuring the integration branch in the hosting Git repository with a branch policy that allows updates only through pull requests.
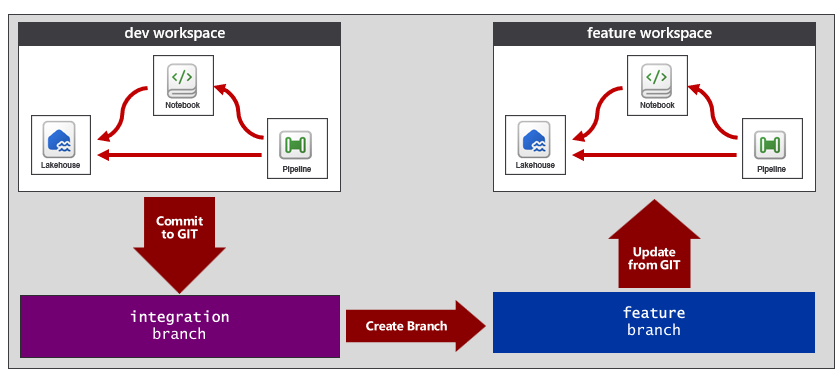
Once you configure the integration branch as a single source of truth, you can begin to create feature workspaces. This process typically involves creating a new feature branch based on the integration branch, creating a new workspace, connecting it to the feature branch, and running an Update from Git operation. This flow automatically populates the feature workspace with a matching set of workspace items.

When you initialize a feature workspace with an Update from Git operation, you often need to complete additional configuration before the workspace is ready for development. The How can you automate Fabric CI/CD? section discusses that configuration.
Once you standardize on a process for creating feature workspaces, you can begin to build what's required for continuous integration. The following diagram shows a development process that uses feature branches and feature workspaces. This approach can scale to accommodate a larger number of developers or development teams.
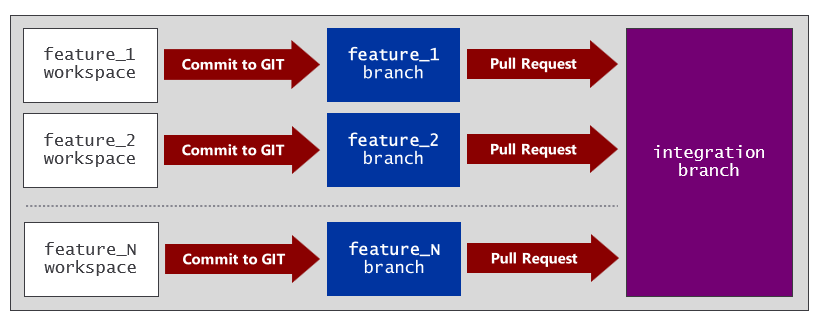
Remember that feature branches should be short-lived. A feature branch that remains active too long increases the risk of merge conflicts with the integration branch. It's a common practice to delete a feature branch as soon as a pull request completes and merges its changes into the integration branch.
When you manage the lifecycle of feature workspaces, choose one of these patterns:
| Feature workspace lifecycle pattern | Use when | Tradeoff |
|---|---|---|
| Create and delete with each feature branch | You want an isolated workspace for every pull request. | Highest isolation, but more workspace provisioning and cleanup. |
| Recycle feature workspaces across branches | You have dedicated developers or teams that work repeatedly in the same area, such as Spark notebooks, semantic models, or reports. | Lower provisioning overhead, but you must keep reused workspaces synchronized and clean. |
For day-to-day branch operations from inside Fabric, see Manage branches.
Branched workspaces
Fabric offers a capability known as branched workspaces to help create and manage feature workspaces. Branched workspaces simplify creating feature workspaces and switching between feature branches because Fabric automatically creates new Git branches and manages Git connections.
Consider a scenario in which you connect the dev workspace to an integration branch named main in a Git repository. If you navigate in the dev workspace to the Branches panel of the Source control pane, you can find a set of branching commands that include Branch out to workspace.
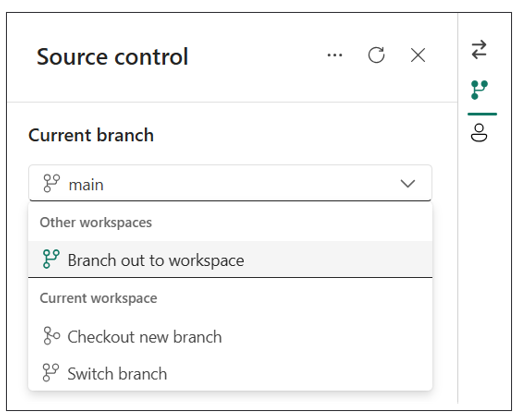
When you run the Branch out to workspace command, Fabric prompts you with a dialog to enter a new branch name. In the Branch out to workspace dialog, choose whether to create a new feature workspace or connect to an existing feature workspace.
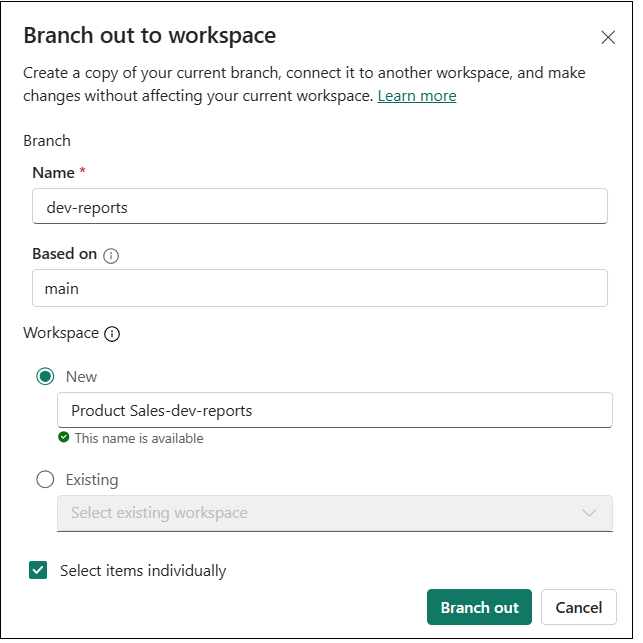
The Branch out to workspace dialog provides an option to Select items individually to enable a capability known as selective branching. If you select this option and select the Branch out button, you're prompted with another dialog where you select which items to include in the branch-out process.
Selective branching is particularly useful for workspaces that contain many items. A full branch-out process can require significant time when the dev workspace contains hundreds of items. Selective branching lets you complete the branch-out process faster when you only need to work on a small subset of items. After the initial branch out, you can also incrementally add other items to the branched workspace as needed.
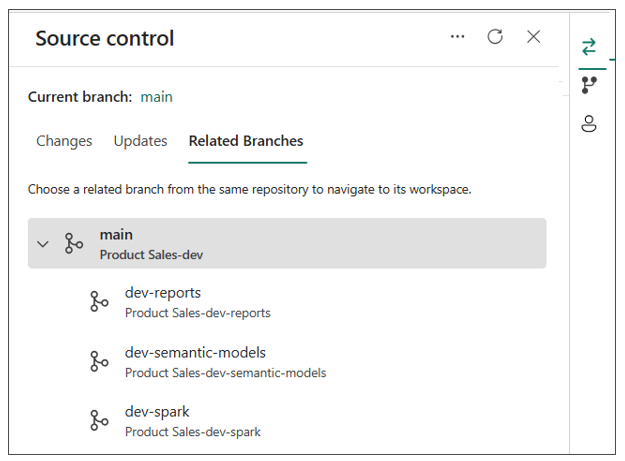
When you branch out to a feature workspace, Fabric creates a relationship between the branched workspace and the shared dev workspace that connects to the integration branch. This makes it easier to visualize the high-level development process for a Fabric CI/CD project. If you navigate the Related Branches view in the Source control pane, you can see that the top navigation node in the hierarchy displays the integration branch named main and the name of the shared dev workspace. Each child node displays the name of each feature workspace along with its underlying Git branch name.
Within each branched workspace, Fabric also provides a workspace breadcrumb menu that shows the relationship between a feature workspace and the shared dev workspace connected to the integration branch.

An important consideration when working with the Branch out to workspace command involves the permissions required in the Git repository and in Fabric. To branch out to a new workspace, you must have permissions to create new branches in the Git repository. You also need permissions in Fabric to create new workspaces and to assign workspaces to a Fabric capacity. For more information about permissions, see Required Git permissions for popular actions.
Microsoft is enhancing branched workspace capabilities to address permissions issues. Fabric plans to introduce a delegated model to enable self-service branch-out operations for users who don't have permissions to create workspaces or assign a workspace to a Fabric capacity.
In addition to the Branch out to workspace command, the Source control pane includes other commands for managing branched workspaces and their connections to feature branches. The Switch branch command lets you switch the connection for the current workspace from one branch to another in the same Git repository. Before switching to another branch, you must either commit or discard any uncommitted changes in the workspace. When switching to a different branch, Fabric runs an Update from Git operation that can add, update, or delete workspace items in the current workspace.
The Check out new branch command runs a set of operations that can help resolve merge conflicts between a feature branch and the integration branch. This command lets you switch from the current branch to a new branch without discarding changes in the current branch.
For more information about permissions for the branch-out experience, see Development process using branched workspace and Git integration process. To review changes before committing or updating, see Compare changes with granular compare.
Variable libraries
An essential aspect of the CI/CD lifecycle involves promoting changes through a sequence of environments. The canonical example is a Fabric solution lifecycle that moves changes through environments, such as dev, test, and prod. When you need to test and validate code for a project across multiple environments, it's essential to define an effective parameterization strategy for environment-specific settings.
The Fabric platform provides the variable library to assist with parameterization. The variable library is a creatable type of workspace item in which you can define a set of variables. You can define other workspace items, such as notebooks, pipelines, copy jobs, and dataflows, to read variable values from a variable library. This makes it possible to avoid hardcoding configuration settings that change across environments.
Consider the classic scenario in which you need to build a release process that moves workspace item updates through a sequence of workspaces representing environments, such as dev, test, and prod. The problem is that you must configure items in different workspaces with different settings to connect to a different database or to some other type of data source. To solve this problem, items in each workspace require access to their own connection settings.
The variable library solves the problem of parameterizing these types of settings across workspaces. Use a variable library to avoid hardcoding the configuration settings required to connect to a database. Consider a scenario in which you must write Python code in a Fabric notebook to connect to a SQL database. Avoid hardcoding these configuration settings into your code as literal strings.
database_server = '<server-name>.database.windows.net'
database_name = 'ProductSalesDev'
These hardcoded settings are specific to a single environment. As an alternative, you can use a variable library to support parameterization. In the variable library, define two string variables named database_server and database_name.
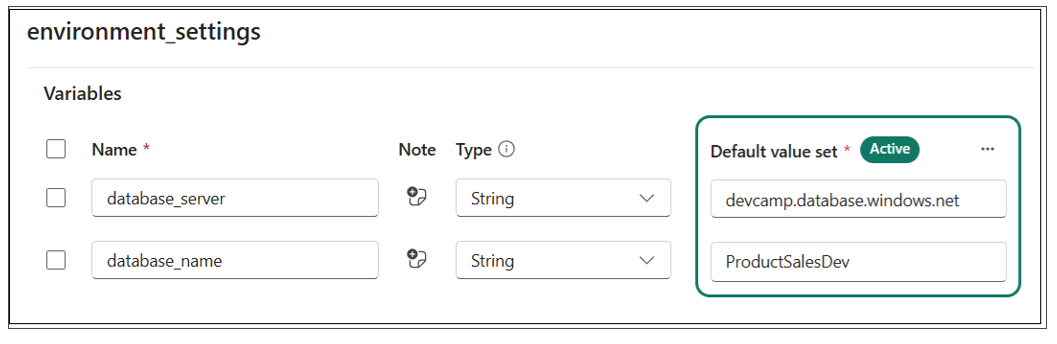
Once you have created the variable library with the two variables, you can remove the hardcoded configuration values from the notebook and replace them with code to read the variable values at run time.
database_server = notebookutils.variableLibrary.get("$(/**/environment_settings/database_server)")
database_name = notebookutils.variableLibrary.get("$(/**/environment_settings/database_name)")
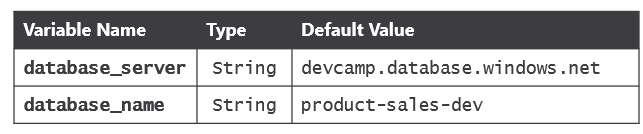
A value set provides alternate values for each variable in the variable library. Consider an example of a variable library in which you configured the default values for the dev environment. You can extend the variable library by adding a value set for the test workspace and a second value set for the prod workspace.
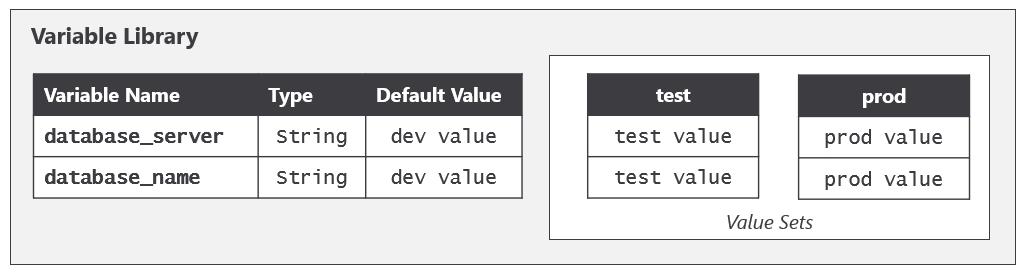
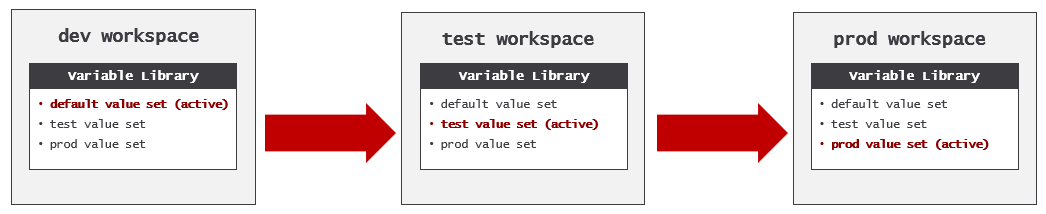
The item definition for a variable library includes variables and value sets. However, the item definition doesn't contain anything to indicate which value set is active. That's because Fabric maintains a separate workspace-level setting that tracks which value set is active in the context of that workspace. That means three different workspaces could each contain a variable library with an identical item definition. You can configure each workspace to use a different value set.
You can create variables in a variable library based on standard types, including String, Number, Integer, DateTime, and GUID. Variable libraries additionally support two important reference variable types: Connection reference and Item reference. Using these reference variable types makes it easier to edit variable values through the Fabric UI. When you edit the value of a reference-type variable, the Fabric UI displays an item picker showing a list of candidate items from which to choose.
Use connection reference variables to parameterize connections for ETL items, such as pipelines and shortcuts in a lakehouse. Design items that connect to external data sources by using a variable library that includes a connection reference variable and other variables that parameterize data-source paths. A connection reference variable removes environment-specific values from the item definition.
Item reference variables are useful for managing dependencies between items in the same solution. This is especially true when you need to manage an item dependency that spans across workspace boundaries. Revisit the scenario with the multi-workspace solution introduced earlier. A notebook in the staging workspace needs to write its output to a lakehouse in the presentation workspace with gold layer tables. You can use an item reference variable to parameterize the target lakehouse. This removes environment-specific code from the notebook because the notebook can use the item reference to determine where to write its output.
For more on variable libraries in CI/CD, see What is a variable library?, CI/CD and variable libraries, Variable types, Value sets, and Variable library permissions. For details on the two reference variable types, see Connection reference variable type and Item reference variable type.
Workspace item types
Every Fabric solution is a composition of workspace items, and every item uses a workspace item type that defines its capabilities and the user experience it provides in the Fabric service.
The workspace item type abstraction is what allows artifacts from different Fabric workloads to behave in a similar and consistent manner. Each item type provides Git synchronization so Fabric can generate item definitions and store them in Git. Each item type responds to an Update from Git command by either creating or updating items from the definitions in Git.
Fabric is an evolving platform. Microsoft regularly updates workspace item types and continually adds new item types. As a result, some item types are more mature than others with respect to their CI/CD capabilities.
There are four primary CI/CD capabilities that some, but not all, workspace item types support:
| Workspace item type capability | Why it matters for Fabric CI/CD |
|---|---|
| Read variables from a variable library | Lets items use environment-specific values without hardcoded settings. |
| Create and update items through Fabric REST APIs using item definitions | Enables automated deployment through scripts, tools, and libraries. |
| Call Fabric REST APIs as a service principal | Supports unattended CI/CD jobs in Azure Pipelines, GitHub Actions, and other automation hosts. |
| Auto-bind workspace item dependencies | Reconnects related items after Git synchronization or deployment without manual rebinding. |
Whenever possible, use variable libraries to manage parameterization across environments. When you encounter an item type that doesn't support variable libraries, you may need to fall back to direct edits of the item definition—either in Git or through a Fabric REST API call—to achieve the same goal.
You'll also find differences across item types in their support for the Fabric REST APIs. Some item types support creating and updating items by using item definitions; others don't. Some item types don't yet support calls to the Fabric REST APIs under the identity of a service principal. This is especially common while an item type is in public preview.
For the current per-item-type CI/CD support matrix, see the supported items lists for Git integration supported items and deployment-pipeline supported items.
Auto-binding support
Most Fabric workspace item types can self-manage their relationships to other items in the same workspace. Auto-binding is the term for this behavior: as part of the Git synchronization process, item types that support auto-binding rebind their dependencies automatically. Item types that don't support auto-binding require your attention. You might need to run a script after an Update from Git operation to correctly rebind item dependencies.
Consider a Fabric solution composed of a lakehouse, a notebook, and a pipeline, where the notebook depends on the lakehouse and the pipeline depends on both the lakehouse and the notebook. After you build the solution in the dev workspace, three dependencies exist between these items.
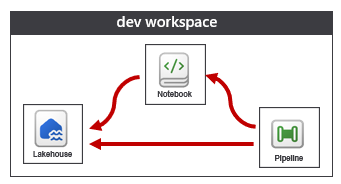
Now consider what happens when you use Git synchronization to replicate these three items from the dev workspace to a feature workspace. The outcome you want to avoid is workspace items in the feature workspace that retain dependencies pointing back to items in the dev workspace. Instead, you want each item to resolve its dependencies to the related items in the same workspace. With auto-binding, the notebook and pipeline in the feature workspace properly rebind to siblings in their new workspace.
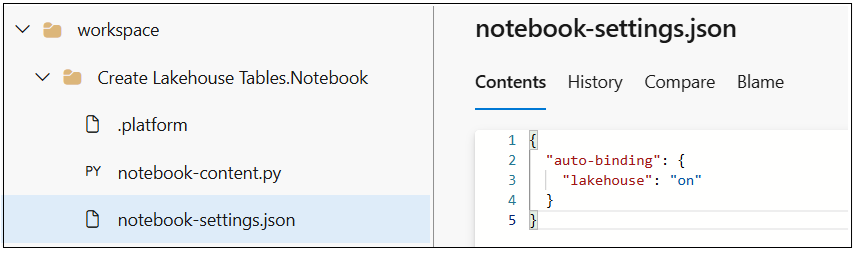
Auto-binding maturity varies. Fabric notebooks didn't support auto-binding until Microsoft added auto-binding support to the Notebook item type in March 2026. Notebooks also don't support auto-binding by default; you must extend a notebook's item definition with a notebook-settings.json file.
If you build a Fabric solution with an item type that lacks auto-binding support, plan to write a post-sync script that reestablishes the item's relations. When auto-binding fails or item dependencies don't resolve as expected, see Dependency errors for diagnostics and remediation.
Fabric only supports auto-binding behavior between items that exist in the same workspace. When designing multi-workspace solutions, use item reference variables in a variable library to manage item dependencies that span workspace boundaries.
Item definitions
Item definitions are an essential component of Fabric's CI/CD support. An item definition is a portable, named folder containing a set of files with the settings and metadata that represent an item of a specific workspace item type. The files in an item definition vary significantly from one item type to another. The idea that Fabric can serialize every item into a folder in Git is the foundation of the Fabric CI/CD infrastructure.
Every item definition requires a file named .platform—the platform file. The platform file contains metadata, such as the item type and display name. It also contains a logicalId value that Fabric uses internally to track logical instances of workspace items as they propagate across Git branches and workspaces.
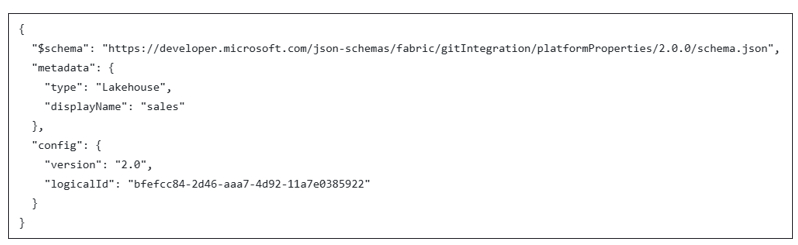
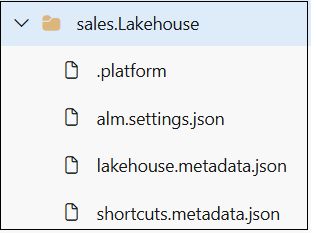
In addition to the platform file, each workspace item type defines its own schema for the files it requires and allows in an item definition. For example, the item definition for a lakehouse contains files, such as alm.settings.json, lakehouse.metadata.json, and shortcuts.metadata.json.
The minimal item definition for a notebook requires only a notebook-content.py file in addition to the platform file.
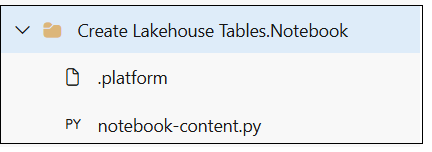
Fabric allows creating the notebook-content file with a .ipynb extension to support the Jupyter Notebook format. Fabric also supports creating the notebook-content file with extensions, such as .sql, .scala, and .r, to support other programming languages. As this article discussed earlier, the item definition for a notebook requires a notebook-settings.json file to add support for auto-binding.
Some item definitions contain a small number of files; others don't. The item definition for a semantic model can include dozens or even hundreds of TMDL files structured across several folders. While a large file count adds complexity, it enables much more granular collaboration: splitting each table into its own file lets one developer work on measures in the Sales table while another developer changes the Calendar table—essential when multiple developers are working on a large semantic model concurrently.
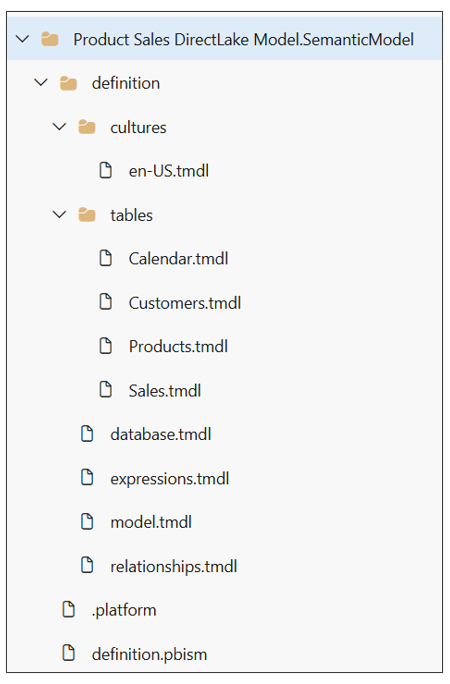
In this section, you've seen examples of item definitions for lakehouses, notebooks, and semantic models. You'll work with other workspace item types as well. For each, build a basic understanding of the item definition files. A good starting point is to review the item definition files in Git that Git synchronization created for an item type you're working with.
For the full item-definition file format and the source-code conventions Fabric uses, see Item source code format.
The role of the logicalId
Using Fabric Git integration, you can replicate a set of workspace items from one workspace to another. Imagine you created a lakehouse named sales and used Git synchronization to replicate the lakehouse across three workspaces. All three lakehouse instances share the same type and display name, but Fabric assigns each a unique ID.
To support auto-binding, Fabric needs a way to track that these three lakehouse instances are all associated with a single logical item. That's where the logicalId comes in. While each lakehouse instance has its own unique ID, all three lakehouses share the same logicalId.

The logicalId matters because it allows Fabric to avoid persisting workspace-specific item IDs into Git. Using logicalId values instead of workspace-specific item IDs is what makes auto-binding possible. Examine the following snippet from the item definition for a pipeline that has a dependency on a lakehouse in the same workspace:
{
  "typeProperties": {
    "linkedService": {
      "name": "sales_lakehouse",
      "properties": {
        "typeProperties": {
          "workspaceId": "00000000-0000-0000-0000-000000000000",
          "artifactId": "<lakehouse-logicalId>",
          "rootFolder": "Files"
        }
      }
    }
  }
}
The workspaceId is the empty GUID 00000000-0000-0000-0000-000000000000, which signals that artifactId is the logicalId of the lakehouse, not a workspace-specific item ID. When you run Update from Git on a new workspace, Fabric uses the logicalId to look up the workspace-specific lakehouse ID and rebind the pipeline to the lakehouse to reestablish the relation.
It's unlikely you'll ever need to work directly with the logicalId—treat it as an internal property Fabric uses. Never modify a logicalId value: Fabric doesn't support doing so, and changing it can lead to unpredictable behavior. For more on logical IDs and the conflicts they can resolve, see Logical ID conflicts and Resolve conflicts.
Deployment pipelines
The Fabric platform provides deployment pipelines as a continuous-deployment mechanism to help manage the lifecycle of workspace items. The key concept behind deployment pipelines is that they can deploy changes to workspace items through a set of stages where you assign each stage to a Fabric workspace associated with an environment. The following screenshot shows the deployment-pipeline user interface that deploys item-level changes across workspaces.
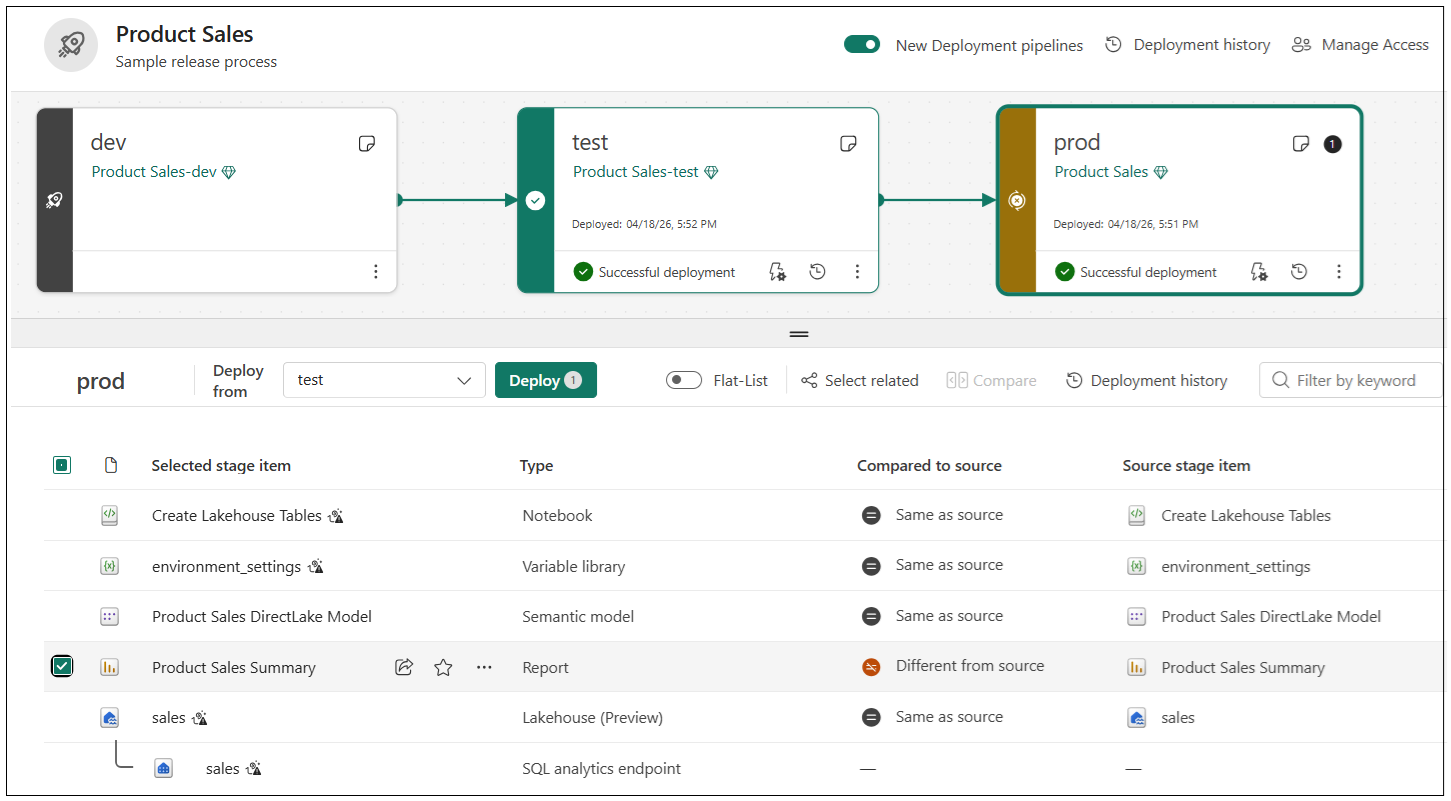
Deployment pipelines reduce manual effort by hiding low-level details associated with propagating changes through a sequence of workspaces. Deployment pipelines are similar to Git synchronization in that they automatically rebind item relationships when deploying a Fabric solution with item dependencies between lakehouses, notebooks, and pipelines.
Microsoft originally introduced deployment pipelines in the Power BI service several years before it first released Fabric. In their initial release, deployment pipelines offered deployment rules as a mechanism for supporting parameterization. For example, you can configure a semantic model with a deployment rule to update its data-source location so the semantic model in each of the three workspaces connects to its own environment-specific database.
Deployment pipelines in Fabric continue to support deployment rules. However, variable libraries should usually be your first choice for parameterization because they're the strategic Fabric capability for environment-specific configuration.
Deployment pipelines assist with continuous deployment, which represents only the second half of the CI/CD lifecycle. Combine deployment pipelines with Fabric Git integration to implement an end-to-end solution.
How can you automate Fabric CI/CD?
Implementing a Fabric project with end-to-end CI/CD support requires a significant number of steps. Your ability to automate the setup process is essential. The alternative—known as ClickOps—involves completing setup tasks manually by using a browser. Relying on ClickOps is unreliable because it's prone to human error, causing unnecessary delays and the need to troubleshoot configuration errors. It's especially harmful when you're trying to create a repeatable plan for disaster recovery.
The Fabric platform provides public APIs that make it possible to automate setup and CI/CD processes for a Fabric project. You typically use the Fabric REST APIs to create workspaces, connections, and workspace items. While you can write code that calls the Fabric REST APIs directly, you can also reduce implementation effort by using developer tools and libraries that call the Fabric REST APIs on your behalf. The following diagram shows the developer tools and libraries that this article discusses.

This section starts by examining common scenarios where you need to write automation logic. Then it describes three developer tools and libraries: Terraform for infrastructure-as-code provisioning, the Fabric CLI for general-purpose automation logic, and Semantic Link Labs for in-Fabric scripting. The section then explains why the fabric-cicd library is a best practice for building a release process and concludes with a primer on Fabric REST API programming when you need the greatest level of control with Fabric automation.
Automation targets
The first part of implementing a Fabric CI/CD project is configuring the project's infrastructure. The infrastructure for a Fabric CI/CD project includes tenant-scoped items in Fabric, such as workspaces, capacities, connections, gateways, and deployment pipelines. You also need to create a Git repository and configure Git integration support between Fabric workspaces and Git branches.
After a Fabric CI/CD project is operational, there's often an ongoing need to create and configure feature workspaces. The flow for creating a feature workspace involves creating a new feature branch from the integration branch and then running Update from Git against a new workspace.

The problem is that Update from Git doesn't complete all required configuration. It creates a lakehouse, but it doesn't automatically populate the lakehouse with tables. It creates a semantic model, but it doesn't automatically create and bind a connection to the semantic model's data source.
You often need additional automation after Update from Git initializes or updates a workspace. As you begin developing these types of scripts, consider two different types of jobs:
- Post-deploy jobs run only once after Update from Git first initializes an empty workspace.
- Post-sync jobs run each time after Update from Git completes on a workspace.
A post-deploy job is a set of one-time tasks that are part of the workspace initialization process. A post-deploy job commonly automates tasks such as setting the active value set for a variable library, running a notebook to populate a lakehouse with data, and creating and binding a connection for each semantic model. If your Fabric solution includes a semantic model that uses import mode, you should also automate the process of running a refresh operation to ingest and store the imported data.
Avoid putting ETL logic directly into the scripts you write for post-deploy jobs. Instead, factor out ETL logic into ETL-focused workspace items, such as notebooks, pipelines, copy jobs, user-defined functions, and dataflows. If a post-deploy script discovers a notebook by name and runs it, you can update the ETL logic in the notebook without requiring any updates to the script.
A post-sync job contains logic that must run every time after an Update from Git operation completes. Consider the common scenario in which you need to automate keeping the dev workspace in sync with the integration branch. The high-level flow of the development process begins with a developer making a series of changes to items in a feature workspace and committing those changes to a feature branch. The developer then creates a pull request, and reviewers approve it to merge those changes into the integration branch.

When a pull request merges changes into the integration branch, you must find a way to synchronize those changes to items in the dev workspace. Automate this synchronization process by creating a workflow that runs whenever a pull request merges changes from a feature branch into the integration branch.
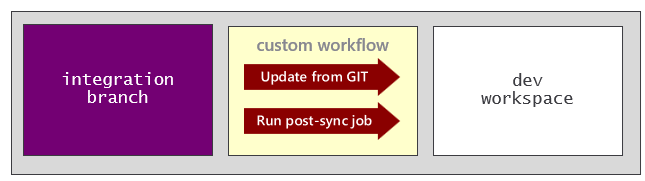
The workflow should include logic that begins by running an Update from Git operation to sync changes from the integration branch to the dev workspace. However, some workspace items might require additional modification after the Update from Git operation completes. This can happen when workspace items don't support auto-bind behavior. It can also happen when items don't yet support variable libraries but require environment-specific settings.
After a post-sync job finishes, verify the target workspace is in the expected state: Git status is Synced, the required variable library value set is active, and item dependencies point to related items in the same workspace.
Important
Regardless of which tool you use or whether you call Fabric APIs directly, you must consider the identity that runs your automation jobs. Every call to a Fabric REST API executes under the identity of a specific Microsoft Entra security principal. Fabric REST APIs support two types of identity: user principals and service principals.
Execute API calls as a service principal whenever possible. This is especially important when CI/CD workflow automation logic executes in a cloud-based platform, such as Azure Pipelines or GitHub Actions.
Terraform for project infrastructure
Terraform is an open-source tool built on the principles of infrastructure as code (IaC). IaC defines the infrastructure for a software project by using configuration files instead of manual processes or procedural programming logic. For organizations managing cloud deployments, the use of IaC is a well-established best practice in DevOps and CI/CD.
Terraform offers the advantage of a deployment process that is both versionable and repeatable. You can version a Terraform configuration by adding its files to a Git repository, as you would version any source file. A Terraform deployment process is repeatable: you can run it repeatedly and it produces the same outcome. A repeatable process provides consistency and the fastest path to disaster recovery.
Architecturally, Terraform plays the role of an orchestrator that completes its work indirectly by calling APIs through providers. Terraform doesn't call those APIs directly; instead, it delegates to Terraform providers, plug-in components designed to interact with a specific set of cloud-based APIs. The Terraform registry contains thousands of providers covering platforms, such as Azure, Amazon Web Services, and Google Cloud. Microsoft released the Fabric provider for Terraform in 2025, making it possible to set up the infrastructure for a Fabric CI/CD project by using an IaC-based provisioning process.
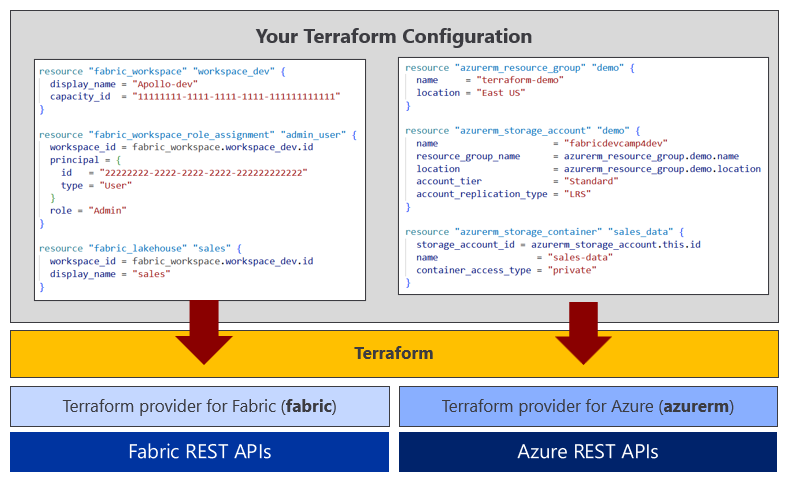
For more on Terraform, see the Terraform documentation on the HashiCorp Developer site.
You define a Terraform configuration by using a set of files that contain HashiCorp Configuration Language (HCL). A typical project layout uses files, such as providers.tf, variables.tf, main.tf, output.tf, and terraform.tfvars. The variables.tf file defines a set of typed variables. The terraform.tfvars file assigns variable values when Terraform is running locally in a client tool, such as Visual Studio Code. Because terraform.tfvars often contains sensitive information, such as a client secret that authenticates as a service principal, add a .gitignore entry so that you never upload terraform.tfvars to a Git repository.
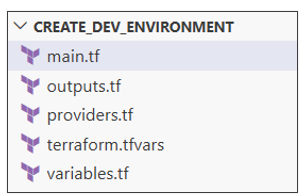
The providers.tf file contains a terraform block with required_version and required_providers arguments. The required_providers block specifies each provider with its source and version. The same file contains a provider block that authenticates the Fabric provider as a service principal:
terraform {
  required_version = ">= 1.8, < 2.0"
  required_providers {
    fabric = {
      source  = "microsoft/fabric"
      version = "1.8.0"
    }
  }
}

provider "fabric" {
  tenant_id     = var.tenant_id
  client_id     = var.client_id
  client_secret = var.client_secret
}
Once the configuration contains what's required to initialize the provider, run terraform init to download the executable code for the provider along with security configuration that verifies no one has tampered with the downloaded provider code.
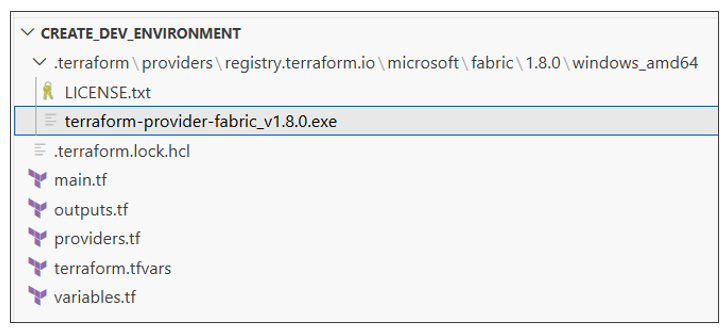
After initializing the Fabric provider, define resources by adding resource blocks to main.tf. Each resource block requires a provider-specific resource type and a local resource name. The Fabric provider offers the fabric_workspace resource type for creating workspaces and the fabric_workspace_role_assignment resource type for configuring access through workspace role assignments:
resource "fabric_workspace" "workspace_main" {
  display_name = var.workspace_name
  capacity_id  = var.capacity_id
}

resource "fabric_workspace_role_assignment" "admin_group" {
  workspace_id = fabric_workspace.workspace_main.id
  principal = {
    id   = var.admin_group
    type = "Group"
  }
  role = "Admin"
}

resource "fabric_workspace_role_assignment" "dev_group" {
  workspace_id = fabric_workspace.workspace_main.id
  principal = {
    id   = var.dev_group
    type = "Group"
  }
  role = "Member"
}
When you create a fabric_workspace resource, specify argument values for display_name and capacity_id. The fabric_workspace resource is also assigned a local name (workspace_main in the previous listing). The local name matters because it lets you create references by using syntax, such as fabric_workspace.workspace_main.id.
Once you have a configuration with a set of resources, terraform plan reviews the steps required to deploy the configuration without making changes. terraform apply executes the job that creates the resources needed to match your configuration.
The first time you run terraform apply, Terraform creates a state file named terraform.tfstate that tracks the property values for each resource as Terraform creates or updates it. By default, Terraform creates terraform.tfstate locally in the root folder of the current configuration. Using a local state file is convenient when you're first learning to use Terraform and when you're developing and testing a configuration in Visual Studio Code.
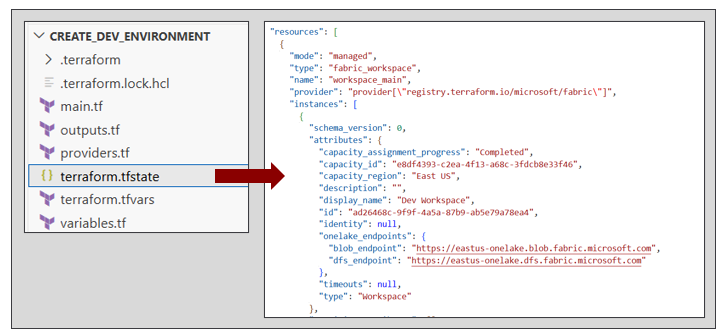
Important
In production, it's critical to initialize the configuration to manage the Terraform state file in cloud storage, such as an Azure Storage account. The state file often contains sensitive data, such as authentication credentials, so limit access to the state file and encrypt its contents.
A configuration commonly contains an output.tf file with output blocks that capture property values for resources that the configuration creates. The following listing shows two output blocks that provide values for a workspace ID and DFS endpoint:
output "workspace_id" {
  description = "ID of Fabric workspace"
  value       = fabric_workspace.workspace_main.id
}

output "workspace_dfs_endpoint" {
  description = "DFS endpoint for Fabric workspace"
  value       = fabric_workspace.workspace_main.onelake_endpoints.dfs_endpoint
}
By tracking the state of resources in the current deployment, Terraform compares what's in the configuration against the current deployment. This lets Terraform determine what resources it needs to create, update, or destroy each time you run terraform apply. Running terraform apply a second time without any configuration changes does nothing—Terraform determines the state file matches the current deployment.
Terraform also helps manage resources over the lifetime of a project. To update an existing resource, change the configuration and run terraform apply again. For example, to change the workspace role assignment with the local name dev_group from Member to Contributor, update the resource argument, save your changes, and run terraform apply. Terraform handles the sequence of API calls required to make the change.
Fabric capacities are an Azure resource, and you must create them with the Terraform provider for Azure (azurerm). You can authenticate the Azure provider as a service principal in a similar way to the Fabric provider. You also need to include the subscription_id for the subscription where you provision the capacity. The service principal must have the appropriate permissions in that subscription to create a Fabric capacity:
terraform {
  required_version = ">= 1.8, < 2.0"
  required_providers {
    azurerm = {
      source  = "hashicorp/azurerm"
      version = "4.63.0"
    }
  }
}

provider "azurerm" {
  features        {}
  tenant_id       = var.tenant_id
  client_id       = var.client_id
  client_secret   = var.client_secret
  subscription_id = var.subscription_id
}
The following listing demonstrates how to create a Fabric capacity. First create an Azure resource group by using an azurerm_resource_group resource, then create a capacity in that resource group by using an azurerm_fabric_capacity resource:
data "azurerm_client_config" "current" {}

locals {
  spn_object_id = data.azurerm_client_config.current.object_id
}

resource "azurerm_resource_group" "main" {
  name     = var.resource_group_name
  location = var.capacity_location
}

resource "azurerm_fabric_capacity" "main" {
  name                = var.capacity_name
  resource_group_name = azurerm_resource_group.main.name
  location            = azurerm_resource_group.main.location
  administration_members = [
    local.spn_object_id,
    var.admin_user_upn
  ]
  sku {
    name = var.capacity_sku_size
    tier = "Fabric"
  }
}
In addition to resource blocks, Terraform supports data blocks for scenarios where you need to query a data source. The previous listing uses a data block based on the azurerm_client_config data source to dynamically retrieve the Microsoft Entra object ID for the service principal that runs the Terraform deployment. The locals block creates a local variable named spn_object_id holding the service principal object ID, which the azurerm_fabric_capacity resource then uses to add the service principal to the capacity's administrators group.
When you add an azurerm_fabric_capacity resource, you must configure a sku block with a name argument that controls the capacity SKU size. For example, you might provision the capacities for your project environments with an F4 for dev, an F16 for test, and an F64 for prod. If the test environment capacity is undersized and you need to increase it to F32, update the test configuration with the new SKU name and run terraform apply.
Now consider creating a Fabric capacity and a workspace in the same configuration. You need to load both the Azure provider and the Fabric provider. One detail requires careful handling: the Azure provider and the Fabric provider use different formats for the capacity ID. Fabric uses a GUID-based ID for capacities while Azure uses a long string identifier containing the subscription ID and resource group name. The best way to handle this is to add a data block based on a fabric_capacity data source to query the capacity for its GUID-based ID:
data "fabric_capacity" "main" {
  display_name = var.capacity_name
  depends_on   = [azurerm_fabric_capacity.main]
}

resource "fabric_workspace" "main" {
  display_name = var.workspace_name
  capacity_id  = data.fabric_capacity.main.id
  depends_on   = [data.fabric_capacity.main]
}
A Terraform configuration for building Fabric CI/CD project environments typically includes workspaces, capacities, and connections. You can also provision other Azure resources, such as Azure Storage accounts, Azure SQL databases, or Azure Key Vault instances. The following diagram shows an example of a Fabric CI/CD project plan that includes a standard set of resources that three environments require. Each environment contains the same set of resource types. Terraform supports parameterization that lets you provision resources for each environment with its own unique settings.
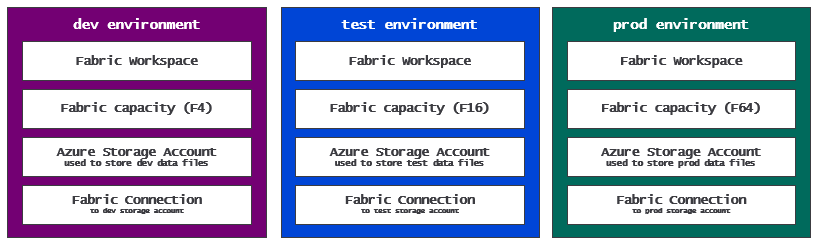
When using Terraform, it's recommended that you create a separate configuration for each environment. After all, you don't want a problem in the configuration for the dev environment or the test environment to affect the prod environment. You can create configurations for these environments by using this common provisioning flow:
| Sequence | Terraform resource | Resource purpose |
|---|---|---|
| 1 | azurerm_fabric_capacity |
Creates the Fabric capacity for the environment. |
| 2 | fabric_workspace |
Creates a workspace assigned to the capacity. |
| 3 | fabric_workspace_role_assignment |
Configures workspace role assignments for access control. |
| 4 | azurerm_storage_account |
Creates an Azure Storage account for environment-specific data files. |
| 5 | azurerm_storage_container |
Creates a container in the Storage account. |
| 6 | azurerm_storage_account_blob_container_sas |
Creates a SAS token credential to access the Storage container. |
| 7 | fabric_connection |
Creates a Fabric connection used to access data files in the Storage account. |
| 8 | fabric_connection_role_assignment |
Configures connection permissions. |
For more on Terraform providers, see the Microsoft Fabric Terraform provider in the Terraform Registry and the Azure provider documentation.
This example demonstrates how Terraform helps enforce security and governance best practices. A Terraform configuration can manage access control to project resources by adding role assignments. If anything changes in the future with respect to permissions or access control, you can update the configuration and run the terraform apply command.
The example also demonstrates a security best practice for credential management. The Terraform configuration creates a credential in the form of a SAS token and then uses that credential to create a Fabric connection. This approach eliminates the need to share connection credentials with other humans or external processes. The Terraform configuration manages credentials in a secured, encrypted state file in cloud storage. Terraform creates the connection, configures its permissions, and passes the connection ID back to you as output.
Fabric CLI
Fabric CLI is a developer tool for writing automation logic for Fabric CI/CD processes. The Fabric CLI abstracts the underlying Microsoft APIs to provide a single, focused experience for Fabric automation. It handles Microsoft Entra authentication, access token acquisition, and HTTP request dispatch. It also simplifies running automation logic under the identity of a service principal.
The Fabric CLI supports both an interactive mode and a scripting mode. Interactive mode lets you type and execute a sequence of commands. For example, you can use the Fabric CLI in interactive mode to create a new workspace and then create a lakehouse inside that workspace. The Fabric CLI also provides commands to load data into lakehouse tables and to automate running notebooks and pipelines that contain ETL logic.
Scripting mode makes it possible to write and version automation logic for a Fabric CI/CD project. Use a shell script or a programming language, such as PowerShell or Python, to execute a sequence of Fabric CLI commands. If you decide not to use Terraform, you can write scripts that call Fabric CLI commands to create and manage tenant-level items, such as workspaces, capacities, connections, domains, and gateways.
The Fabric CLI provides workspace-item commands for creating and managing Fabric items. Commands, such as create, get, set, and rm, perform CRUD operations on workspace items. There are also two Fabric CLI commands for working with item definitions: import creates or updates a workspace item by using an item definition. The complementary export command exports a workspace item to a local folder as a set of definition files.
For more information, see the Fabric CLI documentation.
Another important capability of the Fabric CLI is its integration with cloud-based Git providers, such as Azure DevOps and GitHub. If you're developing GitHub Actions workflows, you can install and load the Fabric CLI executable so your workflows can call Fabric CLI commands. If you're developing Azure Pipelines workflows, the Fabric automation tools extension for Azure DevOps adds the FabricCLITask@0 task that provisions the Fabric CLI into the pipeline agent without manual installation. For more information, see Fabric automation tools for Azure DevOps.
Semantic Link Labs
Semantic Link is a capability in Microsoft Fabric that connects data science and data analytics by integrating Power BI semantic models with Python and Spark environments. Semantic Link lets data scientists load data from a semantic model into a FabricDataFrame object that they can use directly with data science libraries, such as pandas and scikit-learn.
Semantic Link Labs is a Python library designed for use in Fabric notebooks. It provides access to Semantic Link when you work in Fabric and adds functionality for working with workspace items, such as semantic models, reports, lakehouses, notebooks, and variable libraries. The goal of Semantic Link Labs is to simplify technical processes so you can focus on higher-level activities.
Semantic Link Labs completes its work by calling public Microsoft APIs, such as the Fabric REST APIs, Power BI REST APIs, and the Tabular Object Model. When you use Semantic Link Labs, you benefit from the simplicity of a single API surface without managing the details of acquiring access tokens or dispatching calls to multiple APIs.
Semantic Link Labs lets you work with workspace items from the Data Engineering workload, such as lakehouses, notebooks, and environments. It simplifies creating lakehouses and notebooks, configuring a notebook to use a specific lakehouse as its default lakehouse, running jobs for notebooks and pipelines, and monitoring job execution to determine whether a job completed successfully.
For more on Semantic Link Labs, see the Semantic Link Labs project on GitHub.
Semantic Link Labs works only inside the Fabric environment. You can't load the Semantic Link Labs library in a non-Fabric environment, such as Azure Pipelines or GitHub Actions workflows. To use Semantic Link Labs functionality from an external automation host, maintain the code that calls Semantic Link Labs in a Fabric notebook, and automate running that notebook from your external host.
Release process options
Earlier sections described the fundamentals of building a development process by using feature branches and feature workspaces. The goal of the development process is to create a single source of truth in the integration branch that is always ready for deployment. To complete the full CI/CD lifecycle, you must also build a release process that deploys a Fabric solution to workspaces in environments for testing and production.
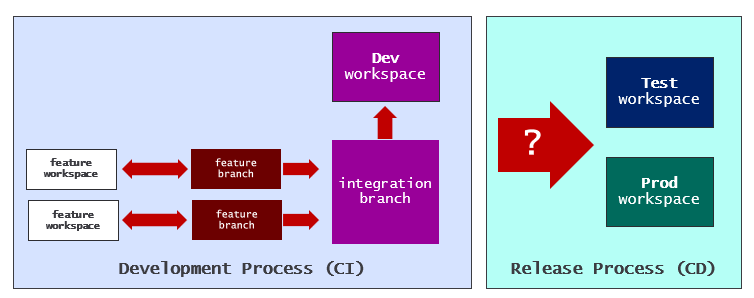
This article examines three options for building a release process:
| Release process option | Best fit | Main tradeoff |
|---|---|---|
| Deployment pipeline | Low-code promotion across staged workspaces. | Lower setup effort, but less automation flexibility and more limitations for large or cross-tenant projects. |
| Git synchronization | Branch-based releases where target workspaces can stay connected to Git. | Uses familiar Git flows, but requires post-sync jobs for environment-specific settings. |
| API-driven approach | Scalable releases that need custom branching, parameterization, or many target workspaces. | Most flexible, but requires tooling, such as fabric-cicd or custom API code. |
The first and lowest-effort option for building a release process is using a deployment pipeline. Deployment pipelines offer a low-code approach that can fit small-to-medium-sized projects, especially those exclusively focused on semantic models and Power BI reports.
As mentioned earlier, deployment pipelines assist with building a release process and not a development process. When you choose to use a deployment pipeline in a Fabric CI/CD project, you still need to plan how to build a development process. At a minimum, connect the first workspace in a deployment pipeline to a Git branch to gain basic CI/CD capabilities, such as versioning items and reverting to an earlier version of an item if something goes wrong with an update.
The following diagram shows a deployment pipeline with the first workspace connected to the main branch in a Git repository. In the simplest development scenario, you can make direct updates to items in the dev workspace and then use Commit to Git operations to commit changes to Git where you can use them to revert to earlier item versions when necessary.
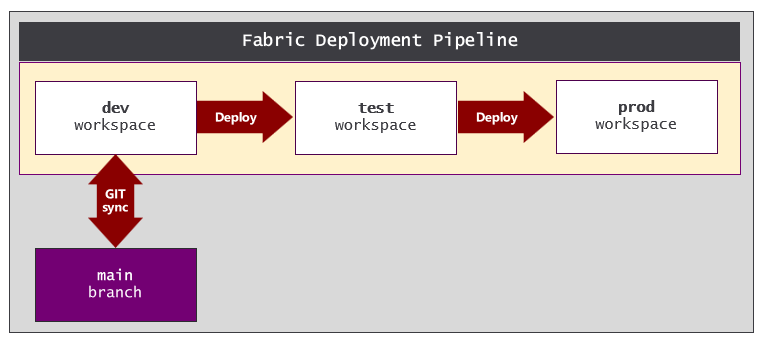
If you decide to build the release process by using a deployment pipeline, you still have the ability to design a scalable development process by using feature branches and feature workspaces. As an example, you can use the main branch as the integration branch for your development process. This makes it possible to create new feature workspaces by using the Branch out to workspace command to branch out from the dev workspace. After you commit changes and a pull request merges them into the main branch, use an Update from Git operation to synchronize the changes to items in the dev workspace. Once item-level changes propagate to the dev workspace, use the Deploy command to deploy them across the other workspaces in the deployment pipeline.
While deployment pipelines provide the lowest-effort path to build a release process, they also have noteworthy limitations. For example, a deployment pipeline and all of its associated workspaces must exist inside the same Microsoft Entra ID tenant. If you have a requirement to create the dev workspace in one Microsoft Entra ID tenant and the prod workspace in another, you can't use deployment pipelines to build your release process.
There are some other factors to consider as well when deciding whether to use deployment pipelines. Setting up a deployment pipeline always requires some degree of manual configuration because public APIs don't support certain setup tasks. Deployment pipelines are also limited when it comes to setting up manual-approval processes. This is especially true when compared to what's possible with pull requests and approval gates in a Git repository. Moreover, deployment pipelines aren't well suited to handle larger projects where there are workspaces containing hundreds of items.
A second option is to build a release process by using Git synchronization. For example, you can use a GitFlow branching strategy in which you configure a Git repository with three long-lived branches named dev, test, and main. The dev branch serves as the integration branch with code ready for deployment. Pull requests push changes to the test branch and to the main branch, which act as dedicated release branches. You can then use an Update from Git operation to deploy changes from a release branch to its target workspace.
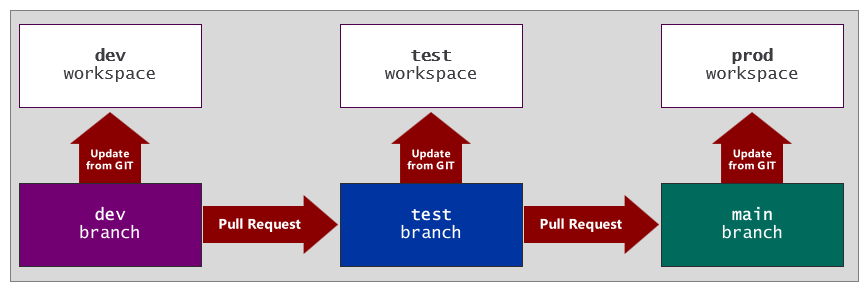
There are two important issues to consider when deciding whether to build a release process by using Git synchronization. Environment-specific settings that you commit to Git cause one issue. For example, Git synchronization commits the data-source location for semantic models in the dev workspace to Git and then propagates it to semantic models in the test workspace and the prod workspace. That means you need to run a post-sync job after an Update from Git operation completes to update each semantic model with the data-source path that is appropriate for its target environment.
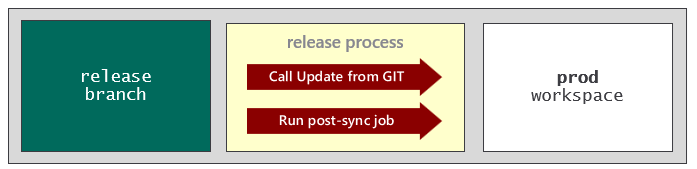
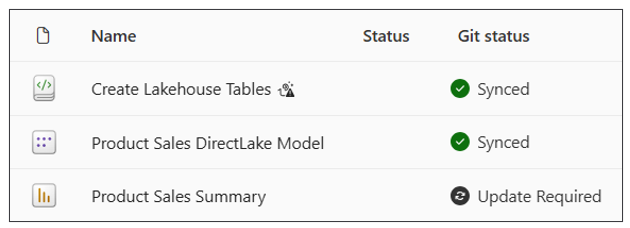
A second issue with Git synchronization is that it requires a connection between the target workspace and a Git branch. When you connect a workspace to a Git branch, the Fabric user interface displays indicators and messages to control and monitor Git synchronization. For example, the workspace summary page displays the Status column with values, such as Synced or Update required, which you might prefer to hide from users in a production workspace.
The third option for building a release process is using an API-driven approach. An API-driven approach can scale better than the other two choices for larger projects in which workspaces contain hundreds of items.
Using an API-driven release process also provides the flexibility to use whatever Git branching strategy your organization prefers. For example, you might prefer a GitFlow branching strategy or standardize on trunk-based development. Once you've chosen a branching strategy, you can then adapt an API-driven release process to accommodate it.
You could implement a release process by using the Fabric REST APIs, but that approach requires non-trivial coding effort. The fabric-cicd library reduces that effort by providing an API-driven release process that can adapt to common branching strategies.
Consider the release process in the following screenshot, which uses a GitFlow branching strategy. The dev branch serves as the integration branch. This release process uses pull requests to push changes to test and main, which serve as release branches. The use of pull requests makes it possible to configure manual-approval processes and to trigger workflows that run when a pull request completes. When a pull request completes and merges its changes into one of the release branches, a workflow runs automatically and uses fabric-cicd to deploy changes to the target workspace.
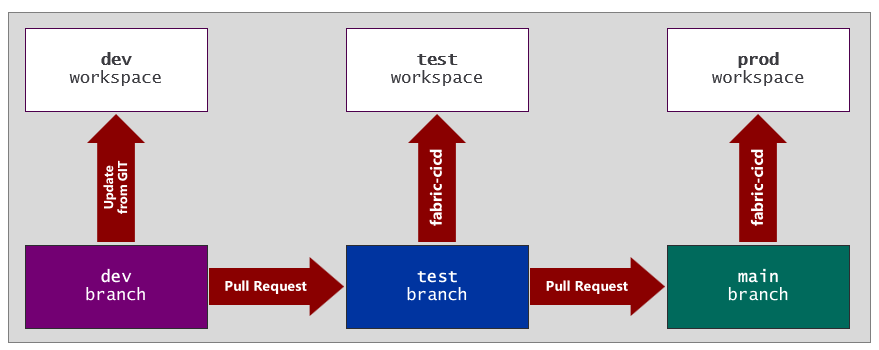
This example is similar to the Git synchronization example shown earlier because both use the GitFlow branching strategy. However, fabric-cicd supports parameterization, which makes it possible to dynamically update environment-specific settings as part of the deployment process. Compare this to Git synchronization, which pushes environment-specific settings to items in the target workspace and then requires additional automation after an Update from Git operation to apply a fix.
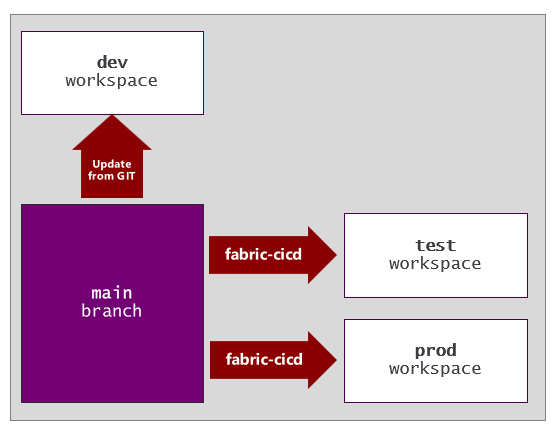
Another release process can use a different branching strategy. Consider a scenario in which your organization has standardized on trunk-based development by using a branching strategy based on a single long-lived branch. The following diagram shows a release process in which the main branch acts as both the integration branch and the release branch. The fabric-cicd library provides the flexibility of building a release process with a one-to-many mapping between a release branch and multiple target workspaces.
The ability to configure a one-to-many mapping between a release branch and target workspaces is suitable for independent software vendors (ISVs) that build multi-tenant solutions. The following diagram shows a release process that uses fabric-cicd to deploy a Fabric solution to multiple customer-specific workspaces, also called tenant workspaces. As pull requests merge new changes into main, workflows can deploy those changes to the test workspace for validation before deploying them to tenant workspaces.
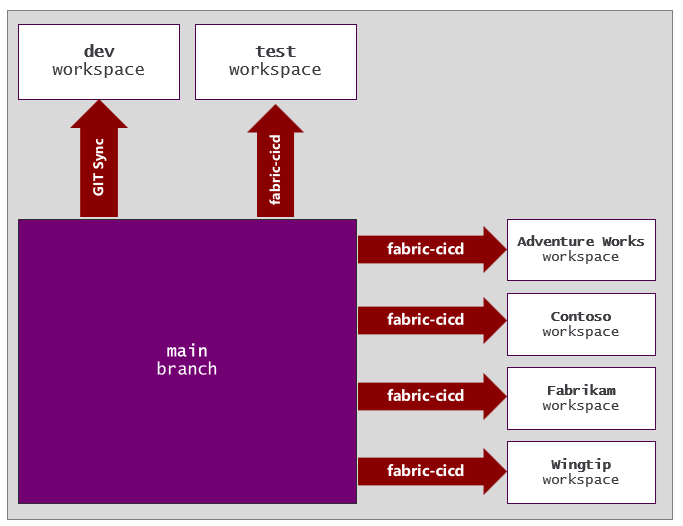
In the previous diagram, Git synchronization pushes main branch changes to the dev workspace instead of fabric-cicd. You need Git synchronization to build a development process by using branched workspaces. By connecting the dev workspace to main, you make it possible to run the Branch out to workspace command to create and manage feature branches and feature workspaces.
When building a release process, you often need to configure a manual-approval process in which one or more approvers approve a release before the workflow deploys it to a target workspace. When using a GitFlow branching strategy, you can configure pull requests with the required manual-approval process. When using trunk-based development, the release process doesn't involve pull requests.
Azure DevOps and GitHub provide another way to configure a manual-approval process without using pull requests. You can extend a Git repository by creating environments. An environment in a Git repository acts as a deployment target that you can configure with a manual-approval process. When you run a workflow that targets an environment that has a manual-approval process, the workflow pauses until the approval process completes. Once the approval is complete, the workflow resumes and can use the fabric-cicd library to deploy the new release to the target workspace.
The fabric-cicd library
fabric-cicd is an open-source Python library that Microsoft designed to enable code-first deployment. Code-first deployment uses the idea that you can create the single source of truth for a Fabric solution by assembling a set of item definitions. Once you've assembled the item definitions for a Fabric solution, you can then use these item definitions as templates to deploy a matching set of items to a target workspace.
While fabric-cicd is an open-source project, the Fabric product team officially supports and recommends it as a best practice.
A stated goal of the fabric-cicd project is to assist you if you prefer not to interact directly with the Fabric REST APIs. Running a deployment job with fabric-cicd only requires a small number of lines of code, while the library handles discovery, create-or-update checks, dependency sequencing, and item relationship binding.
To run a deployment job by using fabric-cicd, you must supply two important inputs:
fabric-cicd deployment input |
Purpose |
|---|---|
| Root folder with item definitions | Identifies the source item definitions to deploy, including definitions in child folders. |
| Target environment | Identifies where fabric-cicd creates or updates matching workspace items. |
When you start a deployment job, fabric-cicd enumerates the root folder to discover every item definition. For each item definition that fabric-cicd discovers, it runs a check on the target workspace to determine whether a matching item already exists. fabric-cicd requires this check so it can decide whether to create a new item or update an existing item.
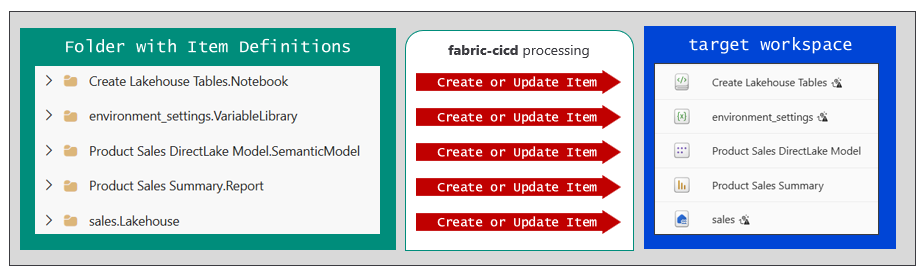
fabric-cicd is able to automatically reestablish relationships for items that support auto-binding. The fabric-cicd library implements auto-binding behavior in a manner similar to Git synchronization by using the logicalId found in the platform file of an item definition. When a fabric-cicd deployment job runs, it uses the logicalId to map out and rebind item dependencies between items in the target workspace.
When fabric-cicd runs a deployment job, it processes items in a specific sequence to handle item dependencies. fabric-cicd can't create an item with a dependency until after it has created the items on which it depends. As an example, notebooks can have dependencies on lakehouses. Pipelines can have dependencies on lakehouses and on notebooks. fabric-cicd handles this dependency tree by deploying lakehouses first, then notebooks, and then pipelines. The library also includes logic to detect whether any pipelines have dependencies on other pipelines. The sequencing ensures that pipelines with dependencies are always deployed after other pipelines on which they depend.
The following example shows how to run a deployment job. You can start by adding a pair of YAML files to the same root folder that holds the item definitions for a Fabric solution. Use the first file, named deploy.yml, to configure settings for fabric-cicd deployment jobs. Use the second file, named parameter.yml, to configure parameterization to manage environment-specific settings committed to Git.
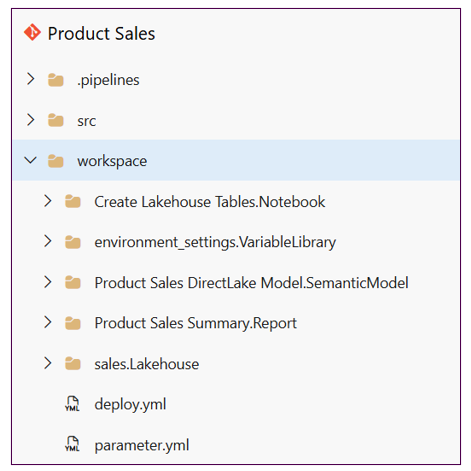
The following example shows configuration-based deployment by using fabric-cicd. The YAML content in deploy.yml contains a top-level key named core with the following child keys:
deploy.yml key |
What it configures |
|---|---|
workspace_id |
Maps environment names, such as test and prod, to target workspace IDs. |
repository_directory |
Points to the root folder that contains Fabric item definitions. |
item_types_in_scope |
Limits deployment to the listed Fabric workspace item types. |
parameter |
Points to the parameterization file used for environment-specific replacements. |
core:
  workspace_id:
    test: "a0a0a0a0-bbbb-cccc-dddd-e1e1e1e1e1e1"
    prod: "b1b1b1b1-cccc-dddd-eeee-f2f2f2f2f2f2"

  repository_directory: "/workspace"

  item_types_in_scope:
    - VariableLibrary
    - Lakehouse
    - Notebook
    - DataPipeline
    - SemanticModel
    - Report

  parameter: "parameter.yml"
Target environments are an important concept when using fabric-cicd. The configuration in this example defines two target environments named test and prod. The configuration maps each environment to a target workspace by using a unique workspace_id value. Whenever you start a deployment job, you must pass a parameter indicating which environment you want to target. You'll experience an error if you try to start a deployment job by using an environment name that deploy.yml doesn't define.
You can replace workspace_id with workspace to configure target workspaces by using their display name instead of their ID.
fabric-cicd handles variable libraries specially. If your solution contains a variable library, fabric-cicd always deploys it first before any other items that depend on it. After creating a variable library, fabric-cicd can also activate a specific value set. Value set activation requires matching names between the environment passed to fabric-cicd and the value set to activate. If you run a fabric-cicd deployment job with a target environment name, such as test or prod, ensure the variable library also contains value sets named test or prod.
The following Python code starts a fabric-cicd deployment job. You can install the fabric-cicd library from the Python Package Index (PyPI) with the pip install command.
pip install fabric-cicd
You can use the fabric-cicd library to build release processes in workflows that run in Azure DevOps or GitHub. The ability to install on demand by using pip install helps integrate fabric-cicd with Azure Pipelines or GitHub Actions.
The following Python code demonstrates a minimal deployment job with fabric-cicd. The example creates a credential to authenticate with Microsoft Entra ID as a service principal by using credentials stored in environment variables. You start a deployment job by calling the deploy_with_config function and passing parameter values for token_credential, config_file_path, and environment.
import os
from azure.identity import ClientSecretCredential
from fabric_cicd import deploy_with_config

# Create a credential to authenticate as a service principal.
credential = ClientSecretCredential(
    tenant_id=os.environ["AZURE_TENANT_ID"],
    client_id=os.environ["AZURE_CLIENT_ID"],
    client_secret=os.environ["AZURE_CLIENT_SECRET"],
)

# Deploy to the test workspace.
deploy_with_config(
    token_credential=credential,
    config_file_path="../cicd/workspace/deploy.yml",
    environment="test",
)

# Deploy to the prod workspace.
deploy_with_config(
    token_credential=credential,
    config_file_path="../cicd/workspace/deploy.yml",
    environment="prod",
)
When calling deploy_with_config, you must pass an environment value that maps to a target environment defined in deploy.yml. With multiple deployment targets in configuration, you can build a release process with a one-to-many mapping between a single release branch and multiple target workspaces. The previous code listing switches between deploying to the test workspace and the prod workspace by passing a different environment name when calling deploy_with_config.
Next, examine the fabric-cicd support for parameterization, which makes it possible to dynamically update settings in item definition files during a deployment job. This parameterization support provides a reliable way to manage environment-specific settings that you committed to Git.
Consider an example of a semantic model that connects to an Azure Storage account but requires different data-source paths for the three environments dev, test, and prod. The problem is that Git commits the data-source path for the semantic model in the dev workspace to the integration branch. You need parameterization to update the semantic models in the test workspace and the prod workspace with their environment-specific data-source paths.
The following YAML listing demonstrates configuring parameter.yml with a find-and-replace operation. There's a top-level key named find_replace with nested keys named find_value and replace_value. You assign the find_value key a string value from the dev workspace that you want to replace. The replace_value key contains a nested key-value pair for each target environment. In this example, the configuration defines two target environments named test and prod.
find_replace:
  - find_value: "https://<dev-storage-account>.dfs.core.windows.net/productsales/"
    replace_value:
      test: "https://<test-storage-account>.dfs.core.windows.net/productsales/"
      prod: "https://<prod-storage-account>.dfs.core.windows.net/productsales/"
By default, fabric-cicd processes a find_replace operation by inspecting every file in every item definition whose type the item_type_in_scope property setting includes. This can lead to longer processing times in scenarios in which you have many items or item definitions, such as a semantic model with many files.
To optimize performance, use fabric-cicd parameterization filters to control which items and files fabric-cicd examines during a replacement operation. For example, you can extend the find_value key by adding filtering keys, such as item_type, item_name, and file_path. The following configuration demonstrates how to filter a find_replace operation to restrict processing to a single file named expressions.tmdl in the item definition for a single semantic model by using its display name.
find_replace:
  - find_value: "https://<dev-storage-account>.dfs.core.windows.net/productsales/"
    replace_value:
      test: "https://<test-storage-account>.dfs.core.windows.net/productsales/"
      prod: "https://<prod-storage-account>.dfs.core.windows.net/productsales/"
    item_type: "SemanticModel"
    item_name: "Product Sales Imported Model"
    file_path: "/definition/expressions.tmdl"
The parameterization support in fabric-cicd supports more than simple find-and-replace operations. fabric-cicd also supports parameterization by using regular expressions and dynamic variables. To demonstrate these advanced parameterization capabilities, examine a common scenario in which a semantic model connects to the SQL endpoint of a lakehouse in the same workspace. This scenario requires parameterization because each semantic model requires a unique data-source path to reference the SQL endpoint for the lakehouse in the same workspace.
The item definition for a semantic model includes an expressions.tmdl file that typically contains data-source paths and Power Query code that connects to its data source. The expressions.tmdl file for a semantic model that uses the DirectLake on SQL model includes a call to the SQL.Database function that accepts two parameters. The first parameter is for the SQL endpoint server path, and the second parameter references the target lakehouse.
Sql.Database(<SQL Endpoint Connect String>, "c2c2c2c2-dddd-eeee-ffff-a3a3a3a3a3a3")
The second parameter passed to SQL.Database identifies the target lakehouse. For this lakehouse parameter, you can pass either the lakehouse ID or the lakehouse display name. Using the lakehouse ID is problematic because it's always different across workspaces, requiring additional parameterization. Instead, pass the lakehouse name. The lakehouse name stays the same across all environments, eliminating the need for parameterization.
Sql.Database(<SQL Endpoint Connect String>, "sales")
The first parameter passed to Sql.Database is the SQL endpoint connection string, which ends with .datawarehouse.fabric.microsoft.com. The first part of the SQL endpoint connection string is always unique to a specific workspace. This means the SQL endpoint connection string requires parameterization.
Sql.Database("<workspace-unique-path>.datawarehouse.fabric.microsoft.com",
fabric-cicd supports parameterization by using regular expressions to identify capture zones used in find and replace operations. The following regular expression demonstrates defining a capture zone for the SQL endpoint connection string.
Sql\.Database\(\s*"([^"]*datawarehouse\.fabric\.microsoft\.com[^"]*)"\s*,
Once you have created the regular expression with a capture zone to replace the SQL endpoint connection string, you can use it in a find_replace operation as long as you add an is_regex key with a value set to true.
find_replace:
  - find_value: 'Sql\.Database\(\s*"([^"]*datawarehouse\.fabric\.microsoft\.com[^"]*)"\s*,'
    replace_value:
      test: $items.Lakehouse.sales.$sqlendpoint
      prod: $items.Lakehouse.sales.$sqlendpoint
    is_regex: "true"
    item_type: ["SemanticModel"]
    file_path: "**/expressions.tmdl"
In addition to using a regular expression with a capture zone, the previous example demonstrates how fabric-cicd supports dynamic variables. You can create a dynamic variable to reference a lakehouse named sales by using the syntax $items.Lakehouse.sales. In this example, the $sqlendpoint property of the dynamic lakehouse variable provides the replacement value in the replace_value key.
You can simplify the example. In the previous listing, both environments use the same dynamic variable expression in the replace_value key. In a parameterization scenario where all environments can use the same expressions, use the _ALL_ key to eliminate redundant environment keys.
find_replace:
  - find_value: 'Sql\.Database\(\s*"([^"]*datawarehouse\.fabric\.microsoft\.com[^"]*)"\s*,'
    replace_value:
      _ALL_: $items.Lakehouse.sales.$sqlendpoint
    is_regex: "true"
    item_type: ["SemanticModel"]
    file_path: "**/expressions.tmdl"
This example demonstrates parameterization by using regular expressions, capture zones, and dynamic variables. You can use dynamic variables to obtain the $id property for any type of workspace item. You can also use a dynamic $workspace variable to obtain the $id property and the $name property when you need the ID or display name of the current workspace.
To learn more about fabric-cicd, see the fabric-cicd documentation home page, fabric-cicd code samples, fabric-cicd code reference, and fabric-cicd parameterization guidance.
Data orchestration
Fabric provides several workspace item types for building data-centric solutions. This support builds on one set of workspace item types that act as data containers and a complementary set of workspace item types that focus on running ETL processes and data integration. When designing a Fabric solution with a data container item, such as a lakehouse, you must plan how to build and run ETL logic to populate the lakehouse. You can choose between several types of ETL-focused item types, such as notebooks, pipelines, copy jobs, user-defined functions, dataflows, and Spark job definitions.
Author and maintain the ETL logic for a Fabric solution by using workspace items that are part of the same solution. When you build ETL logic by using workspace items, such as notebooks or pipelines, Git can track and version the ETL logic over time along with all other items in the Fabric solution. Avoid designing Fabric solutions that depend on external ETL processes or scripts that aren't part of the current solution.
You have several options for deploying a Fabric solution with a lakehouse to a target workspace.
| Lakehouse deployment option | What happens after deployment |
|---|---|
| Deployment pipeline | The lakehouse item is promoted to the target workspace as an empty data container. |
| Git synchronization | Update from Git creates or updates the lakehouse item from its item definition. |
fabric-cicd |
The deployment job creates or updates the lakehouse item from the source item definition. |
Whichever of these three deployment options you choose, the deployment result is the same. Each option creates the lakehouse as an empty data container that requires additional work. More specifically, you need to design a Fabric solution with a data orchestration strategy that addresses requirements for data ingestion, data transformation, and data storage.
The following diagram shows an example of data orchestration in a Fabric solution. This solution uses a medallion architecture in which data flows across three lakehouses that serve as storage for the bronze, silver, and gold layers. The bronze lakehouse uses an Azure Data Lake Storage Gen2 (ADLS Gen2) shortcut to enable access to data files in an Azure Storage account container. One notebook builds the silver layer by loading the data files from the bronze lakehouse and persisting them as Delta tables in the silver lakehouse. A second notebook builds the gold layer by loading tables from the silver lakehouse and transforming them into a star schema before saving them as Delta tables in the gold lakehouse.
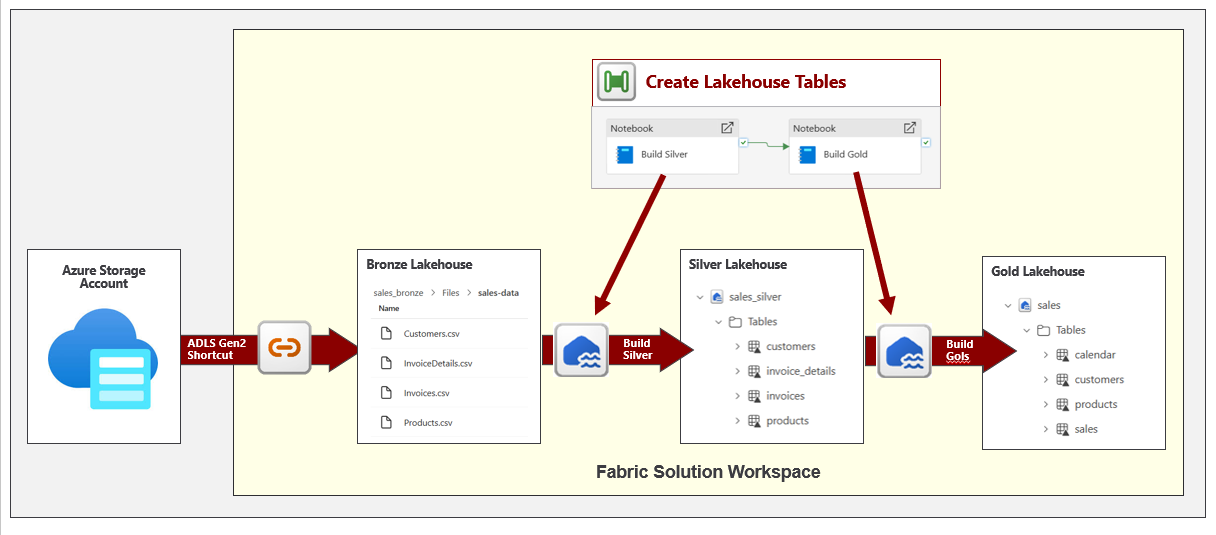
An important aspect of this data orchestration strategy is that it exposes a top-level pipeline named Create Lakehouse Tables. When you run this pipeline, it runs the two notebooks in sequence to execute all the necessary ETL logic to populate all lakehouses with data. After you deploy this Fabric solution, which creates lakehouses in an empty state, you can then automate running this pipeline to execute the data orchestration that moves the workspace into a state where it's ready for use.
A Fabric solution should expose a single item with top-level ETL logic that you can run to populate data container items with data. Whether you implement a data orchestration strategy by using notebooks, pipelines, or another item type, the important point is that when you first deploy a Fabric solution, you can follow up deployment by running a single job with the data orchestration that prepares the workspace for users.
When designing a data orchestration strategy, you must also consider data refresh requirements. Consider what happens after the initial deployment populates data container items with data for the first time. How do you plan to keep the data in a lakehouse up to date? Automate the processes for refreshing data by using scheduled jobs.
For example, you could schedule a pipeline that processes a full data refresh to run once a day while designing another pipeline with incremental refresh logic to run as a scheduled job every 15 minutes. The key point is that adding scheduled jobs should be part of the data orchestration strategy because it enables a Fabric solution to self-manage all its data refresh requirements.
Fabric makes it possible to extend the item definition of notebooks and pipelines by using a .schedules file. The .schedules file contains JSON content with a schedules element containing a list of one or more scheduled jobs. By extending the item definitions for ETL items in a Fabric solution with .schedules files, you can automate a data refresh strategy.
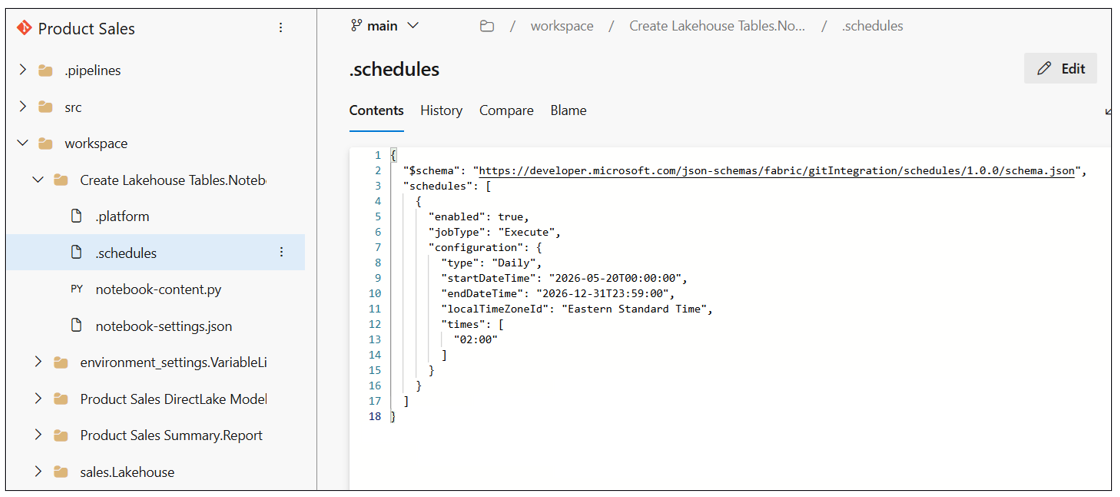
One final issue to consider with data orchestration is how to address changes to schemas over time. Consider a scenario where you need to update the table schema for a lakehouse that deployment already created and populated with data. Deploying table schema changes to a lakehouse is challenging because Fabric doesn't track any metadata for the table schema in the underlying item definition for a lakehouse. The most common way to update the table schema for a lakehouse is to run a notebook with procedural programming logic to add and remove tables and table columns.
In a feature workspace, you might write and test code in a notebook to update the lakehouse table schema. After testing the code against a lakehouse in the feature workspace, you commit your changes to Git and use a pull request to push the notebook with the schema update logic to the integration branch.
At this point, you can use an Update from Git operation to deploy the notebook to the dev workspace. Likewise, you can use fabric-cicd to deploy the notebook to the test workspace or the prod workspace. However, deploying the notebook to the workspace with the lakehouse isn't enough. You still need to run the notebook in the target workspace to update the lakehouse schema.
Managing schema and pushing schema changes with a Fabric warehouse differs significantly from doing so with a lakehouse. The best practice for implementing CI/CD processes with a warehouse schema involves using the SqlPackage and Data-tier Application Framework tooling Microsoft provides. For more information, see the SqlPackage documentation.
Fabric REST API programming
Fabric offers several developer tools and libraries that reduce implementation effort. You have seen examples of Terraform, Fabric CLI, Semantic Link Labs, and fabric-cicd, which hide low-level details associated with authentication, acquiring access tokens, and executing HTTP requests. However, you might encounter scenarios in which you need a greater degree of control. You can use Fabric REST API programming to execute API calls by using a familiar programming language, such as C# or Python.
This guidance article recommends using Terraform as your first choice to provision the infrastructure for Fabric CI/CD projects. But there could be factors that make you decide against using Terraform in a particular Fabric CI/CD project. As an alternative, you can write automation scripts that call the Fabric REST APIs to create tenant-level Fabric items, such as workspaces, connections, gateways, and deployment pipelines. Using Fabric REST APIs also makes it possible to fully automate the process of setting up Git integration for a Fabric CI/CD project. You create a Git source control connection and then use that connection to bind workspaces to Git branches.
Fabric REST API programming provides the most control for managing the lifecycle of workspace items. This is due to the ability to work directly with item definitions when calling CRUD APIs to create and update workspace items. This makes it possible to deploy a Fabric solution to a target workspace by using a repeatable process that creates workspace items with the correct relationships to other items in the same workspace. For example, you can create a lakehouse and a notebook in such a way that you configure the notebook to use the new lakehouse as its default lakehouse.
You can use the Fabric REST APIs to control Git synchronization. The Update from Git API can initialize or update a feature workspace from an underlying Git branch. It's also common to call Update from Git on the dev workspace after pull requests merge feature branch changes into the integration branch. The complementary Commit to Git API supports scenarios in which you need to automate the commit operation to push workspace item changes to its underlying Git branch.
For API fundamentals, see Fabric REST APIs.
If you program directly against the Fabric REST APIs, you need to understand three essential concepts: paginated results, long-running operations (LROs), and throttling. These concepts help you write correct and reliable code:
| Fabric REST API concept | Why automation code must handle it | Reference |
|---|---|---|
| Paginated results | List operations can return partial result sets that require continuation requests. | Fabric REST API pagination |
| Long-running operations (LROs) | Create, update, and deployment calls can return an operation to poll before results are available. | Fabric REST API long-running operations |
| Throttling | High-volume automation can receive throttling responses and must retry according to service guidance. | Fabric REST API throttling |
Developer tools, such as Terraform and Fabric CLI, automatically handle paginated results, long-running operations, and throttling.
Microsoft offers two Software Development Kits (SDKs) for the Fabric REST APIs. Microsoft provides a Fabric .NET SDK for C# developers and a Fabric Python SDK for Python developers. These SDKs reduce repetitive code by abstracting low-level details for executing HTTP requests, transmitting access tokens, and converting between JSON and strongly typed objects. The two SDKs also automatically handle paginated results, long-running operations, and throttling errors.
The following listing shows basic example code for using the Fabric Python SDK to create a new workspace. This code begins by creating a ClientSecretCredential object that authenticates as a service principal. Then the code creates a FabricClient object named fabric_client, which exposes methods to execute calls to Fabric REST API endpoints. The code in the listing creates a workspace by calling create_workspace. It then calls list_workspaces and uses the result to enumerate the existing set of workspaces.
"""Basic example for Fabric REST API Python SDK"""

import os
from azure.identity import ClientSecretCredential
from microsoft_fabric_api import FabricClient

credential = ClientSecretCredential(
    tenant_id=os.getenv("AZURE_TENANT_ID"),
    client_id=os.getenv("AZURE_CLIENT_ID"),
    client_secret=os.getenv("AZURE_CLIENT_SECRET")
)

fabric_client = FabricClient(credential)

# Create a request body for creating a new workspace.
create_workspace_request = {
    "displayName": "Hello Python SDK",
    "description": "Sample workspace",
    "capacityId": os.getenv("FABRIC_CAPACITY_ID")
}

# Call the Create Workspace API.
workspace = fabric_client.core.workspaces.create_workspace(create_workspace_request)

# Enumerate workspaces by calling the List Workspaces API.
workspaces = fabric_client.core.workspaces.list_workspaces()
for workspace in workspaces:
    print(f'{workspace.display_name} - [{workspace.id}]')
For more SDK details, see the Microsoft Fabric Python SDK on PyPI and the Microsoft Fabric .NET SDK on NuGet.
The Fabric REST APIs offer three primary CRUD APIs that involve programming with item definitions. The Create Item API accepts an item definition when creating a new item. The Update Item Definition API accepts an item definition when updating an existing item. The Get Item Definition API retrieves the item definition for an existing item.
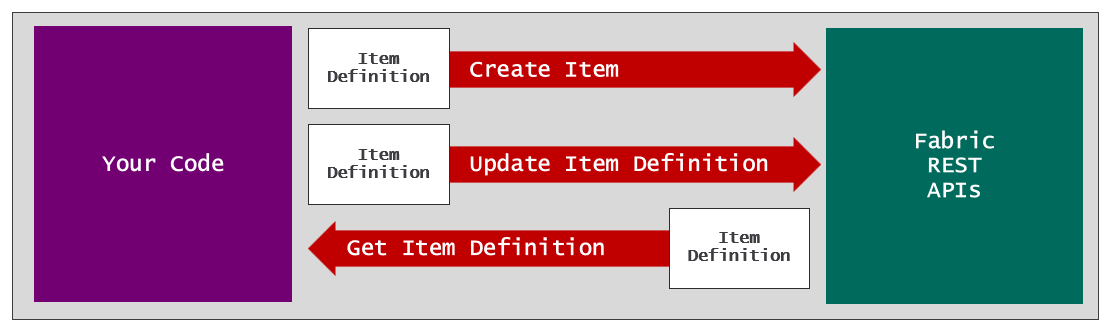
For more details, see Create Item API, Update Item Definition API, and Get Item Definition API.
Programming with item definitions and passing them to Fabric REST API endpoints requires a more complicated, low-level style of programming. The following example shows what's involved. Imagine that you need to program the Fabric REST APIs to deploy a Fabric solution by using the following sequence of API calls.
- Call the Create Workspace API to create a workspace.
- Call the Create Item API to create a lakehouse inside the workspace.
- Call the Create Item API to create a notebook that uses the lakehouse as its default.
The call to Create Workspace creates a workspace and returns the workspace ID. The first call to Create Item creates a lakehouse and returns the lakehouse ID. The second call to Create Item must create a notebook that uses the lakehouse as its default.
Suppose you want to create the notebook by using an item definition that includes a file named notebook-content.py with Python code. As this article discussed earlier, notebook-content.py contains metadata at the top that tracks the configuration of its default lakehouse. The Fabric service hides the metadata from users when they open the notebook in the web-based notebook editor that the Fabric service provides. However, you can view this metadata by examining the raw file contents of notebook-content.py, as the following listing shows.
# Fabric notebook source

# METADATA ********************

# META {
# META   "dependencies": {
# META     "lakehouse": {
# META       "default_lakehouse": "{LAKEHOUSE_ID}",
# META       "default_lakehouse_name": "sales",
# META       "default_lakehouse_workspace_id": "{WORKSPACE_ID}",
# META       "known_lakehouses": []
# META     }
# META   }
# META }
Before calling Create Item, you need to update the contents of notebook-content.py with the correct workspace ID and lakehouse ID. This means your code must track the workspace ID and lakehouse ID to perform a find-and-replace operation on the contents of notebook-content.py.
Caution
Directly manipulating item definition files assumes you know the item definition schema. If you update an item definition file with invalid syntax, you will experience errors when calling Create Item and Update Item Definition.
When programming with an item definition, you need to enumerate each of its files to load its contents and relative file paths into memory. Once your code loads the contents of notebook-content.py into memory, you can perform the search-and-replace operation to update it with the correct metadata for its default lakehouse.
The next step is to prepare the item definition so you can pass it across the network. This involves assembling a JSON payload for the body of an HTTP request. You need to pass the contents of multiple files across the network in a single HTTP request. To accomplish this, convert the contents of each file into a base64-encoded format. By formatting file contents by using base64 encoding, you can add the content of any file to a JSON element as a standard string value. This makes it possible to transmit all the files an item definition requires across the network in a single call to the Create Item API.
The following listing shows an example of JSON in the request body in a call to Create Item. The definition element contains a parts collection that contains a part element for each file in the item definition. Each part element includes a relative path value and a payload value for the file contents in a base64-encoded format.
{
  "displayName": "Create Lakehouse Tables",
  "type": "Notebook",
  "definition": {
    "parts": [
      {
        "path": ".platform",
        "payload": "<base64-encoded-file-content>",
        "payloadType": "InlineBase64"
      },
      {
        "path": "notebook-content.py",
        "payload": "<base64-encoded-file-content>",
        "payloadType": "InlineBase64"
      },
      {
        "path": "notebook-settings.json",
        "payload": "<base64-encoded-file-content>",
        "payloadType": "InlineBase64"
      }
    ]
  }
}
Another common scenario is programming the Fabric REST APIs to update an existing workspace item. For example, you might need to update the metadata for an existing notebook to switch its default lakehouse from one lakehouse to another. You can accomplish this by using the following sequence.
- Call Get Item Definition to retrieve a JSON response with the current item definition.
- Extract the
notebook-content.pyfile content and convert it from base64 to plain text. - Perform a find-and-replace operation on
notebook-content.pyto update the workspace ID and lakehouse ID. - Convert the updated contents of
notebook-content.pyback to the base64-encoded format. - Update the JSON element for the item definition with the base64-encoded content for
notebook-content.py. - Call Update Item Definition, passing the JSON with the updated item definition.
Fabric REST API programming provides more control than the Fabric developer tools and libraries this article discussed earlier, but it also adds complexity. When you use Terraform, Fabric CLI, Semantic Link Labs, or fabric-cicd, these tools and libraries handle the work of converting file contents between base64 encoding and clear text automatically. These tools and libraries provide less direct control, but they make implementation easier.
Terraform and fabric-cicd also check whether target items already exist. They use these checks to determine whether to create a new item or update an existing item. To implement the same logic with the Fabric REST APIs, the implementation first calls the Get Items API to determine whether a target item exists. It must follow that with conditional logic that determines whether to call Create Item or Update Item Definition.
The Fabric REST APIs offer both item-generic API endpoints and item-specific API endpoints. You've already seen examples of using item-generic APIs, such as Create Item and Update Item Definition. However, the Fabric REST APIs also offer item-specific APIs, such as Create Lakehouse and Create Notebook. This raises the question of whether you should use item-generic APIs or item-specific APIs.
For creating, updating, and deleting workspace items, it doesn't matter whether you use the item-generic APIs or item-specific APIs because the result is the same. For this reason, you might prefer using item-generic APIs to create and update workspace items because they allow you to write generic code that you can reuse with any type of workspace item.
The only time where it's essential to use item-specific APIs is when you need to query a workspace item to retrieve its properties. As an example, compare the results of calling Get Item versus Get Lakehouse. You call Get Item by executing an HTTP GET request to a URL that targets the items endpoint for a specific workspace.
https://api.fabric.microsoft.com/v1/workspaces/{workspaceId}/items/{itemId}
The HTTP response from Get Item returns a JSON element that contains properties common to all types of workspace items.
{
  "displayName": "sales",
  "description": "Container for sales data",
  "type": "Lakehouse",
  "workspaceId": "{WORKSPACE_ID}",
  "id": "{LAKEHOUSE_ID}"
}
Now compare this to a call to Get Lakehouse, which uses a URL targeting the lakehouses endpoint for a workspace.
https://api.fabric.microsoft.com/v1/workspaces/{workspaceId}/lakehouses/{lakehouseId}
A call to Get Lakehouse returns a JSON response with a properties element containing additional properties that are specific to lakehouses. The following JSON listing shows the custom lakehouse properties that include data-source paths used to access lakehouse data through OneLake or its SQL endpoint.
{
  "displayName": "sales",
  "description": "Container for sales data",
  "type": "Lakehouse",
  "workspaceId": "{WORKSPACE_ID}",
  "id": "{LAKEHOUSE_ID}",
  "properties": {
    "oneLakeTablesPath": "https://onelake.dfs.fabric.microsoft.com/{workspaceId}-{ItemId}/Tables",
    "oneLakeFilesPath": "https://onelake.dfs.fabric.microsoft.com/{workspaceId}-{ItemId}/Files",
    "sqlEndpointProperties": {
      "connectionString": "{WORKSPACE_UNIQUE_PATH}.datawarehouse.fabric.microsoft.com",
      "id": "{LAKEHOUSE_ID}",
      "provisioningStatus": "Success"
    }
  }
}
Fabric bulk import and export APIs overview
The Microsoft Fabric Bulk Import Item Definitions API and Bulk Export Item Definitions API move multiple Fabric item definitions in one request. These Fabric APIs capture, copy, and restore Fabric workspace items as JSON-based item definitions instead of processing one item at a time.
Use Bulk Import Item Definitions and Bulk Export Item Definitions when you need to back up a Fabric workspace, clone items between workspaces, migrate items across tenants, or build custom lifecycle workflows for Git providers that Fabric doesn't support natively.
In this article, you learn when to use Fabric bulk import and export APIs, how their request and response payloads work, and when to prefer fabric-cicd for release automation.
How do Fabric bulk import and export APIs support backup, restore, clone, and migration?
Fabric REST APIs, such as Create Item API, Update Item Definition API, and Get Item Definition API, support CRUD operations that use item definitions. These single-item APIs process one item definition per call. The Bulk Import Item Definitions API and Bulk Export Item Definitions API, which entered public preview in March 2026, extend that model by sending multiple item definitions in a single API call for batch processing.
Use the following scenario map to choose the correct bulk import and export workflow:
| Scenario | Use Bulk Export Item Definitions to | Use Bulk Import Item Definitions to | Persist the JSON output? |
|---|---|---|---|
| Backup and restore | Export item definitions from a source Fabric workspace. | Restore those definitions into the same workspace or a replacement workspace. | Yes. Save the JSON in Git or cloud storage for disaster recovery. |
| Clone or refactor workspaces | Export selected item definitions from a source Fabric workspace. | Create matching items in one or more target workspaces. | Optional. Persist only if you need an audit trail or repeatable clone package. |
| Cross-tenant migration | Export item definitions from a workspace in the source Microsoft Entra ID tenant. | Import those definitions into a workspace in the target Microsoft Entra ID tenant. | Yes. Persist the JSON between tenant-specific authentication contexts. |
| Custom Git synchronization | Convert exported JSON item definitions into Git folder files. | Convert Git folder files back into JSON item definitions for import. | Yes. The Git branch becomes the persisted authoritative version. |
Back up and restore Fabric workspace items
Backup and restore support version control and disaster recovery. For backup and restore, Bulk Export Item Definitions generates JSON item definitions that you can persist to storage. Bulk Import Item Definitions can later use those definitions to create or update items in a target Fabric workspace.
In a simple backup-and-restore workflow for a single-workspace solution, Bulk Export Item Definitions returns a JSON result that contains an item definition for each item in the source workspace. You can save the result as a JSON file in a Git repository branch or in another type of cloud storage, such as an Azure Storage account container.
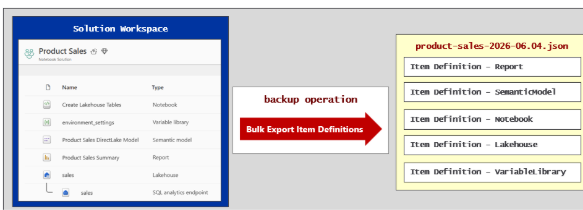
The solution workspace contains Product Sales items, including a notebook, variable library, semantic model, report, lakehouse, and SQL analytics endpoint. A backup operation arrow labeled Bulk Export Item Definitions points from the workspace to a JSON file named product-sales-2026-06-04.json. The JSON file contains item definitions for the report, semantic model, notebook, lakehouse, and variable library.
A restore operation uses Bulk Import Item Definitions with JSON that contains the list of item definitions. You can prefilter the item-definition list to limit the restore operation to a single item or to a subset of items.
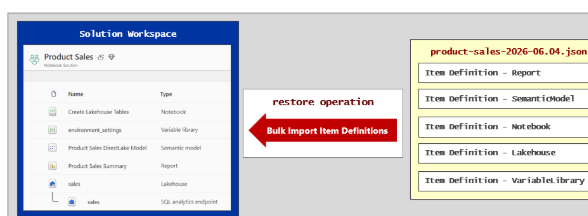
The product-sales-2026-06-04.json file contains item definitions for the report, semantic model, notebook, lakehouse, and variable library. A restore operation arrow labeled Bulk Import Item Definitions points from the JSON file to the solution workspace, where Bulk Import Item Definitions recreates the Product Sales items.
Clone and refactor Fabric workspace items
Cloning copies Fabric items from one workspace to another without deleting the original source items. Bulk Export Item Definitions retrieves item definitions for the items in a source Fabric workspace. Bulk Import Item Definitions then uses those definitions to clone the items in a target Fabric workspace. For clone-only workflows, you don't need to persist the JSON result that contains the item definitions as a file.
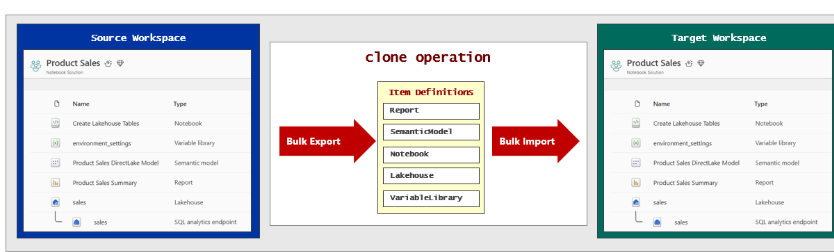
The source workspace contains Product Sales items. The clone operation exports item definitions for the report, semantic model, notebook, lakehouse, and variable library. A Bulk Import Item Definitions arrow then imports those item definitions into the target Fabric workspace to create matching items.
Selective cloning controls which items move from the source workspace to the target workspace. For example, you can refactor a Fabric solution from a single workspace to a multi-workspace layout for increased scalability or more granular access control. Alternatively, item cloning can reduce complexity by aggregating items from multiple workspaces into a single-workspace design.
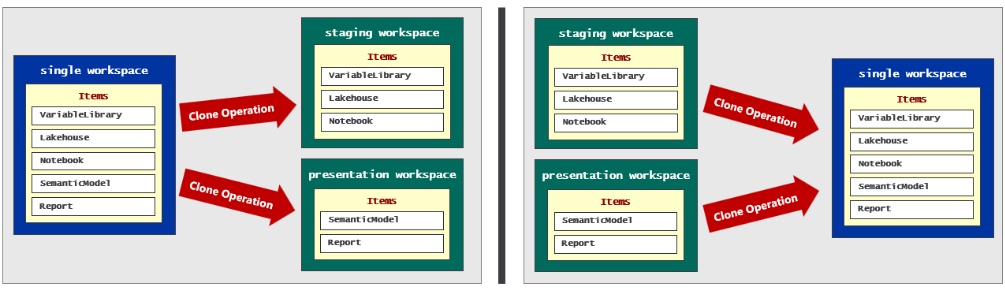
A clone operation is different from a move operation because it doesn't delete the original source item. To delete the source item after a clone operation, use the Delete Item API as a separate step.
Rebind dependencies and run post-deploy tasks
For item types that support auto-binding, the bulk import and export APIs reestablish dependencies automatically. The Bulk Export Item Definitions API facilitates auto-binding by returning item definitions that track dependencies by using logicalId values instead of source-workspace item IDs. Bulk Import Item Definitions discovers these logicalId values and uses them to rebind item dependencies in the target workspace.
The bulk import and export APIs don't eliminate the need for post-deploy jobs. A call to Bulk Import Item Definitions doesn't populate a lakehouse with data. After cloning a Fabric solution into a new workspace, post-deploy orchestration might still need to run a notebook or pipeline to populate data containers. Other post-deploy tasks can include activating a value set for a variable library or updating imported items that don't support variable libraries or auto-binding.
What don't bulk import and export APIs handle automatically?
Bulk import and export APIs don't automatically handle these tasks:
- Export or import unsupported workspace item types. When export mode is
All, Fabric skips unsupported item types instead of returning them in the JSON package. - Populate data containers, run notebooks or pipelines, activate value sets for variable libraries, or create shortcuts. These tasks require separate post-deploy orchestration or Fabric REST API calls.
- Resolve release-time parameterization dependencies, such as retrieving a new lakehouse SQL endpoint before a dependent semantic model import. These dependencies require sequencing imports or retrieving values before importing a dependent item.
Migrate Fabric items across Microsoft Entra ID tenants
Cross-workspace cloning also supports migration scenarios. The source workspace and target workspace don't need to exist in the same Microsoft Entra ID tenant. For example, an acquisition might require moving all items from workspaces in one Microsoft Entra ID tenant to new workspaces in a different Microsoft Entra ID tenant.
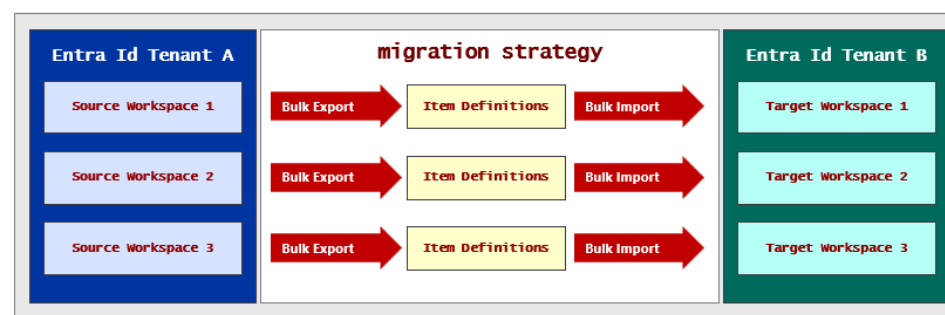
Microsoft Entra ID tenant A contains Source Workspace 1, Source Workspace 2, and Source Workspace 3. Microsoft Entra ID tenant B contains Target Workspace 1, Target Workspace 2, and Target Workspace 3. Each row uses Bulk Export Item Definitions to export a source workspace into item definitions, then uses Bulk Import Item Definitions to import those item definitions into the corresponding target workspace.
A cross-tenant migration requires separate authentication for each Microsoft Entra ID tenant. For example, a service principal in Microsoft Entra ID tenant A can call Bulk Export Item Definitions, while a different service principal in Microsoft Entra ID tenant B can call Bulk Import Item Definitions.
How does Bulk Export Item Definitions export Fabric workspace items?
The Bulk Export Item Definitions API uses an HTTP POST request to a source-workspace endpoint, where {workspaceId} is the Fabric workspace ID that contains the items to export. The request body controls whether Fabric exports all supported items in the workspace or only selected items.
https://api.fabric.microsoft.com/v1/workspaces/{workspaceId}/items/bulkExportDefinitions?beta=true
Note
While the Bulk Import Item Definitions API and Bulk Export Item Definitions API are in preview, you must add a query string of ?beta=true. You can remove this query string once the APIs reach general availability (GA).
The export request body uses these fields:
| Field | Required | Value | Purpose |
|---|---|---|---|
mode |
Yes | All or Selective |
Controls whether Fabric exports all supported items or only the item IDs listed in items. |
items[].id |
Required when mode is Selective |
Fabric item ID | Identifies each workspace item to export. |
To export all supported items in the source workspace, set mode to All.
{ "mode": "All" }
The bulk import and export APIs only support workspace item types that offer CRUD APIs that use item definitions. When mode is All, Fabric skips unsupported workspace item types without returning an error.
To export selected workspace items, set mode to Selective and add an items list that contains the id values for the items to export.
{
    "mode": "Selective",
    "items": [
        { "id": "a0a0a0a0-bbbb-cccc-dddd-e1e1e1e1e1e1" },
        { "id": "b1b1b1b1-cccc-dddd-eeee-f2f2f2f2f2f2" },
        { "id": "c2c2c2c2-dddd-eeee-ffff-a3a3a3a3a3a3" }
    ]
}
For large requests, calls to the Bulk Export Item Definitions API and Bulk Import Item Definitions API can run asynchronously as long-running operations (LROs). If you're not using one of the Fabric REST API SDKs, your implementation must monitor LRO progress and retrieve the return value upon completion.
A Bulk Export Item Definitions API response contains these top-level lists:
| Response list | Purpose |
|---|---|
itemDefinitionsIndex |
Maps each exported item to its relative rootPath and source-workspace item id. |
definitionParts |
Contains the exported item-definition files, including each file path, base64-encoded payload, and payloadType. |
{
    "itemDefinitionsIndex": [],
    "definitionParts": []
}
The itemDefinitionsIndex list contains metadata for each exported item. The Bulk Export Item Definitions API generates the relative rootPath from the item display name and item type in the format /[Item Display Name].[Item Type]. The id value maps each exported item definition back to its item of origin in the source workspace.
{
    "itemDefinitionsIndex": [
        {
            "id": "a0a0a0a0-bbbb-cccc-dddd-e1e1e1e1e1e1",
            "rootPath": "/Product Sales Summary.Report"
        },
        {
            "id": "b1b1b1b1-cccc-dddd-eeee-f2f2f2f2f2f2",
            "rootPath": "/Product Sales DirectLake Model.SemanticModel"
        }
    ]
}
The definitionParts list contains an element for each item-definition file. Each element represents a file with a relative path value, a payload value that holds the file contents in base64-encoded format, and a payloadType value, such as InlineBase64.
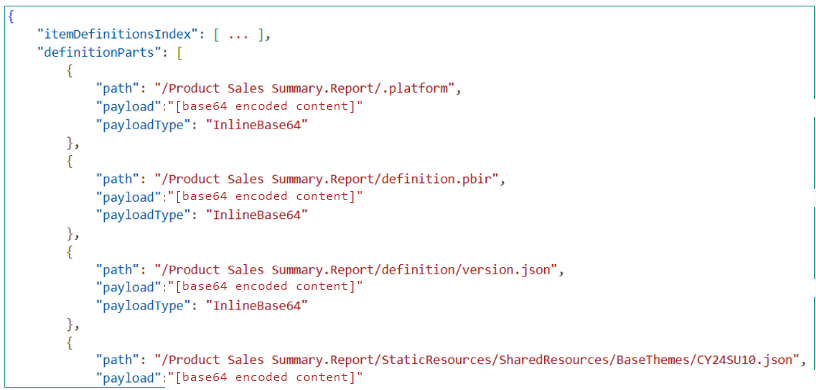
The JSON response includes an `itemDefinitionsIndex` list and a `definitionParts` list. The `definitionParts` list shows files for `/Product Sales Summary.Report/`, including `.platform`, `definition.pbir`, `definition/version.json`, and a theme resource JSON file. Each entry includes a `path`, a `payload` with base64-encoded content, and `payloadType` set to `InlineBase64`.
How does Bulk Import Item Definitions import Fabric item definitions?
The Bulk Import Item Definitions API uses an HTTP POST request to a target-workspace endpoint, where {workspaceId} is the Fabric workspace ID that receives the imported items. The request body contains item-definition files that Fabric assembles into item definitions for batch processing.
https://api.fabric.microsoft.com/v1/workspaces/{workspaceId}/items/bulkImportDefinitions?beta=true
The import request body uses these fields:
| Field | Required | Value | Purpose |
|---|---|---|---|
definitionParts |
Yes | List of item-definition files | Provides the files that Fabric assembles into one or more item definitions. |
definitionParts[].path |
Yes | Relative item-definition file path | Identifies the item folder and file name, such as /Product Sales Summary.Report/.platform. |
definitionParts[].payload |
Yes | Base64-encoded file content | Provides the contents of the item-definition file. |
definitionParts[].payloadType |
Yes | InlineBase64 |
Tells Fabric how to interpret the payload value. |
options.allowPairingByName |
No | true or false |
Allows Fabric to update an existing target item by matching display name and type when logicalId values differ. |
At minimum, the request body must include a definitionParts list of item-definition files.
{
    "definitionParts": [
        {
            "path": "/Product Sales Summary.Report/.platform",
            "payload": "<base64-encoded-content>",
            "payloadType": "InlineBase64"
        },
        {
            "path": "/Product Sales Summary.Report/definition.pbir",
            "payload": "<base64-encoded-content>",
            "payloadType": "InlineBase64"
        },
        {
            "path": "/Product Sales Summary.Report/definition/report.json",
            "payload": "<base64-encoded-content>",
            "payloadType": "InlineBase64"
        }
    ]
}
Fabric dynamically assembles the item-definition files into distinct item definitions and processes each definition independently. For each definition, Fabric checks whether another item in the target workspace has the same display name and type. If no match exists, Fabric creates a new item. If a match exists, Fabric evaluates the logicalId before deciding whether to update the item or return an error.
Fabric tracks an internal logicalId property for each item. When the display name and type match an existing item, Fabric checks whether the item definition and target item have the same logicalId. If the values match, Fabric updates the target item. Backup-and-restore workflows commonly use this behavior because the exported item definition retains the source item's logicalId.
If the display name and type match but the logicalId values differ, the Bulk Import Item Definitions API returns a DuplicateDisplayNameAndType exception by default. To update the existing item by name despite the mismatch, add an options element with allowPairingByName set to true.
{
    "definitionParts": [
        {
            "path": "/Product Sales Summary.Report/.platform",
            "payload": "<base64-encoded-content>",
            "payloadType": "InlineBase64"
        }
    ],
    "options": {
        "allowPairingByName": true
    }
}
A successful call to the Bulk Import Item Definitions API returns JSON with an importItemDefinitionsDetails list. The response fields describe each import operation:
| Response field | Purpose |
|---|---|
itemId |
Identifies the created or updated item in the target workspace. |
itemDisplayName |
Shows the display name of the imported item. |
itemType |
Shows the Fabric item type, such as Report or SemanticModel. |
itemLogicalId |
Identifies the logical item identity used for dependency rebinding. |
operationType |
Indicates whether Fabric created or updated the item. |
operationStatus |
Indicates whether the import operation succeeded or failed. |
{
    "importItemDefinitionsDetails": [
        {
            "itemId": "a0a0a0a0-bbbb-cccc-dddd-e1e1e1e1e1e1",
            "itemDisplayName": "Product Sales Summary",
            "itemType": "Report",
            "itemLogicalId": "aaaaaaaa-0000-1111-2222-bbbbbbbbbbbb",
            "operationType": "Create",
            "operationStatus": "Succeeded"
        },
        {
            "itemId": "b1b1b1b1-cccc-dddd-eeee-f2f2f2f2f2f2",
            "itemDisplayName": "Product Sales DirectLake Model",
            "itemType": "SemanticModel",
            "itemLogicalId": "bbbbbbbb-1111-2222-3333-cccccccccccc",
            "operationType": "Update",
            "operationStatus": "Succeeded"
        }
    ]
}
How can custom Git synchronization use Fabric bulk import and export APIs?
The bulk import and export APIs can support Git providers that Fabric doesn't natively support. You can use supported providers, such as Azure DevOps, GitHub, or GitHub Enterprise, or build custom synchronization logic if you require GitLab or another provider. The logic uses Bulk Export Item Definitions and Bulk Import Item Definitions to implement equivalents of the Commit to Git and Update from Git operations.
In a custom Commit to Git operation, Bulk Export Item Definitions retrieves item definitions from a source workspace in JSON format. Custom code enumerates the item-definition files, uses each path value to create a structured item-definition folder in a Git branch, and converts each base64-encoded payload value to clear text before saving it.
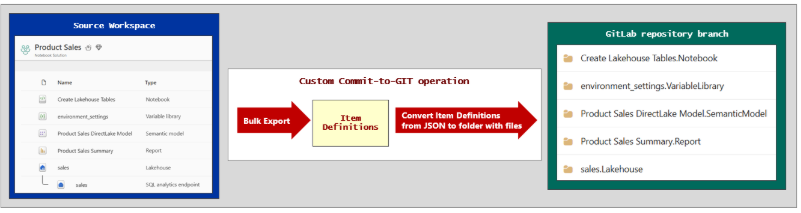
Bulk Export Item Definitions exports the source workspace to produce item definitions. The custom Commit-to-Git operation converts item definitions from JSON to folders with files, then writes those folders to a GitLab repository branch. The branch contains item-definition folders for a notebook, variable library, semantic model, report, and lakehouse.
A custom Update from Git operation reverses the flow. Custom code enumerates files in the Git folder, builds a JSON request body with the correct path values, encodes file contents as base64 in each payload, and calls Bulk Import Item Definitions to import the item definitions into a target workspace.
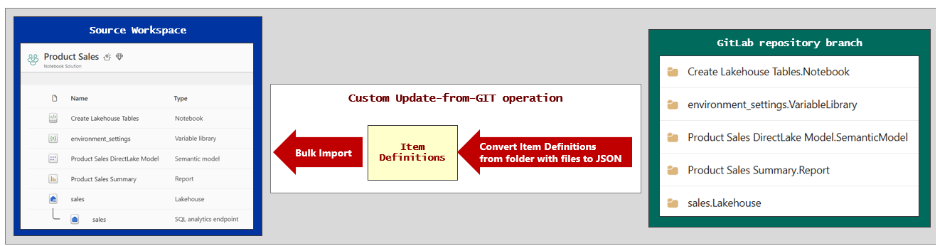
The GitLab repository branch contains item-definition folders for a notebook, variable library, semantic model, report, and lakehouse. The custom Update-from-Git operation converts the folder contents to JSON item definitions, then uses Bulk Import Item Definitions to import those item definitions into the workspace.
When should you use the fabric-cicd library instead of bulk import and export APIs?
You can use the bulk import and export APIs in release processes for continuous integration and continuous delivery (CI/CD). However, you should usually prefer the fabric-cicd Python library. The fabric-cicd library provides deployment capabilities and conveniences that aren't available when programming directly against the bulk import and export APIs.
Use this decision table when choosing between fabric-cicd and the bulk import and export APIs for Fabric release automation:
| Requirement | Prefer | Why |
|---|---|---|
| Standard Fabric CI/CD deployment | fabric-cicd |
The library provides built-in deployment orchestration, parameterization, post-deploy actions, and orphan control. |
| Unsupported Git provider integration | Bulk Import Item Definitions and Bulk Export Item Definitions | The APIs let you build custom Commit to Git and Update from Git equivalents for providers, such as GitLab. |
| Backup, clone, or cross-tenant migration workflow | Bulk Import Item Definitions and Bulk Export Item Definitions | The APIs provide JSON item-definition packages that can be persisted, moved, and imported across workspaces or tenants. |
fabric-cicd provides configurable parameterization support, while the bulk import and export APIs require custom parameterization code. That code must convert file content between base64 encoding and clear text to run search-and-replace operations.
You can configure fabric-cicd with post-deploy actions that call Fabric REST APIs. For example, post-deploy actions can activate a value set after creating a variable library or create shortcuts after creating a lakehouse. fabric-cicd also supports orphan control to delete items when Git no longer contains their source item definition. With the bulk import and export APIs, these post-deploy actions require custom calls to Fabric REST APIs.
The fabric-cicd library also supports dynamic variables. For example, use the parameterization support in fabric-cicd to update the datasource path for a semantic model by using a dynamic lakehouse variable that exposes a property named $sqlendpoint. The fabric-cicd library enables dynamic variables for a lakehouse by calling the Get Lakehouse API as a post-deploy action to cache the SQL endpoint server path.
With the bulk import and export APIs, dynamic lakehouse variable deployment requires handling timing dependencies directly. A semantic model definition might need the lakehouse SQL endpoint path before import, but the endpoint isn't available until after the lakehouse exists. In that case, a single Bulk Import Item Definitions call can't import the lakehouse and semantic model. The release process must import them in separate batches.
The following diagram shows an example of deploying a Fabric solution with a lakehouse and a dependent semantic model. The first call to Bulk Import Item Definitions imports the first batch of items, which includes the lakehouse. After the first Bulk Import Item Definitions call creates the lakehouse, the release process calls the Get Lakehouse API to retrieve the server path for its SQL endpoint. The release process then uses the SQL endpoint server path to update the semantic model definition for the call to Bulk Import Item Definitions, which imports the second batch of items.
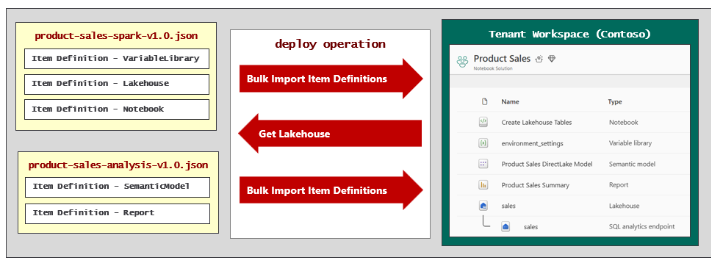
The deployment uses two JSON files. The product-sales-spark-v1.0.json file contains item definitions for a variable library, lakehouse, and notebook. The product-sales-analysis-v1.0.json file contains item definitions for a semantic model and report. The deploy operation imports the first JSON file into the tenant workspace, calls the Get Lakehouse API, and then imports the second JSON file into the same tenant workspace.
The main conclusion is to prefer fabric-cicd over the bulk import and export APIs for most Fabric CI/CD release processes. The fabric-cicd library provides a configurable, lower-code approach that handles many low-level Fabric REST API programming tasks. The bulk import and export APIs remain important for these lifecycle scenarios:
- Implement backup-and-restore capabilities without Git.
- Clone items across workspaces.
- Refactor item distribution across workspaces in a Fabric solution.
- Migrate items in Fabric solutions across Microsoft Entra ID tenant boundaries.
- Integrate a Git provider that Fabric doesn't natively support.
Automation summary
- Always execute automation as service principals, not user principals.
- Use Terraform at project startup to provision resources each environment requires.
- Use Fabric CLI or Semantic Link Labs to script post-sync jobs and post-deploy jobs.
- Use Fabric REST APIs to script post-sync jobs and post-deploy jobs with greater control and flexibility.
- Build release processes by using an API-driven approach that can adapt to any Git branching strategy.
- Implement an API-driven release process by using
fabric-cicdwith configuration-based deployment. - Use
fabric-cicdparameterization to dynamically update environment-specific settings during deployment.
How do you develop Fabric CI/CD workflows?
After you choose an approach for automation logic, decide where that code should live. Store the code that runs Fabric CI/CD processes in the same Git repository that holds the item definitions. This design keeps workflow logic, deployment configuration, and solution source files versioned together.
Fabric supports two primary Git providers: Azure DevOps and GitHub. Both Git providers offer the capability to run workflow jobs on demand, on a schedule, or in response to Git events, such as commits and pull requests. Both Git providers also provide a way to store variables, protect secrets, model deployment environments, and configure manual approvals that reviewers must complete before a workflow can deploy its changes to a target workspace.
Regardless of whether you use Azure DevOps or GitHub, a Fabric CI/CD repository commonly contains three categories of files.
| Repository file category | Typical location | Purpose |
|---|---|---|
| Item definitions | workspace or another Git folder configured for Fabric synchronization. |
Stores source files for Fabric workspace items. |
| Deployment scripts | src or another scripts folder. |
Runs setup, synchronization, deployment, or post-deploy logic. |
| Workflow YAML files | .pipelines for Azure Pipelines or .github/workflows for GitHub Actions. |
Defines the workflow jobs that invoke deployment scripts. |
The YAML file content for defining workflows and folder names differs between Azure DevOps and GitHub. However, the goal is the same: source files for item definitions and files with automation logic move through review and release together. The following two sections examine the unique details of each Git provider.
Azure Pipelines workflows
Azure DevOps is a Microsoft cloud platform that provides a suite of development tools for software teams to plan, build, test, and deploy applications. Microsoft designed it with CI/CD features to support the entire software development lifecycle. When you create a new project in Azure DevOps, Azure DevOps automatically creates the project with a Git repository of the same name. For example, creating a project named Product Sales will automatically create a repository inside the project named Product Sales.
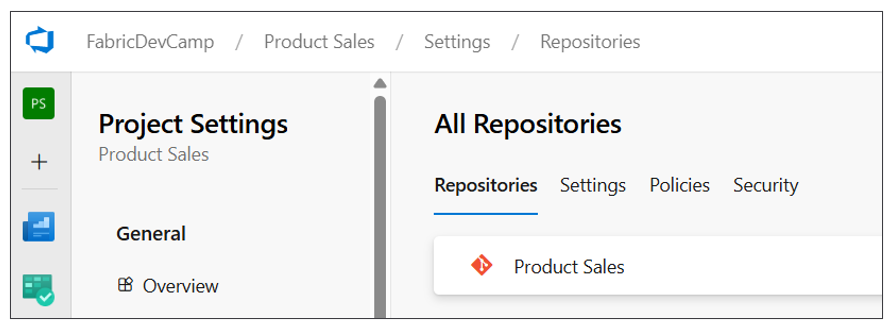
Azure DevOps includes Azure Pipelines as its workflow-development platform. Azure Pipelines provide the capability to integrate, test, and deploy code by using the principles of CI/CD. When you create an Azure pipeline, you can configure it to run on demand or on a schedule, such as every night at midnight. Alternatively, you can define an Azure pipeline with a trigger to run automatically in response to a code commit or the completion of a pull request.
To create an Azure pipeline, you must first add a YAML file with a pipeline definition into your repository. Once you have added the YAML file, you must then explicitly register it with the Azure DevOps project so Azure DevOps recognizes it as an Azure pipeline. You can complete this registration through the Azure DevOps user interface. You can automate it by using the Azure DevOps CLI or the Azure REST APIs. Once you register a pipeline, you should be able to see it in the Pipelines page in an Azure DevOps project.
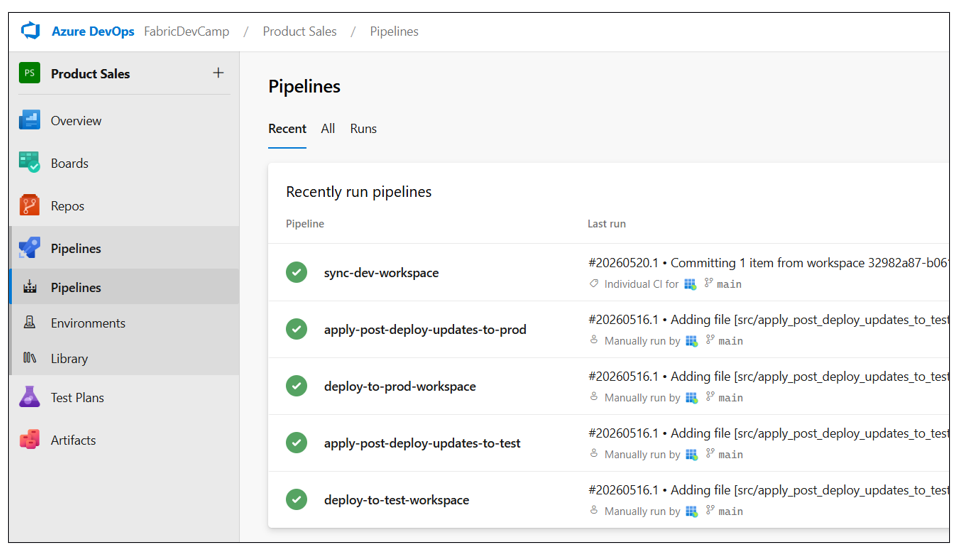
When you create an Azure pipeline, you can use different triggers for different parts of the CI/CD lifecycle. A validation pipeline can run any time a developer creates a new pull request to check files, run tests, or validate item definitions before reviewers approve the merge. You can configure a release pipeline to run after changes merge into a release branch or after a release manager starts it manually. Keeping validation and release responsibilities separate makes the workflow easier to govern.
You can write the code for an Azure pipeline in a programming language, such as Python. You do this by referencing a script with Python code from the YAML file. The following screenshot shows an example of YAML files for Azure pipelines in the .pipelines folder and their associated Python scripts in the src folder. Below these two folders you can also see the workspace folder that contains the item definitions for a specific Fabric solution.
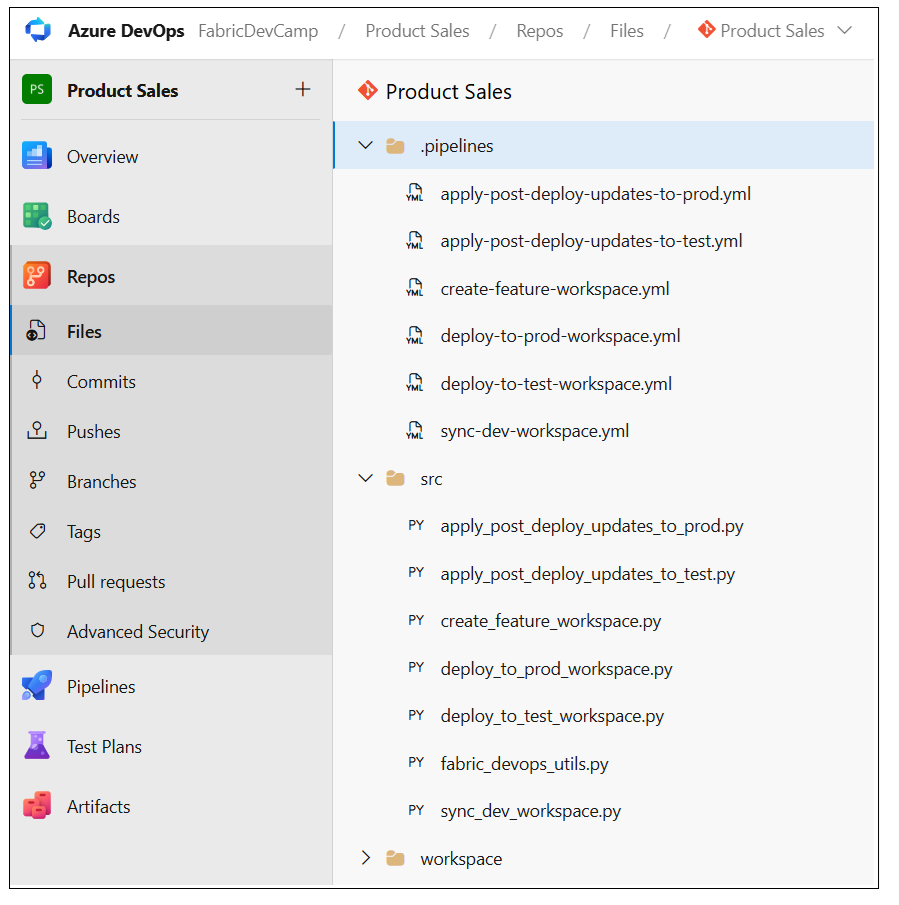
As you begin to develop Azure pipelines for a Fabric CI/CD project, you'll find your code requires access to environment-specific settings, such as the IDs for workspaces, capacities, users, and groups. You might also need credentials for a Microsoft Entra ID application to authenticate as a service principal. Use the Azure Pipelines service to create variables and secrets that make these types of environment settings available to the code in your Azure pipelines.
To create variables and secrets that are accessible to Azure pipelines, create a variable group. Once you have created a variable group in the current Azure DevOps project, you can add a set of named variables. The following screenshot shows a typical set of variables and secrets for Azure pipelines in a Fabric CI/CD project.
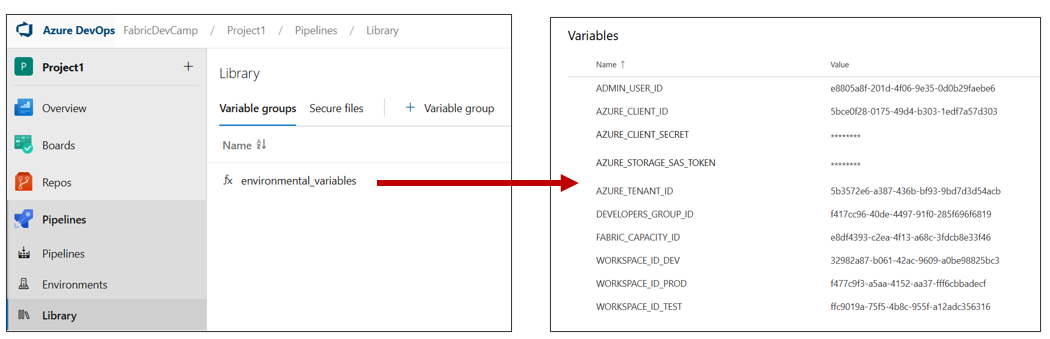
When you create a variable that contains sensitive data, you can mark that variable as a secret. For example, your pipeline might need access to a client secret for authenticating as a service principal. When you mark a variable as a secret, the Azure DevOps service protects its value in three ways: it persists the variable in the cloud by using an encrypted format rather than plain text, it prevents users from viewing the value in the Azure DevOps user interface after saving, and it masks the secret value in logs. If the secret value appears in pipeline output, Azure Pipelines replaces it with *** so users won't see it in build logs.
Important
You can integrate variable groups in Azure DevOps with Azure Key Vault. This integration makes it possible to access Azure Key Vault secrets from code running in an Azure pipeline. Microsoft recommends integrating a variable group with Azure Key Vault because you can take advantage of Azure Key Vault features, such as conditional access policies, auditing, and secret rotation.
By default, an Azure pipeline doesn't have access to the variables in a variable group. Instead, you must configure permissions for a variable group to ensure the code in your Azure pipelines has access to its variables and secrets. You can configure these permissions by using the Pipeline permissions dialog in the Azure DevOps user interface or by using the Azure DevOps CLI or the Azure REST APIs.
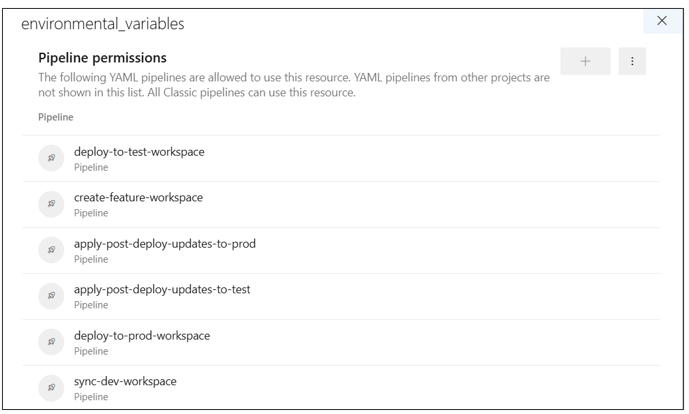
When building a release process by using an Azure pipeline, you often need to configure a manual-approval process. This can be complex with trunk-based development because the release process doesn't involve pull requests. However, you can solve this problem by creating environments in your Azure DevOps project with names, such as test and prod. Once you have created these two environments, you can configure each of them with a manual-approval process.
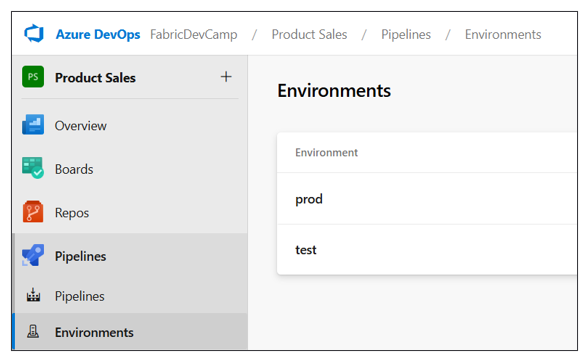
Once you create the two environments and configure them with a manual-approval process, you can create Azure pipelines that target them. When you run an Azure pipeline that targets one of these environments, the pipeline job pauses until the interactive approval process is complete. Once the approval process completes, the pipeline resumes its execution and can use the fabric-cicd library to deploy the new release to a target workspace.
This guidance helps you begin developing Azure pipelines for Fabric CI/CD projects. Become familiar with monitoring pipeline runs so you can test and debug your code. Add logging to your pipeline logic to report successful operations and provide diagnostic information about any errors that occur. The following screenshot shows how an Azure pipeline can log its progress in a Fabric CI/CD workflow.
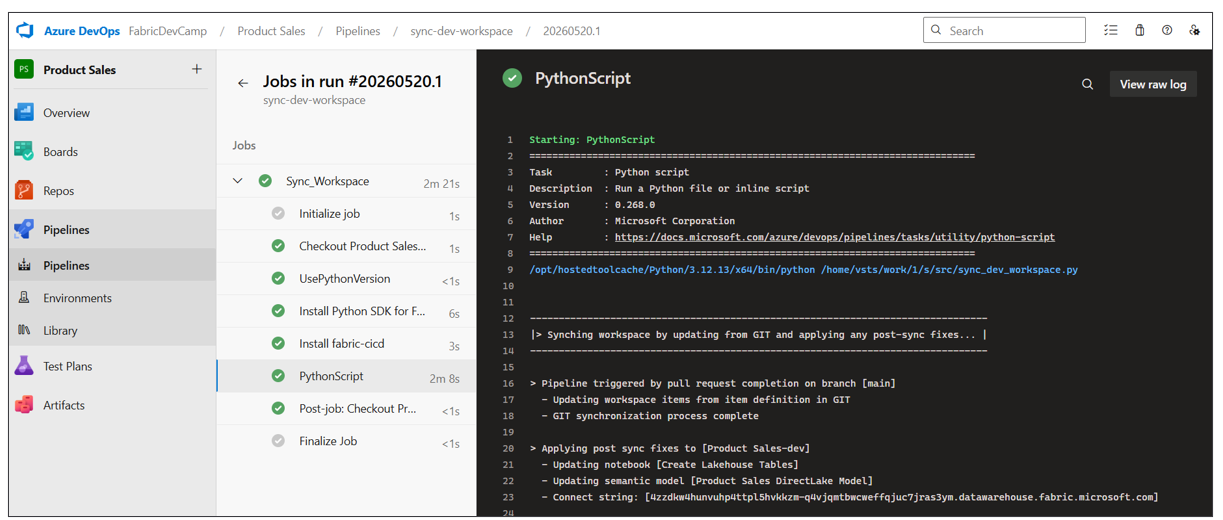
For more details on Azure DevOps and Azure pipelines, see Azure Pipelines documentation, Azure Pipelines key concepts, YAML pipeline editor, Manage variable groups, and Use Azure Key Vault secrets in Azure Pipelines.
For a complete tutorial, see Tutorial: CI/CD using Azure DevOps and the fabric-cicd library.
GitHub Actions workflows
GitHub is different from Azure DevOps with respect to how you work with projects and repositories. With GitHub, you can create repositories without first creating a project. While GitHub supports creating projects to assist with organizing repositories, the use of projects in GitHub is optional. When using GitHub for a Fabric CI/CD project, you only need to create a repository to begin.
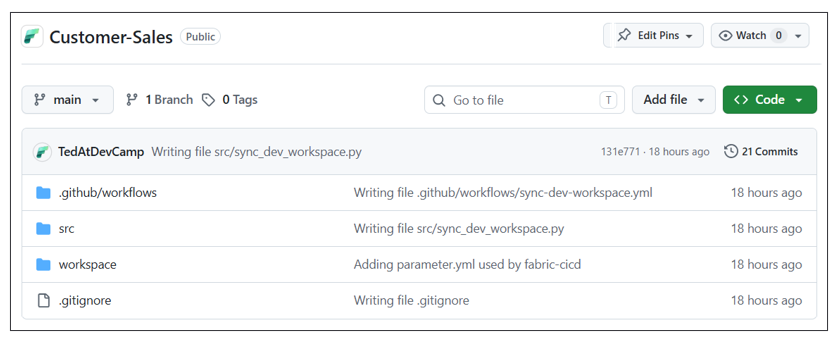
GitHub Actions is the platform in GitHub for developing workflows for CI/CD processes. You can create workflows by using GitHub Actions that can be run on demand, run on a schedule, or run in response to Git events associated with a commit or a pull request.
With GitHub Actions, you create a new workflow by copying a YAML file with a workflow definition into a special repository folder named .github/workflows. Unlike Azure pipelines, there's no need to register the YAML file with GitHub. Copying the YAML file into the .github/workflows folder is all you need to do for GitHub to recognize it as a workflow action. Inside the YAML file, it's possible to reference a script written in a language, such as Python. The following screenshot shows a typical example of the file structure of workflow files for a Fabric CI/CD project in a GitHub repository.
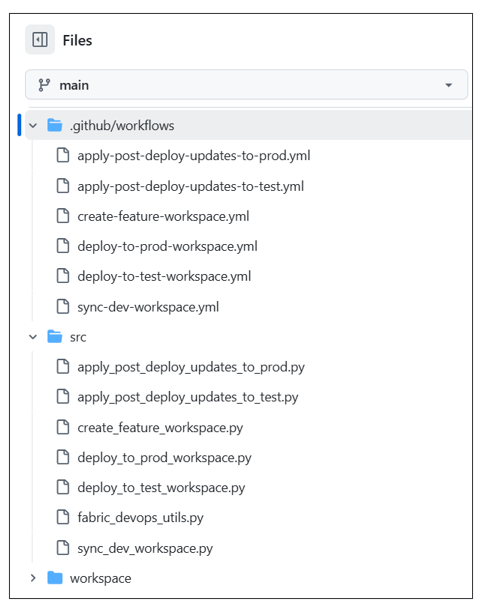
As you begin to develop GitHub Actions for a Fabric CI/CD project, you need a way to track environment settings, such as the IDs for workspaces, capacities, users, and groups. Your code might also need authentication credentials to authenticate as a service principal. In GitHub, you can create secrets and variables to track these types of environment settings at two different levels. You can create secrets and variables at the scope of the repository or at the scope of a specific environment.
To create a secret or a variable, navigate to the Settings page and select Secrets and variables > Actions. When you create a secret, GitHub protects it by encrypting its value and redacting it from logs. When a GitHub Action runs, GitHub decrypts a secret at runtime, injects its value into your workflow and then immediately purges the secret from memory when the workflow completes.
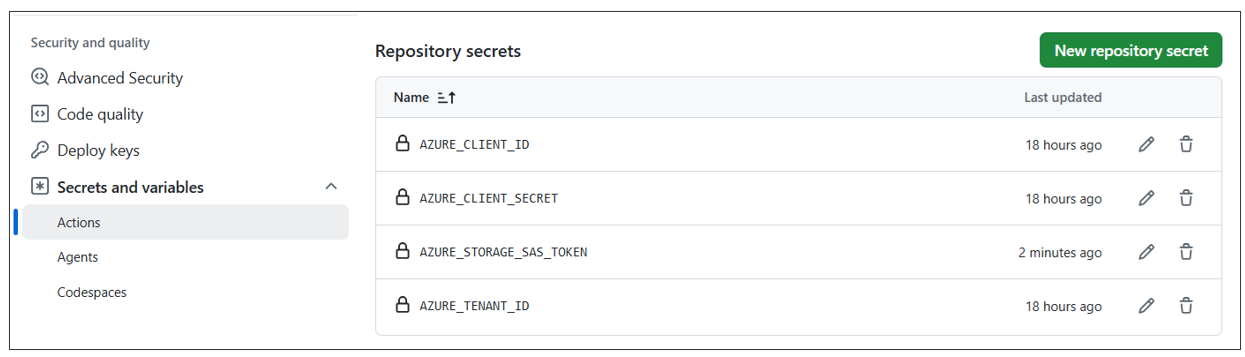
You can also add variables to a GitHub repository for environment settings that aren't sensitive. The following screenshot shows an example of variables created for GitHub Actions in a Fabric CI/CD project.
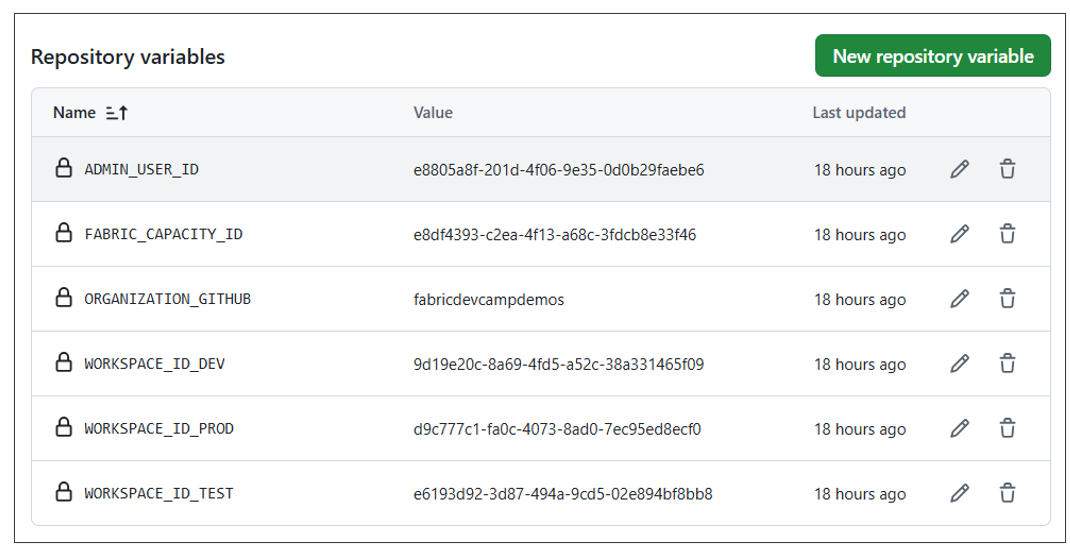
While creating secrets and variables at the repository level is adequate for some projects, you might find you need more granularity in other projects. GitHub supports extending a repository by creating environments and configuring them with their own secrets and variables.
Consider a Fabric CI/CD project in which all workspaces don't exist within the same Microsoft Entra ID tenant. For example, imagine the dev workspace, the test workspace, and the prod workspace all exist in different Microsoft Entra ID tenants. In this scenario, you need different authentication credentials for each Microsoft Entra ID tenant. You can start by creating three different environments in your GitHub repository named dev, test, and prod.
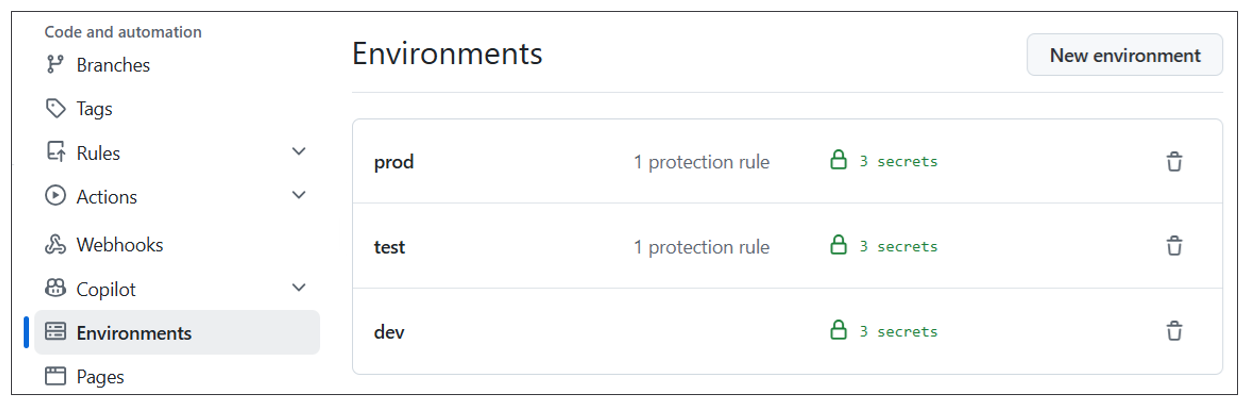
Then you can configure each environment with the authentication credentials specific to its Microsoft Entra ID tenant.
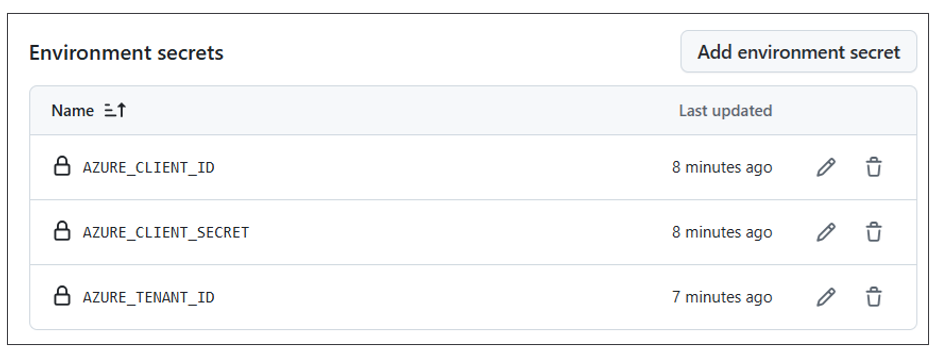
In addition to tracking environment-specific secrets and variables, you can configure an environment with protection rules. For example, you can create a protection rule for the test environment and the prod environment to require a manual-approval process with one or more approvers.
Once you have configured an environment with a manual-approval process, you can create GitHub Actions that target it. When you run a GitHub Action targeting an environment with a manual-approval process, the GitHub Actions job pauses until the manual-approval process completes. Once the approval is complete, the GitHub Actions job resumes its execution and can use the fabric-cicd library to deploy the new release to a target workspace.
Once you have created workflow actions in a GitHub repository by copying YAML files into the .github/workflows folder, you can view them in the left navigation of the Actions page.
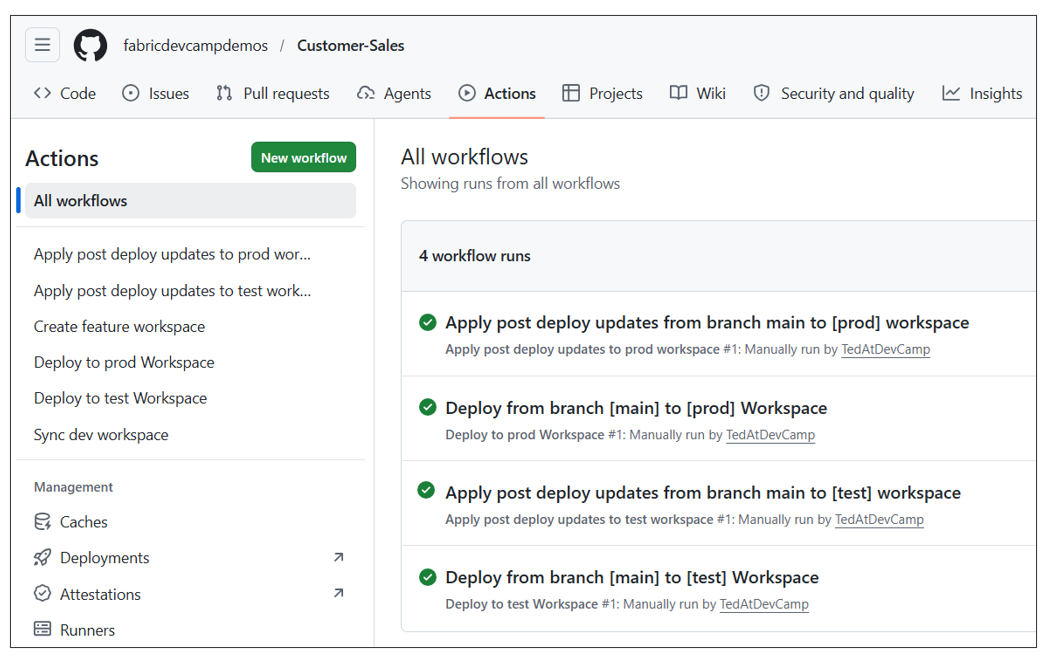
By selecting a workflow action in the left navigation, you can view its runs to see whether each run succeeded or failed. You can open a specific run's details if you'd like to view its logs. You can also run an action on demand by opening the Run workflow menu and selecting the Run workflow button. If you need to collect input before running the workflow, you can define input fields in the workflow's YAML file. The following screenshot shows an example of a workflow action that defines input parameters that collect values by using a text box and two checkboxes.
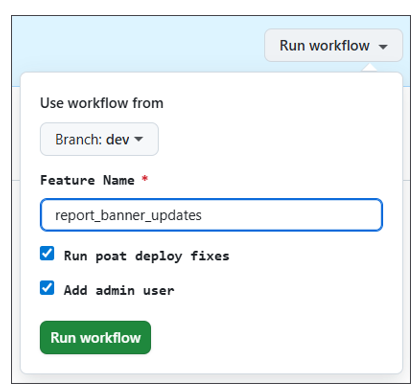
As you begin to develop workflows by using GitHub Actions, become familiar with monitoring workflow runs so you can test and debug your code. Add logging logic to your workflow actions to report successful operations and display diagnostic information about any errors that occur. The following screenshot shows an example of a GitHub Action that logs its progress.
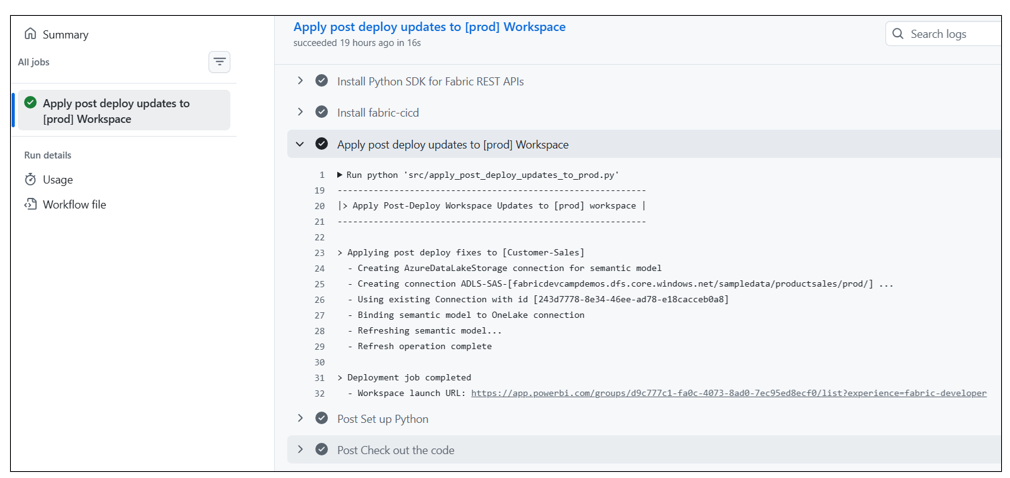
What are Fabric CI/CD best practices?
This article presented the DevOps and CI/CD capabilities that the Fabric platform provides and explained how to apply them when setting up and managing Fabric CI/CD projects. This final section provides a checklist of best practices that you can reference as you build, deploy, and manage real-world Fabric solutions.
Fabric solution design
- Design the Fabric solution as a composition of workspace item types.
- Design a medallion architecture by using lakehouse items as storage containers for bronze, silver, and gold layers.
- Design ETL logic by using items, such as notebooks, pipelines, copy jobs, dataflows, and user-defined functions.
- Design semantic models and reports to analyze and visualize data in lakehouse tables.
- Determine whether the solution can run in a single workspace or if it requires multiple workspaces.
- Prototype the Fabric solution and validate its value to business users through peer review.
Fabric CI/CD project planning
- Plan the project environments (for example, dev, test, and prod).
- Plan what tenant-level Fabric items each environment requires (for example, workspaces, connections, and gateways).
- Plan what Azure resources each environment requires (for example, Fabric capacity and Azure Storage account).
- Select a Git provider by choosing between Azure DevOps, GitHub, and GitHub Enterprise.
- Select a Git branching strategy for the project (for example, GitFlow or trunk-based development).
Security best practices
- Use service principal authentication for all DevOps and CI/CD automation.
- Never commit files with sensitive credentials to Git.
Fabric CI/CD project setup
- Use Terraform to provision Fabric CI/CD project environment resources by using the principles of infrastructure as code.
- Use Terraform to create the workspace or workspaces and a separate capacity that each environment requires.
- Use Terraform to create other Azure resources that each environment requires (for example, Azure Storage account and Azure Key Vault).
- Use Terraform to configure permissions and access control for resources for Microsoft Entra ID users, groups, and service principals.
- Use Terraform to create all connections required for each environment as part of the project startup process.
- Let Terraform manage connection credentials (for example, SAS tokens) so secrets always remain encrypted.
- For production scenarios, configure Terraform to store the state file in protected cloud storage in an encrypted format.
- If you're not using Terraform, write repeatable setup scripts by using Fabric CLI, Semantic Link Labs, or Fabric REST APIs.
Parameterization for environment-specific settings
- Determine which items contain settings with environment-specific values (for example, data-source paths and connection IDs).
- Create a variable library and add variables to parameterize environment-specific settings.
- Update item settings to read variables from the variable library to remove environment-specific settings.
- Use connection reference variables to parameterize connections to external data sources.
- Use item reference variables in multi-workspace solutions to manage item dependencies across workspaces.
- Extend the variable library by creating value sets for testing and production environments.
Data orchestration strategy
- Implement a medallion architecture by using lakehouse items as storage containers for bronze, silver, and gold layers.
- Implement ETL logic by using items, such as notebooks, pipelines, copy jobs, dataflows, and user-defined functions.
- Expose a single top-level pipeline or notebook to run end-to-end ETL processing to populate all lakehouses with data.
- Write a post-deploy script to automate running a single top-level pipeline or notebook after the deployment operation.
- Configure ETL items with scheduled jobs for ongoing data refresh through
.schedulesfiles in item definitions. - Manage schema changes to lakehouse tables by writing code in a notebook with table management logic.
- Manage schema changes to a warehouse by using SqlPackage and Data-tier Application Framework tooling instead.
Continuous integration development process
- Create a Git repository and configure branches for the selected branching strategy (for example, GitFlow or trunk-based development).
- Create a single source of truth in the integration branch by adding the item definitions for a Fabric solution.
- Create a Git connection between the dev workspace and the integration branch.
- Create Git connections with the Git folder setting to separate item definition folders from other workflow-related files.
- For multi-workspace solutions, use unique Git folder settings to connect all workspaces to a single Git branch.
- Configure an integration branch policy to prohibit direct commits and require pull requests to merge all changes.
- Use the branched workspaces capabilities of Fabric to create and manage feature branches and feature workspaces.
- Delete feature branches after pull requests to keep them short-lived.
- Recycle feature workspaces across multiple feature branches for dedicated teams.
- Review item definition structures to understand what files each item type requires or supports.
- For notebooks, enable auto-binding by adding
notebook-settings.jsonto their item definition. - For items that don't support auto-binding, write post-sync scripts to reestablish relationships.
Continuous deployment release process
- Configure the Git repository with variables (for example, workspace IDs and Microsoft Entra IDs for users and groups).
- Configure the Git repository with secrets (for example, authentication credentials for a service principal).
- Use
fabric-cicdand its support for configuration-based deployment to build a code-first release process. - Configure
fabric-cicdenvironment names to match value set names in the variable library to enable auto-activation. - Use
fabric-cicdparameterization support to update environment-specific settings during deployment. - When possible, use pull requests to configure manual-approval processes for deployment jobs.
- When using trunk-based development, create environments in the hosting repository to configure manual-approval processes.