Note
Access to this page requires authorization. You can try signing in or changing directories.
Access to this page requires authorization. You can try changing directories.
Note
This article is part of the Power BI implementation planning series of articles. The series focuses on planning to implement a Power BI experience inside Microsoft Fabric. See the series introduction.
This security planning article describes strategies for read-only consumers. The focus is on viewer permissions for reports and apps, and how to enforce data security. It's primarily targeted at:
- Power BI administrators: The administrators who are responsible for overseeing Power BI in the organization.
- Center of Excellence, IT, and BI team: The teams that are also responsible for overseeing Power BI. They might need to collaborate with Power BI administrators, information security teams, and other relevant teams.
- Content creators and owners: Self-service BI creators who need to create, publish, secure, and manage content that other users consume.
The series of articles is intended to expand upon the content in the Power BI security white paper. While the Power BI security white paper focuses on key technical topics such as authentication, data residency, and network isolation, the primary goal of the series is to provide you with considerations and decisions to help you plan for security and privacy.
In an organization, many users are classified as consumers. Consumers view content that other users have created and published. Consumers are the focus of this article. For security planning focused on content creators and owners, see the Content creator security planning article.
To get the most from this article, it's helpful to understand the meaning of the terms sharing and distribution in the context of Power BI.
Sharing is where one user gives another user (or group of users) access to a specific item of content. The sharing capability in the Power BI service is scoped to one item. It most commonly takes place between individuals who know each other and work closely together.
Distribution is where content is delivered to other users, who are known as recipients. It often involves a larger number of users across multiple teams. Recipients might not have explicitly requested the content, but it's recognized that they need it to perform their role. Recipients who consume distributed content might or might not know the original creator of the content. As such, distribution as a concept is more formal than sharing.
When you talk with other people, determine whether they're using the term sharing in a general way, or literally. Use of the term sharing can be interpreted in two ways.
- The term sharing is often used in a general way related to sharing content with colleagues. There are several techniques for delivering read-only content, which are described in this article.
- Sharing is also a specific feature in Power BI. It's a capability where a user or group is granted access to a single item. Sharing links and direct access sharing are described in this article.
Important
The Power BI administrator role has been renamed. The new name of the role is Fabric administrator.
Strategy for read-only consumers
In the Power BI service, consumers can view a report or dashboard when they have permission to both:
- View the Power BI item that contains the visualizations (such as a report or dashboard).
- Read the underlying data (semantic model or other source).
You can provide read-only access to consumers by using different techniques. The common techniques used by self-service content creators include:
- Granting users and groups access to a Power BI app.
- Adding users and groups to a Power BI workspace Viewer role.
- Providing users and groups per-item permissions by using a sharing link.
- Providing users and groups per-item permissions by using direct access.
The Power BI app and Power BI workspace Viewer role options involve managing permissions for a set of items. The two per-item permissions techniques involve managing permissions for one individual item.
Tip
Generally, it's a best practice to use a Power BI app for most consumers. Occasionally the workspace Viewer role could also be appropriate. Both Power BI apps and the workspace Viewer role allow managing permissions for many items, and should be used whenever possible. Managing permissions for individual items can be tedious, time consuming, and error prone. In contrast, managing a set of items reduces maintenance and improves accuracy.
When reviewing security settings for an item, you might see that its permissions are either:
- Inherited from the workspace or an app.
- Applied directly to the item.
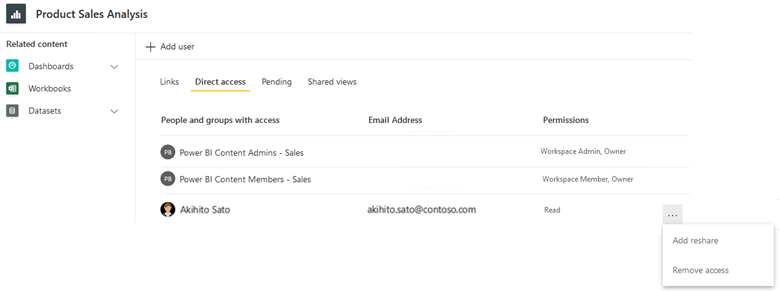
In the following screenshot, the Direct access permissions are shown for a report. In this instance, the workspace Admin and Member roles are each assigned to a group. These roles are shown for the report because the report-level access is inherited from the workspace. There's also one user who has Read permissions applied directly to the report.
The strategy you choose for read-only consumers can be different. It should be based on the individual solution, the preferences of who manages the solution, or the needs of the consumer. The remainder of this section describes when to consider using each of the available techniques.

Checklist - When creating your strategy for how to provide content to read-only consumers, key decisions and actions include:
- Assess your existing strategy for read-only consumers: Verify how content is currently distributed and shared to consumers. Identify whether there are opportunities for improvement.
- Decide on your strategy for read-only consumers: Consider what your preferences are for using app permissions, workspace roles, or per-item permissions. If changes are necessary to meet these preferences, create a plan for making improvements.
Power BI app permissions
A Power BI app delivers a collection of reports, dashboards, and workbooks to consumers. An app provides the best user experience for consumers because:
- The app's navigation pane provides a simple and intuitive user experience. It's a nicer experience than accessing content directly in a workspace.
- Content can be logically organized into sections (which are like folders) in the app's navigation pane.
- Consumers only have access to specific items that have been explicitly included in the app for their audience.
- Links to additional information, documentation, or other content can be added to the navigation pane for their audience.
- There's a built-in Request access workflow.
Note
All references to an app in this article refer to a Power BI app. It's a different concept from Power Apps. It's also a different concept than the Power BI mobile applications. In this section, the focus is on organizational apps rather than template apps.
You can create one app for each workspace as a formal way to distribute some, or all, workspace content. Apps are a good way to distribute content broadly within an organization, especially to users that you don't know or don't collaborate with closely.
Tip
For more information about using a Power BI app for broad content distribution, see the enterprise BI usage scenario. We recommend that content creators who need to distribute content consider creating an app as their first choice.
You manage app permissions separately from workspace roles. The separation of permissions has two advantages. It encourages:
- Granting workspace access to content creators. It includes users that are actively collaborating on the content, like semantic model creators, report creators, and testers.
- Granting app permissions to consumers. Unlike workspace permissions, app permissions are always read-only (or none).
All users with workspace access can automatically view the app (when a Power BI app has been published for the workspace). Due to this behavior, you can conceptually think of workspace roles as being inherited by each app audience. Some users with workspace access can also update the Power BI app, depending on their assigned workspace role.
Tip
For more information about workspace access, see the Content creator security planning article.
Using an app to distribute content to read-only consumers is the best choice when:
- You want users to be able to view only specific items that are visible for that audience (rather than all items within the underlying workspace).
- You want to manage read-only permissions for the app separately from the workspace.
- You want simpler permission management for read-only users than per-item permissions.
- You want to ensure that row-level security is enforced for consumers (when they have read-only permission on the underlying semantic model).
- You want to ensure that consumers can't view new and changed reports until the app is republished.
While it's true that changes to reports and dashboards aren't visible to users of the app until the app is republished, there are two considerations that require caution.
- Immediate semantic model changes: Semantic model changes always take effect immediately. For example, if you introduce breaking changes to a semantic model in the workspace, it could inadvertently result in reports becoming unstable (even though they haven't been republished in the app). There are two ways to mitigate this risk: First, do all development work in Power BI Desktop (separate from the workspace). Second, insulate the production app by using separate workspaces for development and test. (Optionally, you can achieve a higher level of control over deploying workspace content from development to test and production by using deployment pipelines.)
- Content and permissions are published together: When you publish an app, its permissions are published at the same time as the content. For example, you might have report changes in a workspace that aren't yet complete, fully tested, or approved. So, you can't republish the app merely to update permissions. To mitigate this risk, assign app permissions to security group(s), and use security group memberships (instead of individual users) when granting app permissions. Avoid republishing an app merely to apply permission changes.
App audience
Each workspace in the Power BI service can have only one Power BI app. However, within the app you can create one or more audiences. Consider the following scenario.
- You have five sales reports that are distributed to many users throughout your global sales organization.
- One audience is defined in the app for the sales representatives. This audience can view three of the five reports.
- Another audience is defined in the app for the sales leadership team. This audience can view all five reports, including the two reports that aren't available to sales representatives.
This capability to mix and match content and audiences has the following advantages.
- Certain reports can be available for viewing by multiple audiences. So, creating multiple audiences removes the need to duplicate content across different workspaces.
- Certain reports should be available to only one audience. So, content for that one audience can reside in the same workspace as other related content.
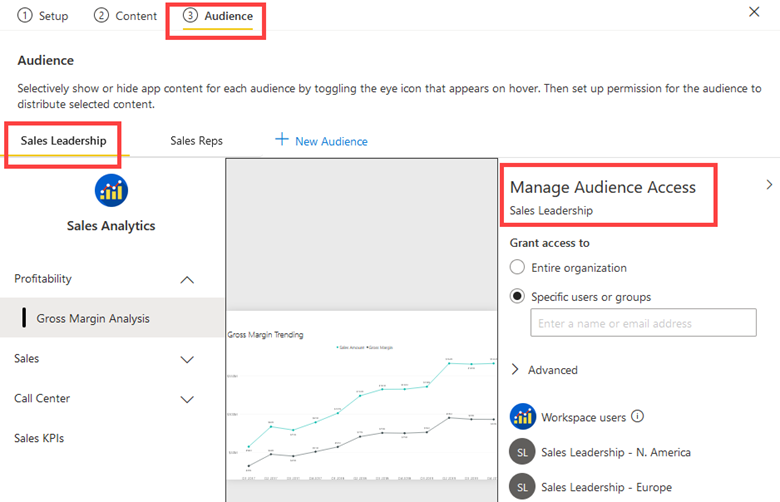
The following screenshot shows an app with two audiences: Sales Leadership and Sales Reps. The Manage Audience Access pane provides access to the Sales Leadership audience group for two security groups: Sales Leadership-North America and Sales Leadership-Europe. The Gross Margin Analysis report that's shown in the screenshot for the Sales Leadership audience group isn't available to the Sales Reps audience group.
Note
The term audience group is sometimes used. It isn't a direct reference to the use of security groups. It includes members of the target audience who will see the collection of content within a Power BI app. While you can assign individual users to an audience, it's a best practice to assign security groups, Microsoft 365 groups, or distribution groups whenever practical. For more information, see the strategy for using groups in the Tenant-level security planning article.
When you manage permissions for an app, on the Direct Access page you can view the members of each audience. You can also see users with a workspace role listed under the All audience. You can't update the app permissions from the Direct Access page. Instead, you must republish the app. You can, however, update app permissions from the Pending page when there are open access requests for the app.
Tip
The primary use case for using app audiences is to define specific permissions for different sets of users. However, you can get a little creative when using audiences. A user can be a member of multiple audiences, and each audience is shown to viewers of the app as a secondary set of menus. For example, you can create an audience named Start Here that contains information about how to use the app, who to contact, how to provide feedback, and how to get help. Or, you can create an audience named KPI Definitions that includes a data dictionary. Providing this type of information helps new users and improves solution adoption efforts.
App permission options
When you create (or republish) an app, each audience has a Manage Audience Access pane. In that pane, the following permissions are available.
- Grant access to: For each audience, you can grant access to individual users and groups. It's possible to publish the app to the entire organization when it's enabled by the Publish apps to the entire organization tenant setting, and the app isn't installed automatically. Whenever possible, we recommend that you assign groups to audiences because adding or removing users involves republishing the app. Everyone with workspace access automatically has permission to view or update the app depending on their workspace role.
- Semantic model permissions: Two types of semantic model permissions can be granted while publishing an app:
- Semantic model Reshare: When enabled, app users are granted the Reshare permission to the underlying semantic model(s) with others. It makes sense to enable this option when the underlying semantic model(s) can be readily reshared with anyone. We recommend that you get approval from the semantic model owner(s) before granting the Reshare permission to an app audience.
- Semantic model Build: When enabled, app users are granted the Build permission for the semantic models. Build permission allows users to create new reports, export underlying data from reports, and more. We recommend that you get approval from the semantic model owner(s) before granting Build permission to an app audience.
The capability to add the semantic model Reshare or Build permissions while publishing an app is convenient. However, we recommend that you consider managing app permissions and semantic model permissions separately. Here are the reasons why.
- Shared semantic model might be in a separate workspace: If the semantic model is published to a separate workspace from the app, you'll need to manage its permissions directly. The ability to add Read, Build or Reshare permissions while publishing an app only works for semantic models that are in the same workspace as the app. For this reason, we recommend that you get into the habit of managing semantic model permissions independently.
- Semantic model permissions are managed separately: If you remove or change permissions for an app, that action only affects the app. It doesn't automatically remove any semantic model permissions that were previously assigned. In this way, you can think of the app permissions and semantic model permissions as being decoupled. You'll need to manage the semantic model directly, separately from the app, when semantic model permissions change or need to be removed.
- Semantic model permissions should be controlled: Granting semantic model permissions through an app removes control from the semantic model owner. Granting the Reshare permission relies on good judgment by users who are choosing to reshare the semantic model(s). Your internal governance or security guidelines can become more difficult to manage when resharing is allowed.
- Consumers and creators have different goals: Typically, there are many more content consumers than creators in an organization. In line with the principle of least privilege, consumers only need Read permission for the underlying semantic model. They don't need Build permission unless they intend to create new reports.
Tip
For more information about when to use separate data workspaces and reporting workspaces, see the Workspace-level planning article.
App pre-installation rights
After you publish a Power BI app, a user typically needs to install it so they can open it. A user can install an app from the Apps page in the Power BI service, or by using a link they've received from another user. They'll be able to find (and install) an app when they're included in at least one audience of the app.
An alternative approach to install an app is to push it to app consumers. It results in the pre-installation of the app so that it automatically shows up in the Apps page in the Power BI service. This approach is a convenience for consumers because they don't need to find and install the app. However, pre-installed apps can become an annoyance for users because they might become overwhelmed by too many apps that aren't relevant to them.
The Push apps to end users tenant setting controls who's allowed to automatically install apps. We recommend that you use this feature because it's convenient for users. However, we also recommend that you educate your content creators on when to use it so that it isn't overused.
Tip
When publishing an app, if you select the option to install the app automatically, you can't set the audience to be the entire organization (if enabled by the Push apps to end users tenant setting).
Checklist - When creating your strategy for using apps for content viewers, key decisions and actions include:
- Decide on the strategy for use of apps: Define your preferences for how to use apps. Ensure that it aligns with your overall strategy for read-only consumers.
- Decide who can publish apps to the entire organization: Decide which report creators are able to publish to the entire organization. Set the Publish apps to the entire organization tenant setting to align with this decision.
- Decide who can push apps to end users: Decide which Power BI report creators can pre-install apps. Set the Push apps to end users tenant setting to align with this decision.
- Create and publish guidance for content creators: Provide documentation and training for content creators. Include requirements and preferences for how to use apps most effectively.
- Determine how to handle app access requests: Ensure that a process is in place to assign contacts and handle app access requests in a timely manner.
Workspace Viewer role
As described in the Workspace planning articles, the primary purpose of a workspace is collaboration. Workspace collaborators, such as semantic model creators, report creators, and testers, should be assigned to one of three roles: Contributor, Member, or Admin. These roles are described in the Content creator security planning article.
You can assign the workspace Viewer role to consumers. Allowing consumers to access content directly in a workspace can make sense for small teams and informal teams who work closely together.
Allowing consumers to access workspace content directly is a good choice when:
- The formality of an app, with its separate permissions, isn't necessary.
- Viewers are permitted to view all items stored within the workspace.
- You want simpler permissions management than per-item permissions.
- Workspace users might also view an app (when an app is published for the workspace).
- The intention is for viewers to review content before it's published in an app.
Here are some suggestions to support workspace viewers.
- Organize content in each workspace so that the items are easily located by report consumers and so they align well with security. Workspace organization by subject area or project usually works well.
- Separate development and test content from production content so that work-in-progress items can't be accessed by viewers.
- Use apps (or per-item permissions when appropriate) when you expect to have many access requests to process. There isn't a Request access workflow for workspaces.
Checklist - When creating your strategy for using workspaces for content viewers, key decisions and actions include:
- Decide on a strategy for using the workspace Viewer role: Define what your preferences are for how to use workspaces for consumers. Ensure that it aligns with your overall strategy for read-only consumers.
- Create and publish guidance for content creators: Provide documentation and training for content creators. Include requirements and preferences for how to use workspace permissions most effectively.
Per-item permissions
Individual item sharing grants permission to a single item. Less experienced content creators commonly use this technique as the primary sharing technique because the sharing commands are prominently displayed in the Power BI service. For this reason, it's important to educate your content creators on the different sharing options, including when to use app permissions instead of workspace roles.
Per-item permissions are a good choice when:
- You want to provide read-only access to one item (report or dashboard).
- You don't want the consumer to view all content published to a workspace.
- You don't want the consumer to view all content published to an app audience.
Use per-item permissions sparingly because sharing grants Read permission to a single item. In a way, you can think of per-item permissions as an override of workspace roles or app permissions.
Tip
We recommend that you use app permissions whenever possible. Next, consider using workspace roles to enable direct workspace access. Lastly, use per-item permissions when they meet the above criteria. App permissions and workspace roles both specify security for a collection of content (rather than individual items), which is a better security practice.
Sharing many items by using per-item permissions can be tedious and error prone, especially when sharing to individual users instead of groups. Consider this scenario: You have 40 reports that you've shared to colleagues by using their individual user accounts. When one colleague transfers to a different department, you'll need to revoke their access, which will involve editing permissions for all 40 reports.
Important
Sharing content from a personal workspace should be done infrequently. Personal workspaces are best suited to non-critical, informal, or temporary content. If you have a situation where content creators frequently share important or critical content from their personal workspaces, you should take appropriate action to move that content to a standard workspace. For more information, see the personal BI usage scenario.
When you share an individual item, you have several permission options.
- Reshare permission: When enabled, users can share the item with other users, including its underlying semantic models. It makes sense to grant this permission when the item can be readily shared with anyone. It removes control from the person or team that manages the item. So, it relies on good judgment by users who are granted the Reshare permission. However, your internal governance or security guidelines can become more difficult to manage when resharing is allowed.
- Build permission: When enabled, users are granted Build permission for the underlying semantic model. Build permission allows users to create new content that's based on the semantic model. It also allows them to export underlying data from reports, and more. Considerations for granting Build permission are described in the Content creator security planning article.
Per-item permissions for reports and dashboards can make sense for informal scenarios when content is shared with a few users. It's a good idea to educate users on managing permissions with apps and workspaces instead, especially when they're sharing content to large numbers of users or users outside their team. It's important to emphasize the following points.
- It becomes more difficult to determine which content has been shared with which users, because the permissions on each report and dashboard must be reviewed individually.
- In many instances, Reshare permission is set because the user experience enables this option by default. So, there's a risk that content is shared to a wider set of users than intended. This outcome can be prevented by unchecking the Allow recipients to share this report option when sharing. Minimizing oversharing in this way is a user training issue. The content creator that's setting the sharing permissions should consider this choice every time.
- All changes to reports and dashboards are viewable by others immediately, which could confuse users when content modifications are a work in progress. This concern can be mitigated by distributing content in an app, or by using separate workspaces to segregate development, test, and production content. For more information, see the self-service content publishing usage scenario.
- When a user shares content from their personal workspace and they leave the organization, IT usually disables their user account. In this case, all recipients of the shared content will immediately lose access to the content.
There are three specific types of sharing: sharing links, direct access sharing, and shared views.
Per-item permission links
When you share an individual item, the default experience results in a sharing link. There are three types of sharing links.
- People in your organization: When enabled in your Fabric tenant settings, this type of sharing link is a straightforward way to provide read-only access to everyone within the organization. However, the sharing link won't work for external users. This option is best suited to when anyone can view the content, and the link can be freely shared throughout the organization. Unless it's disabled by the Allow shareable links to grant access to everyone in your organization tenant setting, this type of sharing is the default.
- People with existing access: This option doesn't create a new sharing link. Rather, it allows you to retrieve the URL so you can send it to someone who already has access.
- Specific people: This option produces a sharing link for specific users or groups. We recommend that you use this option most of the time because it provides specific access. If you commonly work with external users, you can use this type of link for guest users who already exist in Microsoft Entra ID. For more information about the planned invitation process to create guest users, see the Tenant-level security planning article.
Important
We recommend that you consider restricting the Allow shareable links to grant access to everyone in your organization tenant setting to members of a group. You can create a group name like Power BI Share to Entire Organization, and then add a small number of users who understand the implications of organization-wide sharing. If you're concerned about existing organization-wide links, you can use the admin API to find all items that have been shared with the entire organization.
A sharing link adds Read permission to the item. The Reshare permission is selected by default. It's also possible to add Build permission to the underlying semantic model at the same time that the sharing link is created.
Tip
We recommend that you teach content creators to enable the Build permission option only when the consumer of the report is also a content creator who might need to create reports, export data, or create a composite model from the underlying semantic model.
Sharing links are easier to maintain than direct access sharing, particularly when you need to do bulk changes. It's a significant advantage when individual users are granted sharing permissions, more so than groups (which commonly occurs when self-service users are responsible for managing permissions). Consider the following comparisons.
- Sharing link: 20 individual users are granted access with a sharing link. With a single change to the link, it affects all 20 users.
- Direct access: 20 individuals are granted direct access to an item. To make a change, all 20 user permissions must be modified.
Per-item direct access permissions
You can also achieve per-item permissions by using direct access. Direct access involves setting up the permissions for a single item. You can also determine any inherited permissions derived from workspace roles.
When you grant a user direct access, they're granted Read permission for the item. The Reshare permission is selected by default, as is the Build permission for the underlying semantic model. We recommend that you teach content creators to enable Build permission only when the consumer of this report is also a content creator who might need to create reports, export data, or create composite models from the underlying semantic model.
Tip
The user experience makes granting Reshare and Build permissions very straightforward, but the user doing the sharing should always verify whether those permissions are necessary.
Shared views
Use a shared view to share a filtered perspective of a report with another user. You can publish a shared view by using a sharing link or by direct access.
Shared views are a temporary concept. They automatically expire after 180 days. For this reason, shared views are best suited to informal and temporary sharing scenarios. Be sure your users are aware of this limitation.
Checklist - When creating your strategy for using per-item permissions, key decisions and actions include:
- Decide on the strategy for use of the sharing feature: Define what your preferences are for how to use per-item permissions. Ensure that it aligns with your overall strategy for read-only consumers.
- Decide who can publish links to the entire organization: Decide which report creators are able to publish links for the entire organization. Set the Allow shareable links to grant access to everyone in your organization tenant setting to align with this decision.
- Create and publish guidance for content creators: Provide documentation and training for content creators that includes requirements and preferences for how to use per-item permissions most effectively. Ensure they're clear on the advantages and disadvantages of per-item permissions. Include guidance for when to use sharing links and when to use direct access sharing.
Other consumer query techniques
The most common ways for consumers to interact with Power BI are with apps, workspaces, and per-item permissions (previously described in this article).
There are other techniques that consumers can use to query Power BI data. Each of the following query techniques requires semantic model or datamart Build permission.
- Analyze in Excel: Consumers who prefer to use Excel can query a Power BI semantic model by using Analyze in Excel. This capability is a great alternative to exporting data to Excel because the data isn't duplicated. With a live connection to the semantic model, users can create PivotTables, charts, and slicers. They can then publish the workbook to a workspace in the Power BI service which allows consumers to open it and interact with it.
- XMLA endpoint: Consumers can query a semantic model by connecting to the XMLA endpoint. An application that's XMLA-compliant can connect to, query, and consume a semantic model that's stored in a Premium workspace. This capability is helpful when consumers want to use a Power BI semantic model as their data source for a data visualization tool outside of the Microsoft ecosystem.
- Datamart editor: Consumers can query a Power BI datamart by using the datamart editor. It's a web-based visual query editor for creating no-code queries. There's also a web-based SQL editor for when consumers prefer to write SQL queries. Both editors query the managed Azure SQL Database that underlies the Power BI datamart (rather than the built-in semantic model).
- SQL endpoint: Consumers can query a Power BI datamart by using the SQL endpoint. They can use tools like Azure Data Studio or SQL Server Management Studio (SSMS) to run SQL queries. The SQL endpoint directs queries to the managed Azure SQL Database that underlies the Power BI datamart (rather than the built-in semantic model).
For more information about the Build permission, see the Content creator security planning article.
Checklist - When planning which query techniques consumers will use, key decisions and actions include:
- Create guidance for users on using Analyze in Excel: Provide documentation and training for consumers on the best way to reuse existing semantic models with Excel.
- Create guidance for users on using the XMLA endpoint: Provide documentation and training for consumers on the best way to reuse existing semantic models with the XMLA endpoint.
- Create guidance for users on datamart queries: Provide documentation and training for consumers on the available techniques for querying Power BI datamarts.
Request access workflow for consumers
When sharing content, it's common that one user forwards a link (URL) to another user. When the recipient tries to view the content, and discovers that they don't have access to it, they can select the Request access button. This action initiates the Request access workflow. The user is then asked to provide a message to explain why they want access.
A Request access workflow exists for:
- Access to a Power BI app.
- Access to an item, like a report or dashboard.
- Access to a semantic model. For more information about the Request access workflow when a semantic model is discoverable, see the Content creator security planning article.
App access requests
There are two ways to learn about pending access requests that have been submitted for an app.
- Email: The contact(s) for the app receive an email notification. By default, this contact is the app publisher. To provide better support for critical apps, we recommend that you set the contact to a group that's able to respond quickly to access requests.
- Manage permissions menu: Workspace administrators and members can view, approve, or decline access requests. The Manage permissions page is available on the Apps page, and can be opened for each app. This capability is also available to workspace contributors when the Allow contributors to update the app for this workspace setting is enabled.
Pending access requests for an app show the message provided by the user. Each pending request can be approved or declined. When choosing to approve a request, an app audience must be selected.
The following screenshot shows a pending access request from a user. To approve it, one of the two app audiences, Sales Reps or Sales Leadership, must be selected.
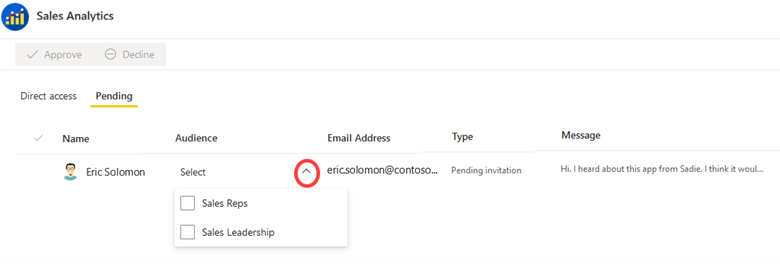
When you publish an app, the content and the permissions are published at the same time. As previously described, it's not possible to publish only the app permissions without content changes too. However, there's one exception: When you approve a pending access request (such as the one shown in the previous screenshot), the permission change occurs without publishing the latest content in the workspace.
Workspace access requests
Workspace access is granted by users who belong to the Admin role or Member role.
A user who is attempting to view a workspace receives an access denied message when they aren't a member of a workspace role. Since there isn't a built-in Request access workflow for workspaces, they're best used for small teams and informal teams who work closely together. That's one reason why a Power BI app is better suited to larger teams and broader content distribution scenarios.
Per-item access requests
There are two ways to learn about pending access requests that have been submitted for an individual item, like a report.
- Email: The contact(s) for the item receive an email notification. To provide better support for critical reports, we recommend that you set the contact to a group that's able to respond quickly to access requests.
- Manage permissions menu: Workspace administrators and members can access the Manage permissions page for each item. They can view, approve, or decline access pending requests.
Manage access requests with groups
When a user submits the Request access form for a Power BI item (like a report or semantic model) or a Power BI app, the request is submitted for an individual user. However, many large organizations need to use groups to comply with their internal security policies.
We recommend that you use groups, rather than individuals, for securing content whenever practical. For more information about planning for groups, see the Tenant-level security planning article.
If you intend to provide access to groups instead of individual users, the content owner or administrator that's processing the request for access will need to complete the request in multiple steps:
- Decline the pending request in Power BI (because it's associated with an individual user).
- Add the requestor to the correct group according to your current process.
- Notify the requestor that they now have access.
Tip
See Request access workflow for creators for information about responding to requests for Build access from content creators. It also includes recommendations about using a form for access requests.
Checklist - When planning the Request access workflow, key decisions and actions include:
- Determine who should handle app access requests: Ensure that a process is in place to handle app access requests in a timely manner. Ensure that app contacts are assigned to support the process.
- Determine who should handle per-item requests: Ensure that a process is in place to handle access requests in a timely manner. Ensure that contacts are assigned to each item to support the process.
- Include in documentation and training for content creators: Ensure that content creators understand how to handle access requests in a timely manner. Make them aware of how to handle requests when a group should be used instead of an individual user.
- Include in documentation and training: Include guidance for your content creators on how to manage access requests effectively. Also include guidance for consumers on what information to include in their access request message.
Enforce data security based on consumer identity
You can plan to create fewer semantic models and reports by enforcing data security. The objective is to enforce data security based on the identity of the user who's viewing the content.
For example, consider that you can share a single sales report with all salespeople (consumers), knowing that each salesperson will only see sales results for their region. This approach allows you to avoid the complexity of creating separate reports per region that would need to be shared with the salespeople from that sales region.
Some organizations have specific requirements for endorsed (certified or promoted) semantic models or datamarts. For data that will be widely used, there might be a requirement to use data security.
You can accomplish data security in multiple ways.
- Power BI semantic model: As a Power BI data creator, you can enforce row-level security (RLS) and object-level security (OLS). RLS involves defining roles and rules that filter data model rows, while OLS restricts access to specific tables or columns. These defined RLS and OLS rules do not apply to references stored outside the semantic model such as slicer and filter selections. Both RLS and OLS techniques are further described later in this section.
- Analysis Services: A live connection semantic model can connect to a remote data model, which is hosted by either Azure Analysis Services (AAS) or SQL Server Analysis Services (SSAS). The remote model can enforce RLS or OLS based on the consumer identity.
- Data source: Some data sources, like Azure SQL Database, can enforce RLS. In this case, the Power BI model can take advantage of the existing security rather than redefining it. That approach can be a significant advantage when RLS defined in the source is complex. You can develop and publish a DirectQuery model and set the data source credentials of the semantic model in the Power BI service to enable single sign-on (SSO). When a report consumer opens a report, Power BI passes their identity to the data source. The data source then enforces RLS based on the identity of the report consumer. For more information about Azure SQL Database RLS, see this article.
Note
Source systems, like Azure SQL Database, can also use techniques like views to narrow down what the user can see. While that's a valid technique, it's not relevant to the focus of this section.
Row-level security
Row-level security (RLS) allows a data modeler to restrict access to a subset of data. It's typically used to ensure that some report consumers can't see specific data, like sales results of other sales regions.
Tip
If you've noticed someone creating multiple data models to support different groups of consumers, check whether RLS will satisfy their requirements. It's typically better to create, test, and maintain one data model rather than multiple data models.
Take care, because if a Power BI report references a row with RLS configured then the same message will be displayed as for a deleted or non-existing field. To these users, it looks like the report is broken.
There are two steps for setting up RLS: rules and role mappings.
RLS rules
For semantic models, a data modeler can set up RLS in Power BI Desktop by creating one or more roles. A role has a unique name in the model, and it usually includes one or more rules. Rules enforce filters on model tables by using Data Analysis Expressions (DAX) filter expressions. By default, a model has no roles.
Important
A model without roles means that users (who have permission to query the data model) have access to all model data.
Rule expressions are evaluated within row context. Row context means the expression is evaluated for each row by using the column values of that row. When the expression returns TRUE, the user can see the row. You can define rules that are either static or dynamic.
- Static rules: Use DAX expressions that refer to constants, like
[Region] = "Midwest". - Dynamic rules: Use specific DAX functions that return environmental values (as opposed to constants). Environmental values are returned from three specific DAX functions: USERNAME, USERPRINCIPALNAME, and CUSTOMDATA. Defining dynamic rules is simple and effective when a model table stores username values. They allow you to enforce a data-driven RLS design.
RLS role mappings
After you publish the model to the Power BI service, you must set up role mappings in advance of users accessing related reports. Role mapping involves assigning Microsoft Entra security objects to roles. Security objects can be user accounts or security groups.
Whenever possible, it's a best practice to map roles to security groups. That way, there will be fewer mappings, and group membership management can be handled by the owner of the group.
We recommend that you make security account information from Microsoft Entra available to your content creators. One option is to create a dataflow with data that's kept in sync with Microsoft Entra ID. That way, content creators can integrate the dataflow data to produce a data-driven semantic model.
Tip
It's possible to define a role that has no rules. In this case, the role provides access to all rows of all model tables. Setting up this type of role is suitable when an administrator or user is allowed to view all data in the model.
RLS user experience
Some organizations choose to purposefully use RLS as a secondary layer of security, in addition to standard Power BI permissions. Consider the following scenario: You share a link to a report with the entire organization. Any user who views the report must be mapped to an RLS role to be able to see data in the report. If they aren't mapped to an RLS role, they won't see any data.
The presence of RLS changes the default experience for consumers.
- When RLS isn't defined for the semantic model: Creators and consumers with at least Read permission on the semantic model can view all data in the semantic model.
- When RLS is defined on the semantic model: Creators and consumers with only Read permission on the semantic model will only be able to view the data they're allowed to see (based on their RLS role mapping).
Note
Some organizations enforce RLS as an additional layer of security, especially when sensitive data is involved. For this reason, you might choose to require RLS for semantic models that are certified. That requirement can be accomplished with an internal review and approval process prior to certifying the semantic model.
When a user views a report in either a workspace or an app, RLS might or might not be enforced depending on their semantic model permissions. For this reason, it's critical that content consumers and creators only possess Read permission on the underlying semantic model when RLS must be enforced.
Here are the permission rules that determine whether RLS is enforced.
- User has Read permission on the semantic model: RLS is enforced for the user.
- User has Read and Build permissions on the semantic model: RLS is enforced for the user.
- User has Write permission on the semantic model: RLS isn't enforced for the user, meaning that they can see all data in the semantic model. The Write permission provides the ability to edit a semantic model. It can be granted in one of two ways:
- With the Contributor, Member, or Admin workspace roles (for the workspace where the semantic model is stored).
- With the per-item Write semantic model permission.
Tip
For more information about how to use separate workspaces so that RLS works for content creators, see the managed self-service BI usage scenario.
For more information about RLS, see Restrict access to Power BI model data.
RLS for datamarts
Power BI datamarts can also enforce RLS. However, the implementation is different.
The main difference is that RLS for datamarts is set up in the Power BI service, rather than in Power BI Desktop.
Another difference is that datamarts enforce RLS on both the semantic model and the managed Azure SQL Database that's associated with the datamart. Enforcing RLS at both layers provides consistency and flexibility. The same RLS filters are applied regardless of how the user queries the data, whether it's by connecting to the semantic model or to the managed Azure SQL Database.
For more information, see RLS for datamarts.
Object-level security
Object-level security (OLS) allows a data modeler to restrict access to specific tables and columns, and their metadata. You typically use OLS to ensure sensitive columns, like employee salary, aren't visible to certain users. While it isn't possible to restrict access to measures, any measure that references a restricted column will itself be restricted.
Consider an example of an employee table. It contains columns that store the employee name and phone number, and also salary. You can use OLS to ensure that only certain users, like senior Human Resources staff, can see salary values. For those users that can't see salary values, it's as if that column doesn't exist.
Take care, because if a Power BI report visual includes salary, users that don't have access to that field will receive an error message. The message will inform them that the object doesn't exist. To these users, it looks like the report is broken.
Note
You can also define perspectives in a data model. A perspective defines viewable subsets of model objects to help provide a specific focus for report creators. Perspectives aren't intended to restrict access to model objects. A user can still query a table or column even when it's not visible to them. Therefore, consider perspectives as a user convenience rather than a security feature.
There isn't currently an interface in Power BI Desktop to set up OLS. You can use Tabular Editor, which is a third-party tool for creating, maintaining, and managing models. For more information, see the advanced data model management usage scenario.
For more information about OLS, see Restrict access to Power BI model objects.
Checklist - When planning for RLS and OLS, key decisions and actions include:
- Decide on the strategy for use of RLS: Consider for which use cases and purposes you intend to use row-level security.
- Decide on the strategy for use of OLS: Consider for which use cases and purposes you intend to use object-level security.
- Consider requirements for certified content: If you have a process for what's required to certify a semantic model, decide whether to include any specific requirements for using RLS or OLS.
- Create and publish user guidance: Create documentation for users that includes requirements and preferences for using RLS and OLS. Describe how to obtain user mapping information if it exists in a centralized location.
- Update training materials: Include key information about requirements and preferences for RLS and OLS in user training materials. Provide examples for users to understand when it's appropriate to use either data security technique.
Related content
In the next article in this series, learn about security planning for content creators who are responsible for creating semantic models, dataflows, datamarts, reports, or dashboards.