Apply Zero Trust principles to a hub virtual network in Azure
Summary: To apply Zero Trust principles to a hub virtual network in Azure, you must secure Azure Firewall Premium, deploy Azure DDoS Protection Standard, configure network gateway routing to the firewall, and configure threat protection.
The best way to deploy an Azure-based hub virtual network (VNet) for Zero Trust is to use the Azure Landing Zone materials to deploy a feature-complete hub VNet, and then tailor it to your specific configuration expectations.
This article provides steps for how to take an existing hub VNet and ensure you're ready for a Zero Trust methodology. It assumes that you have used the ALZ-Bicep hubNetworking module to rapidly deploy a hub VNet, or have deployed some other hub VNet with similar resources. Using a separate connectivity hub connected to isolated workplace spokes is an anchor pattern in Azure secure networking and helps support the Zero Trust principles.
This article describes how to deploy a hub VNet for Zero Trust by mapping the principles of Zero Trust in the following ways.
| Zero Trust principle | Definition | Met by |
|---|---|---|
| Verify explicitly | Always authenticate and authorize based on all available data points. | Use Azure Firewall with Transport Layer Security (TLS) inspection to verify risk and threats based on all available data. |
| Use least privileged access | Limit user access with Just-In-Time and Just-Enough-Access (JIT/JEA), risk-based adaptive policies, and data protection. | Each spoke VNet has no access to other spoke VNets unless the traffic gets routed through the firewall. The firewall is set to deny by default, allowing only traffic allowed by specified rules. |
| Assume breach | Minimize blast radius and segment access. Verify end-to-end encryption and use analytics to get visibility, drive threat detection, and improve defenses. | In the event of a compromise or breach of one application/workload, it has limited ability to spread due to the Azure Firewall performing traffic inspection and only forwarding allowed traffic. Only resources in the same workload would be exposed to the breach in the same application. |
This article is a part of a series of articles that demonstrate how to apply the principles of Zero Trust across an environment in Azure that includes a hub VNet to support an IaaS workload. For more information, see the Apply Zero Trust principles to Azure IaaS overview.
Reference architecture
The following diagram shows the reference architecture. The hub VNet is highlighted in red. For more information about this architecture, see the Apply Zero Trust principles to Azure IaaS overview.

For this reference architecture, there are many ways you can deploy the resources across the Azure subscription. The reference architecture shows the recommendation of isolating all resources for the hub VNet within a dedicated resource group. The resources for the spoke VNet are also shown for comparison. This model works well if different teams are given responsibility for these different areas.
In the diagram, a hub VNet includes components to support access to other apps and services within the Azure environment. These resources include:
- Azure Firewall Premium
- Azure Bastion
- VPN Gateway
- DDOS Protection
The hub VNet provides access from these components to an IaaS-based app hosted on virtual machines in a spoke VNet.
For guidance on organizing for cloud adoption, see Manage organization alignment in the Cloud Adoption Framework.
The resources that are deployed for the hub VNet are:
- An Azure VNet
- Azure Firewall with Azure Firewall policy and a public IP address
- Bastion
- VPN gateway with a public IP address and route table
The following diagram shows the components of a resource group for a hub VNet in an Azure subscription separate from the subscription for the spoke VNet. This is one way of organizing these elements within the subscription. Your organization might choose to organize these in a different way.

In the diagram:
- The resources for the hub VNet are contained within a dedicated resource group. If you're deploying Azure DDoS Plan a part of the resources, you need to include that in the resource group.
- The resources within a spoke VNet are contained within a separate dedicated resource group.
Depending on your deployment, you may also note that there can be a deployment of an array for Private DNS Zones used for Private Link DNS resolution. These are used to secure PaaS resources with Private Endpoints, which are detailed in a future section. Note that it deploys both a VPN Gateway and an ExpressRoute Gateway. You may not need both, so you can remove whichever one isn't needed for your scenario or turn it off during deployment.
What's in this article?
This article provides recommendations for securing the components of a hub VNet for Zero Trust principles. The following table describes the recommendations for securing this architecture.
| Step | Task | Zero Trust principle(s) applied |
|---|---|---|
| 1 | Secure Azure Firewall Premium. | Verify explicitly Use least privileged access Assume breach |
| 2 | Deploy Azure DDoS Protection Standard. | Verify explicitly Use least privileged access Assume breach |
| 3 | Configure network gateway routing to the firewall. | Verify explicitly Use least privileged access Assume breach |
| 4 | Configure threat protection. | Assume breach |
As a part of your deployment, you'll want to make specific selections that aren't the defaults for automated deployments due to their additional costs. Prior to the deployment, you should review the costs.
Operating the connectivity hub as deployed still provides significant value for isolation and inspection. If your organization isn't ready to incur the costs of these advanced features, you can deploy a reduced functionality hub and make these adjustments later.
Step 1: Secure Azure Firewall Premium
Azure Firewall Premium plays a vital role in helping you secure your Azure infrastructure for Zero Trust.
As a part of the deployment, use Azure Firewall Premium. This requires that you deploy the generated management policy as a premium policy. Changing to Azure Firewall Premium involves recreating the firewall and often the policy as well. As a result, start with Azure Firewall if possible, or be prepared for redeployment activities to replace the existing firewall.
Why Azure Firewall Premium?
Azure Firewall Premium provides advanced features for inspecting traffic. The most significant are the following TLS inspection options:
- Outbound TLS Inspection protects against malicious traffic that is sent from an internal client to the internet. This helps identify when a client has been breached, and if it is trying to send data outside of your network or establish a connection to a remote computer.
- East-West TLS Inspection protects against malicious traffic sent from within Azure to other parts of Azure or to your non-Azure networks. This helps identify attempts for a breach to expand and spread its blast radius.
- Inbound TLS Inspection protects resources in Azure from malicious requests that arrive from outside the Azure network. Azure Application Gateway with Web Application Firewall provides this protection.
You should use the Inbound TLS Inspection for resources whenever possible. Azure Application Gateway only provides protection for HTTP and HTTPS traffic. It can't be used for some scenarios, such as those that use SQL or RDP traffic. Other services often have their own threat protection options that could be used to provide explicit verification controls for those services. You can review Security baselines for Azure overview to understand the threat protection options for these services.
Azure Application Gateway isn't recommended for the hub VNet. It should instead reside in a spoke VNet or a dedicated VNet. For more information, see Apply Zero Trust principles to spoke virtual network in Azure for guidance on the spoke VNet or Zero-trust network for web applications.
These scenarios have specific digital certificate considerations. For more information, see Azure Firewall Premium certificates.
Without TLS inspection, Azure Firewall has no visibility in the data that flows in the encrypted TLS tunnel, and so it is less secure.
For example, Azure Virtual Desktop doesn't support SSL termination. You should review your specific workloads to understand how to provide TLS inspection.
In addition to the customer defined allow/deny rules, the Azure Firewall is still able to apply threat intelligence-based filtering. Threat intelligence-based filtering uses known-bad IP addresses and domains to identify traffic that poses a risk. This filtering occurs prior to any other rules, which means even if the access was allowed by your defined rules, Azure Firewall can stop the traffic.
Azure Firewall Premium also has enhanced options for URL filtering and web category filtering, allowing for more fine-tuning for roles.
You can set threat intelligence to notify you with an alert when this traffic occurs, but to allow it through. However for Zero Trust, set it to Deny.
Configure Azure Firewall Premium for Zero Trust
To configure Azure Firewall Premium to a Zero Trust configuration, make the following changes.
Enable Threat Intelligence in Alert and Deny Mode:
- Navigate to the Firewall Policy and select Threat Intelligence.
- In Threat intelligence mode, select Alert and deny.
- Select Save.

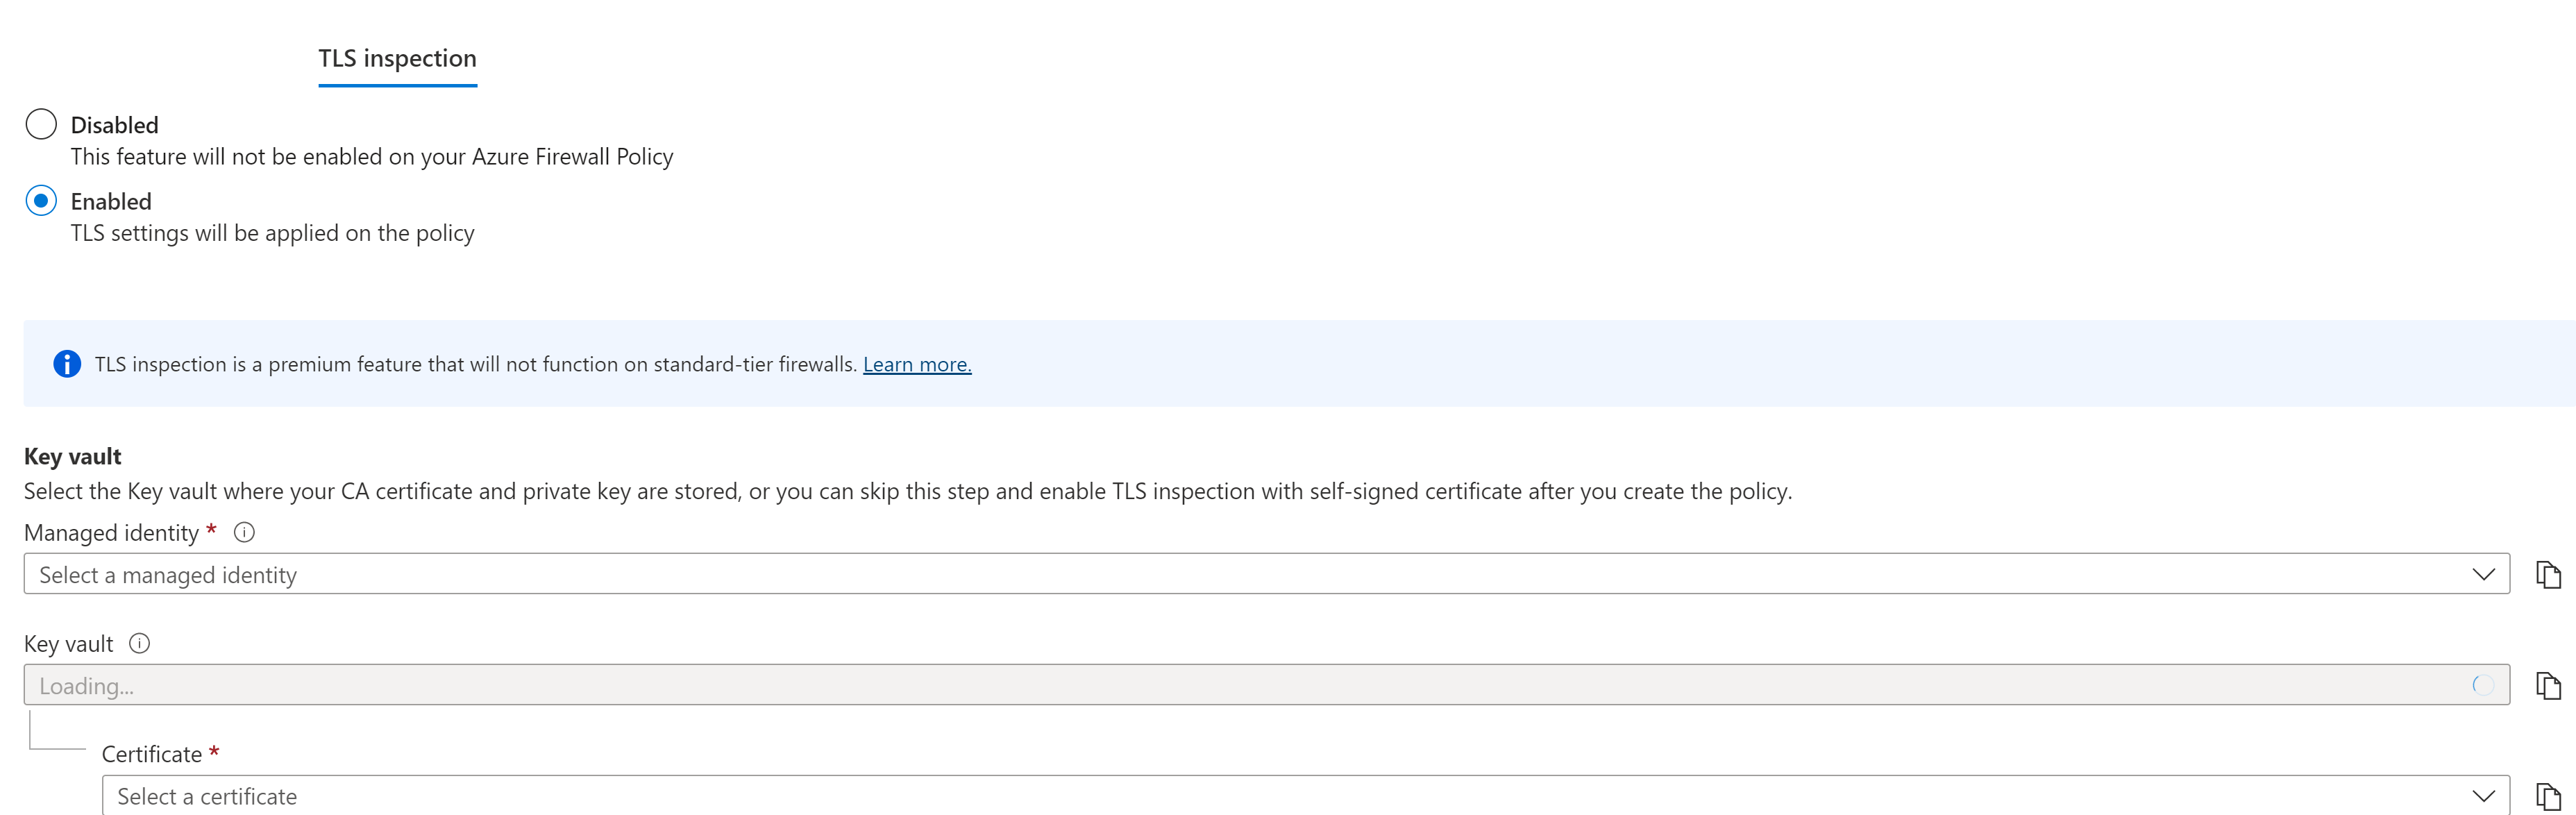
Enable TLS inspection:
- Prepare a certificate to store in a Key Vault, or plan to auto-generate a certificate with a managed identity. You can review these options for Azure Firewall Premium certificates to select the option for your scenario.
- Navigate to the Firewall Policy and select TLS Inspection.
- Select Enabled.
- Either select a Managed Identity to generate certificates, or select the key vault and certificate.
- Then select Save.
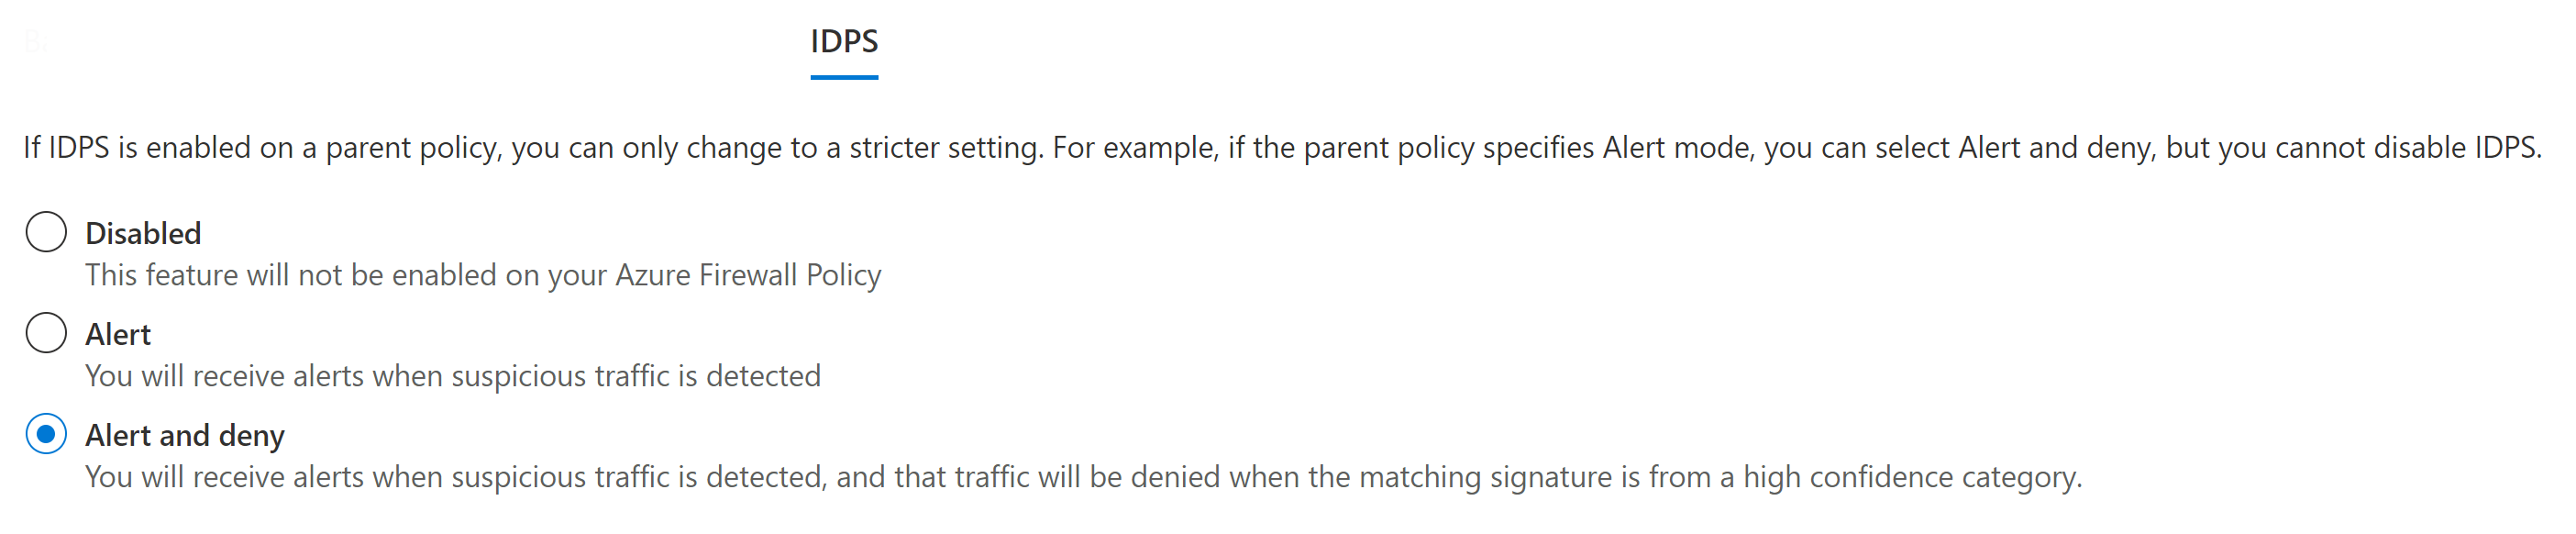
Enable the Intrusion Detection and Prevention System (IDPS):
- Navigate to the Firewall Policy and select IDPS.
- Select Alert and deny.
- Then select Apply.
Next, you'll need to create an application rule for the traffic.
- In the Firewall Policy, navigate to Application Rules.
- Select Add a rule collection.
- Create an application rule with the source of your Application Gateway subnet, and a destination of the domain name of the web app that is being protected.
- Ensure that you enable TLS inspection.


Additional configuration
With the Azure Firewall Premium configured, you can now perform the following configuration:
- Configure Application Gateways to route traffic to your Azure Firewall by assigning the appropriate route tables and following this guidance.
- Create alerts for firewall events and metrics by following these instructions.
- Deploy the Azure Firewall Workbook to visualize events.
- Configure URL and Web category filtering, if needed. Because Azure Firewall denies by default, this configuration is needed only if the Azure Firewall needs to grant outbound internet access broadly. However, use additional verifications to determine connections.
Step 2: Deploy Azure DDoS Protection Standard
As a part of the deployment, you'll want to deploy an Azure DDoS Protection Standard Policy. This increases Zero Trust protection provided on the Azure Platform.
Because you can deploy the created policy to existing resources, you can add this protection after the initial deployment without requiring the redeployment of resources.
Why Azure DDoS Protection Standard?
Azure DDoS Protection Standard has increased benefits over the default DDoS Protection. For Zero Trust, you can have:
- Access to mitigation reports, flow logs, and metrics.
- Application based mitigation policies.
- Access to DDoS rapid response support in the event of a DDoS attack.
Although automatic detection and automatic mitigation are both a part of the DDoS Protection Basic that is enabled by default, these additional features are only available with DDoS Standard.
Configure Azure DDoS Protection Standard
Because there are no Zero Trust-specific configurations for DDoS Protection Standard, you can follow the resource specific guides for this solution:
In the current version of Azure DDoS Protection, you must apply Azure DDoS Protection per VNet. See additional instructions in DDoS Quickstart.
In addition, protect the following public IP addresses:
- Azure Firewall public IP addresses
- Azure Bastion public IP addresses
- Azure Network Gateway public IP addresses
- Application Gateway public IP addresses
Step 3: Configure network gateway routing to the firewall
After deployment, you'll need to configure route tables on various subnets to ensure that traffic between spoke VNets and the on-premises networks are inspected by the Azure Firewall. You can perform this activity in an existing environment without a requirement of redeployment, but you have to author the necessary firewall rules to allow access.
If you configure only one side, either just the spoke subnets or the gateway subnets, then you have asynchronous routing that prevents connections from working.
Why route network gateway traffic to the firewall?
A key element of Zero Trust is to not assume that just because something is in your environment, that it should have access to other resources in your environment. A default configuration often allows for routing between resources in Azure to your on-premises networks, controlled only by network security groups.
By routing the traffic to the firewall, you increase the level of inspection and increase the security of your environment. You're also alerted to suspicious activity and can take action.
Configure gateway routing
There are two main ways to ensure that gateway traffic is being routed to the Azure firewall:
- Deploy the Azure Network Gateway (either for VPN or ExpressRoute connections) in a dedicated VNet (often called a Transit or Gateway VNet), peer it to the hub VNet, and then create a broad routing rule that covers your planned Azure networking address spaces routing to the firewall.
- Deploy the Azure Network Gateway in the hub VNet, configure routing on the gateway subnet, and then configure routing on the spoke VNet subnets.
This guide details the second option because it is more compatible with the reference architecture.
Note
Azure Virtual Network Manager is a service that simplifies this process. When this service is Generally Available, used it to manage the routing.
Configure gateway subnet routing
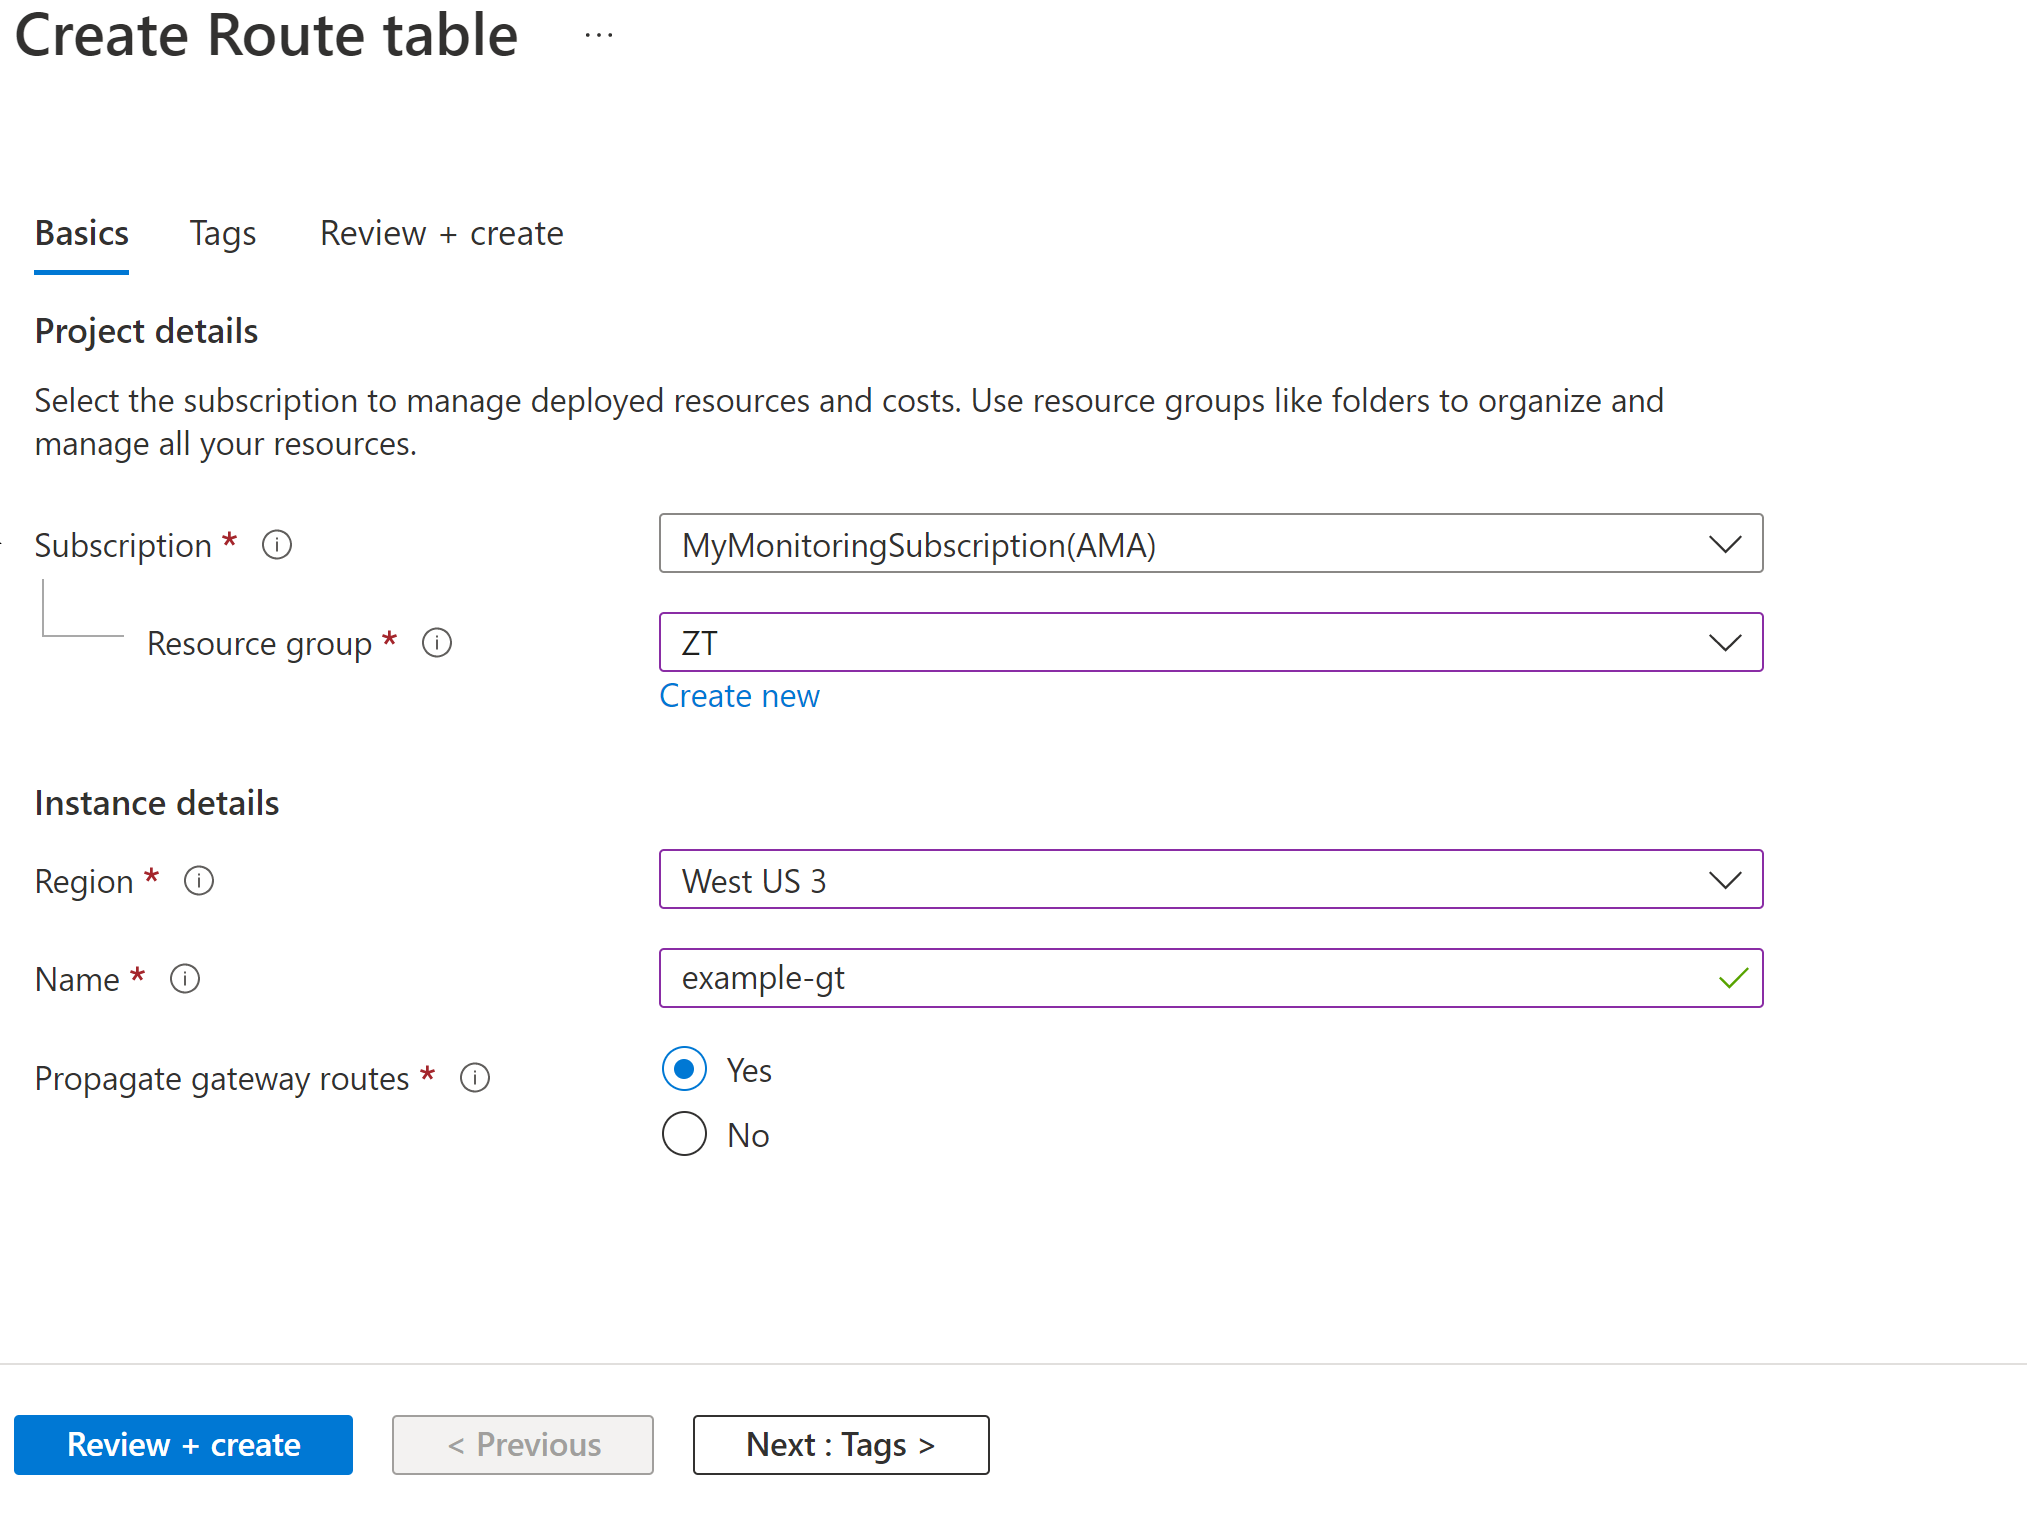
To configure the Gateway Subnet route table to forward internal traffic to the Azure Firewall, create and configure a new Route Table:
Navigate to Create a Route Table in the Microsoft Azure portal.
Place the Route Table in a resource group, select a region, and specify a name.
Select Review + Create and then Create.
Navigate to the new route table, and select Routes.
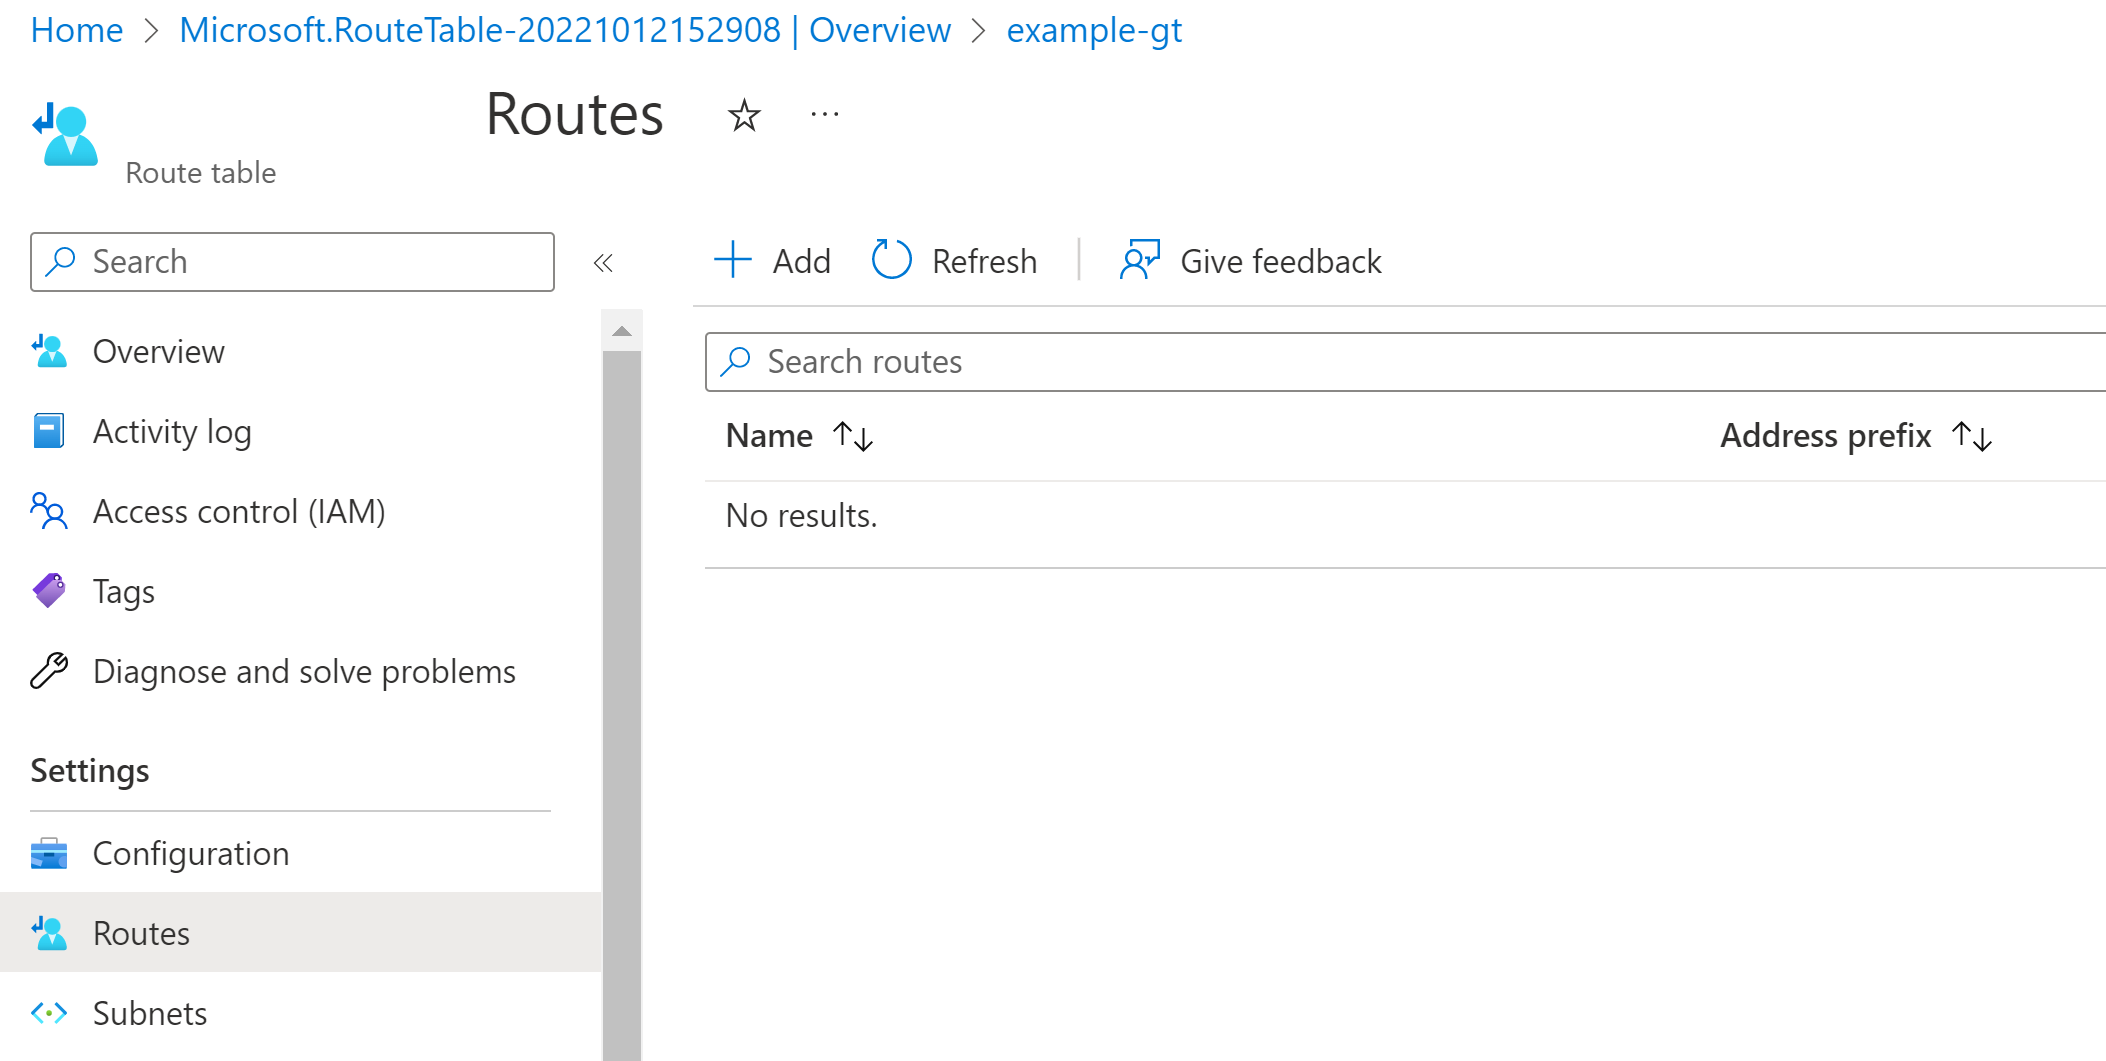
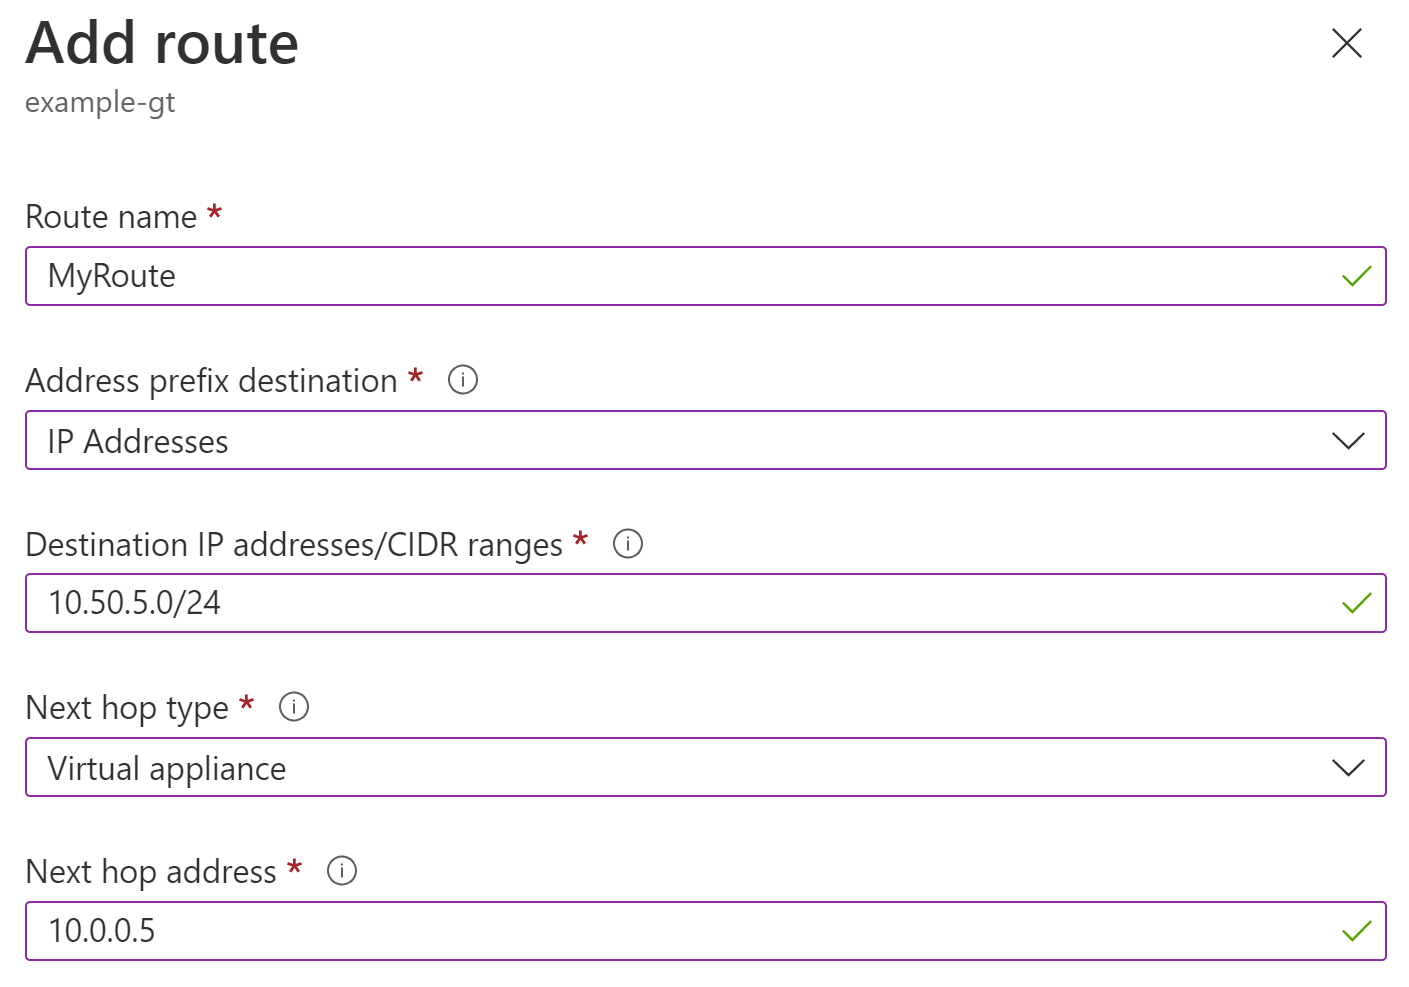
Select Add and then add a route to one of the spoke VNets:
- In Route name, specify the name of the route field.
- Select IP Addresses in the Address prefix destination drop-down.
- Provide the spoke VNet's address space in the Destination IP addresses/CIDR ranges field.
- Select Virtual appliance in the Next hop type drop-down box.
- Provide the Azure Firewall's private IP address in the Next hop address field.
- Select Add.


Associate the route table to the gateway subnet
- Navigate to Subnets, and select Associate.
- Select the Hub VNet in the Virtual network drop-down list.
- Select the GatewaySubnet in the Subnet drop-down.
- Select OK.
Here's an example.

The gateway now forwards traffic intended for spoke VNets to the Azure Firewall.
Configure spoke subnet routing
This process assumes that you already have a route table attached to your spoke VNet subnets, with a default route to forward traffic to the Azure Firewall. This is most often accomplished by a rule that forwards traffic for CIDR range 0.0.0.0/0, often called a quad-zero route.
Here's an example.

This process disables the propagation of routes from the gateway, which enables the default route to take traffic intended to the on-premises networks.
Note
Resources, such as Application Gateways, that require internet access to function should not receive this route table. They should have their own route table to allow their necessary functions, such as what is outlined in the article Zero-trust network for web applications with Azure Firewall and Application Gateway.
To configure spoke subnet routing:
- Navigate to the Route Table associated with your subnet, and select Configuration.
- For Propagate gateway routes, select No.
- Select Save.

Your default route now forwards traffic intended for the gateway to the Azure Firewall.
Step 4: Configure threat protection
Microsoft Defender for Cloud can protect your hub VNet built on Azure, just like other resources from your IT business environment running on Azure or on-premises.
Microsoft Defender for Cloud is a Cloud Security Posture Management (CSPM) and Cloud Workload Protection (CWP) that offers a secure score system to help your company build an IT environment with a better security posture. It also includes features to protect your network environment against threats.
This article won't cover Microsoft Defender for Cloud in detail. However, it is important to understand that Microsoft Defender for Cloud works based on Azure Policies and logs that it ingests in a Log Analytics workspace.
You write Azure Policies in JavaScript Object Notation (JSON) to hold different analysis of Azure resource properties, including network services and resources. That said, it is easy for Microsoft Defender for Cloud to check a property under a network resource and provide a recommendation to your subscription if you're protected or exposed to a threat.
How to check all network recommendations available through Microsoft Defender for Cloud
To view all the Azure policies that provide network recommendations used by Microsoft Defender for Cloud:

Open Microsoft Defender for Cloud, by selecting the Microsoft Defender for Cloud icon in the left menu.
Select Environment settings.
Select Security policy.
If you select in the ASC Default, you'll be able to review all the policies available, including the policies that evaluate network resources.
Additionally, there are network resources evaluated by other regulatory compliances including PCI, ISO and the Microsoft cloud security benchmark. You can enable any of them and track for network recommendations.
Network recommendations
Follow these steps to view some of the network recommendations, based on the Microsoft cloud security benchmark:

Open Microsoft Defender for Cloud.
Select Regulatory compliance.
Select Microsoft cloud security benchmark.
Expand NS. Network Security to review the recommended network control.
It is important to understand that Microsoft Defender for Cloud provides other network recommendations for different Azure resources such as virtual machines and storage. You may review those recommendations in the left menu, under Recommendations.
On the left menu of the Microsoft Defender for Cloud portal, select Security Alerts to review alerts based on network resources so you may avoid some types of threats. Those alerts are generated automatically by Microsoft Defender for Cloud based on logs ingested in the Log Analytics workspace and monitored by Microsoft Defender for Cloud.
Mapping and hardening your Azure network environment through Microsoft Defender for Cloud
You can also check options to get a better security posture by hardening your network environment in an effortless way by mapping your network environment for a better understanding of your network topology. Those recommendations are done through Workload protection option in the left menu, as show here.

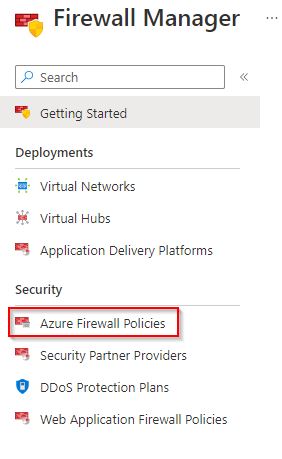
Managing Azure Firewall policies through Microsoft Defender for Cloud
Azure Firewall is recommended for a hub VNet, as described in this article. Microsoft Defender for Cloud can manage multiple Azure Firewall policies centrally. In addition to Azure Firewall policies, you'll be able to manage other features related to Azure Firewall, as shown here.
For more information about how Microsoft Defender for Cloud protects your network environment against threats, see What is Microsoft Defender for Cloud?
Recommended training
- Configure Azure Policy
- Design and implement network security
- Configure Azure Firewall
- Configure VPN Gateway
- Introduction to Azure DDoS Protection
- Resolve security threats with Microsoft Defender for Cloud
For more training on security in Azure, see these resources in the Microsoft catalog:
Security in Azure | Microsoft Learn
Next Steps
See these additional articles for applying Zero Trust principles to Azure:
- Azure IaaS overview
- Azure Virtual Desktop
- Azure Virtual WAN
- IaaS applications in Amazon Web Services
- Microsoft Sentinel and Microsoft Defender XDR
Technical illustrations
This poster provides a single-page, at-a-glance view of the components of Azure IaaS as reference and logical architectures, along with the steps to ensure that these components have the "never trust, always verify" principles of the Zero Trust model applied.
| Item | Description |
|---|---|
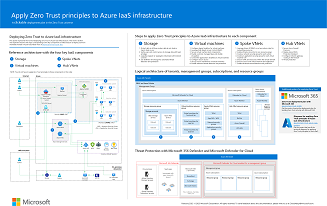 PDF | Visio Updated March 2024 |
Use this illustration together with this article: Apply Zero Trust principles to Azure IaaS overview Related solution guides |
This poster provides the reference and logical architectures and the detailed configurations of the separate components of Zero Trust for Azure IaaS. Use the pages of this poster for separate IT departments or specialties or, with the Microsoft Visio version of the file, customize the diagrams for your infrastructure.
| Item | Description |
|---|---|
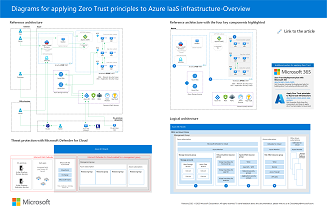 PDF | Visio Updated March 2024 |
Use these diagrams together with the articles starting here: Apply Zero Trust principles to Azure IaaS overview Related solution guides |
For additional technical illustrations, click here.
References
Refer to these links to learn about the various services and technologies mentioned in this article.
Feedback
Coming soon: Throughout 2024 we will be phasing out GitHub Issues as the feedback mechanism for content and replacing it with a new feedback system. For more information see: https://aka.ms/ContentUserFeedback.
Submit and view feedback for