Note
Access to this page requires authorization. You can try signing in or changing directories.
Access to this page requires authorization. You can try changing directories.
This step-by-step tutorial shows you how to set up a cloud-native Windows endpoint using Microsoft Intune and Windows Autopilot. A cloud-native Windows endpoint (sometimes written as cloud native Windows) is Microsoft Entra joined, enrolled in Microsoft Intune, and managed entirely from the cloud — no Active Directory domain join, no on-premises infrastructure required.
By the end of this tutorial, you have a fully configured Windows device that's:
- Microsoft Entra joined and enrolled in Microsoft Intune
- Secured with Microsoft Defender Antivirus, BitLocker encryption, Windows LAPS, and security baselines
- Provisioned through Windows Autopilot with Microsoft 365 apps, OneDrive Known Folder Move, and the Company Portal
- Ready to scale to the rest of your Windows fleet
For background, see What are cloud-native endpoints? and How to plan your Microsoft Entra join implementation.
Tip
When reading about cloud native endpoints, you see the following terms:
- Endpoint: An endpoint is a device, like a mobile phone, tablet, laptop, or desktop computer. "Endpoints" and "devices" are used interchangeably.
- Managed endpoints: Endpoints that receive policies from the organization using an MDM solution or Group Policy Objects. These devices are typically organization owned, but can also be BYOD or personally owned devices.
- Cloud native endpoints: Endpoints that are joined to Microsoft Entra. They aren't joined to on-premises AD.
- Workload: Any program, service, or process.
How to get started
Complete the five phases in order — each builds on the previous one.

| Phase | Goal |
|---|---|
| Phase 1 – Set up your environment | Prepare your tenant, test device, and baseline Autopilot policies |
| Phase 2 – Build a cloud-native Windows endpoint | Provision your first endpoint through Autopilot |
| Phase 3 – Secure your cloud-native Windows endpoint | Apply endpoint security: Defender, BitLocker, LAPS, baselines, updates |
| Phase 4 – Apply customizations and review your on-premises configuration | Add organization-specific apps, settings, and migrate from Group Policy |
| Phase 5 – Scale your deployment with Windows Autopilot | Scale provisioning to your fleet using OEM registration, personas, and rollout rings |
After your endpoints are deployed, use the Monitor your cloud-native Windows endpoints section to validate policy, app, and compliance status from the Intune admin center as part of ongoing operations.
Phase 1 – Set up your environment

Before you build your first cloud-native Windows endpoint, there are some key requirements and configuration that need to be checked. This phase walks you through checking the requirements, configuring Windows Autopilot, and creating some settings and applications.
Step 1 - Network requirements
Your cloud-native Windows endpoint needs access to several internet services. Start your testing on an open network. Or, use your corporate network after providing access to all the endpoints that are listed at Windows Autopilot networking requirements.
If your wireless network requires certificates, you can start with an Ethernet connection during testing while you determine the best approach for wireless connections for device provisioning.
Step 2 - Enrollment and Licensing
Before you can join Microsoft Entra and enroll in Intune, there are a few things you need to check. You could create a new Microsoft Entra group, such as the name Intune MDM Users. Then, add specific test user accounts and target each of the following configurations at that group to limit who can enroll devices while you set up your configuration. To create a Microsoft Entra group, go to Manage Microsoft Entra groups and group membership.
Enrollment restrictions Enrollment restrictions allow you to control what types of devices can enroll into management with Intune. For this guide to be successful, make sure Windows (MDM) enrollment is allowed, which is the default configuration.
For information on configuring Enrollment Restrictions, go to Set enrollment restrictions in Microsoft Intune.
Microsoft Entra Device MDM settings When you join a Windows device to Microsoft Entra, Microsoft Entra can be configured to tell your devices to automatically enroll with an MDM. This configuration is required for Windows Autopilot to work.
To check your Microsoft Entra Device MDM settings are enabled properly, go to Quickstart - Set up automatic enrollment in Intune.
Microsoft Entra company branding Adding your corporate logo and images to Microsoft Entra ensures that users see a familiar and consistent look-and-feel when they sign-in to Microsoft 365. This configuration is required for Windows Autopilot to work.
For information on configuring custom branding in Microsoft Entra, go to Add branding to your organization's Microsoft Entra sign-in page.
Licensing Users enrolling Windows devices from the Out Of Box Experience (OOBE) into Intune require two key capabilities.
Users require the following licenses:
- A Microsoft Intune or Microsoft Intune for Education license
- A license like one of the following options that allows for automatic MDM enrollment:
- Microsoft Entra Premium P1
- Microsoft Intune for Education
To assign licenses, go to Assign Microsoft Intune licenses.
Note
Both types of licenses are typically included with licensing bundles, like Microsoft 365 E3 (or A3) and higher. View comparisons of Microsoft 365 licensing here.
Step 3 - Import your test device
To test the cloud-native Windows endpoint, we need to start by getting a virtual machine or physical device ready for testing. The following steps get the device details and upload them into the Windows Autopilot service, which are used later in this article.
Note
While the following steps provide a way to import a device for testing, Partners and OEMs can import devices into Windows Autopilot on your behalf as part of purchasing. There's more information about Windows Autopilot in Phase 5.
Install Windows in a virtual machine or reset a physical device so that it's waiting at the OOBE setup screen. For a virtual machine, you can optionally create a checkpoint.
Complete the necessary steps to connect to the Internet.
Open a command prompt by using the Shift + F10 keyboard combination.
Verify that you have internet access by pinging bing.com:
ping bing.com
Switch into PowerShell by running the command:
powershell.exe
Download the Get-WindowsAutopilotInfo script by running the following commands:
Set-ExecutionPolicy -ExecutionPolicy Bypass -Scope ProcessInstall-Script Get-WindowsAutopilotInfo
When prompted, enter Y to accept.
Type the following command:
Get-WindowsAutopilotInfo.ps1 -GroupTag CloudNative -Online
Note
Group Tags allow you to create dynamic Microsoft Entra groups based on a subset of devices. Group Tags can be set when importing devices or changed later in the Microsoft Intune admin center. We use the Group Tag CloudNative in Step 4. You can set the tag name to something different for your testing.
When prompted for credentials, sign in with your Intune Administrator account.
Leave the computer at the out of box experience until Phase 2.
Step 4 - Create Microsoft Entra dynamic group for the device
To limit the configurations from this guide to the test devices that you import to Windows Autopilot, create a dynamic Microsoft Entra group. This group should automatically include the devices that import to Windows Autopilot and have the Group Tag CloudNative. You can then target all your configurations and applications at this group.
Open the Microsoft Intune admin center.
Select Groups > New group. Enter the following details:
- Group type: Select Security.
- Group Name: Enter Autopilot Cloud-Native Windows Endpoints.
- Membership type: Select Dynamic Device.
Select Add dynamic query.
In the Rule Syntax section, select Edit.
Paste the following text:
(device.devicePhysicalIds -any (_ -eq "[OrderID]:CloudNative"))Select OK > Save > Create.
Tip
Dynamic groups take a few minutes to populate after changes occur. In large organizations, it can take longer. After creating a new group, wait a few minutes before you check to confirm the device is now a member of the group.
For more information about dynamic groups for devices, go to Rules for devices.
Step 5 - Configure the Enrollment Status Page
The enrollment status page (ESP) is the mechanism an IT pro uses to control the end-user experience during endpoint provisioning. See Set up the Enrollment Status Page. To limit the scope of the enrollment status page, you can create a new profile and target the Autopilot Cloud-Native Windows Endpoints group created in the previous step, Create Microsoft Entra dynamic group for the device.
For the purposes of testing, we recommend the following settings, but feel free to adjust them as required:
Setting Value Show app and profile configuration progress Yes Only show page to devices provisioned by out-of-box experience (OOBE) Yes (default)
Step 6 - Create and assign the Windows Autopilot profile
Now we can create the Windows Autopilot profile and assign it to our test device. This profile tells your device to join Microsoft Entra and what settings to apply during OOBE.
Open the Microsoft Intune admin center.
Select Devices > Device onboarding > Enrollment > Windows > Windows Autopilot > Deployment profiles.
Select Create profile > Windows PC.
Enter the name Autopilot Cloud-Native Windows Endpoints, and then select Next.
In the Out-of-box experience (OOBE) settings, confirm the following key values and select Next:
Setting Value Deployment mode User-driven Join to Microsoft Entra ID as Microsoft Entra joined User account type Standard Apply device name template Optional. A naming template like CloudPC-%SERIAL%makes devices easy to identify in the admin center.Important
Setting User account type to Standard is a security best practice. It prevents users from installing unapproved software and reduces the attack surface on cloud-native endpoints.
Leave the scope tags and select Next.
Assign the profile to the Microsoft Entra group you created called Autopilot Cloud-Native Windows Endpoints, select Next, and then select Create.
Step 7 - Sync Windows Autopilot devices
The Windows Autopilot service synchronizes several times a day. You can also trigger a sync immediately so that your device is ready to test. To synchronize immediately:
Open the Microsoft Intune admin center.
Select Devices > Device onboarding > Enrollment > Windows > Windows Autopilot > Devices.
Select Sync.
The sync takes several minutes and continues in the background. When the sync is complete, the profile status for the imported device displays Assigned.
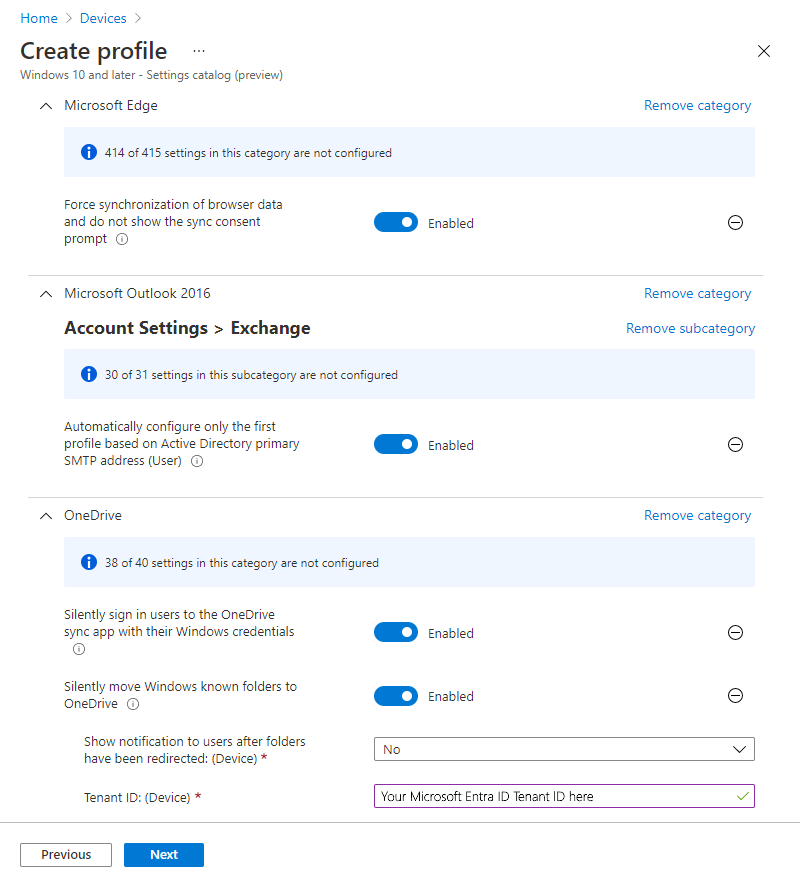
Step 8 - Configure settings for an optimal Microsoft 365 experience
We've selected a few settings to configure. These settings demonstrate an optimal Microsoft 365 end-user experience on your Windows cloud-native device. These settings are configured using a device configuration settings catalog profile. For more information, go to Create a policy using the settings catalog in Microsoft Intune.
After you created the profile and added your settings, assign the profile to the Autopilot Cloud-Native Windows Endpoints group created previously.
Microsoft Outlook - To improve the first run experience for Microsoft Outlook, the following setting automatically configures a profile when Outlook is opened for the first time.
Setting category Setting Value Microsoft Outlook 2016\Account Settings\Exchange (User setting) Automatically configure only the first profile based on Active Directory primary SMTP address Enabled Microsoft Edge - To improve the first run experience for Microsoft Edge, the following settings configure Microsoft Edge to sync the user's settings and skip the first run experience.
Setting category Setting Value Microsoft Edge Hide the first-run experience and splash screen Enabled Force synchronization of browser data and do not show the sync consent prompt Enabled Microsoft OneDrive - To improve the first sign-in experience, the following settings configure Microsoft OneDrive to automatically sign in and redirect Desktop, Pictures, and Documents to OneDrive. Files On-Demand (FOD) is also recommended. It's enabled by default and isn't included in the following list. For more information on the recommended configuration for the OneDrive sync app, go to Recommended sync app configuration for Microsoft OneDrive.
Setting category Setting Value OneDrive Silently sign in users to the OneDrive sync app with their Windows credentials Enabled Silently move Windows known folders to OneDrive Enabled Note
For more information, go to Redirect Known Folders.
The following screenshot shows an example of a settings catalog profile with each of the suggested settings configured:
Step 9 - Create and assign some applications
Your cloud-native endpoint needs some applications. To get started, we recommend configuring the following applications and targeting them at the Autopilot Cloud-Native Windows Endpoints group created previously.
Microsoft 365 Apps (formerly Office 365 ProPlus) - Microsoft 365 Apps such as Word, Excel, and Outlook can easily be deployed to devices using the built-in Microsoft 365 apps for Windows app profile in Intune.
- Select configuration designer for the settings format, as opposed to XML.
- Select Current Channel for the update channel.
To deploy Microsoft 365 Apps, go to Add Microsoft 365 apps to Windows devices using Microsoft Intune
Company Portal app - Deploying the Intune Company Portal app to all devices as a required application is recommended. Company Portal app is the self-service hub for users that they use to install applications from multiple sources, like Intune, Microsoft Store, and Configuration Manager. Users also use the Company Portal app to sync their device with Intune, check compliance status, and so on.
To deploy Company Portal as required, see Add and assign the Windows Company Portal app for Intune managed devices.
Microsoft Store App (Whiteboard) - While Intune can deploy a wide variety of apps, we deploy a store app (Microsoft Whiteboard) to help keep things simple for this guide. Follow the steps in Add Microsoft Store apps to Microsoft Intune to install Microsoft Whiteboard.
Phase 2 – Build a cloud-native Windows endpoint

To build your first cloud-native Windows endpoint, use the same virtual machine or physical device that you gathered and then uploaded the hardware hash to the Windows Autopilot service in Phase 1, Step 3 - Import your test device. With this device, go through the Windows Autopilot process.
Resume (or reset if necessary) your Windows PC to the Out of Box Experience (OOBE).
Note
If you're prompted to choose setup for personal or an organization, then the Windows Autopilot process didn't start. In that situation, restart the device and ensure it has internet access. If it still doesn't work, try resetting the PC or reinstalling Windows.
Sign in with Microsoft Entra credentials (UPN or AzureAD\username).
The enrollment status page shows the status of the device configuration.
Congratulations! You provisioned your first cloud-native Windows endpoint!
Validate your endpoint
Verify the following tasks on your new device before moving to Phase 3:
- OneDrive folders (Desktop, Documents, Pictures) are redirected and syncing.
- Outlook opens and auto-configures your Microsoft 365 profile.
- Company Portal is installed and Microsoft Whiteboard is available.
- You can sign in with your Microsoft Entra credentials and access cloud resources.
- On-premises resources (file shares, intranet sites, printers) are accessible if required.
If you're prompted to enter a password when using Windows Hello to access on-premises resources, Windows Hello for Business Hybrid isn't configured yet. You can continue testing by selecting the key icon on the sign-in screen and using your username and password instead. For more information, see Windows Hello for Business Hybrid.
Phase 3 – Secure your cloud-native Windows endpoint

This phase is designed to help you build out security settings for your organization. This section draws your attention to the various Endpoint Security components in Microsoft Intune including:
- Microsoft Defender Antivirus (MDAV)
- Microsoft Defender Firewall
- BitLocker Encryption
- Windows Local Administrator Password Solution (LAPS)
- Security baselines
- Windows Update client policies
- Compliance policy
- Conditional Access
Microsoft Defender Antivirus (MDAV)
The following settings are recommended as a minimum configuration for Microsoft Defender Antivirus, a built-in OS component of Windows. These settings don't require any specific licensing agreement such as E3 or E5, and can be enabled in the Microsoft Intune admin center.
In the admin center, go to Endpoint Security > Antivirus > Create Policy > Windows and later > Profile type = Microsoft Defender Antivirus.
Defender:
- Allow Behavior Monitoring: Allowed. Turns on real-time behavior monitoring.
- Allow Cloud Protection: Allowed. Turns on Cloud Protection.
- Allow Email Scanning: Allowed. Turns on email scanning.
- Allow scanning of all downloaded files and attachments: Allowed.
- Allow Realtime Monitoring: Allowed. Turns on and runs the real-time monitoring service.
- Allow Scanning Network Files: Allowed. Scans network files.
- Allow Script Scanning: Allowed.
- Cloud Extended Timeout: 50
- Days To Retain Cleaned Malware: 30
- Enable Network Protection: Enabled (audit mode)
- PUA Protection: PUA Protection on. Detected items are blocked. They will show in history along with other threats.
- Real Time Scan Direction: Monitor all files (bi-directional).
- Submit Samples Consent: Send safe samples automatically.
- Allow On Access Protection: Allowed.
- Remediation action for Severe threats: Quarantine. Moves files to quarantine.
- Remediation action for Low severity threat: Quarantine. Moves files to quarantine.
- Remediation action for Moderate severity threats: Quarantine. Moves files to quarantine.
- Remediation action for High severity threats: Quarantine. Moves files to quarantine.
For more information on Windows Defender configuration, including Microsoft Defender for Endpoint for customer's licensed for E3 and E5, go to:
- Next-generation protection in Windows, Windows Server 2016, and Windows Server 2019
- Evaluate Microsoft Defender Antivirus
Microsoft Defender Firewall
Use Endpoint Security in Microsoft Intune to configure the firewall and firewall rules. For more information, go to Firewall policy for endpoint security in Intune.
Microsoft Defender Firewall can detect a trusted network using the NetworkListManager CSP. And, it can switch to the domain firewall profile on endpoints running Windows.
Using the domain network profile allows you to separate firewall rules based on a trusted network, a private network, and a public network. These settings can be applied using a Windows custom profile.
Note
Microsoft Entra joined endpoints can't use LDAP to detect a domain connection in the same way that domain-joined endpoints do. Instead, use the NetworkListManager CSP to specify a TLS endpoint that when accessible, switches the endpoint to the domain firewall profile.
BitLocker Encryption
Use Endpoint Security in Microsoft Intune to configure encryption with BitLocker.
- For more information about managing BitLocker, go to Encrypt Windows devices with BitLocker in Intune.
- Check out our blog series on BitLocker at Enabling BitLocker with Microsoft Intune.
These settings can be enabled in the Microsoft Intune admin center. In the admin center, go to Endpoint Security > Manage > Disk encryption > Create Policy > Windows and later > Profile = BitLocker.
When you configure the following BitLocker settings, they silently enable 128-bit encryption for standard users, which is a common scenario. However, your organization might have different security requirements, so use the BitLocker documentation for more settings.
| Setting category | Setting | Value |
|---|---|---|
| BitLocker | Require Device Encryption | Enabled |
| Allow Warning For Other Disk Encryption | Disabled | |
| Allow Standard User Encryption | Enabled | |
| Configure Recovery Password Rotation | Refresh on for Azure AD-joined devices | |
| BitLocker Drive Encryption | Choose drive encryption method and cipher strength | Not Configured |
| Provide the unique identifiers for your organization | Not Configured | |
| Operating System Drives | Enforce drive encryption type on operating system drives | Enabled |
| Select the encryption type (Device) | Used Space Only encryption | |
| Require additional authentication at startup | Enabled | |
| Allow BitLocker without a compatible TPM (requires a password or a startup key on a USB flash drive) | False | |
| Configure TPM startup key and PIN | Allow startup key and PIN with TPM | |
| Configure TPM startup key | Allow startup key with TPM | |
| Configure TPM startup PIN | Allow startup PIN with TPM | |
| Configure TPM startup | Require TPM | |
| Configure minimum PIN length for startup | Not configured | |
| Allow enhanced PINs for startup | Not configured | |
| Disallow standard users from changing the PIN or password | Not configured | |
| Allow devices compliant with InstantGo or HSTI to opt out of pre-boot PIN | Not configured | |
| Enable use of BitLocker authentication requiring preboot keyboard input on slates | Not configured | |
| Choose how BitLocker-protected operating system drives can be recovered | Enabled | |
| Configure user storage of BitLocker recovery information | Require 48-digit recovery password | |
| Allow data recovery agent | False | |
| Configure storage of BitLocker recovery information to AD DS | Store recovery passwords and key packages | |
| Do not enable BitLocker until recovery information is stored to AD DS for operating system drives | True | |
| Omit recovery options from the BitLocker setup wizard | True | |
| Save BitLocker recovery information to AD DS for operating system drives | True | |
| Configure pre-boot recovery message and URL | Not configured | |
| Fixed Data Drives | Enforce drive encryption type on fixed data drives | Enabled |
| Select the encryption type: (Device) | Allow user to choose (default) | |
| Choose how BitLocker-protected fixed drives can be recovered | Enabled | |
| Configure user storage of BitLocker recovery information | Require 48-digit recovery password | |
| Allow data recovery agent | False | |
| Configure storage of BitLocker recovery information to AD DS | Backup recovery passwords and key packages | |
| Do not enable BitLocker until recovery information is stored to AD DS for fixed data drives | True | |
| Omit recovery options from the BitLocker setup wizard | True | |
| Save BitLocker recovery information to AD DS for fixed data drives | True | |
| Deny write access to fixed drives not protected by BitLocker | Not configured | |
| Removable Data Drives | Control use of BitLocker on removable drives | Enabled |
| Allow users to apply BitLocker protection on removable data drives (Device) | False | |
| Allow users to suspend and decrypt BitLocker protection on removable data drives (Device) | False | |
| Deny write access to removable drives not protected by BitLocker | Not configured |
Windows Local Administrator Password Solution (LAPS)
By default, the built-in local administrator account (well known SID S-1-5-500) is disabled. There are some scenarios where a local administrator account can be beneficial, such as troubleshooting, end-user support, and device recovery. If you decide to enable the built-in administrator account, or create a new local administrator account, it's important to secure the password for that account.
Windows Local Administrator Password Solution (LAPS) is one of the features you can use to randomize and securely store the password in Microsoft Entra. If you're using Intune as your MDM service, then use the following steps to enable Windows LAPS.
Important
Windows LAPS assumes that the default local administrator account is enabled, even if it's renamed or if you create another local admin account. Windows LAPS doesn't create or enable any local accounts for you unless you configure Automatic account management mode.
You need to create or enable any local accounts separately from configuring Windows LAPS. You can script this task or use the Configuration Service Providers (CSPs), such as the Accounts CSP or Policy CSP.
Make sure your Windows devices have the April 2023 (or later) security update installed.
For more information, go to Microsoft Entra operating system updates.
Enable Windows LAPS in Microsoft Entra:
- Sign in to Microsoft Entra.
- For the Enable Local Administrator Password Solution (LAPS) setting, select Yes > Save (top of the page).
For more information, go to Enabling Windows LAPS with Microsoft Entra.
In Intune, create an endpoint security policy:
- Sign in to the Microsoft Intune admin center.
- Select Endpoint Security > Account Protection > Create Policy > Windows > Local admin password solution (Windows LAPS) > Create.
For more information, go to Create a LAPS policy in Intune.
Security Baselines
You can use security baselines to apply a set of configurations that are known to increase the security of a Windows endpoint. For more information about security baselines, go to Windows MDM security baseline settings for Intune.
Baselines can be applied using the suggested settings and customized as per your requirements. Some settings within baselines might cause unexpected results or be incompatible with apps and services running on your Windows endpoints. As a result, baselines should be tested in isolation. Only apply the baseline to a selective group of test endpoints without any other configuration profiles or settings.
Security Baselines Known Issues
The following settings in the Windows security baseline can cause issues with Windows Autopilot or attempting to install apps as a standard user:
- Local Policies Security Options\Administrator elevation prompt behavior (default = Prompt for consent on the secure desktop)
- Standard user elevation prompt behavior (default = Automatically deny elevation requests)
For more information, see Troubleshooting policy conflicts with Windows Autopilot.
Windows Update client policies
Windows Update client policies is the cloud technology for controlling how and when updates are installed on devices. In Intune, Windows Update client policies can be configured using:
For more information, go to:
- Learn about using Windows Update client policies in Microsoft Intune
- Module 4.2 - Windows Update for Business Fundamentals from the Intune for Education Deployment Workshop video series
Tip
For cloud-native environments, consider Windows Autopatch. Autopatch automates update ring management and reporting, removing the need to manually tune deferral periods and deadlines. It's included with Microsoft Intune and is the recommended approach for organizations that want fully automated, policy-driven Windows updates with minimal admin overhead.
Compliance policy
A compliance policy reports on the health of your cloud-native Windows endpoints — for example, whether BitLocker is enabled, Secure Boot is on, and Microsoft Defender Antivirus is running. The policy is also the foundation for Conditional Access, so you can block noncompliant devices from accessing organization resources.
To create a Windows compliance policy:
Sign in to the Microsoft Intune admin center.
Select Devices > Compliance > Create policy.
For Platform, select Windows 10 and later > Create.
In Basics, enter a name for the policy and select Next.
In Compliance settings, configure the following recommended values and select Next:
Setting category Setting Value Device Health Require BitLocker Require Require Secure Boot to be enabled on the device Require Require code integrity Require System Security Firewall Require Antivirus Require Antispyware Require Require a password to unlock mobile devices Require Simple passwords Block Password type Alphanumeric Minimum password length 14 Maximum minutes of inactivity before password is required 1 Minute Password expiration (days) 365 Number of previous passwords to prevent reuse 5 Defender Microsoft Defender Antimalware Require Microsoft Defender Antimalware security intelligence up-to-date Require Real-time protection Require Tip
Microsoft and current NIST guidance no longer recommend periodic password expiration. The Windows security baseline removed password expiration in 2019. For cloud-native endpoints, the strongest posture is to move users to passwordless sign-in with Windows Hello for Business and passkeys / FIDO2 security keys, and to block weak passwords with Microsoft Entra Password Protection. Adjust the values above to match your organization's policy. To learn more, see Passwordless authentication with Microsoft Intune.
In Actions for noncompliance, set the Mark device noncompliant schedule to
1day (or another grace period that suits your organization).Tip
If you use Conditional Access, configure a grace period so noncompliant devices don't immediately lose access to organization resources. You can also add an action to email users with steps to get compliant.
Assign the policy to the Autopilot Cloud-Native Windows Endpoints group from Step 4 - Create Microsoft Entra dynamic group for the device.
For more information on Windows compliance settings, see Windows device compliance settings in Microsoft Intune.
Conditional Access
Conditional Access in Microsoft Entra uses compliance signal from Intune to allow or block access to organization resources. The most common cloud-native pattern is require a compliant device for Microsoft 365 apps and other cloud services. This pattern ensures only Intune-managed, healthy devices can access your data.
A typical cloud-native Conditional Access baseline includes:
- Require multifactor authentication for all users.
- Require a compliant device (or hybrid Microsoft Entra joined device) for cloud apps.
- Block legacy authentication protocols.
Important
Test Conditional Access policies on a pilot group first. A misconfigured policy can lock administrators out of the Microsoft Entra admin center.
For step-by-step guidance, see:
- Conditional Access: Require compliant or hybrid Microsoft Entra joined device
- Plan a Conditional Access deployment
- Conditional Access common policies
Phase 4 – Apply customizations and review your on-premises configuration

In this phase, you apply organization-specific settings, apps, and review your on-premises configuration. The phase helps you build any customizations specific to your organization. Notice the various components of Windows, how you can review existing configurations from an on-premises AD Group Policy environment, and apply them to cloud-native endpoints. There are sections for each of the following areas:
- User experience
- Device configuration
- Migrate from on-premises
- Applications
Microsoft Edge
Microsoft Edge Deployment
Microsoft Edge is included on devices that run:
- Windows
After users sign in, Microsoft Edge updates automatically. To trigger an update for Microsoft Edge during deployment, you can run the following command:
Start-Process -FilePath "C:\Program Files (x86)\Microsoft\EdgeUpdate\MicrosoftEdgeUpdate.exe" -argumentlist "/silent /install appguid={56EB18F8-B008-4CBD-B6D2-8C97FE7E9062}&appname=Microsoft%20Edge&needsadmin=True"
To deploy Microsoft Edge to previous versions of Windows, go to Add Microsoft Edge for Windows to Microsoft Intune.
Microsoft Edge Configuration
Two components of the Microsoft Edge experience, which apply when users sign in with their Microsoft 365 credentials, can be configured from the Microsoft 365 Admin Center.
The start page logo in Microsoft Edge can be customized by configuring the Your organization section within the Microsoft 365 admin center. For more information, go to Customize the Microsoft 365 theme for your organization.
The default new tab page experience in Microsoft Edge includes Office 365 information and personalized news. How this page is displayed can be customized from the Microsoft 365 admin center at Settings > Org settings > News > Microsoft Edge new tab page.
You can also set other settings for Microsoft Edge using settings catalog profiles. For example, you might want to configure specific sync settings for your organization.
- Microsoft Edge
- Configure the list of types that are excluded from synchronization - passwords
Start and Taskbar layout
You can customize and set a standard start and taskbar layout using Intune.
For Windows 11:
- To create and apply a Start menu layout, go to Customize the Start menu layout on Windows 11.
- To create and apply a Taskbar layout, go to Customize the Taskbar on Windows 11.
For Windows 10:
- For more information about start and taskbar customization, go to Manage Windows Start and taskbar layout (Windows).
- To create a start and taskbar layout, go to Customize and export Start layout (Windows).
After the layout is created, it can be uploaded to Intune by configuring a Device Restrictions profile. The setting is under the Start category.
Important
On October 14, 2025, Windows 10 reached end of support and won't receive quality and feature updates. Windows 10 is an allowed version in Intune. Devices running this version can still enroll in Intune and use eligible features, but functionality won't be guaranteed and can vary.
Settings catalog
The settings catalog is a single location where all configurable Windows settings are listed. This feature simplifies how you create a policy, and how you see all the available settings. For more information, go to Create a policy using the settings catalog in Microsoft Intune.
Tip
Many of the settings you're familiar with from group policy are built into the settings catalog. If settings aren't available in the settings catalog, then check the device configuration profiles templates.
Following are some settings available in the settings catalog that might be relevant to your organization:
Azure Active Directory preferred tenant domain - This setting configures the preferred tenant domain name to be appended to a user's username. A preferred tenant domain allows users to sign in to Microsoft Entra endpoints with only their username rather than their whole UPN so long as the user's domain name matches the preferred tenant domain. For users that have different domain names, they can type their whole UPN.
Setting category Setting Value Authentication Preferred AAD Tenant Domain Name Enter domain name, like contoso.onmicrosoft.com.Note
The setting label uses legacy terminology. "AAD" refers to Microsoft Entra ID.
Windows Spotlight - By default, several consumer features of Windows are enabled which results in selected Store apps installing and third-party suggestions on the lock screen. You can control this using the Experience section of the settings catalog.
Setting category Setting Value Experience > Allow Windows Spotlight Allow Windows Consumer Features Block Allow Third-Party Suggestions in Windows Spotlight (user) Block Microsoft Store - Organizations typically want to restrict the applications that can install on endpoints. Use this setting if your organization wants to control which applications can install from the Microsoft Store. This setting prevents users from installing applications unless they're approved.
Setting category Setting Value Microsoft App Store Require Private Store Only Only Private store is enabled Note
This setting applies to Windows 10. On Windows 11, this setting blocks access to the public Microsoft store. For more information, go to:
Block Gaming - Organizations might prefer that corporate endpoints can't be used to play games. The Gaming page within the Settings app can be hidden entirely using the following setting. For additional information on the settings page visibility, go to the CSP documentation and the ms-settings URI scheme reference.
Setting category Setting Value Settings Page Visibility List hide:gaming-gamebar;gaming-gamedvr;gaming-broadcasting;gaming-gamemode;gaming-trueplay;gaming-xboxnetworking;quietmomentsgame Control which tenants the Teams desktop client can sign in to - When this policy is configured on a device, users can only sign in with accounts homed in a Microsoft Entra tenant that's included in the "Tenant Allow List" defined in this policy. The "Tenant Allow List" is a comma separated list of Microsoft Entra tenant IDs. By specifying this policy and defining a Microsoft Entra tenant, you also block sign in to Teams for personal use. For more information, go to How to restrict sign in on desktop devices.
Setting category Setting Value Microsoft Teams Restrict sign in to Teams to accounts in specific tenants (User) Enabled
Device Restrictions
Windows Device restrictions templates contain many of the settings required to secure and manage a Windows endpoint using Windows Configuration Service Providers (CSPs). More of these settings will be made available in the settings catalog over time. For more information, go to Device Restrictions.
To create a profile that uses the Device restrictions template, in the Microsoft Intune admin center, go to Devices > Manage devices > Configuration > Create > New policy > Select Windows 10 and later for platform > Templates Device restrictions for profile type.
Desktop background picture URL (Desktop only) - Use this setting to set a wallpaper on Windows Enterprise or Windows Education SKUs. You host the file online or reference a file that's copied locally. To configure this setting, on the Configuration settings tab in the Device restrictions profile, expand Personalization, and configure Desktop background picture URL (Desktop only).
Require users to connect to a network during device setup - This setting reduces the risk that a device can skip Windows Autopilot if the computer is reset. This setting requires devices to have a network connection during the out of box experience phase. To configure this setting, on the Configuration settings tab in the Device restrictions profile, expand General, and configure Require users to connect to network during device setup.
Note
The setting becomes effective the next time the device is wiped or reset.
Delivery Optimization
Delivery Optimization is used to reduce bandwidth consumption by sharing the work of downloading supported packages among multiple endpoints. Delivery Optimization is a self-organizing distributed cache that enables clients to download those packages from alternate sources, like peers on the network. These peer sources supplement the traditional Internet-based servers. You can find out about all the settings available for Delivery Optimization and what types of downloads are supported at Delivery Optimization for Windows updates.
To apply Delivery Optimization settings, create an Intune Delivery Optimization profile or a settings catalog profile.
Some settings that are commonly used by organizations are:
- Restrict peer selection – Subnet - This setting restricts peer caching to computers on the same subnet.
- Group ID - Delivery Optimization clients can be configured to only share content with devices in the same group. Group IDs can be configured directly by sending a GUID through policy or using DHCP options in DHCP scopes.
Customers using Microsoft Configuration Manager can deploy connected cache servers that can be used to host Delivery Optimization content. For more information, go to Microsoft Connected Cache in Configuration Manager.
Local Administrators
If there's only one user group that needs local administrator access to all Microsoft Entra joined Windows devices, then you can add them to the Microsoft Entra Joined Device Local Administrator.
You might have a requirement for IT helpdesk or other support staff to have local admin rights on a select group of devices. You can meet this requirement by using the following Configuration Service Providers (CSPs).
- Local Users and Groups CSP (preferred)
- Restricted Groups CSP (no update action, only replace)
For more information, go to How to manage the local administrators group on Microsoft Entra joined devices
Group Policy to MDM Setting Migration
There are several options for creating your device configuration when considering a migration from Group Policy to cloud-native device management:
- Start fresh and apply custom settings as required.
- Review existing Group Policies and apply required settings. You can use tools to help, like Group Policy analytics.
- Use Group Policy analytics to create Device Configuration profiles directly for supported settings.
The transition to a cloud-native Windows endpoint represents an opportunity to review your end-user computing requirements and establish a new configuration for the future. Wherever possible, start fresh with a minimal set of policies. Avoid carrying forward unnecessary or legacy settings from a domain-joined environment or older operating systems, like Windows 7 or Windows XP.
To start fresh, review your current requirements and implement a minimal collection of settings to meet these requirements. Requirements might include regulatory or mandatory security settings and settings to enhance the end-user experience. The business creates a list of requirements, not IT. Every setting should be documented, understood, and should serve a purpose.
Migrating settings from existing Group Policies to MDM (Microsoft Intune) isn't the preferred approach. When you transition to cloud-native Windows, the intention shouldn't be to lift and shift existing group policy settings. Instead, consider the target audience and what settings they require. It's time consuming and likely impractical to review each group policy setting in your environment to determine its relevance and compatibility with a modern managed device. Avoid trying to assess every group policy and individual setting. Instead, focus on assessing those common policies that cover most devices and scenarios.
Instead, identify the group policy settings that are mandatory and review those settings against available MDM settings. Any gaps would represent blockers that can prevent you from moving forward with a cloud-native device if unresolved. Tools such as Group Policy analytics can be used to analyze group policy settings and determine if they can be migrated to MDM policies or not.
Scripts
You can use PowerShell scripts for any settings or customizations that you need to configure outside of the in-built configuration profiles. For more information, go to Add PowerShell scripts to Windows devices in Microsoft Intune.
Mapping Network Drives and Printers
Cloud-native scenarios have no built-in solution for mapped network drives. Instead, we recommend that users migrate to Teams, SharePoint, and OneDrive. If migration isn't possible, consider the use of scripts if necessary.
For personal storage, in Step 8 - Configure settings for an optimal Microsoft 365 experience, we configured OneDrive Known Folder move. For more information, go to Redirect Known Folders.
For document storage, users can also benefit from SharePoint integration with File Explorer and the ability to sync libraries locally, as referenced here: Sync SharePoint and Teams files with your computer.
If you use corporate Office document templates, which are typically on internal servers, consider the newer cloud-based equivalent that allows users to access the templates from anywhere.
For printing solutions, consider Universal Print. For more information, go to:
- What is Universal Print?
- Announcing general availability of Universal Print
- Tasks you can complete using the Settings Catalog in Intune
Applications
Intune supports the deployment of many different Windows application types.
- Windows Installer (MSI) – Add a Windows line-of-business app to Microsoft Intune
- MSIX – Add a Windows line-of-business app to Microsoft Intune
- Win32 apps (MSI, EXE, script installers) – Win32 app management in Microsoft Intune
- Store apps – Add Microsoft Store apps to Microsoft Intune
- Web links – Add web apps to Microsoft Intune
If you have applications that use MSI, EXE, or script installers, you can deploy all of these applications using Win32 app management in Microsoft Intune. Wrapping these installers in the Win32 format provides more flexibility and benefits, including notifications, delivery optimization, dependencies, detection rules, and support for the Enrollment Status Page in Windows Autopilot.
Note
To prevent conflicts during installation, we recommend that you stick to using the Windows line-of-business apps or Win32 apps features exclusively. If you have applications that are packaged as .msi or .exe, then they can be converted to Win32 apps (.intunewin) using the Microsoft Win32 Content Prep Tool available on GitHub.
Phase 5 – Scale your deployment with Windows Autopilot

You proved cloud-native works on one device. This phase covers how to move from a test device to your production fleet — how devices get registered, how you group them by persona, how you stage rollout, and how you handle the existing PCs you already manage.
Register devices at scale
In Phase 1, you uploaded a hardware hash manually. That's fine for a lab, but doesn't scale. The production-ready options are:
| Registration source | How it works | Best for |
|---|---|---|
| OEM or hardware partner | Devices ship from the vendor already registered to your tenant (Dell, HP, Lenovo, Microsoft, Surface, and others). | New hardware procurement — the recommended target state. |
| Reseller or CSP | A Microsoft partner registers devices on your behalf. | Indirect or mixed supply chains. |
| Manual hash upload (CSV) | Same Get-WindowsAutopilotInfo flow from Phase 1, Step 3, bulk-uploaded as a CSV. |
Pilots, lab devices, small batches, existing devices being onboarded. |
| Intune Connector / direct enrollment | Newer registration paths surfaced in the admin center. | Specific enrollment scenarios — see the Autopilot registration overview. |
For full details, see Register Autopilot devices.
Tip
Whenever you buy new Windows hardware, ask your reseller or OEM to register devices to your Microsoft Entra tenant ID at the time of purchase. This approach is the lowest-friction long-term pattern and removes the need to ever collect a hash manually.
Use Group Tags for personas
You already used the CloudNative group tag in Phase 1 to drive a dynamic group. The same pattern scales to multiple device personas. Define one group tag per persona, one dynamic Microsoft Entra group per tag, and one Autopilot deployment profile plus Enrollment Status Page per group.
| Persona | Suggested group tag | Autopilot profile | User account type |
|---|---|---|---|
| Knowledge worker | KnowledgeWorker |
User-driven | Standard user |
| Developer / power user | Developer |
User-driven | Administrator |
| Kiosk or shared device | Kiosk |
Self-deploying | N/A |
| Pre-provisioned (white glove) | PreProvisioned |
Pre-provisioned | Standard user |
This pattern keeps configuration, apps, and security policies isolated per persona and avoids one-off exceptions sprawling across your tenant.
Roll out in rings
Don't deploy to the whole fleet at once. Use the same ring concept that you use for Windows Updates:
| Ring | Audience | Purpose |
|---|---|---|
| Pilot | IT team and a small group of volunteers | Validate end-to-end provisioning and policy. |
| Early adopters | ~5% of users, spread across departments | Catch persona- and app-specific issues. |
| Broad | The remaining fleet, staged by region or department | Production rollout. |
Use assignment filters to target rings instead of creating duplicate groups for every policy. Monitor each ring using the Monitor your cloud-native Windows endpoints section before promoting to the next.
Handle existing devices
For Windows PCs you already manage, Microsoft recommends moving to Autopilot at the next hardware refresh rather than re-provisioning your entire fleet today. Cloud-native Windows gets its full benefits from a clean OOBE start, and refresh cycles let you transition naturally with minimal user disruption.
If you can't wait for refresh, two paths are available:
- Register and reset in place. Collect the hash for an existing device, register it to Autopilot, then reset the PC. The device comes back through OOBE as a cloud-native endpoint. See Add existing devices to Windows Autopilot.
- Reimage on refresh. Only new or refreshed hardware enrolls as cloud-native. Existing devices stay on their current management until they reach end of life.
Caution
Don't register devices that are actively managed by Microsoft Configuration Manager without a co-management plan. Decide whether the device will be cloud-managed, co-managed, or stay on Configuration Manager before you register it to Autopilot. For more information, see Co-management for Windows devices.
Learn more
- Overview of Windows Autopilot
- Windows Autopilot deployment profiles
- Module 6.4 - Windows Autopilot Fundamentals - YouTube
If Windows Autopilot isn't the right fit for your scenario, see Intune enrollment methods for Windows devices for alternatives.
Monitor your cloud-native Windows endpoints
After your cloud-native Windows endpoints are provisioned and configured, use the monitoring views in the Microsoft Intune admin center to confirm policies, scripts, and apps deploy successfully — and to spot issues early. Monitoring is an ongoing operational task, not a one-time setup step.
| What to monitor | In the admin center | What to review | More information |
|---|---|---|---|
| Script status | Devices > By platform > Windows > Manage devices > Scripts and remediations > Platform scripts | Select a script > Device status | — |
| App installation status | Apps > Windows > Windows apps | Select an app > Device install status or User install status | Troubleshoot app installs |
| Security baselines | — | — | Monitor security baselines in Intune |
| Disk encryption (BitLocker) | Endpoint security > Disk encryption | Select the BitLocker policy > Device install status. Recovery keys: Devices > Windows > select a device > Recovery keys | — |
| Windows Update rings | Devices > Manage updates > Windows 10 and later updates > Update rings | Select a ring > Device status | Reports for update rings |
| Compliance | Devices > Compliance | Select the policy to see assignment results, noncompliant devices, and per-setting failures | Monitor compliance policies |
| Endpoint analytics | Reports > Endpoint analytics | Startup performance, app reliability, and proactive remediations across your fleet | Endpoint analytics overview · Intune reports |
Follow the cloud-native endpoints guidance
- Overview: What are cloud-native endpoints?
- 🡺 Tutorial: Set up cloud-native Windows endpoints with Microsoft Intune (You're here)
- Concept: Microsoft Entra joined vs. Hybrid Microsoft Entra joined
- Concept: Cloud-native endpoints and on-premises resources
- High level planning guide
- Known issues and important information
Frequently asked questions
What is a cloud-native Windows endpoint?
A cloud-native Windows endpoint is a Windows device that's Microsoft Entra joined and enrolled in Microsoft Intune — with no dependency on on-premises Active Directory, Group Policy, or domain controllers. All configuration, security, and app deployment is managed from the cloud using Microsoft Intune and Windows Autopilot.
What's the difference between cloud-native and hybrid Microsoft Entra joined?
A hybrid Microsoft Entra joined device is joined to both on-premises Active Directory and Microsoft Entra. It still depends on domain controllers for authentication and Group Policy for configuration. A cloud-native (Microsoft Entra joined only) device has no on-premises dependency — identity, policy, and apps all come from the cloud. For a detailed comparison, see Microsoft Entra joined vs. Hybrid Microsoft Entra joined.
Do I need Windows 11 for cloud-native endpoints?
No. Cloud-native Windows works with Windows 10 22H2 or later. Microsoft recommends Windows 11 for the best experience with Windows Autopilot, Windows Hello for Business, and modern security features.
Can I move existing domain-joined devices to cloud-native?
Yes, but Microsoft recommends doing it at the next hardware refresh rather than re-provisioning your entire fleet. Cloud-native Windows gets its full benefits from a clean OOBE start. For devices you can't wait to refresh, see Handle existing devices in Phase 5.
Does cloud-native Windows work with on-premises resources like file shares and printers?
Yes, with some planning. Cloud-native devices can access on-premises resources over VPN or through Microsoft Entra application proxy. For file storage, Microsoft recommends migrating to OneDrive and SharePoint. For printing, consider Universal Print. See Cloud-native endpoints and on-premises resources for detailed guidance.
Helpful online resources
- Co-management for Windows devices
- Windows Subscription Activation
- Configure an Intune device compliance policy that can allow or deny access to resources based on a Microsoft Entra Conditional Access policy
- Add Store Apps
- Add Win32 apps
- Use certificates for authentication in Intune
- Deploy network profiles, including VPN and Wi-Fi
- Deploy multifactor authentication
- Security baseline for Microsoft Edge