データ ソースを作成する (Android SDK)
Azure Maps Android SDK によって、データ ソースにデータが格納されます。 データ ソースを使用すると、クエリとレンダリングのデータ操作が最適化されます。 現在、次の 2 種類のデータ ソースがあります。
- GeoJSON ソース: 場所の生データを GeoJSON 形式でローカルに管理します。 小規模から中規模のデータ セット (数十万点を超える図形) に適しています。
- ベクター タイル ソース: マップのタイル システムに基づいて、現在のマップ ビューのベクター タイルとして書式設定されたデータを読み込みます。 大規模から大規模なデータセット (数百万または数十億点の図形) に最適です。
Note
Azure Maps Android SDK の廃止
Android 用 Azure Maps Native SDK は非推奨となり、2025 年 3 月 31 日に廃止されます。 サービスの中断を回避するには、2025 年 3 月 31 日までに Azure Maps Web SDK に移行します。 詳細については、「Azure Maps Android SDK 移行ガイド」を参照してください。
GeoJSON データ ソース
Azure Maps では、プライマリ データ モデルの 1 つとして GeoJSON が使用されます。 GeoJSON は、地理空間データを JSON 形式で表現するためのオープンな地理空間標準方法です。 Azure Maps Android SDK で使用できる GeoJSON クラスによって、GeoJSON データを簡単に作成してシリアル化できます。 DataSource クラスに GeoJSON データを読み込んで格納し、レイヤーを使用してレンダリングします。 次のコードは、Azure Maps で GeoJSON オブジェクトを作成する方法を示しています。
/*
    Raw GeoJSON feature

    {
         "type": "Feature",
         "geometry": {
             "type": "Point",
             "coordinates": [-100, 45]
         },
         "properties": {
             "custom-property": "value"
         }
    }

*/

//Create a point feature.
Feature feature = Feature.fromGeometry(Point.fromLngLat(-100, 45));

//Add a property to the feature.
feature.addStringProperty("custom-property", "value");

//Add the feature to the data source.
source.add(feature);
/*
    Raw GeoJSON feature

    {
         "type": "Feature",
         "geometry": {
             "type": "Point",
             "coordinates": [-100, 45]
         },
         "properties": {
             "custom-property": "value"
         }
    }

*/

//Create a point feature.
val feature = Feature.fromGeometry(Point.fromLngLat(-100, 45))

//Add a property to the feature.
feature.addStringProperty("custom-property", "value")

//Add the feature to the data source.
source.add(feature)
ヒント
GeoJSON データは、3 つのメソッド (add、importDataFromUrl、setShapes) のいずれかを使用して、DataSource インスタンスに追加できます。 setShapes メソッドを使用すると、データ ソース内のすべてのデータを効率的に上書きすることができます。 clear、add の順にメソッドを呼び出してデータ ソース内のすべてのデータを置換すると、マップに対して 2 つのレンダリング呼び出しが行われます。 setShape メソッドを使用すると、マップへの 1 回のレンダリング呼び出しで、データのクリアとデータ ソースへの追加が行われます。
または、次のサンプル コードに示すように、プロパティを JsonObject に先に読み込んでから、作成時にフィーチャーに渡すことができます。
//Create a JsonObject to store properties for the feature.
JsonObject properties = new JsonObject();
properties.addProperty("custom-property", "value");

Feature feature = Feature.fromGeometry(Point.fromLngLat(-100, 45), properties);
//Create a JsonObject to store properties for the feature.
val properties = JsonObject()
properties.addProperty("custom-property", "value")

val feature = Feature.fromGeometry(Point.fromLngLat(-100, 45), properties)
GeoJSON フィーチャーを作成したら、マップの sources プロパティを使用して、マップにデータ ソースを追加できます。 次のコードは、DataSource を作成し、マップに追加し、フィーチャーをデータ ソースに追加する方法を示しています。
//Create a data source and add it to the map.
DataSource source = new DataSource();
map.sources.add(source);

//Add GeoJSON feature to the data source.
source.add(feature);
次のコードは、GeoJSON フィーチャー、FeatureCollection、およびジオメトリを作成するためのさまざまな方法を示しています。
//GeoJSON Point Geometry
Point point = Point.fromLngLat(LONGITUDE, LATITUDE);

//GeoJSON Point Geometry
LineString linestring = LineString.fromLngLats(PointList);

//GeoJSON Polygon Geometry
Polygon polygon = Polygon.fromLngLats(listOfPointList);

Polygon polygonFromOuterInner = Polygon.fromOuterInner(outerLineStringObject,innerLineStringObject);

//GeoJSON MultiPoint Geometry
MultiPoint multiPoint = MultiPoint.fromLngLats(PointList);

//GeoJSON MultiLineString Geometry
MultiLineString multiLineStringFromLngLat = MultiLineString.fromLngLats(listOfPointList);

MultiLineString multiLineString = MultiLineString.fromLineString(singleLineString);

//GeoJSON MultiPolygon Geometry
MultiPolygon multiPolygon = MultiPolygon.fromLngLats(listOflistOfPointList);

MultiPolygon multiPolygonFromPolygon = MultiPolygon.fromPolygon(polygon);

MultiPolygon multiPolygonFromPolygons = MultiPolygon.fromPolygons(PolygonList);

//GeoJSON Feature
Feature pointFeature = Feature.fromGeometry(Point.fromLngLat(LONGITUDE, LATITUDE));

//GeoJSON FeatureCollection
FeatureCollection featureCollectionFromSingleFeature = FeatureCollection.fromFeature(pointFeature);

FeatureCollection featureCollection = FeatureCollection.fromFeatures(listOfFeatures);
//GeoJSON Point Geometry
val point = Point.fromLngLat(LONGITUDE, LATITUDE)

//GeoJSON Point Geometry
val linestring = LineString.fromLngLats(PointList)

//GeoJSON Polygon Geometry
val polygon = Polygon.fromLngLats(listOfPointList)

val polygonFromOuterInner = Polygon.fromOuterInner(outerLineStringObject, innerLineStringObject)

//GeoJSON MultiPoint Geometry
val multiPoint = MultiPoint.fromLngLats(PointList)

//GeoJSON MultiLineString Geometry
val multiLineStringFromLngLat = MultiLineString.fromLngLats(listOfPointList)

val multiLineString = MultiLineString.fromLineString(singleLineString)

//GeoJSON MultiPolygon Geometry
val multiPolygon = MultiPolygon.fromLngLats(listOflistOfPointList)

val multiPolygonFromPolygon = MultiPolygon.fromPolygon(polygon)

val multiPolygonFromPolygons = MultiPolygon.fromPolygons(PolygonList)

//GeoJSON Feature
val pointFeature = Feature.fromGeometry(Point.fromLngLat(LONGITUDE, LATITUDE))

//GeoJSON FeatureCollection
val featureCollectionFromSingleFeature = FeatureCollection.fromFeature(pointFeature)

val featureCollection = FeatureCollection.fromFeatures(listOfFeatures)
GeoJSON のシリアル化と逆シリアル化を行う
フィーチャー コレクション、フィーチャー、およびジオメトリ クラスにはすべてに、静的メソッドである fromJson() と toJson() があり、シリアル化に役立ちます。 fromJson() メソッドを通して渡される書式設定された有効な JSON 文字列によって、ジオメトリ オブジェクトが作成されます。 この fromJson() メソッドは、Gson またはその他のシリアル化/逆シリアル化戦略を使用できることも意味します。 次のコードは、文字列化された GeoJSON フィーチャーを取得し、それを Feature クラスに逆シリアル化した後、GeoJSON 文字列にシリアル化する方法を示しています。
//Take a stringified GeoJSON object.
String GeoJSON_STRING = "{"
    + "      \"type\": \"Feature\","
    + "      \"geometry\": {"
    + "            \"type\": \"Point\""
    + "            \"coordinates\": [-100, 45]"
    + "      },"
    + "      \"properties\": {"
    + "            \"custom-property\": \"value\""
    + "      },"
    + "}";

//Deserialize the JSON string into a feature.
Feature feature = Feature.fromJson(GeoJSON_STRING);

//Serialize a feature collection to a string.
String featureString = feature.toJson();
//Take a stringified GeoJSON object.
val GeoJSON_STRING = ("{"
        + "      \"type\": \"Feature\","
        + "      \"geometry\": {"
        + "            \"type\": \"Point\""
        + "            \"coordinates\": [-100, 45]"
        + "      },"
        + "      \"properties\": {"
        + "            \"custom-property\": \"value\""
        + "      },"
        + "}")

//Deserialize the JSON string into a feature.
val feature = Feature.fromJson(GeoJSON_STRING)

//Serialize a feature collection to a string.
val featureString = feature.toJson()
GeoJSON データを Web または assets フォルダーからインポートする
ほとんどの GeoJSON ファイルには、FeatureCollection が含まれています。 GeoJSON ファイルを文字列として読み取り、FeatureCollection.fromJson メソッドを使用して逆シリアル化します。
DataSource クラスには、importDataFromUrl という組み込みのメソッドがあります。これを使用すると、Web 上または asset フォルダー内のファイルへの URL を使用して GeoJSON ファイルに読み込むことができます。 このメソッドは、データ ソースがマップに追加される前に、呼び出す必要があります。
zone_pivot_groups: azure-maps-android
//Create a data source and add it to the map.
DataSource source = new DataSource();

//Import the geojson data and add it to the data source.
source.importDataFromUrl("URL_or_FilePath_to_GeoJSON_data");

//Examples:
//source.importDataFromUrl("asset://sample_file.json");
//source.importDataFromUrl("https://example.com/sample_file.json");

//Add data source to the map.
map.sources.add(source);
//Create a data source and add it to the map.
var source = new DataSource()

//Import the geojson data and add it to the data source.
source.importDataFromUrl("URL_or_FilePath_to_GeoJSON_data")

//Examples:
//source.importDataFromUrl("asset://sample_file.json")
//source.importDataFromUrl("https://example.com/sample_file.json")

//Add data source to the map.
map.sources.add(source)
importDataFromUrl メソッドを使用すると、GeoJSON フィードをデータ ソースに簡単に読み込むことができますが、データの読み込み方法と、読み込み後の動作の制御は限定されます。 次のコードは、Web または assets フォルダーからデータをインポートし、コールバック関数を介して UI スレッドに返すための再利用可能なクラスです。 次に、コールバックに読み込み後のロジックを追加してデータを処理し、それをマップに追加し、その境界ボックスを計算し、マップ カメラを更新します。
import android.content.Context;
import android.os.Handler;
import android.os.Looper;
import android.webkit.URLUtil;

import java.io.BufferedReader;
import java.io.IOException;
import java.io.InputStream;
import java.io.InputStreamReader;
import java.net.URL;
import java.util.concurrent.ExecutorService;
import java.util.concurrent.Executors;

import javax.net.ssl.HttpsURLConnection;

public class Utils {

    interface SimpleCallback {
        void notify(String result);
    }

    /**
     * Imports data from a web url or asset file name and returns it to a callback.
     * @param urlOrFileName A web url or asset file name that points to data to load.
     * @param context The context of the app.
     * @param callback The callback function to return the data to.
     */
    public static void importData(String urlOrFileName, Context context, SimpleCallback callback){
        importData(urlOrFileName, context, callback, null);
    }

    /**
     * Imports data from a web url or asset file name and returns it to a callback.
     * @param urlOrFileName A web url or asset file name that points to data to load.
     * @param context The context of the app.
     * @param callback The callback function to return the data to.
     * @param error A callback function to return errors to.
     */
    public static void importData(String urlOrFileName, Context context, SimpleCallback callback, SimpleCallback error){
        if(urlOrFileName != null && callback != null) {
            ExecutorService executor = Executors.newSingleThreadExecutor();
            Handler handler = new Handler(Looper.getMainLooper());

            executor.execute(() -> {
                String data = null;

                try {

                    if(URLUtil.isNetworkUrl(urlOrFileName)){
                        data = importFromWeb(urlOrFileName);
                    } else {
                        //Assume file is in assets folder.
                        data = importFromAssets(context, urlOrFileName);
                    }

                    final String result = data;

                    handler.post(() -> {
                        //Ensure the resulting data string is not null or empty.
                        if (result != null && !result.isEmpty()) {
                            callback.notify(result);
                        } else {
                            error.notify("No data imported.");
                        }
                    });
                } catch(Exception e) {
                    if(error != null){
                        error.notify(e.getMessage());
                    }
                }
            });
        }
    }

    /**
     * Imports data from an assets file as a string.
     * @param context The context of the app.
     * @param fileName The asset file name.
     * @return
     * @throws IOException
     */
    private static String importFromAssets(Context context, String fileName) throws IOException {
        InputStream stream = null;

        try {
            stream = context.getAssets().open(fileName);

            if(stream != null) {
                return readStreamAsString(stream);
            }
        } catch (Exception e) {
            e.printStackTrace();
        } finally {
            // Close Stream and disconnect HTTPS connection.
            if (stream != null) {
                stream.close();
            }
        }

        return null;
    }

    /**
     * Imports data from the web as a string.
     * @param url URL to the data.
     * @return
     * @throws IOException
     */
    private static String importFromWeb(String url) throws IOException {
        InputStream stream = null;
        HttpsURLConnection connection = null;
        String result = null;

        try {
            connection = (HttpsURLConnection) new URL(url).openConnection();

            //For this use case, set HTTP method to GET.
            connection.setRequestMethod("GET");

            //Open communications link (network traffic occurs here).
            connection.connect();

            int responseCode = connection.getResponseCode();
            if (responseCode != HttpsURLConnection.HTTP_OK) {
                throw new IOException("HTTP error code: " + responseCode);
            }

            //Retrieve the response body as an InputStream.
            stream = connection.getInputStream();

            if (stream != null) {
                return readStreamAsString(stream);
            }
        } catch (Exception e) {
            e.printStackTrace();
        } finally {
            // Close Stream and disconnect HTTPS connection.
            if (stream != null) {
                stream.close();
            }
            if (connection != null) {
                connection.disconnect();
            }
        }

        return result;
    }

    /**
     * Reads an input stream as a string.
     * @param stream Stream to convert.
     * @return
     * @throws IOException
     */
    private static String readStreamAsString(InputStream stream) throws IOException {
        //Convert the contents of an InputStream to a String.
        BufferedReader in = new BufferedReader(new InputStreamReader(stream, "UTF-8"));

        String inputLine;
        StringBuffer response = new StringBuffer();

        while ((inputLine = in.readLine()) != null) {
            response.append(inputLine);
        }

        in.close();

        return response.toString();
    }
}
import android.content.Context
import android.os.Handler
import android.os.Looper
import android.webkit.URLUtil
import java.net.URL
import java.util.concurrent.ExecutorService
import java.util.concurrent.Executors

class Utils {
    companion object {

        /**
            * Imports data from a web url or asset file name and returns it to a callback.
            * @param urlOrFileName A web url or asset file name that points to data to load.
            * @param context The context of the app.
            * @param callback The callback function to return the data to.
            */
        fun importData(urlOrFileName: String?, context: Context, callback: (String?) -> Unit) {
            importData(urlOrFileName, context, callback, null)
        }

        /**
            * Imports data from a web url or asset file name and returns it to a callback.
            * @param urlOrFileName A web url or asset file name that points to data to load.
            * @param context The context of the app.
            * @param callback The callback function to return the data to.
            * @param error A callback function to return errors to.
            */
        public fun importData(urlOrFileName: String?, context: Context, callback: (String?) -> Unit, error: ((String?) -> Unit)?) {
            if (urlOrFileName != null && callback != null) {
                val executor: ExecutorService = Executors.newSingleThreadExecutor()
                val handler = Handler(Looper.getMainLooper())
                executor.execute {
                    var data: String? = null

                    try {
                        data = if (URLUtil.isNetworkUrl(urlOrFileName)) {
                            URL(urlOrFileName).readText()
                        } else { //Assume file is in assets folder.
                            context.assets.open(urlOrFileName).bufferedReader().use{
                                it.readText()
                            }
                        }

                        handler.post {
                            //Ensure the resulting data string is not null or empty.
                            if (data != null && !data.isEmpty()) {
                                callback(data)
                            } else {
                                error!!("No data imported.")
                            }
                        }
                    } catch (e: Exception) {
                        error!!(e.message)
                    }
                }
            }
        }
    }
}
次のコードは、このユーティリティを使用して、GeoJSON データを文字列としてインポートし、コールバックを介して UI スレッドに返す方法を示しています。 コールバックでは、文字列データを GeoJSON フィーチャー コレクションにシリアル化してデータ ソースに追加できます。 必要に応じて、データに焦点を当てるようにマップのカメラを更新します。
//Create a data source and add it to the map.
DataSource source = new DataSource();
map.sources.add(source);

//Import the geojson data and add it to the data source.
Utils.importData("URL_or_FilePath_to_GeoJSON_data",
    this,
    (String result) -> {
        //Parse the data as a GeoJSON Feature Collection.
        FeatureCollection fc = FeatureCollection.fromJson(result);

        //Add the feature collection to the data source.
        source.add(fc);

        //Optionally, update the maps camera to focus in on the data.

        //Calculate the bounding box of all the data in the Feature Collection.
        BoundingBox bbox = MapMath.fromData(fc);

        //Update the maps camera so it is focused on the data.
        map.setCamera(
            bounds(bbox),
            padding(20));
    });
//Create a data source and add it to the map.
DataSource source = new DataSource();
map.sources.add(source);

//Import the GeoJSON data and add it to the data source.
Utils.importData("SamplePoiDataSet.json", this) {
    result: String? ->
        //Parse the data as a GeoJSON Feature Collection.
            val fc = FeatureCollection.fromJson(result!!)

        //Add the feature collection to the data source.
        source.add(fc)

        //Optionally, update the maps camera to focus in on the data.

        //Calculate the bounding box of all the data in the Feature Collection.
        val bbox = MapMath.fromData(fc);

        //Update the maps camera so it is focused on the data.
        map.setCamera(
            bounds(bbox),

            //Padding added to account for pixel size of rendered points.
            padding(20)
        )
    }
フィーチャーを更新する
DataSource クラスを使用すると、フィーチャーを簡単に追加および削除できます。 フィーチャーのジオメトリまたはプロパティを更新するには、データ ソース内のフィーチャーを置き換える必要があります。 フィーチャーを更新するには、次の 2 つのメソッドを使用できます。
- 必要な更新を使用して新しいフィーチャーを作成し、
setShapesメソッドを使用してデータ ソース内のすべてのフィーチャーを置き換えます。 このメソッドは、データ ソース内のすべてのフィーチャーを更新する場合に適しています。
DataSource source;

private void onReady(AzureMap map) {
    //Create a data source and add it to the map.
    source = new DataSource();
    map.sources.add(source);

    //Create a feature and add it to the data source.
    Feature myFeature = Feature.fromGeometry(Point.fromLngLat(0,0));
    myFeature.addStringProperty("Name", "Original value");

    source.add(myFeature);
}

private void updateFeature(){
    //Create a new replacement feature with an updated geometry and property value.
    Feature myNewFeature = Feature.fromGeometry(Point.fromLngLat(-10, 10));
    myNewFeature.addStringProperty("Name", "New value");

    //Replace all features to the data source with the new one.
    source.setShapes(myNewFeature);
}
var source: DataSource? = null

private fun onReady(map: AzureMap) {
    //Create a data source and add it to the map.
    source = DataSource()
    map.sources.add(source)

    //Create a feature and add it to the data source.
    val myFeature = Feature.fromGeometry(Point.fromLngLat(0.0, 0.0))
    myFeature.addStringProperty("Name", "Original value")
    source!!.add(myFeature)
}

private fun updateFeature() {
    //Create a new replacement feature with an updated geometry and property value.
    val myNewFeature = Feature.fromGeometry(Point.fromLngLat(-10.0, 10.0))
    myNewFeature.addStringProperty("Name", "New value")

    //Replace all features to the data source with the new one.
    source!!.setShapes(myNewFeature)
}
- 変数内のフィーチャー インスタンスを追跡し、それをデータ ソースの
removeメソッドに渡して削除します。 必要な更新を使用して新しいフィーチャーを作成し、変数参照を更新して、addメソッドを使用してそれをデータ ソースに追加します。
DataSource source;
Feature myFeature;

private void onReady(AzureMap map) {
    //Create a data source and add it to the map.
    source = new DataSource();
    map.sources.add(source);

    //Create a feature and add it to the data source.
    myFeature = Feature.fromGeometry(Point.fromLngLat(0,0));
    myFeature.addStringProperty("Name", "Original value");

    source.add(myFeature);
}

private void updateFeature(){
    //Remove the feature instance from the data source.
    source.remove(myFeature);

    //Get properties from original feature.
    JsonObject props = myFeature.properties();

    //Update a property.
    props.addProperty("Name", "New value");

    //Create a new replacement feature with an updated geometry.
    myFeature = Feature.fromGeometry(Point.fromLngLat(-10, 10), props);

    //Re-add the feature to the data source.
    source.add(myFeature);
}
var source: DataSource? = null
var myFeature: Feature? = null

private fun onReady(map: AzureMap) {
    //Create a data source and add it to the map.
    source = DataSource()
    map.sources.add(source)

    //Create a feature and add it to the data source.
    myFeature = Feature.fromGeometry(Point.fromLngLat(0.0, 0.0))
    myFeature.addStringProperty("Name", "Original value")
    source!!.add(myFeature)
}

private fun updateFeature() {
    //Remove the feature instance from the data source.
    source!!.remove(myFeature)

    //Get properties from original feature.
    val props = myFeature!!.properties()

    //Update a property.
    props!!.addProperty("Name", "New value")

    //Create a new replacement feature with an updated geometry.
    myFeature = Feature.fromGeometry(Point.fromLngLat(-10.0, 10.0), props)

    //Re-add the feature to the data source.
    source!!.add(myFeature)
}
ヒント
定期的に更新されるデータや、めったに変更されないその他のデータがある場合は、それらを別々のデータ ソース インスタンスに分割することをお勧めします。 データ ソースで更新が発生すると、マップでデータ ソース内のすべてのフィーチャーが強制的に再描画されます。 このデータを分割することで、一方のデータ ソースで更新が発生したときに、定期的に更新されるフィーチャーのみが再描画され、もう一方のデータ ソースのフィーチャーは再描画する必要がなくなります。 これにより、パフォーマンスが向上します。
ベクター タイル ソース
ベクター タイル ソースには、ベクター タイル レイヤーにアクセスする方法が記述されています。 ベクター タイル ソースをインスタンス化するには、VectorTileSource クラスを使用します。 ベクター タイル レイヤーはタイル レイヤーに似ていますが、同じではありません。 タイル レイヤーはラスター イメージです。 ベクター タイル レイヤーは、PBF 形式の圧縮ファイルです。 この圧縮ファイルには、ベクター マップ データと 1 つ以上のレイヤーが含まれています。 このファイルは、各レイヤーのスタイルに基づいて、クライアントでレンダリングおよびスタイル設定できます。 ベクター タイルのデータには、ポイント、線、および多角形の形式で地理的特徴が含まれています。 ベクター タイル レイヤーの使用には、ラスター タイル レイヤーよりも優れている点がいくつかあります。
- ベクター タイルのファイル サイズは、通常、同等のラスター タイルよりはるかに小さくなります。 そのため、使用される帯域幅が少なくなります。 つまり、待機時間の短縮、より高速なマップ、ユーザー エクスペリエンスの向上を意味します。
- ベクター タイルはクライアント上でレンダリングされるため、表示されているデバイスの解像度に適応できます。 結果として、レンダリングされるマップはより明確に定義され、鮮明なラベルが表示されます。
- ベクター マップ内のデータのスタイルを変更しても、クライアントに新しいスタイルを適用できるので、データを再度ダウンロードする必要はありません。 これに対し、ラスター タイル レイヤーのスタイルを変更するには、通常、タイルをサーバーから読み込み、新しいスタイルを適用する必要があります。
- データはベクター形式で配信されるので、データを準備するために必要なサーバー側の処理が少なくなります。 つまり、新しいデータをより速く使用できるようになります。
Azure Maps は、オープン スタンダードである Mapbox Vector Tile 仕様に準拠しています。 Azure Maps では、プラットフォームの一部として次のベクター タイル サービスが提供されます。
- 道路タイル
- トラフィック インシデント
- トラフィック フロー
- Azure Maps Creator では、Render - Get Map Tile API を使って、カスタム ベクター タイルを作成およびアクセスすることもできます
ヒント
Web SDK を使用して Azure Maps の Render Service からベクターまたはラスター イメージのタイルを使用する場合、atlas.microsoft.com をプレースホルダー azmapsdomain.invalid に置き換えることができます。 このプレースホルダーは、マップによって使用されるのと同じドメインに置き換えられ、同じ認証の詳細も自動的に追加されます。 これにより、Microsoft Entra 認証を使うときに、Render Service での認証が大幅に簡単になります。
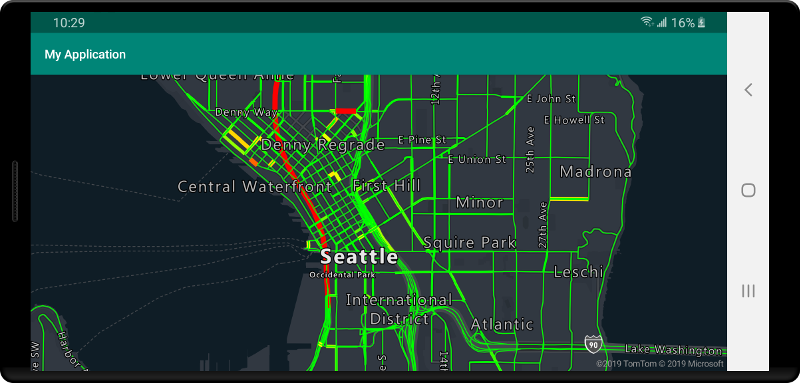
マップにベクター タイル ソースからのデータを表示するには、ソースをいずれかのデータ レンダリング レイヤーに接続します。 ベクター ソースを使用するすべてのレイヤーでオプションの sourceLayer 値を指定する必要があります。 次のコードでは、Azure Maps のトラフィック フロー ベクター タイル サービスをベクター タイル ソースとして読み込み、その後、線レイヤーを使用してマップに表示します。 このベクター タイル ソースには、ソース レイヤーに "Traffic flow" という 1 つのデータ セットがあります。 このデータ セット内の行データには、traffic_level というプロパティがあります。これは、色を選択して線のサイズを拡大縮小するために、このコードで使用されます。
//Formatted URL to the traffic flow vector tiles, with the maps subscription key appended to it.
String trafficFlowUrl = "https://azmapsdomain.invalid/traffic/flow/tile/pbf?api-version=1.0&style=relative&zoom={z}&x={x}&y={y}";

//Create a vector tile source and add it to the map.
VectorTileSource source = new VectorTileSource(
    tiles(new String[] { trafficFlowUrl }),
    maxSourceZoom(22)
);
map.sources.add(source);

//Create a layer for traffic flow lines.
LineLayer layer = new LineLayer(source,
    //The name of the data layer within the data source to pass into this rendering layer.
    sourceLayer("Traffic flow"),

    //Color the roads based on the traffic_level property.
    strokeColor(
        interpolate(
            linear(),
            get("traffic_level"),
            stop(0, color(Color.RED)),
            stop(0.33, color(Color.YELLOW)),
            stop(0.66, color(Color.GREEN))
        )
    ),

    //Scale the width of roads based on the traffic_level property.
    strokeWidth(
        interpolate(
            linear(),
            get("traffic_level"),
            stop(0, 6),
            stop(1,1)
        )
    )
);

//Add the traffic flow layer below the labels to make the map clearer.
map.layers.add(layer, "labels");
//Formatted URL to the traffic flow vector tiles, with the maps subscription key appended to it.
val trafficFlowUrl = "https://azmapsdomain.invalid/traffic/flow/tile/pbf?api-version=1.0&style=relative&zoom={z}&x={x}&y={y}"

//Create a vector tile source and add it to the map.
val source = VectorTileSource(
    tiles(arrayOf(trafficFlowUrl)),
    maxSourceZoom(22)
)
map.sources.add(source)

//Create a layer for traffic flow lines.
val layer = LineLayer(
    source,  //The name of the data layer within the data source to pass into this rendering layer.
    sourceLayer("Traffic flow"),  //Color the roads based on the traffic_level property.
    strokeColor(
        interpolate(
            linear(),
            get("traffic_level"),
            stop(0, color(Color.RED)),
            stop(0.33, color(Color.YELLOW)),
            stop(0.66, color(Color.GREEN))
        )
    ),  //Scale the width of roads based on the traffic_level property.
    strokeWidth(
        interpolate(
            linear(),
            get("traffic_level"),
            stop(0, 6),
            stop(1, 1)
        )
    )
)

//Add the traffic flow layer below the labels to make the map clearer.
map.layers.add(layer, "labels")
レイヤーへのデータ ソースの接続
データは、レンダリング レイヤーを使用してマップ上にレンダリングされます。 1 つ以上のレンダリング レイヤーで 1 つのデータ ソースを参照できます。 次のレンダリング レイヤーでは、データ ソースが必要です。
- バブル レイヤー - ポイント データをマップ上で拡大縮小された円としてレンダリングします。
- シンボル レイヤー - ポイント データをアイコンやテキストとしてレンダリングします。
- ヒート マップ レイヤー - ポイント データを密度ヒート マップとしてレンダリングします。
- 線レイヤー - 線をレンダリングしたり、多角形のアウトラインをレンダリングしたりします。
- 多角形レイヤー - 純色または画像パターンで多角形の領域を塗りつぶします。
次のコードは、データ ソースを作成し、マップに追加してバブル レイヤーに接続する方法を示しています。 次に、GeoJSON ポイント データをリモートの場所からデータ ソースにインポートします。
//Create a data source and add it to the map.
DataSource source = new DataSource();

//Import the geojson data and add it to the data source.
source.importDataFromUrl("URL_or_FilePath_to_GeoJSON_data");

//Add data source to the map.
map.sources.add(source);

//Create a layer that defines how to render points in the data source and add it to the map.
BubbleLayer layer = new BubbleLayer(source);
map.layers.add(layer);
//Create a data source and add it to the map.
val source = DataSource()

//Import the geojson data and add it to the data source.
source.importDataFromUrl("URL_or_FilePath_to_GeoJSON_data")

//Add data source to the map.
map.sources.add(source)
これらのデータ ソースに接続せず、レンダリングするためのデータを直接読み込むレンダリング レイヤーが他にもあります。
- タイル レイヤー - マップの上にラスター タイル レイヤーを重ねて表示します。
複数のレイヤーがある 1 つのデータ ソース
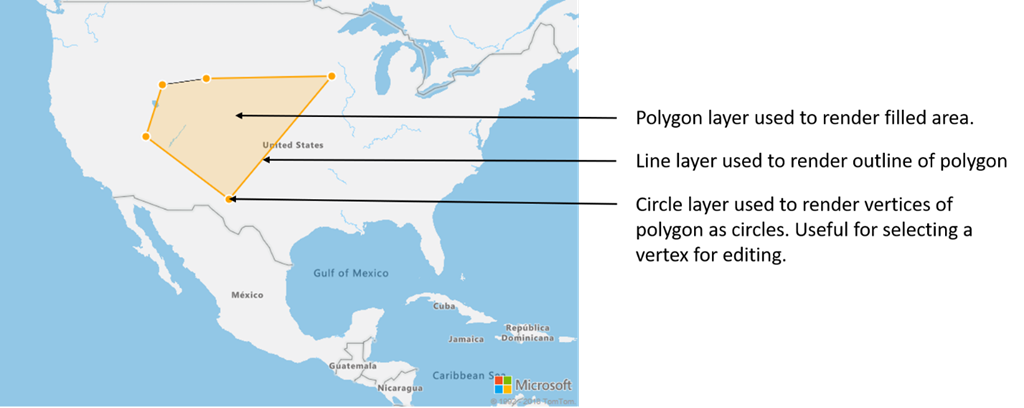
複数のレイヤーを 1 つのデータ ソースに接続できます。 このオプションが役に立つさまざまなシナリオがあります。 たとえば、ユーザーが多角形を描画するシナリオを考えてみます。 ユーザーがポイントをマップに追加するときに、多角形領域をレンダリングして塗りつぶす必要があります。 多角形の輪郭を描画するスタイル指定された線を追加すると、ユーザーが描画するときに多角形のエッジが見やすくなります。 多角形内の個々の位置を簡単に編集するために、各位置の上にピンやマーカーなどのハンドルを追加することもできます。
ほとんどのマッピング プラットフォームで、多角形オブジェクト、線オブジェクト、および多角形内の各位置に対するピンが必要になります。 多角形を変更するときは、線とピンを手動で更新する必要がありますが、これはすぐに複雑になる可能性があります。
Azure Maps で必要なものは、次のコードで示すように、データ ソース内の 1 つの多角形だけです。
//Create a data source and add it to the map.
DataSource source = new DataSource();
map.sources.add(source);

//Create a polygon and add it to the data source.
source.add(Polygon.fromLngLats(/* List of points */));

//Create a polygon layer to render the filled in area of the polygon.
PolygonLayer polygonLayer = new PolygonLayer(source,
    fillColor("rgba(255,165,0,0.2)")
);

//Create a line layer for greater control of rendering the outline of the polygon.
LineLayer lineLayer = new LineLayer(source,
    strokeColor("orange"),
    strokeWidth(2f)
);

//Create a bubble layer to render the vertices of the polygon as scaled circles.
BubbleLayer bubbleLayer = new BubbleLayer(source,
    bubbleColor("orange"),
    bubbleRadius(5f),
    bubbleStrokeColor("white"),
    bubbleStrokeWidth(2f)
);

//Add all layers to the map.
map.layers.add(new Layer[] { polygonLayer, lineLayer, bubbleLayer });
//Create a data source and add it to the map.
val source = DataSource()
map.sources.add(source)

//Create a polygon and add it to the data source.
source.add(Polygon.fromLngLats())

//Create a polygon layer to render the filled in area of the polygon.
val polygonLayer = PolygonLayer(
    source,
    fillColor("rgba(255,165,0,0.2)")
)

//Create a line layer for greater control of rendering the outline of the polygon.
val lineLayer = LineLayer(
    source,
    strokeColor("orange"),
    strokeWidth(2f)
)

//Create a bubble layer to render the vertices of the polygon as scaled circles.
val bubbleLayer = BubbleLayer(
    source,
    bubbleColor("orange"),
    bubbleRadius(5f),
    bubbleStrokeColor("white"),
    bubbleStrokeWidth(2f)
)

//Add all layers to the map.
map.layers.add(arrayOf<Layer>(polygonLayer, lineLayer, bubbleLayer))
ヒント
map.layers.add 関数を使用してマップにレイヤーを追加するときに、既存のレイヤーの ID またはインスタンスを 2 番目のパラメーターとして渡すことができます。 これにより、マップは、追加される新しいレイヤーを既存のレイヤーの下に挿入するように指示されます。 このメソッドは、レイヤー ID を渡すだけでなく、次の値もサポートします。
"labels"- マップ ラベル レイヤーの下に新しいレイヤーを挿入します。"transit"- マップの道路および輸送のレイヤーの下に新しいレイヤーを挿入します。
次のステップ
マップに追加できる他のコード サンプルについては、次の記事をご覧ください。