このチュートリアルでは、Apple 用 Azure Notification Hubs SDK を使用して、Azure Notification Hubs で iOS アプリケーションにプッシュ通知を送信する方法について説明します。
このチュートリアルに含まれる手順は次のとおりです。
- サンプル iOS アプリを作成します。
- iOS アプリを Azure Notification Hubs に接続します。
- テスト プッシュ通知を送信します。
- アプリが通知を受信することを確認します。
このチュートリアルの完全なコードは、GitHub からダウンロードできます。
前提条件
このチュートリアルを完了するには、次の前提条件を用意しておく必要があります。
- Xcode を実行しており、有効な開発者証明書がキーチェーンにインストールされている Mac。
- iOS バージョン 10 以降を実行している iPhone または iPad。
- Apple ポータルに登録され、自分の証明書に関連付けられている物理デバイス。
作業を進める前に、iOS アプリ向けに Azure Notification Hubs の使用を開始することに関する前のチュートリアルを終え、通知ハブでプッシュ資格情報の設定と構成を行ってください。 今までに iOS 開発の経験がなくても、以下の手順に従うことができます。
注意
プッシュ通知の構成要件により、プッシュ通知のデプロイとテストは、iOS エミュレーターではなく物理 iOS デバイス (iPhone または iPad) で行う必要があります。
Notification Hubs に iOS アプリケーションを接続する
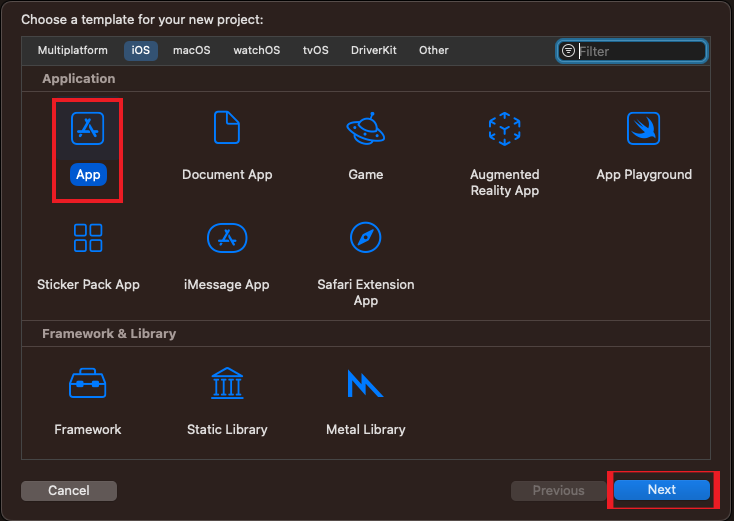
Xcode で、新しい Xcode プロジェクトを作成し、[iOS] タブと [アプリ] テンプレートを選択します。
新しいプロジェクトのオプションを設定する際には、Apple Developer ポータルでバンドル ID を設定したときと同じ製品名と組織識別子を使用してください。 新しいプロジェクト ウィンドウで識別されたバンドルは、Apple Developer ポータルで識別されたバンドルと一致するように設定する必要があります。 大文字小文字が区別されます。
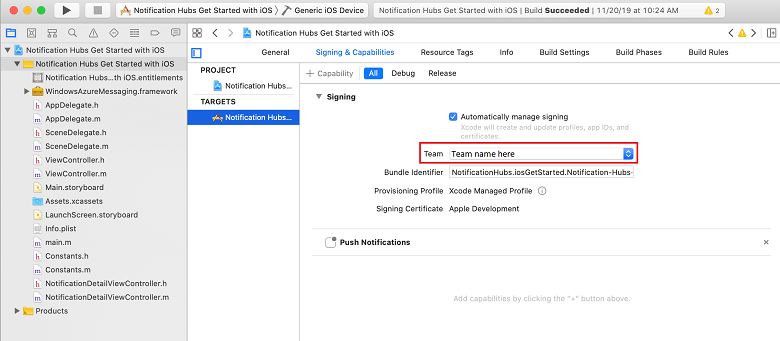
プロジェクト ナビゲーターで、[Targets]\(ターゲット\) で目的のプロジェクト名を選択し、[Signing & Capabilities]\(署名と機能\) タブを選択します。Apple Developer アカウントに適したチームを選択します。 XCode を選択すると、バンドル識別子に基づいて以前に作成したプロビジョニング プロファイルが自動的に表示されます。
Xcode で作成した新しいプロビジョニング プロファイルが表示されない場合は、署名 ID のプロファイルを更新してみてください。 メニュー バーの Xcode をクリックし、[Preference (ユーザー設定)]、[Account (アカウント)] タブ、[View Details (詳細の表示)] ボタンの順にクリックします。次に、署名 ID をクリックし、右下隅にある更新ボタンをクリックします。
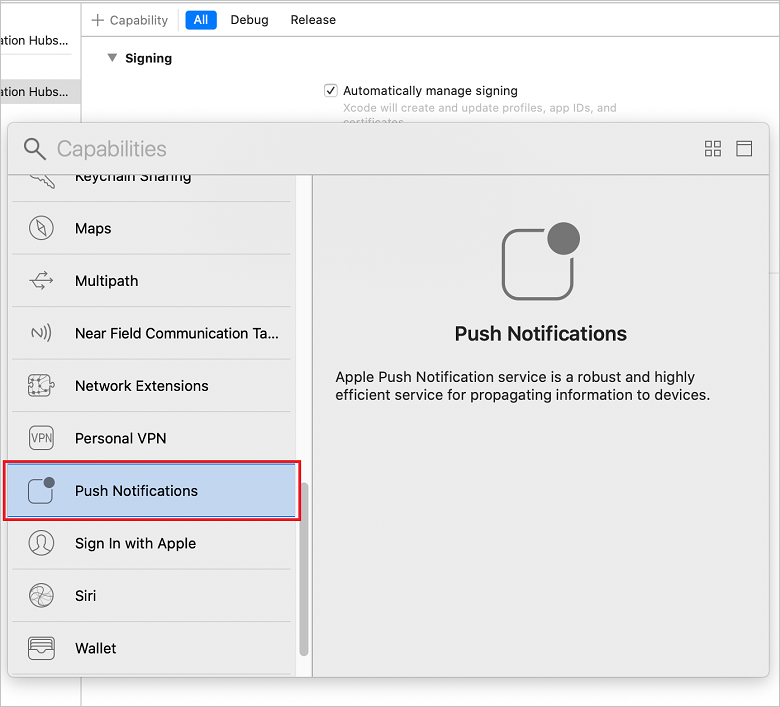
[Signing & Capabilities]\(署名と機能\) タブで、[+ Capability]\(+ 機能\) を選択します。 [Push Notifications](プッシュ通知) をダブルクリックして有効にします。
Azure Notification Hubs SDK モジュールを追加します。
CocoaPods を使用するか、またはバイナリをプロジェクトに手動で追加して、アプリに Azure Notification Hubs SDK を統合することができます。
CocoaPods による統合: 次の依存関係をポッドファイルに追加して、アプリに Azure Notification Hubs SDK を追加します。
pod 'AzureNotificationHubs-iOS'pod install を実行して新しく定義したポッドをインストールし、.xcworkspace を開きます。
pod install の実行中に "Unable to find a specification for AzureNotificationHubs-iOS (AzureNotificationHubs-iOS の仕様を見つけられません)" などのエラーが表示された場合は、
pod repo updateを実行して CocoaPods リポジトリから最新のポッドを取得してから、pod install を実行します。
Carthage による統合:次の依存関係を Cartfile に追加して、アプリに Azure Notification Hubs SDK を含めます。
github "Azure/azure-notificationhubs-ios"- 次に、ビルドの依存関係を更新します。
$ carthage updateCarthage の使用について詳しくは、Carthage GitHub リポジトリをご覧ください。
バイナリをプロジェクトにコピーすることによる統合:
バイナリを次のようにプロジェクトにコピーすることによって、統合が可能です。
zip ファイルとして提供されている Azure Notification Hubs SDK フレームワークをダウンロードして、解凍します。
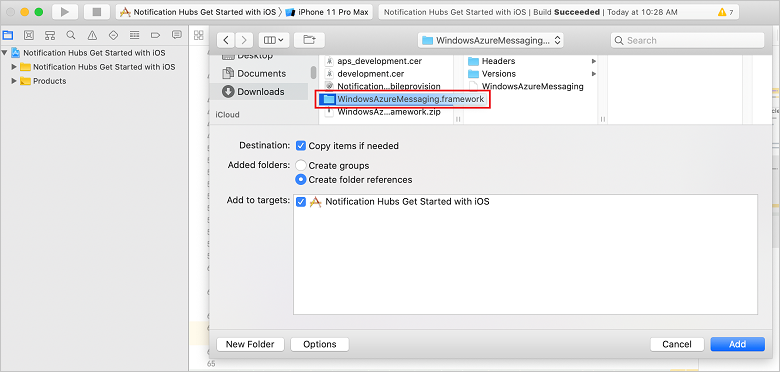
Xcode でプロジェクトを右クリックして [Add Files to (ファイルの追加先)] オプションをクリックし、Xcode プロジェクトに WindowsAzureMessaging.framework フォルダーを追加します。 [オプション] を選択し、[Copy items if needed](必要に応じてアイテムをコピーする) をオンにして [追加] をクリックします。
2 つのプロパティ (
CONNECTION_STRINGおよびHUB_NAME) を含む DevSettings.plist という名前のファイルを追加または編集します。前者は Azure Notification Hub への接続文字列で、後者は Azure Notification Hub の名前です。適切な
<string></string>セクションに、Azure Notification Hubs に接続するための情報を追加します。 文字列リテラルのプレースホルダー--HUB-NAME--と--CONNECTION-STRING--を、以前にポータルから取得した、ハブ名と DefaultListenSharedAccessSignature にそれぞれ置き換えます。<?xml version="1.0" encoding="UTF-8"?> <!DOCTYPE plist PUBLIC "-//Apple//DTD PLIST 1.0//EN" "http://www.apple.com/DTDs/PropertyList-1.0.dtd"> <plist version="1.0"> <dict> <key>HUB_NAME</key> <string>--HUB-NAME--</string> <key>CONNECTION_STRING</key> <string>--CONNECTION-STRING--</string> </dict> </plist>同じ AppDelegate.m ファイルで、
didFinishLaunchingWithOptionsの後のすべてのコードを次のコードに置き換えます。#import <WindowsAzureMessaging/WindowsAzureMessaging.h> #import <UserNotifications/UserNotifications.h> // Extend the AppDelegate to listen for messages using MSNotificationHubDelegate and User Notification Center @interface AppDelegate () <MSNotificationHubDelegate> @end @implementation AppDelegate @synthesize notificationPresentationCompletionHandler; @synthesize notificationResponseCompletionHandler; - (BOOL)application:(UIApplication *)application didFinishLaunchingWithOptions:(NSDictionary *)launchOptions { NSString *path = [[NSBundle mainBundle] pathForResource:@"DevSettings" ofType:@"plist"]; NSDictionary *configValues = [NSDictionary dictionaryWithContentsOfFile:path]; NSString *connectionString = [configValues objectForKey:@"CONNECTION_STRING"]; NSString *hubName = [configValues objectForKey:@"HUB_NAME"]; if([connectionString length] != 0 && [hubName length] != 0) { [[UNUserNotificationCenter currentNotificationCenter] setDelegate:self]; [MSNotificationHub setDelegate:self]; [MSNotificationHub initWithConnectionString:connectionString withHubName:hubName]; return YES; } NSLog(@"Please setup CONNECTION_STRING and HUB_NAME in DevSettings.plist and restart application"); exit(-1); } - (void)notificationHub:(MSNotificationHub *)notificationHub didReceivePushNotification:(MSNotificationHubMessage *)message { // Send message using NSNotificationCenter with the message NSDictionary *userInfo = [NSDictionary dictionaryWithObject:message forKey:@"message"]; [[NSNotificationCenter defaultCenter] postNotificationName:@"MessageReceived" object:nil userInfo:userInfo]; } @endこのコードは、DevSettings.plist で指定した接続情報を使用して通知ハブに接続します。 その後、通知ハブにデバイス トークンを付与して、ハブで通知を送信できるようにします。
NotificationDetailViewController ヘッダー ファイルを作成する
前の手順と同様に、SetupViewController.h という名前の別のヘッダー ファイルを追加します。 新しいヘッダー ファイルの内容を次のコードに置き換えます。
#import <UIKit/UIKit.h>

NS_ASSUME_NONNULL_BEGIN

@interface SetupViewController : UIViewController

@end

NS_ASSUME_NONNULL_END
実装ファイル SetupViewController.m を追加します。 ファイルの内容を、UIViewController メソッドを実装する次のコードに置き換えます。
#import "SetupViewController.h"

 static NSString *const kNHMessageReceived = @"MessageReceived";

 @interface SetupViewController ()

 @end

 @implementation SetupViewController

 - (void)viewDidLoad {
     [super viewDidLoad];

     // Listen for messages using NSNotificationCenter
     [[NSNotificationCenter defaultCenter] addObserver:self selector:@selector(didReceivePushNotification:) name:kNHMessageReceived object:nil];
 }

 - (void)dealloc {
     // Clean up subscription to NSNotificationCenter
     [[NSNotificationCenter defaultCenter] removeObserver:self name:kNHMessageReceived object:nil];
 }

 - (void)didReceivePushNotification:(NSNotification *)notification {
     MSNotificationHubMessage *message = [notification.userInfo objectForKey:@"message"];

     // Create UI Alert controller with message title and body
     UIAlertController *alertController = [UIAlertController alertControllerWithTitle:message.title
                          message:message.body
                   preferredStyle:UIAlertControllerStyleAlert];
     [alertController addAction:[UIAlertAction actionWithTitle:@"OK" style:UIAlertActionStyleCancel handler:nil]];
     [self presentViewController:alertController animated:YES completion:nil];

     // Dismiss after 2 seconds
     dispatch_after(dispatch_time(DISPATCH_TIME_NOW, (int64_t)(2.0 * NSEC_PER_SEC)), dispatch_get_main_queue(), ^{
         [alertController dismissViewControllerAnimated:YES completion: nil];
     });

 }

 @end
エラーがないことを確認するために、デバイスでアプリをビルドして実行します。
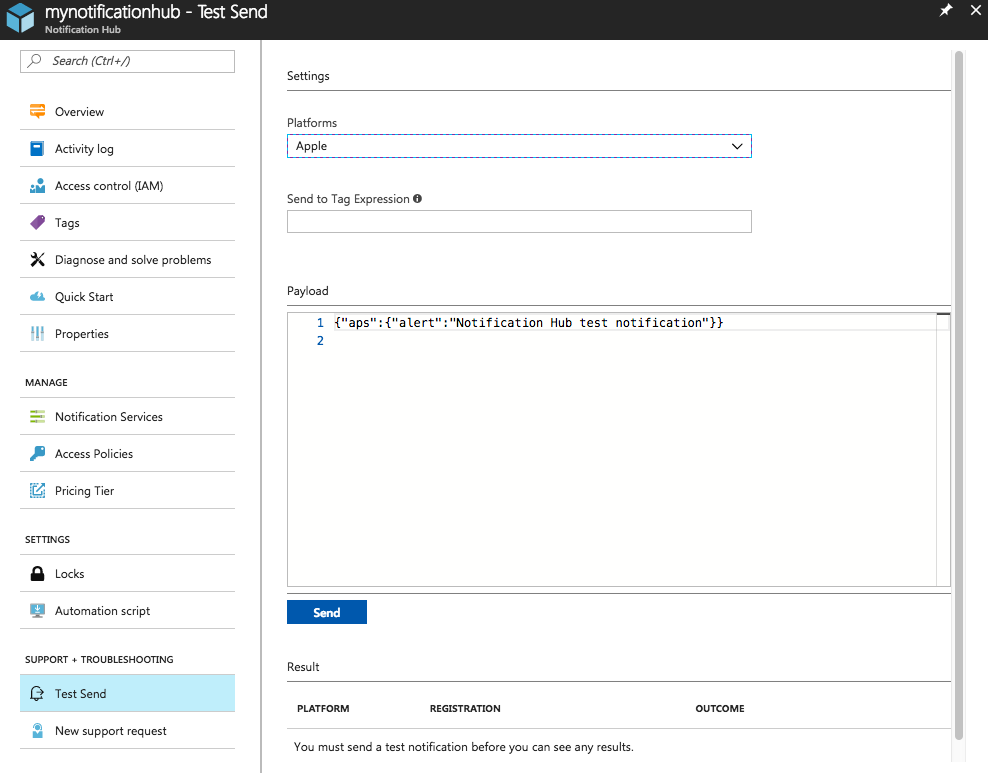
テスト プッシュ通知を送信する
アプリの通知の受信をテストするには、Azure Portal の [テスト送信] オプションを使用します。 これは、デバイスにテスト プッシュ通知を送信します。
プッシュ通知は通常、互換性のあるライブラリを使用して Mobile Apps などのバックエンド サービスや ASP.NET に送信されます。 ライブラリがバックエンドに使用できない場合は、REST API を直接使用して通知メッセージを送信することもできます。
通知の送信方法を確認できるチュートリアルの一覧を次に示します。
- Azure Mobile Apps:Notification Hubs に統合されている Mobile Apps バックエンドから通知を送信する方法の例については、「iOS アプリへのプッシュ通知の追加」を参照してください。
- ASP.NET:Notification Hubs を使用してユーザーにプッシュ通知を送信する方法。
- Azure Notification Hub Java SDK: Java からの通知を送信するには「 Java から Notification Hubs を使用する方法 」を参照してください。 これは Android の開発用に Eclipse でテストされています。
- PHP: PHP から Notification Hubs を使用する方法
アプリがプッシュ通知を受信することを確認する
iOS でプッシュ通知をテストするには、物理 iOS デバイスにアプリをデプロイする必要があります。 iOS シミュレーターを使用して Apple のプッシュ通知を送信することはできません。
アプリケーションを実行して登録が成功したことを確認したら、 [OK]を押します。
![[登録]](media/ios-sdk/image7.png)
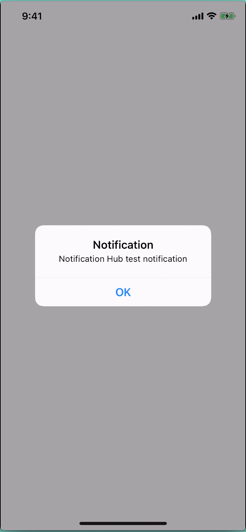
次に、前のセクションで説明されているように、Azure portal からテスト プッシュ通知を送信します。
プッシュ通知は、特定の通知ハブから通知を受信するように登録されているすべてのデバイスに送信されます。
次のステップ
この簡単な例では、登録されているすべての iOS デバイスにプッシュ通知をブロードキャストします。 特定の iOS デバイスにプッシュ通知を送信する方法を学習するには、次のチュートリアルに進んでください。
詳細については、次の記事を参照してください。
- Azure Notification Hubs の概要
- Notification Hubs REST API
- バックエンド操作用の Notification Hubs SDK
- GitHub 上の Notification Hubs SDK
- アプリケーション バックエンドへの登録
- 登録管理
- タグの使用
- カスタム テンプレートの使用
- Service Bus access control with shared access signatures (共有アクセス署名による Service Bus のアクセスの制御)
- プログラムによる SAS トークンの生成
- Apple のセキュリティ: 一般的な暗号化
- UNIX エポック時間
- HMAC