この記事では、一括インジェスト API を使用して、多数の地理空間データ資産を一度に GeoCatalog に取り込む方法について説明します。 まず、GeoCatalog インジェスト ソースを作成して構成します。 インジェスト ソースを作成すると、GeoCatalog リソースと既存の地理空間データの保存場所との間にセキュリティで保護された接続が確立されます。 次に、GeoCatalog リソース内に SpatioTemporal Access Catalog (STAC) コレクションを作成し、取り込まれるデータを格納します。 最後に、一括インジェスト API を使用してインジェスト ワークフローを開始します。 これらの手順が完了すると、地理空間データが取り込まれるので、GeoCatalog UI と API からアクセスできます。
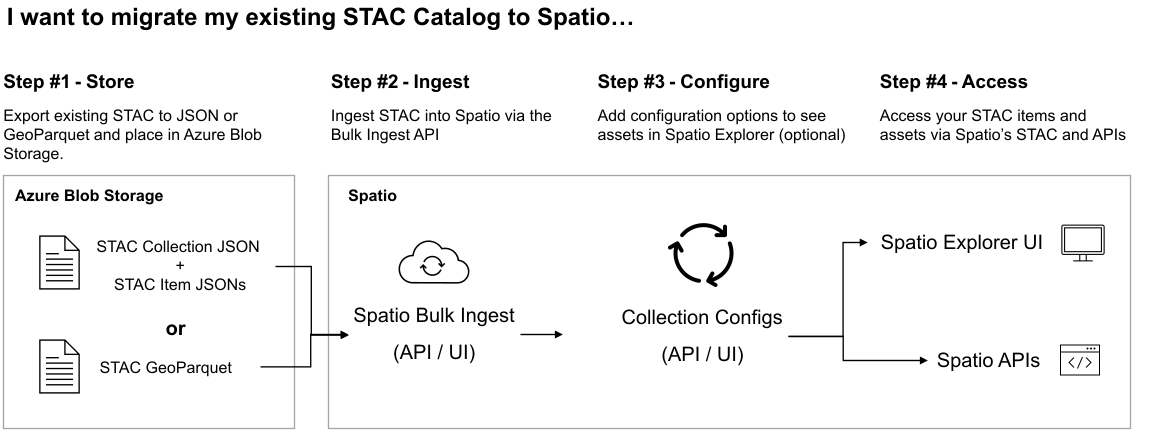
[前提条件]
Azure サブスクリプションで次の手順を実行します。
ストレージ アカウント BLOB コンテナー内の地理空間データセット:
- 地理空間データ資産 (GeoTIFF ファイルなど)
- 関連する STAC 項目によって、これらの資産の STAC 項目が作成 されます。
- すべての STAC 項目と地理空間データ資産を参照する STAC コレクション JSON。
ローカル環境または開発環境で次の手順を実行します。
- 3.10 (またはそれ以降) Python実行されているPython環境。
- Azure CLI
- Azure にサインインしている
Microsoft プラネタリー コンピューター Pro は、Azure Blob Storage コンテナーにアクセスできる必要があります。 この記事では、一時的な SAS トークン資格情報を作成して使用して、このアクセスを許可します。 または、これらのガイドを使用して、マネージド ID またはハードコーディングされた SAS トークンを設定することもできます。
- マネージド ID を使用して Microsoft Planetary Computer Pro のインジェスト資格情報を設定する
- SAS トークンを使用して Microsoft Planetary Computer Pro のインジェスト資格情報を設定する
インジェスト ソースの作成
インジェスト ソースの作成では、地理空間データを取り込むソースと、インジェスト ワークフローで使用する資格情報メカニズムを GeoCatalog 用に定義します。
pip を使用して Require Python モジュールをインストールする
pip install pystac-client azure-identity requests azure-storage-blob pyyaml必要な Python モジュールをインポートする
import os
import requests
from azure.identity import AzureCliCredential
from datetime import datetime, timedelta, timezone
import azure.storage.blob
from urllib.parse import urlparse
import yaml
環境に応じて必要な定数を設定する
MPCPRO_APP_ID = "https://geocatalog.spatio.azure.com"
CONTAINER_URI = "<container_uri>" # The URI for the blob storage container housing your geospatial data
GEOCATALOG_URI = "<geocatalog uri>" # The URI for your GeoCatalog can be found in the Azure portal resource overview
API_VERSION = "2026-04-15"
SAS トークンを作成する
# Parse the container URL
parsed_url = urlparse(CONTAINER_URI)
account_url = f"{parsed_url.scheme}://{parsed_url.netloc}"
account_name = parsed_url.netloc.split(".")[0]
container_name = parsed_url.path.lstrip("/")

credential = azure.identity.AzureCliCredential()
blob_service_client = azure.storage.blob.BlobServiceClient(
    account_url=account_url,
    credential=credential,
)

now = datetime.now(timezone.utc).replace(microsecond=0)
key = blob_service_client.get_user_delegation_key(
    key_start_time=now + timedelta(hours=-1),
    key_expiry_time=now + timedelta(hours=1),
)

sas_token = azure.storage.blob.generate_container_sas(
    account_name=account_name,
    container_name=container_name,
    user_delegation_key=key,
    permission=azure.storage.blob.ContainerSasPermissions(
        read=True,
        list=True,
    ),
    start=now + timedelta(hours=-1),
    expiry=now + timedelta(hours=1),
)
GeoCatalog API アクセス トークンを取得する
# Obtain an access token
credential = AzureCliCredential()
access_token = credential.get_token(f"{MPCPRO_APP_ID}/.default")
インジェスト ソース API の POST ペイロードを作成する
# Payload for the POST request
payload = {
    "Kind": "SasToken",
    "connectionInfo": {
        "containerUrl": CONTAINER_URI,
        "sasToken": sas_token,
    },
}
POST ペイロードをインジェスト ソース エンドポイントに送信してインジェスト ソースを作成する
# STAC Collection API endpoint
endpoint = f"{GEOCATALOG_URI}/inma/ingestion-sources"

# Make the POST request
response = requests.post(
    endpoint,
    json=payload,
    headers={"Authorization": f"Bearer {access_token.token}"},
    params={"api-version": API_VERSION},
)
応答を確認する
# Print the response
if response.status_code == 201:
    print("Ingestion source created successfully")
    ingestion_source_id = response.json().get("id") #saved for later to enable resource clean up
else:
    print(f"Failed to create ingestion: {response.text}")
注
これらの手順を複数回実行すると、409 応答が返されます。
Container url <container uri> already contains a SAS token ingestion source with id <sas token id>
インジェスト ソース API では、同じコンテナー URL に対して複数のインジェスト ソースを作成することはできません。 競合を回避するには、新しいインジェスト ソースを作成する前に、必ず既存のインジェスト ソースをクリーンアップしてください。 詳細については、「リソースのクリーンアップ」を参照してください。
コレクションの作成
STAC コレクションは、STAC アイテムとそれに関連付けられている地理空間資産の高レベル コンテナーです。 このセクションでは、次のセクションで取り込む地理空間データを格納するために、GeoCatalog 内に STAC コレクションを作成します。
必要なモジュールをインポートする
import os
import requests
import yaml
from pprint import pprint
from azure.identity import AzureCliCredential
環境に応じて必要な定数を設定する
MPCPRO_APP_ID = "https://geocatalog.spatio.azure.com"
GEOCATALOG_URI = "<geocatalog uri>" # The URI for your GeoCatalog can be found in the Azure portal resource overview
API_VERSION = "2026-04-15"

COLLECTION_ID = "example-collection" #You can your own collection ID
COLLECTION_TITLE = "Example Collection" #You can your own collection title
GeoCatalog API アクセス トークンを取得する
# Obtain an access token
credential = AzureCliCredential()
access_token = credential.get_token(f"{MPCPRO_APP_ID}/.default")
基本的な STAC コレクション仕様を作成する
collection = {
    "id": COLLECTION_ID,
    "type": "Collection",
    "title": COLLECTION_TITLE,
    "description": "An example collection",
    "license": "CC-BY-4.0",
    "extent": {
        "spatial": {"bbox": [[-180, -90, 180, 90]]},
        "temporal": {"interval": [["2018-01-01T00:00:00Z", "2018-12-31T23:59:59Z"]]},
    },
    "links": [],
    "stac_version": "1.0.0",
    "msft:short_description": "An example collection",
}
注
このサンプル コレクション仕様は、コレクションの基本的な例です。 STAC コレクションと STAC オープン標準の詳細については、 STAC の概要を参照してください。 完全な STAC コレクションの作成の詳細については、「 STAC コレクションの作成」を参照してください。
Collection API を使用して新しいコレクションを作成する
response = requests.post(
    f"{GEOCATALOG_URI}/stac/collections",
    json=collection,
    headers={"Authorization": "Bearer " + access_token.token},
    params={"api-version": API_VERSION},
)
応答結果を確認する
if response.status_code == 201:
    print("Collection created successfully")
    pprint(response.json())
else:
    print(f"Failed to create ingestion: {response.text}")
接続の作成とワークフローの実行
この最後の手順では、インジェスト API を使用して一括インジェスト ワークフローを開始します。
必要なモジュールをインポートする
import os
import requests
import yaml
from azure.identity import AzureCliCredential
環境に応じて必要な定数を設定する
MPCPRO_APP_ID = "https://geocatalog.spatio.azure.com"
GEOCATALOG_URI = "<geocatalog uri>" # The URI for your GeoCatalog can be found in the Azure portal resource overview
API_VERSION = "2026-04-15"

COLLECTION_ID = "example-collection" #You can your own collection ID
catalog_href = "<catalog_href>" #The blob storage location of the STAC Catalog JSON file

skip_existing_items = False
keep_original_assets = False
timeout_seconds = 300
GeoCatalog API アクセス トークンを取得する
# Obtain an access token
credential = AzureCliCredential()
access_token = credential.get_token(f"{MPCPRO_APP_ID}/.default")
一括インジェスト API の POST ペイロードを作成する
url = f"{GEOCATALOG_URI}/inma/collections/{COLLECTION_ID}/ingestions"
body = {
    "importType": "StaticCatalog",
    "sourceCatalogUrl": catalog_href,
    "skipExistingItems": skip_existing_items,
    "keepOriginalAssets": keep_original_assets,
}
ペイロードを一括インジェスト API に送信します。
ing_response = requests.post(
    url,
    json=body,
    timeout=timeout_seconds,
    headers={"Authorization": f"Bearer {access_token.token}"},
    params={"api-version": API_VERSION},
)
応答を確認します。
if ing_response.status_code == 201:
    print("Ingestion created successfully")
    ingestion_id = ing_response.json()["ingestionId"]
    print(f"Created ingestion with ID: {ingestion_id}")
else:
    print(f"Failed to create ingestion: {ing_response.text}")
インジェスト ワークフローの状態を確認します。
runs_endpoint = (
    f"{geocatalog_url}/inma/collections/{collection_id}/ingestions/{ingestion_id}/runs"
)

wf_response = requests.post(
    runs_endpoint,
    headers={"Authorization": f"Bearer {access_token.token}"},
    params={"api-version": API_VERSION},
)

if wf_response.status_code == 201:
    print("Workflow started successfully")
else:
    print(f"Failed to create ingestion run: {wf_response.text}")
ワークフローが完了したら、GeoCatalog STAC またはデータ API、またはデータ エクスプローラーを使用して、地理空間データのクエリ、取得、視覚化を行うことができます。 問題が発生した場合は、 トラブルシューティング ガイド または インジェスト エラー コードの一覧を参照してください。
リソースをクリーンアップする
インジェスト ソースの削除
del_is_endpoint = f"{GEOCATALOG_URI}/inma/ingestion-sources/{ingestion_source_id}"
del_is_response = requests.delete(
    del_is_endpoint,
    headers={"Authorization": f"Bearer {access_token.token}"},
    params={"api-version": API_VERSION},
)

if del_is_response.status_code == 200:
    print("Ingestion source deleted successfully")
else:
    print(f"Failed to delete ingestion source")
次のステップ
いくつかの項目を追加したら、視覚化用にデータを構成する必要があります。