ブラシの使用
ブラシを使用すると、グラフィックス デバイス インターフェイス (GDI) 関数を使用して、ほぼすべての図形の内部を塗りつぶすことができます。 これには、四角形、楕円、多角形、パスの内部が含まれます。 アプリケーションの要件に応じて、指定した色のソリッド ブラシ、ストック ブラシ、ハッチ ブラシ、またはパターン ブラシを使用できます。
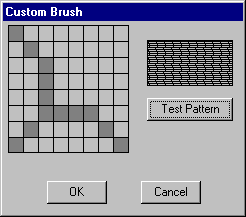
このセクションには、カスタム ブラシ ダイアログ ボックスの作成を示すコード サンプルが含まれています。 ダイアログ ボックスには、システムがブラシとして使用するビットマップを表すグリッドが含まれています。 ユーザーは、このグリッドを使用してパターン ブラシ ビットマップを作成し、[テスト パターン] ボタンをクリックしてカスタム パターン を表示できます。
次の図は、[ カスタム ブラシ ] ダイアログ ボックスを使用して作成されたパターンを示しています。

ダイアログ ボックスを表示するには、まずダイアログ ボックス テンプレートを作成する必要があります。 次のダイアログ ボックス テンプレートは、[ カスタム ブラシ ] ダイアログ ボックスを定義します。
CustBrush DIALOG 6, 18, 160, 118
STYLE WS_DLGFRAME | WS_POPUP | WS_VISIBLE | WS_CAPTION
CAPTION "Custom Brush"
FONT 8, "MS Sans Serif"
BEGIN
    CONTROL         "", IDD_GRID, "Static", SS_BLACKFRAME |
                    WS_CHILD, 3, 2, 83, 79
    CONTROL         "", IDD_RECT, "Static", SS_BLACKFRAME |
                    WS_CHILD, 96, 11, 57, 28
    PUSHBUTTON      "Test Pattern", IDD_PAINTRECT, 96, 47, 57, 14
    PUSHBUTTON      "OK", IDD_OK, 29, 98, 40, 14
    PUSHBUTTON      "Cancel", IDD_CANCEL, 92, 98, 40, 14
END
[ カスタム ブラシ ] ダイアログ ボックスには、ビットマップ グリッド ウィンドウ、パターン表示ウィンドウ、および [テスト パターン]、[ OK]、[ キャンセル] というラベルの付いた 3 つのプッシュ ボタンの 5 つのコントロールが含まれています。 [テスト パターン] プッシュ ボタンを使用すると、ユーザーはパターンを表示できます。 ダイアログ ボックス テンプレートは、ダイアログ ボックス ウィンドウの全体的な寸法を指定し、各コントロールに値を割り当て、各コントロールの場所を指定します。 詳細については、「 ダイアログ ボックス」を参照してください。
ダイアログ ボックス テンプレートのコントロール値は、アプリケーションのヘッダー ファイルで次のように定義されている定数です。
#define IDD_GRID      120
#define IDD_RECT      121
#define IDD_PAINTRECT 122
#define IDD_OK        123
#define IDD_CANCEL    124
ダイアログ ボックス テンプレートを作成し、アプリケーションのリソース定義ファイルに含める場合は、ダイアログ プロシージャを記述する必要があります。 この手順では、システムがダイアログ ボックスに送信するメッセージを処理します。 アプリケーションのソース コードからの次の抜粋は、[ カスタム ブラシ ] ダイアログ ボックスのダイアログ ボックス プロシージャと、呼び出す 2 つのアプリケーション定義関数を示しています。
BOOL CALLBACK BrushDlgProc( HWND hdlg, UINT message, LONG wParam,
                            LONG lParam)
{
    static HWND hwndGrid;       // grid-window control
    static HWND hwndBrush;      // pattern-brush control
    static RECT rctGrid;        // grid-window rectangle
    static RECT rctBrush;       // pattern-brush rectangle
    static UINT bBrushBits[8];  // bitmap bits
    static RECT rect[64];       // grid-cell array
    static HBITMAP hbm;         // bitmap handle
    HBRUSH hbrush;              // current brush
    HBRUSH hbrushOld;           // default brush
    HRGN hrgnCell;              // test-region handle
    HDC hdc;                    // device context (DC) handle
    int x, y, deltaX, deltaY;   // drawing coordinates
    POINTS ptlHit;              // mouse coordinates
    int i;                      // count variable

    switch (message)
        {
        case WM_INITDIALOG:

            // Retrieve a window handle for the grid-window and
            // pattern-brush controls.

            hwndGrid = GetDlgItem(hdlg, IDD_GRID);
            hwndBrush = GetDlgItem(hdlg, IDD_RECT);

            // Initialize the array of bits that defines the
            // custom brush pattern with the value 1 to produce a
            // solid white brush.

            for (i=0; i<8; i++)
                bBrushBits[i] = 0xFF;

            // Retrieve dimensions for the grid-window and pattern-
            // brush controls.

            GetClientRect(hwndGrid, &rctGrid);
            GetClientRect(hwndBrush, &rctBrush);

            // Determine the width and height of a single cell.

            deltaX = (rctGrid.right - rctGrid.left)/8;
            deltaY = (rctGrid.bottom - rctGrid.top)/8;

            // Initialize the array of cell rectangles.

            for (y=rctGrid.top, i=0; y < rctGrid.bottom; y += deltaY)
            {
                for(x=rctGrid.left; x < (rctGrid.right - 8) && i < 64;
                        x += deltaX, i++)
                {
                    rect[i].left = x; rect[i].top = y;
                    rect[i].right = x + deltaX;
                    rect[i].bottom = y + deltaY;
                }
            }
            return FALSE;


        case WM_PAINT:

            // Draw the grid.

            hdc = GetDC(hwndGrid);

            for (i=rctGrid.left; i<rctGrid.right;
                 i+=(rctGrid.right - rctGrid.left)/8)
            {
                 MoveToEx(hdc, i, rctGrid.top, NULL);
                 LineTo(hdc, i, rctGrid.bottom);
            }
            for (i=rctGrid.top; i<rctGrid.bottom;
                 i+=(rctGrid.bottom - rctGrid.top)/8)
            {
                 MoveToEx(hdc, rctGrid.left, i, NULL);
                 LineTo(hdc, rctGrid.right, i);
            }
            ReleaseDC(hwndGrid, hdc);
            return FALSE;


        case WM_LBUTTONDOWN:

            // Store the mouse coordinates in a POINT structure.

            ptlHit = MAKEPOINTS((POINTS FAR *)lParam);

            // Create a rectangular region with dimensions and
            // coordinates that correspond to those of the grid
            // window.

            hrgnCell = CreateRectRgn(rctGrid.left, rctGrid.top,
                        rctGrid.right, rctGrid.bottom);

            // Retrieve a window DC for the grid window.

            hdc = GetDC(hwndGrid);

            // Select the region into the DC.

            SelectObject(hdc, hrgnCell);

            // Test for a button click in the grid-window rectangle.

            if (PtInRegion(hrgnCell, ptlHit.x, ptlHit.y))
            {
                // A button click occurred in the grid-window
                // rectangle; isolate the cell in which it occurred.

                for(i=0; i<64; i++)
                {
                    DeleteObject(hrgnCell);

                    hrgnCell = CreateRectRgn(rect[i].left,
                               rect[i].top,
                               rect[i].right, rect[i].bottom);

                    if (PtInRegion(hrgnCell, ptlHit.x, ptlHit.y))
                    {
                        InvertRgn(hdc, hrgnCell);

                        // Set the appropriate brush bits.

                         if (i % 8 == 0)
                            bBrushBits[i/8] = bBrushBits[i/8] ^ 0x80;
                         else if (i % 8 == 1)
                            bBrushBits[i/8] = bBrushBits[i/8] ^ 0x40;
                         else if (i % 8 == 2)
                            bBrushBits[i/8] = bBrushBits[i/8] ^ 0x20;
                         else if (i % 8 == 3)
                            bBrushBits[i/8] = bBrushBits[i/8] ^ 0x10;
                         else if (i % 8 == 4)
                            bBrushBits[i/8] = bBrushBits[i/8] ^ 0x08;
                         else if (i % 8 == 5)
                            bBrushBits[i/8] = bBrushBits[i/8] ^ 0x04;
                         else if (i % 8 == 6)
                            bBrushBits[i/8] = bBrushBits[i/8] ^ 0x02;
                         else if (i % 8 == 7)
                            bBrushBits[i/8] = bBrushBits[i/8] ^ 0x01;

                      // Exit the "for" loop after the bit is set.

                         break;
                    } // end if

                } // end for

            } // end if

            // Release the DC for the control.

            ReleaseDC(hwndGrid, hdc);
            return TRUE;


        case WM_COMMAND:
            switch (wParam)
            {
               case IDD_PAINTRECT:

                    hdc = GetDC(hwndBrush);

                    // Create a monochrome bitmap.

                    hbm = CreateBitmap(8, 8, 1, 1,
                          (LPBYTE)bBrushBits);

                    // Select the custom brush into the DC.

                    hbrush = CreatePatternBrush(hbm);

                    hbrushOld = SelectObject(hdc, hbrush);

                    // Use the custom brush to fill the rectangle.

                    Rectangle(hdc, rctBrush.left, rctBrush.top,
                              rctBrush.right, rctBrush.bottom);

                    // Clean up memory.
                    SelectObject(hdc, hbrushOld);
                    DeleteObject(hbrush);
                    DeleteObject(hbm);

                    ReleaseDC(hwndBrush, hdc);
                    return TRUE;

                case IDD_OK:

                case IDD_CANCEL:
                    EndDialog(hdlg, TRUE);
                    return TRUE;

            } // end switch
            break;
        default:
            return FALSE;
        }
}


int GetStrLngth(LPTSTR cArray)
{
    int i = 0;

    while (cArray[i++] != 0);
    return i-1;

}

DWORD RetrieveWidth(LPTSTR cArray, int iLength)
{
    int i, iTmp;
    double dVal, dCount;

    dVal = 0.0;
    dCount = (double)(iLength-1);
    for (i=0; i<iLength; i++)
    {
        iTmp = cArray[i] - 0x30;
        dVal = dVal + (((double)iTmp) * pow(10.0, dCount--));
    }

    return (DWORD)dVal;
}
次の表に示すように、[ カスタム ブラシ ] ダイアログ ボックスのダイアログ ボックス プロシージャでは、4 つのメッセージが処理されます。
| メッセージ | アクション |
|---|---|
| WM_INITDIALOG | グリッド ウィンドウ コントロールとパターン ブラシ コントロールのウィンドウ ハンドルと寸法を取得し、グリッド ウィンドウ コントロール内の 1 つのセルの寸法を計算し、グリッド セル座標の配列を初期化します。 |
| Wm_paint | グリッド ウィンドウ コントロールにグリッド パターンを描画します。 |
| WM_LBUTTONDOWN | ユーザーがマウスの左ボタンを押したときに、カーソルがグリッド ウィンドウ コントロール内にあるかどうかを判断します。 その場合、ダイアログ ボックス プロシージャは適切なグリッド セルを反転し、そのセルの状態を、カスタム ブラシのビットマップの作成に使用されるビットの配列に記録します。 |
| WM_COMMAND | 3 つのプッシュ ボタン コントロールの入力を処理します。 ユーザーが [ テスト パターン ] ボタンをクリックすると、ダイアログ ボックス プロシージャによってテスト パターン コントロールが新しいカスタム ブラシ パターンで塗りつぶされます。 ユーザーが [OK] または [ キャンセル ] ボタンをクリックすると、ダイアログ ボックス プロシージャはそれに応じてアクションを実行します。 |
メッセージとメッセージ処理の詳細については、「メッセージ とメッセージ キュー」を参照してください。
ダイアログ ボックス プロシージャを記述した後、アプリケーションのヘッダー ファイルにプロシージャの関数定義を含めてから、アプリケーションの適切なポイントでダイアログ ボックス プロシージャを呼び出します。
アプリケーションのヘッダー ファイルからの次の抜粋は、ダイアログ ボックス プロシージャの関数定義と、それが呼び出す 2 つの関数を示しています。
BOOL CALLBACK BrushDlgProc(HWND, UINT, WPARAM, LPARAM);
int GetStrLngth(LPTSTR);
DWORD RetrieveWidth(LPTSTR, int);
最後に、次のコードは、アプリケーションのソース コード ファイルからダイアログ ボックス プロシージャを呼び出す方法を示しています。
    DialogBox((HANDLE)GetModuleHandle(NULL),
        (LPTSTR)"CustBrush",
        hWnd,
        (DLGPROC) BrushDlgProc);
この呼び出しは、通常、アプリケーションのメニューからオプションを選択したユーザーに応答して行われます。