حدث
١١ شوال، ٣ م - ١٢ شوال، ١٢ م
قم ببرمجة المستقبل مع الذكاء الاصطناعي والتواصل مع نظراء Java والخبراء في JDConf 2025.
التسجيل الآنلم يعد هذا المتصفح مدعومًا.
بادر بالترقية إلى Microsoft Edge للاستفادة من أحدث الميزات والتحديثات الأمنية والدعم الفني.
In this article, you learn how to integrate SAP Fiori with Microsoft Entra ID. When you integrate SAP Fiori with Microsoft Entra ID, you can:
The scenario outlined in this article assumes that you already have the following prerequisites:
In this article, you configure and test Microsoft Entra SSO in a test environment.
ملاحظة
For SAP Fiori initiated iFrame Authentication, we recommend using the IsPassive parameter in the SAML AuthnRequest for silent authentication. For more details of the IsPassive parameter refer to Microsoft Entra SAML single sign-on information.
To configure the integration of SAP Fiori into Microsoft Entra ID, you need to add SAP Fiori from the gallery to your list of managed SaaS apps.
Alternatively, you can also use the Enterprise App Configuration Wizard. In this wizard, you can add an application to your tenant, add users/groups to the app, assign roles, and walk through the SSO configuration as well. Learn more about Microsoft 365 wizards.
Configure and test Microsoft Entra SSO with SAP Fiori using a test user called B.Simon. For SSO to work, you need to establish a link relationship between a Microsoft Entra user and the related user in SAP Fiori.
To configure and test Microsoft Entra SSO with SAP Fiori, perform the following steps:
Follow these steps to enable Microsoft Entra SSO.
Open a new web browser window and sign in to your SAP Fiori company site as an administrator.
Make sure that http and https services are active and that the relevant ports are assigned to transaction code SMICM.
Sign in to SAP Business Client for SAP system T01, where single sign-on is required. Then, activate HTTP Security Session Management.
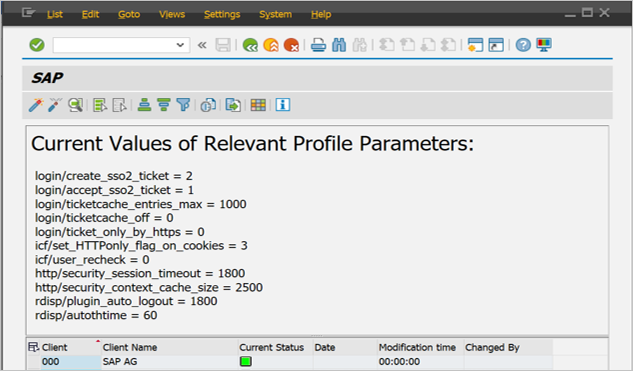
Go to transaction code SICF_SESSIONS. All relevant profile parameters with current values are shown. They look like the following example:
login/create_sso2_ticket = 2
login/accept_sso2_ticket = 1
login/ticketcache_entries_max = 1000
login/ticketcache_off = 0  login/ticket_only_by_https = 0
icf/set_HTTPonly_flag_on_cookies = 3
icf/user_recheck = 0  http/security_session_timeout = 1800
http/security_context_cache_size = 2500
rdisp/plugin_auto_logout = 1800
rdisp/autothtime = 60
ملاحظة
Adjust the parameters based on your organization requirements. The preceding parameters are given only as an example.
If necessary, adjust parameters in the instance (default) profile of the SAP system and restart the SAP system.
Double-select the relevant client to enable an HTTP security session.
Activate the following SICF services:
/sap/public/bc/sec/saml2
/sap/public/bc/sec/cdc_ext_service
/sap/bc/webdynpro/sap/saml2
/sap/bc/webdynpro/sap/sec_diag_tool (This is only to enable / disable trace)
Go to transaction code SAML2 in Business Client for SAP system [T01/122]. The configuration UI opens in a new browser window. In this example, we use Business Client for SAP system 122.
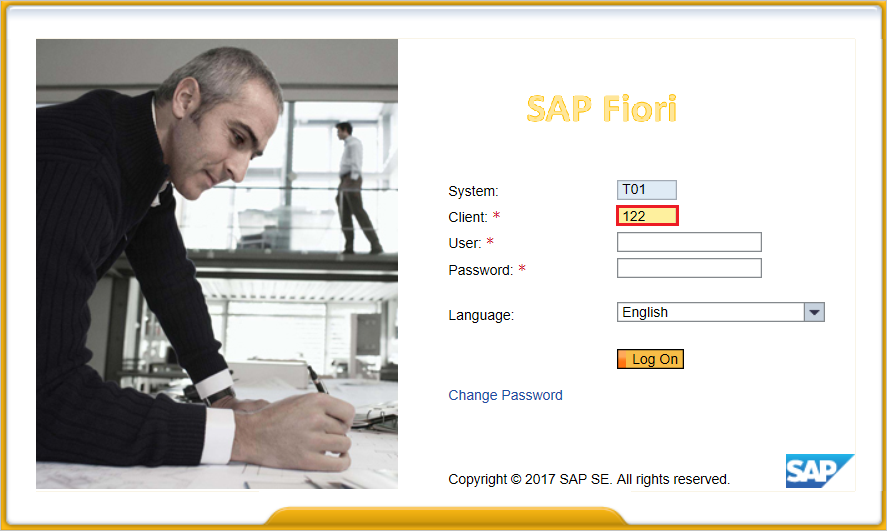
Enter your username and password, and then select Log on.
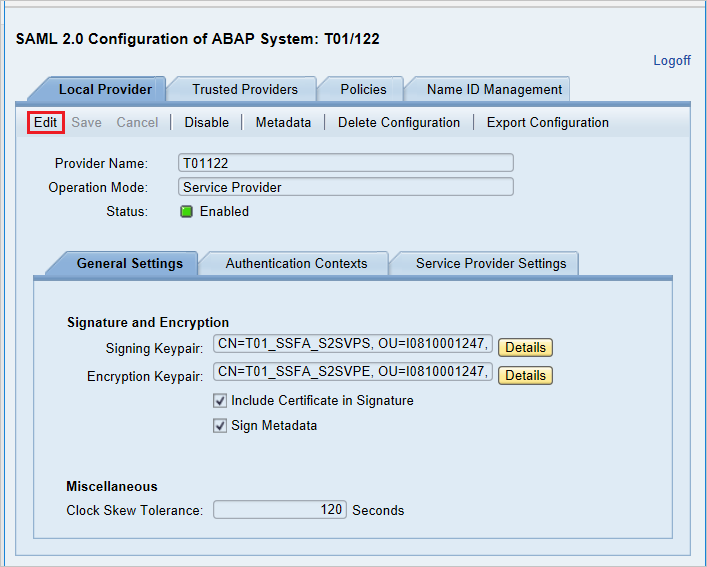
In the Provider Name box, replace T01122 with http://T01122, and then select Save.
ملاحظة
By default, the provider name is in the format <sid><client>. Microsoft Entra ID expects the name in the format <protocol>://<name>. We recommend that you maintain the provider name as https://<sid><client> so you can configure multiple SAP Fiori ABAP engines in Microsoft Entra ID.
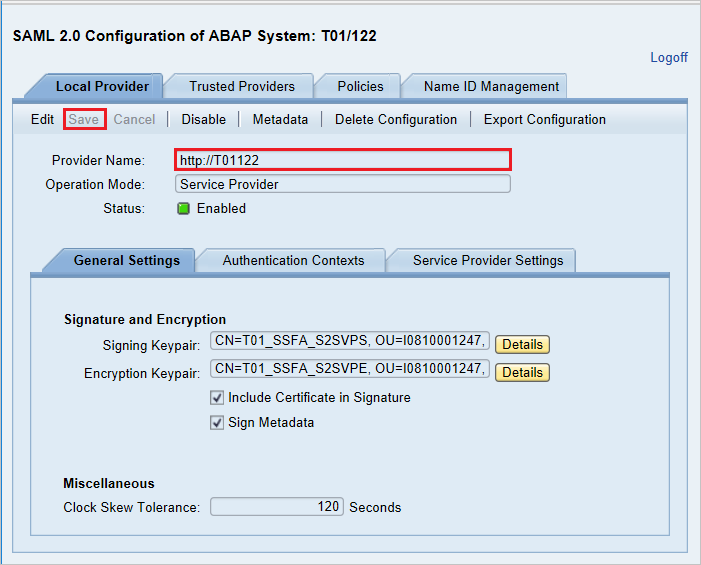
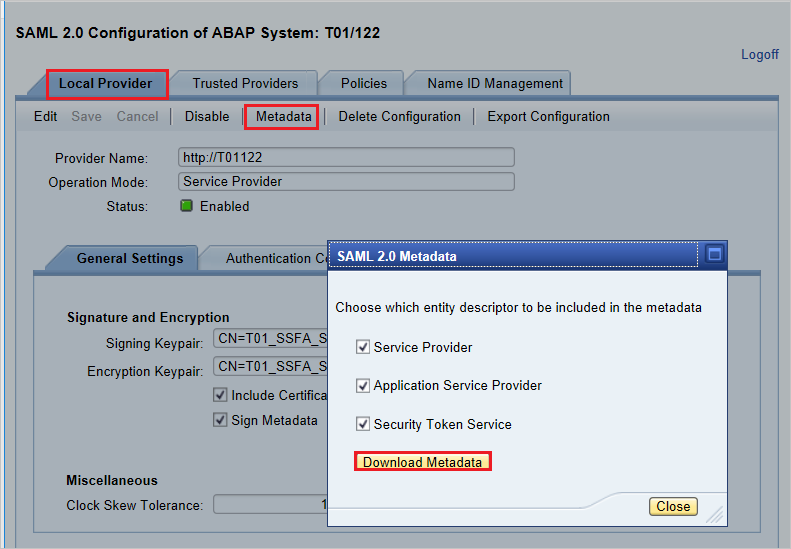
Select Local Provider tab > Metadata.
In the SAML 2.0 Metadata dialog box, download the generated metadata XML file and save it on your computer.
Sign in to the Microsoft Entra admin center as at least a Cloud Application Administrator.
Browse to Identity > Applications > Enterprise applications > SAP Fiori > Single sign-on.
On the Select a single sign-on method page, select SAML.
On the Set up single sign-on with SAML page, select the pencil icon for Basic SAML Configuration to edit the settings.
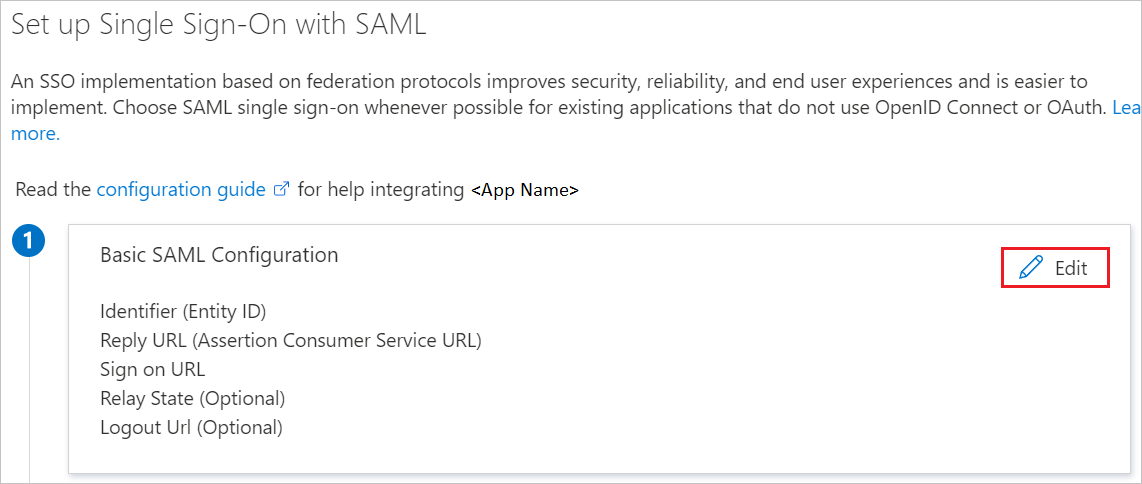
On the Basic SAML Configuration section, if you have Service Provider metadata file, perform the following steps:
Select Upload metadata file.

Select folder logo to select the metadata file and select Upload.
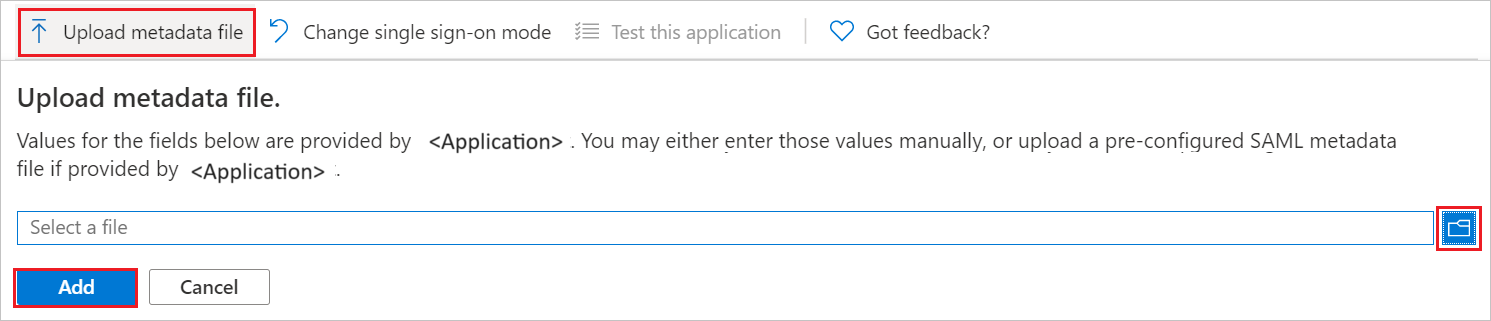
When the metadata file is successfully uploaded, the Identifier and Reply URL values are automatically populated in the Basic SAML Configuration pane. In the Sign on URL box, enter a URL that has the following pattern: https://<your company instance of SAP Fiori>.
ملاحظة
Some customers have encountered an error of an incorrect Reply URL configured for their instance. If you receive any such error, use these PowerShell commands. First update the Reply URLs in the application object with the Reply URL, then update the service principal. Use the Get-MgServicePrincipal to get the Service Principal ID value.
$params = @{
   web = @{
      redirectUris = "<Your Correct Reply URL>"
   }
}
Update-MgApplication -ApplicationId "<Application ID>" -BodyParameter $params
Update-MgServicePrincipal -ServicePrincipalId "<Service Principal ID>" -ReplyUrls "<Your Correct Reply URL>"
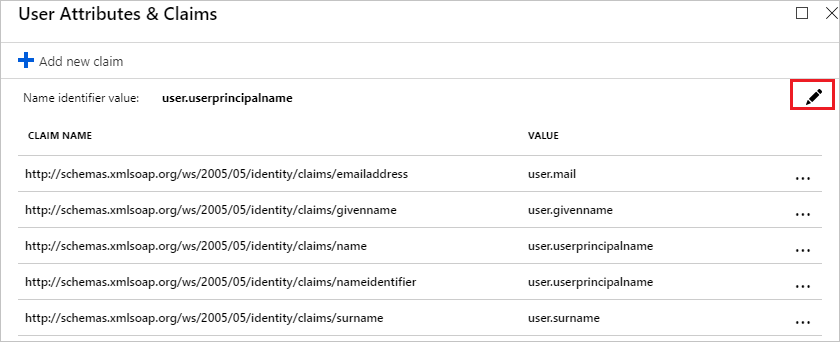
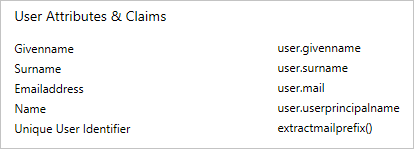
The SAP Fiori application expects the SAML assertions to be in a specific format. Configure the following claims for this application. To manage these attribute values, in the Set up Single Sign-On with SAML pane, select Edit.
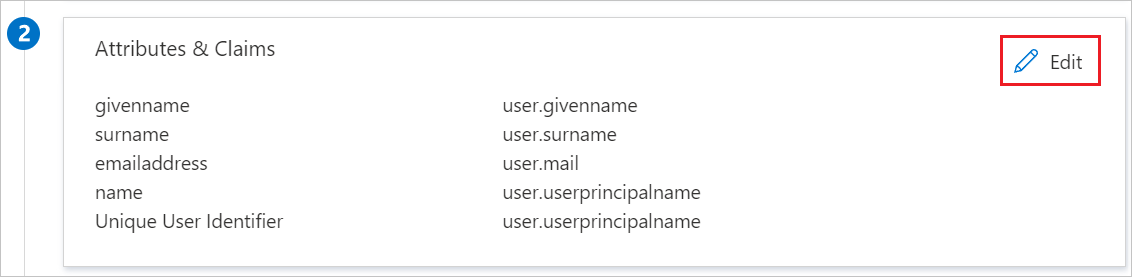
In the User Attributes & Claims pane, configure the SAML token attributes as shown in the preceding image. Then, complete the following steps:
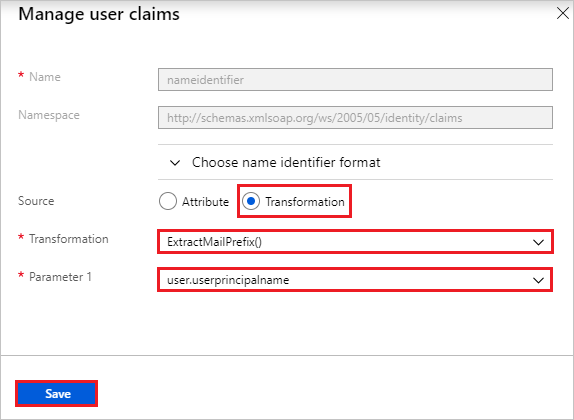
Select Edit to open the Manage user claims pane.
In the Transformation list, select ExtractMailPrefix().
In the Parameter 1 list, select user.userprincipalname.
Select Save.
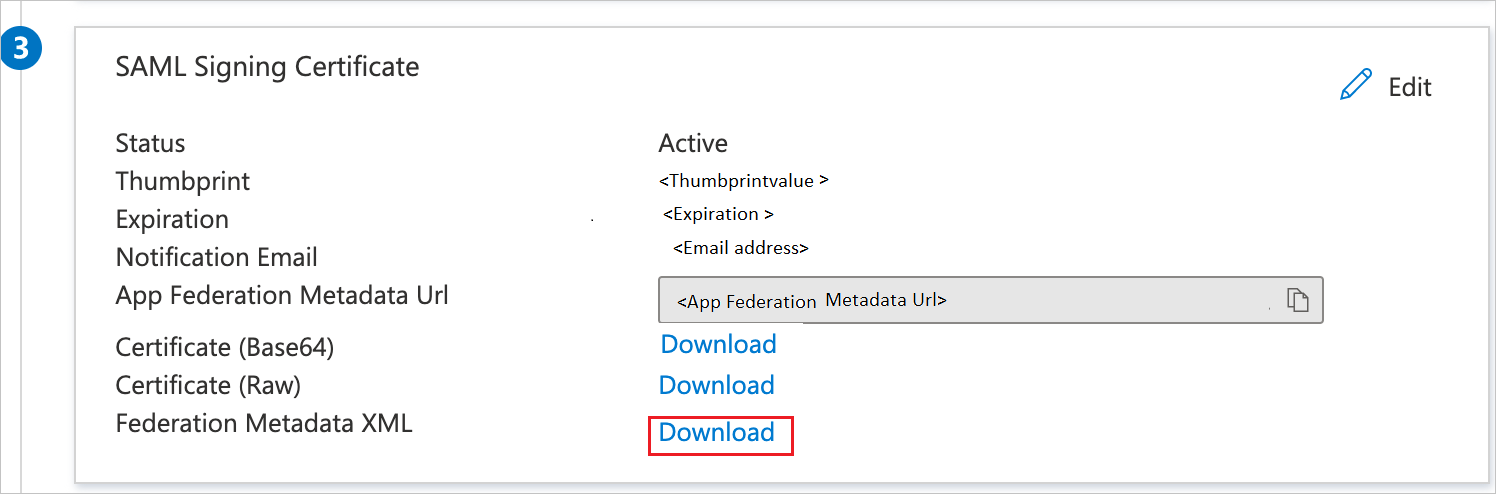
On the Set up single sign-on with SAML page, in the SAML Signing Certificate section, find Federation Metadata XML and select Download to download the certificate and save it on your computer.
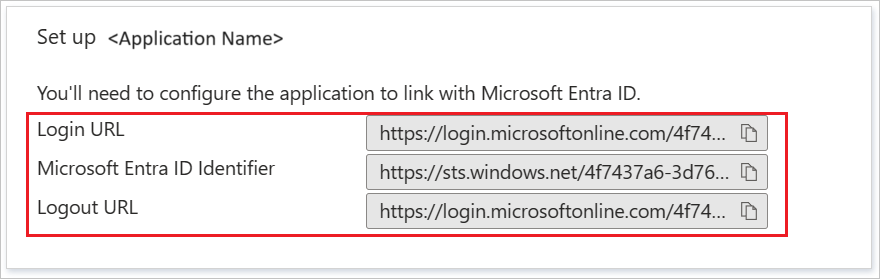
On the Set up SAP Fiori section, copy the appropriate URL(s) based on your requirement.
Follow the guidelines in the create and assign a user account quickstart to create a test user account called B.Simon.
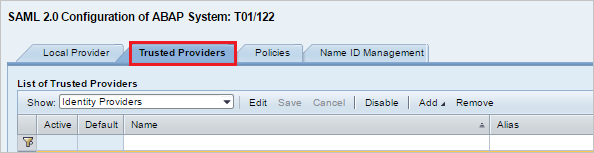
Sign in to the SAP system and go to transaction code SAML2. A new browser window opens with the SAML configuration page.
To configure endpoints for a trusted identity provider (Microsoft Entra ID), select the Trusted Providers tab.
Select Add, and then select Upload Metadata File from the context menu.
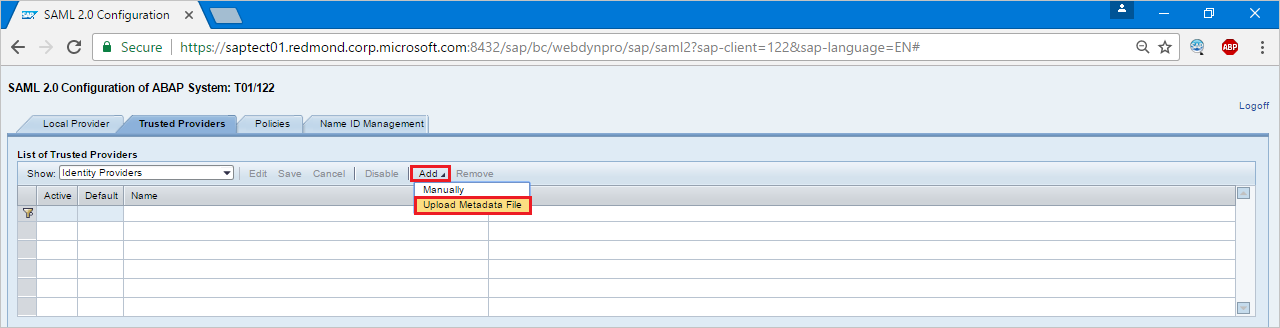
Upload the metadata file that you downloaded. Select Next.
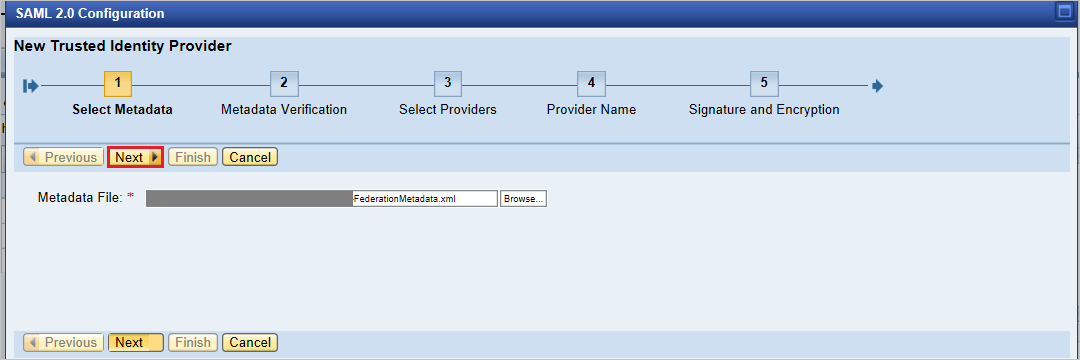
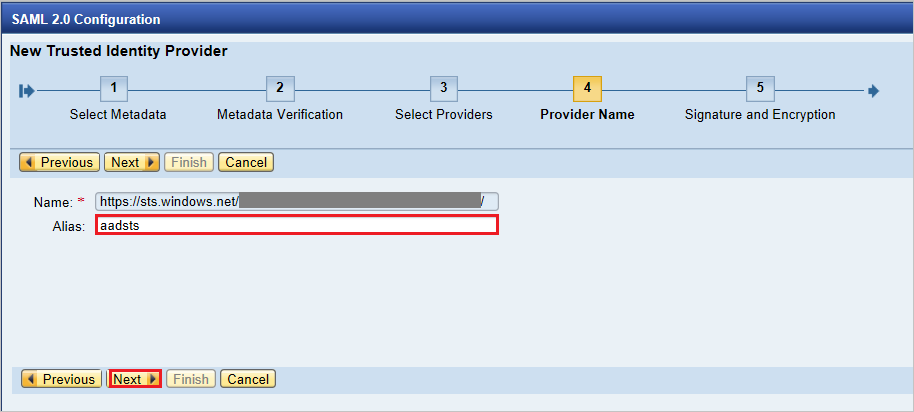
On the next page, in the Alias box, enter the alias name. For example, aadsts. Select Next.
Make sure that the value in the Digest Algorithm box is SHA-256. Select Next.
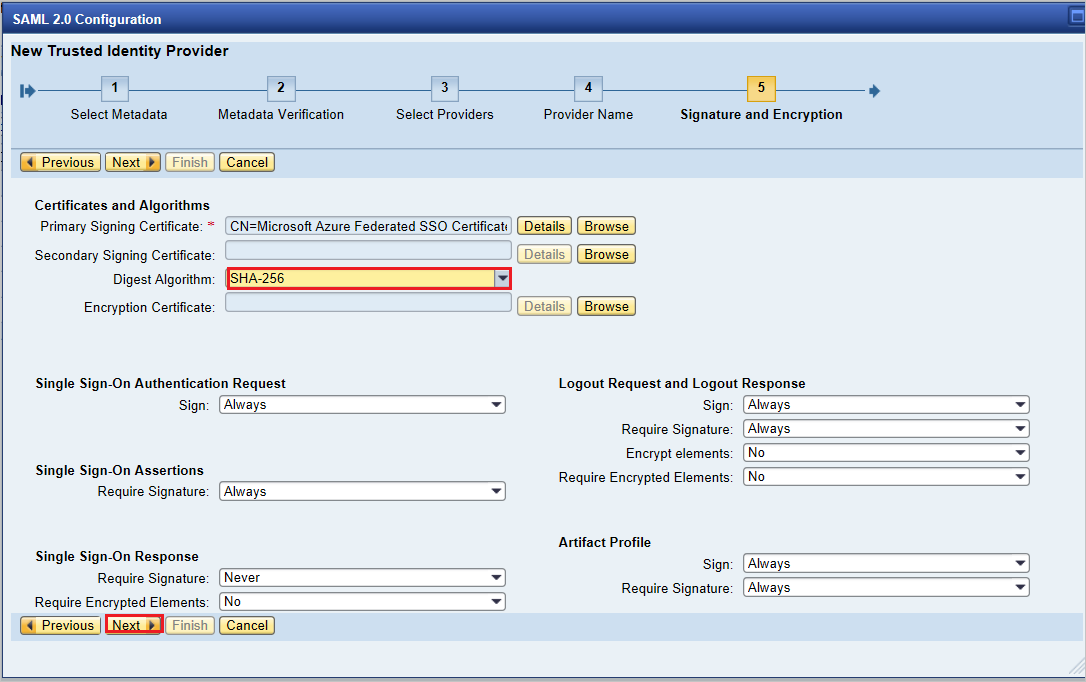
Under Single Sign-On Endpoints, select HTTP POST, and then select Next.

Under Single Logout Endpoints, select HTTP Redirect, and then select Next.

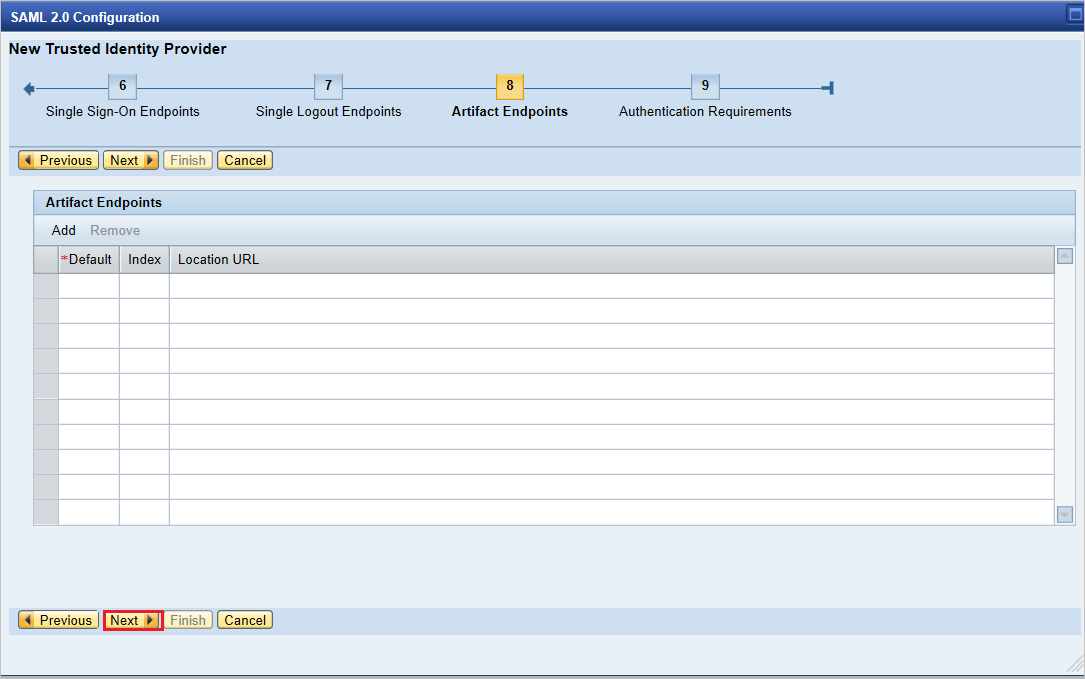
Under Artifact Endpoints, select Next to continue.
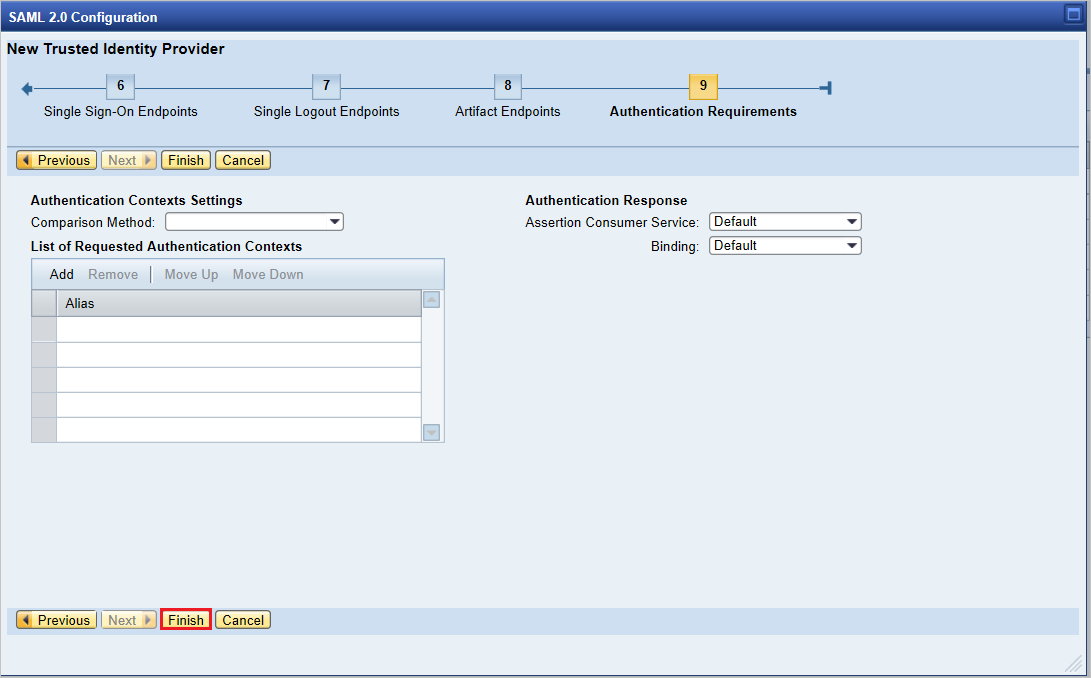
Under Authentication Requirements, select Finish.
Select Trusted Provider > Identity Federation (at the bottom of the page). Select Edit.
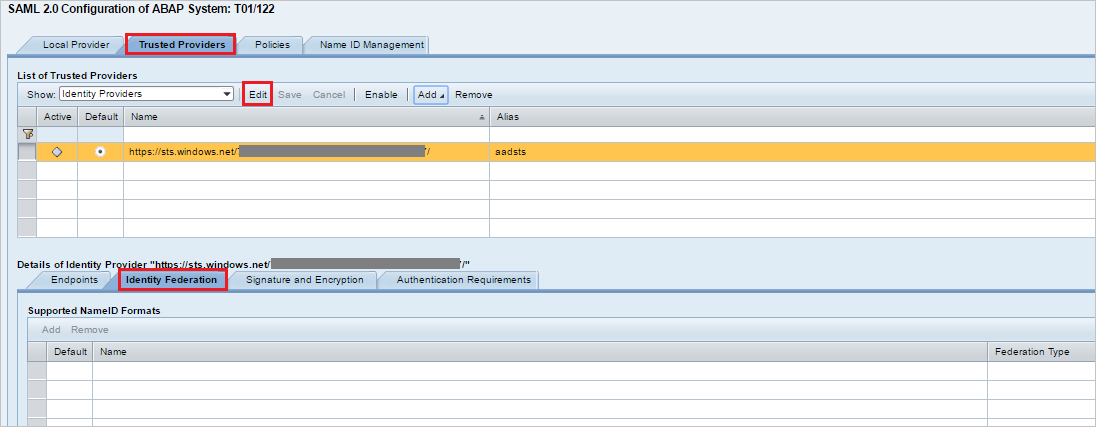
Select Add.
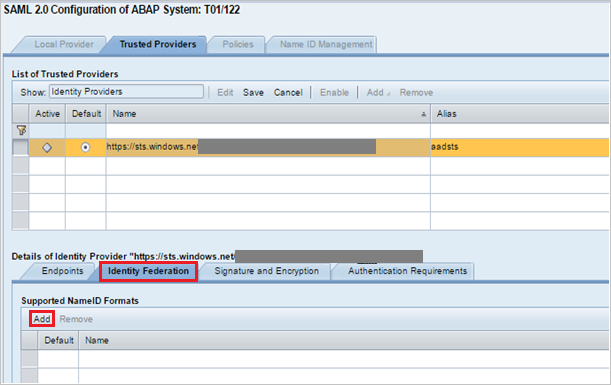
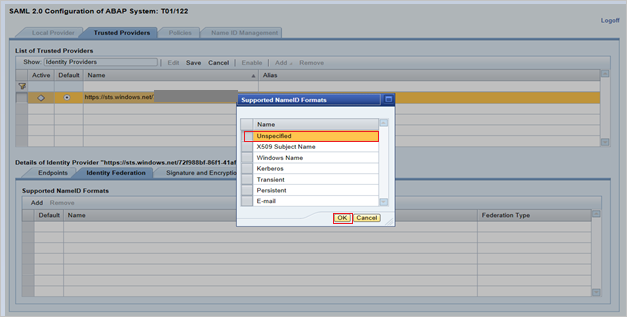
In the Supported NameID Formats dialog box, select Unspecified. Select OK.
The values for User ID Source and User ID Mapping Mode determine the link between the SAP user and the Microsoft Entra claim.
Scenario 1: SAP user to Microsoft Entra user mapping
In SAP, under Details of NameID Format "Unspecified", note the details:

In the Azure portal, under User Attributes & Claims, note the required claims from Microsoft Entra ID.
Scenario 2: Select the SAP user ID based on the configured email address in SU01. In this case, the email ID should be configured in SU01 for each user who requires SSO.
In SAP, under Details of NameID Format "Unspecified", note the details:

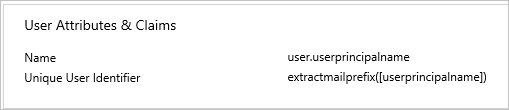
In the Azure portal, under User Attributes & Claims, note the required claims from Microsoft Entra ID.
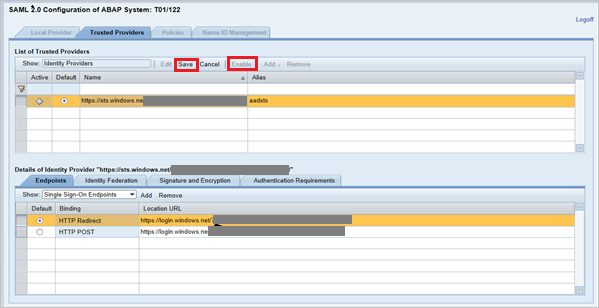
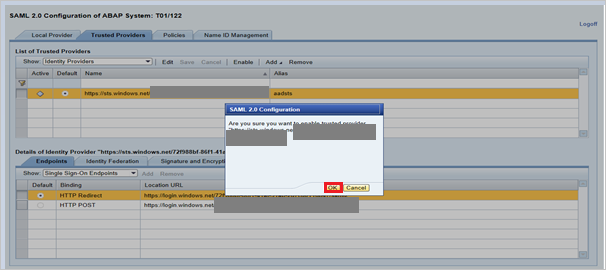
Select Save, and then select Enable to enable the identity provider.
Select OK when prompted.
In this section, you create a user named Britta Simon in SAP Fiori. Work with your in-house SAP team of experts or your organization SAP partner to add the user in the SAP Fiori platform.
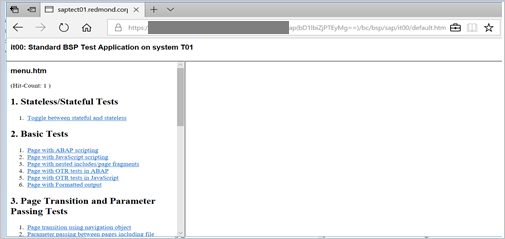
After the identity provider Microsoft Entra ID is activated in SAP Fiori, try to access one of the following URLs to test single sign-on (you shouldn't be prompted for a username and password):
https://<sap-url>/sap/bc/bsp/sap/it00/default.htmhttps://<sap-url>/sap/bc/bsp/sap/it00/default.htmملاحظة
Replace <sap-url> with the actual SAP host name.
The test URL should take you to the following test application page in SAP. If the page opens, Microsoft Entra single sign-on is successfully set up.
If you're prompted for a username and password, enable trace to help diagnose the issue. Use the following URL for the trace:
https://<sap-url>/sap/bc/webdynpro/sap/sec_diag_tool?sap-client=122&sap-language=EN#.
Once you configure SAP Fiori you can enforce session control, which protects exfiltration and infiltration of your organization’s sensitive data in real time. Session control extends from Conditional Access. Learn how to enforce session control with Microsoft Defender for Cloud Apps.
حدث
١١ شوال، ٣ م - ١٢ شوال، ١٢ م
قم ببرمجة المستقبل مع الذكاء الاصطناعي والتواصل مع نظراء Java والخبراء في JDConf 2025.
التسجيل الآنالتدريب
الوحدة النمطية
Secure SAP on Microsoft Cloud - Training
In this module, you learn about integrating Azure Identity Services with SAP RISE, implementing single sign-on, transitioning from SAP Identity Management to Microsoft Entra, using Microsoft Security Copilot and Microsoft Sentinel with SAP RISE.
الشهادة
Microsoft Certified: Azure for SAP Workloads Specialty - Certifications
إظهار تخطيط حل SAP وترحيله وتشغيله على Microsoft Azure أثناء الاستفادة من موارد Azure.
الوثائق
تسجيل الدخول الأحادي (SSO) هو الأساس لأي تكامل منتج مع SAP وMicrosoft. في هذا الفيديو، نحدد الخطوات لتمكين تسجيل الدخول الأحادي بين Azure Active Directory وتطبيقات NetWeaver ABAP المستندة إلى المستعرض، مثل لوحة تشغيل SAP Fiori. الفصول 00:00 - مقدمة 00:38 - تسجيل الدخول الأحادي بين SAP وMicrosoft 02:15 - عرض توضيحي يبدأ بمكتبة SAP Cloud Appliance 03:43 - إضافة تطبيق المؤسسة في Azure Active Directory 05:08 - تمكين تسجيل الدخول الأحادي لتطبيق Enterprise 06:29 - المعرفات الفريدة 08:02 - بدء معاملة SAML2 على SA