Note
Access to this page requires authorization. You can try signing in or changing directories.
Access to this page requires authorization. You can try changing directories.
A forecast helps your organization predict how much revenue your sales team generates in a given time frame. When done correctly, forecasting can play a significant role in your company's success.
Tip
If you’d like to try Dynamics 365 Sales for free, you can sign up for a 30-day trial.
How does forecasting help organizations?
Using forecasts helps your organization by allowing:
- Sellers to track performance against targets and identify pipeline risks that might jeopardize their ability to hit them.
- Managers to track individual sales performance against quotas to proactively provide coaching.
- Directors to forecast trends to anticipate departmental sales and reallocate resources if necessary.
- Organization leaders to project estimates to change the product strategy or provide updated projections to investors.
Forecasting isn't supported on Government Community Cloud (GCC) or mobile devices.
Configure forecasting
You can configure forecasts that are based on revenue or quantity. You define the type of forecast, the hierarchy, access permissions, and the details you want to see in the forecast grid. After a forecast is activated, your sales team can view the revenue, or quantity, and pipeline projections. Until you activate a forecast, your sales team can view an out-of-the-box forecast for the current month. The out-of-the-box forecast isn't available in the forecast configuration page and neither can it be deleted nor deactivated.
In the Sales Hub app, select the Change area icon
 in the lower-left corner, and then select App Settings.
Under Performance management, select Forecast configuration.
Follow the steps to configure a forecast from scratch or use the sample forecast configuration to get started quickly.
Use the sample forecast configuration
A ready-to-publish sample forecast configuration is available to you. Use the sample forecast to experiment and discover how forecasting works. Learn how to tweak the parameters and filters to suit your organization's needs.
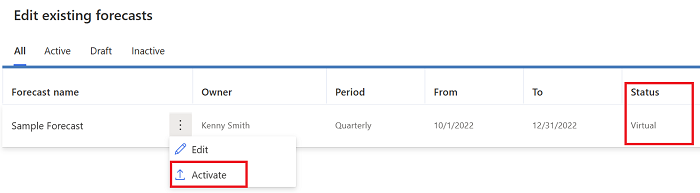
To view the sample forecast configuration
Go to App Settings > Performance management > Forecast configuration.
You can directly activate the sample forecast configuration if you'd like to use the default settings. After the status turns Active, you can view the forecast.
To see who has access to the forecast
Select Sample forecast.
In the General step, check the Preview section to see the users who are part of the forecast. By default, the displayed users have access to view the forecast after you activate it.

To limit access to the forecast
- Go to Permissions and select the appropriate security roles.
To make the forecast available to users in the hierarchy
- Go to Activate & add quotas and select Activate forecast.
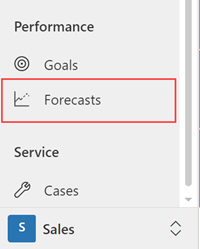
Find your forecasts
In the Sales site map, find Forecasts under Performance.
In the Opportunity form, Forecast Category appears above Description.
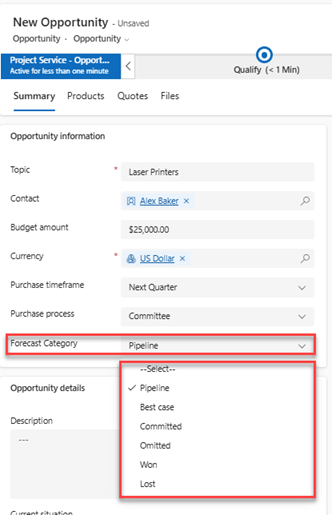
The categories define the confidence level of closing the opportunity. If you need to, you can add custom values for your organization. To learn more, see Capture forecast category for opportunity.
Forecast category options include Won and Lost. If an opportunity is closed as Won or Lost, the Opportunity Forecast Category Mapping Process out-of-the-box workflow automatically changes the forecast category to match.
To view the Opportunity Forecast Category Mapping Process workflow:
- In the sales app, go to Settings > Advanced Settings.
- Go to Process Center > Processes, and then select Processes on the page.
- Select the All Processes view.
- Search for and open the Opportunity Forecast Category Mapping Process workflow. You can customize or deactivate the workflow according to your organization's requirements.
Are you using a custom option set instead of forecast category? You need to create a workflow to automatically sync the opportunity status with your option set to make sure that the projection is accurate. To learn more, see Create a cloud flow in Power Automate.
If you don't want to see the forecast category in the opportunity form, you need to customize the form. You can't use the Visible by default option to hide it. To learn more, see Unable to hide forecast category field in opportunity forms.
Important
- The forecasting feature is intended to help sales managers or supervisors enhance their team’s performance.
- The forecasting feature isn't intended for use in making decisions that affect the employment of an employee or group of employees, including compensation, rewards, seniority, or other rights or entitlements.
- Customers are solely responsible for using Dynamics 365, this feature, and any associated feature or service in compliance with all applicable laws, including laws relating to accessing individual employee analytics and monitoring, recording, and storing communications with users.
- Customers should notify users that their communications with salespersons might be monitored, recorded, or stored and, obtain consent from users before using the feature with them (as required by applicable laws).
- Customers are also encouraged to have a mechanism in place to inform their sales persons that their communications with users might be monitored, recorded, or stored.
Can't find the feature in your app?
There are a few possibilities:
- You don't have the necessary license to use this feature. Check out the comparison table and the licensing guide to see which features are available with your license.
- You don't have the necessary security role to use this feature.
- To configure or setup a feature, you need to have the Administration and customization roles
- To use sales-related features, you need to have the Primary sales roles
- Some tasks require specific Functional roles.
- Your administrator hasn't turned on the feature.
- Your organization is using a custom app. Check with your administrator for exact steps. The steps described in this article are specific to the out-of-the-box Sales Hub and Sales Professional apps.
Related information
Blog: Tips for setting up sales forecasting in Dynamics 365 Sales
System and application users who can push data to Dataverse
Project accurate revenue with sales forecasting
View forecasts
About premium forecasting
msdyn_ForecastApi action
Forecasting FAQs